Articles in this section
Actions - Your Personal Assistant
Feature Availability
Vtiger Editions: One Pilot | One Growth | One Professional | One Enterprise | One AI
Introduction
Vtiger CRM's Actions page is your centralized hub for managing notifications, alerts, and reminders. It streamlines daily operations with automated updates on activities, events, and tasks, helping you stay organized and focused. The Actions page also alerts you to mentions, emails, and key engagements, ensuring timely responses to important information. Whether you're managing sales deals, support tickets, or marketing campaigns, Vtiger CRM's Actions page is designed to keep you informed and in control of all essential business activities.
Actions Page - Use Cases
Sales
- Receive notifications when a deal is idle, won, or lost.
- Monitor the completion of activities by sales reps.
- Get alerts when a rep checks in for an onsite meeting.
- Track deal progress through significant sales stages.
Support Sales
- Get alerts on violated or escalated cases.
- Receive notifications when cases are assigned to a support rep.
Projects
- Track team members' overdue and pending tasks.
- Get notified of your upcoming tasks and assignments.
Marketing
- Get alerts when contacts open your email or click a link through an email campaign.
Benefits of Actions page in Vtiger CRM
Here are the benefits of the Actions page in Vtiger CRM:
- Centralize alerts and notifications in one place.
- Improve time management by prioritizing task alerts.
- Enhance communication with real-time updates.
- Streamline workflows using quick actions.
- Customize alerts to fit your business needs.
- Receive flexible updates through multi-channel notifications.
In this article, you will learn about:
- Accessing Actions Page.
- Elements on the Actions Page.
- Accessing the New Actions tab.
- Accessing Alert Rules
Accessing Actions Page
You can access the Actions in two ways:
- Using the Actions Icon
- Navigating Through the Main Menu
Using the Actions Icon
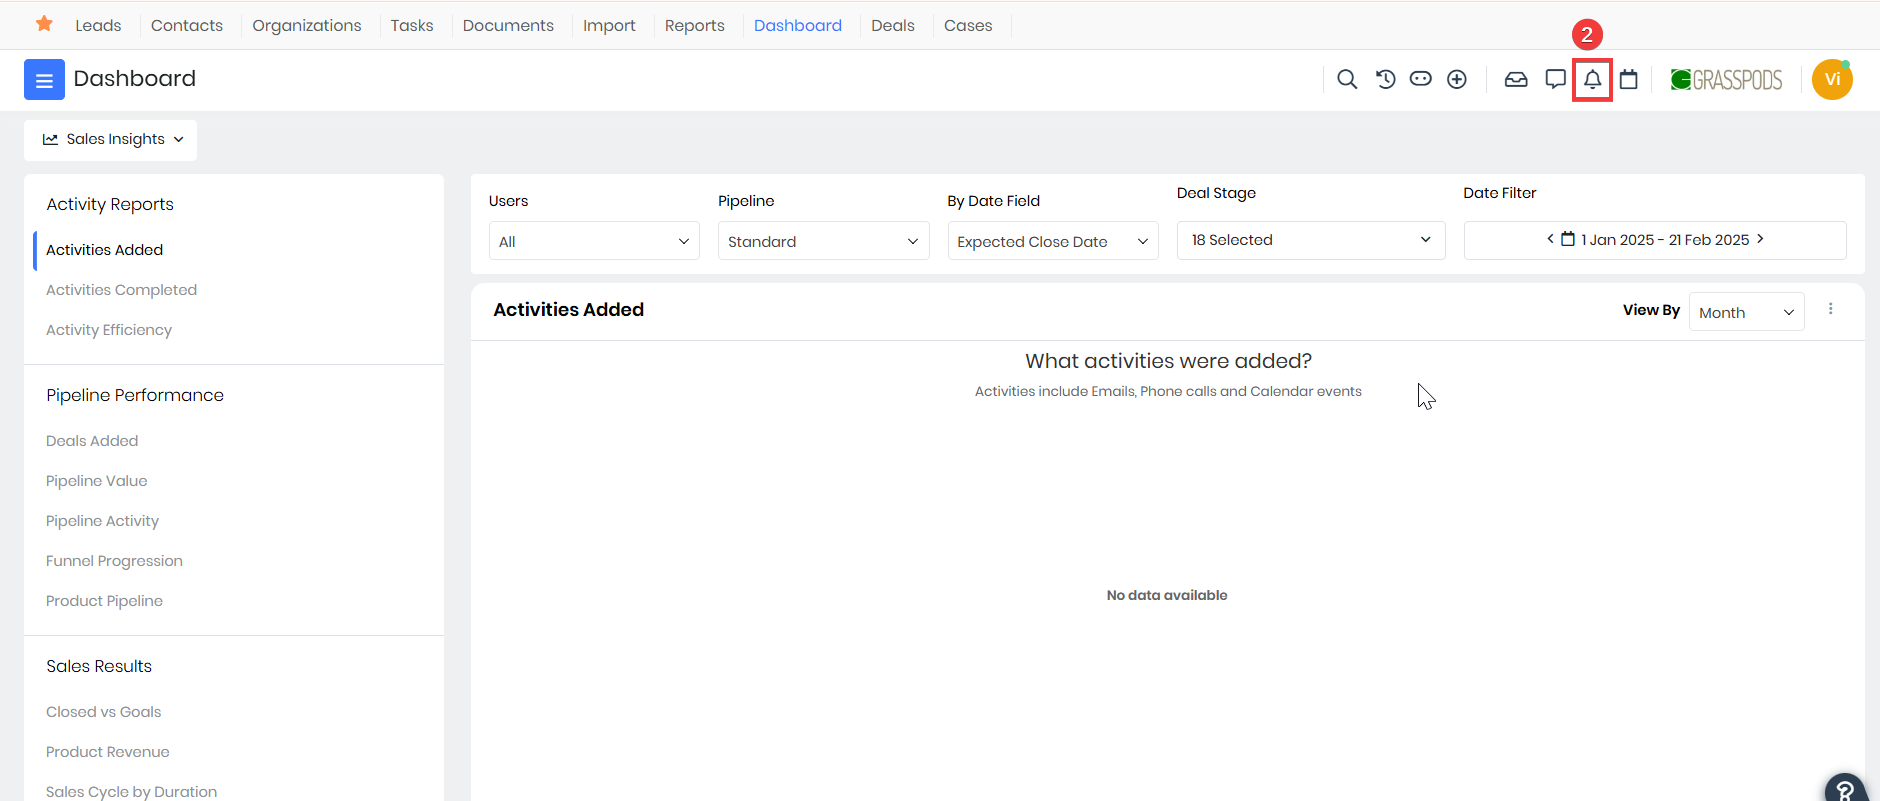
- Log in to the CRM.
- Click the Actions icon available by default.
Note: The actions icon is accessible from all modules within the CRM.
Navigating Through the Main Menu
- Log in to the CRM.
- Click Main Menu.
- Go to Essentials.
- Go to Collaboration > Actions. The Actions page opens.
Elements on the Actions Page
The Actions page is organized into several tabs, each designed to keep you informed and productive. The following sections explain the different aspects of the Actions page.
The @Mentions tab
When a user mentions you or your group on a CRM record, you receive an alert under this tab. All your mentions will be organized under one umbrella, which helps you track updates easily. Mentions are grouped based on records and sorted by time. The latest mention is shown at the top, followed by the older ones.
Follow these steps to view the @mentions tab:
- Log in to the CRM.
- Click Main Menu.
- Go to Essentials.
- Go to Collaboration > Actions. The Actions page opens.
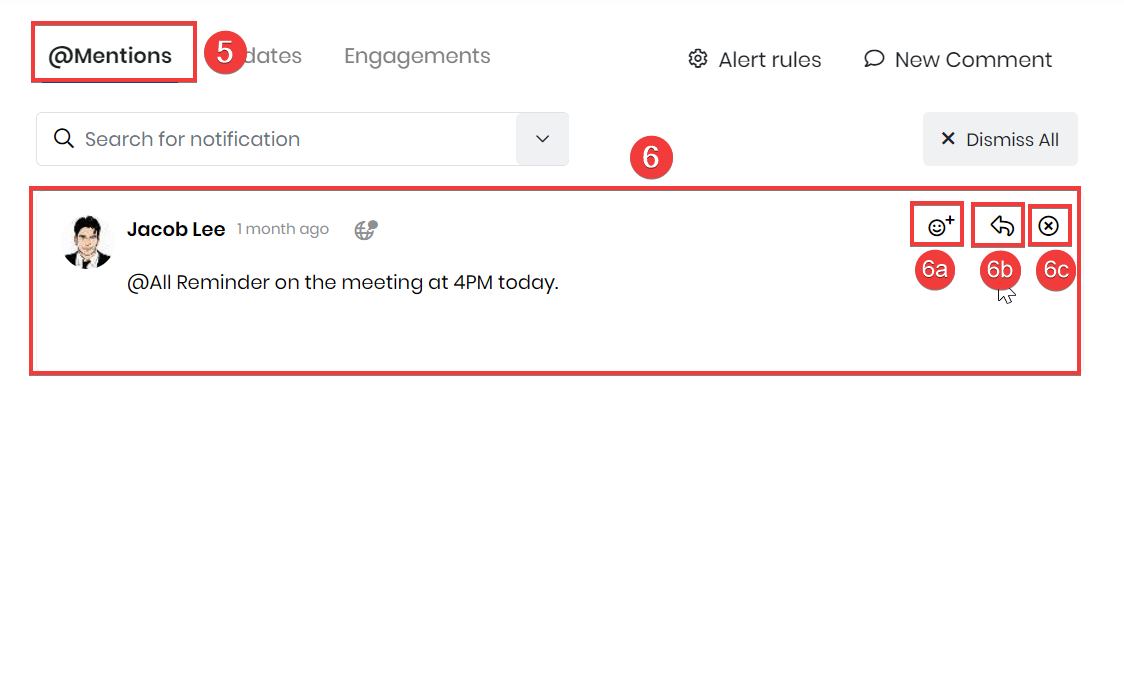
- Click @mentions. You can see all the mentions in this tab, including their name, details, and timings.
- Perform the following actions in the Mentions tab:
- Click the React icon to react by using emojis to the mention.
- Reply to your mentions using the Reply icon.
- Close the Mentions by clicking the Close icon
The Updates tab
When you follow a record in Vtiger, any changes to that record will appear in the Updates tab. For example, updates are shown when a deal closes, a list is shared with you, or approval is given.
Follow these steps to view the Updates tab:
- Log in to the CRM.
- Click Main Menu.
- Go to Essentials.
- Go to Collaboration > Actions. The Actions page opens.
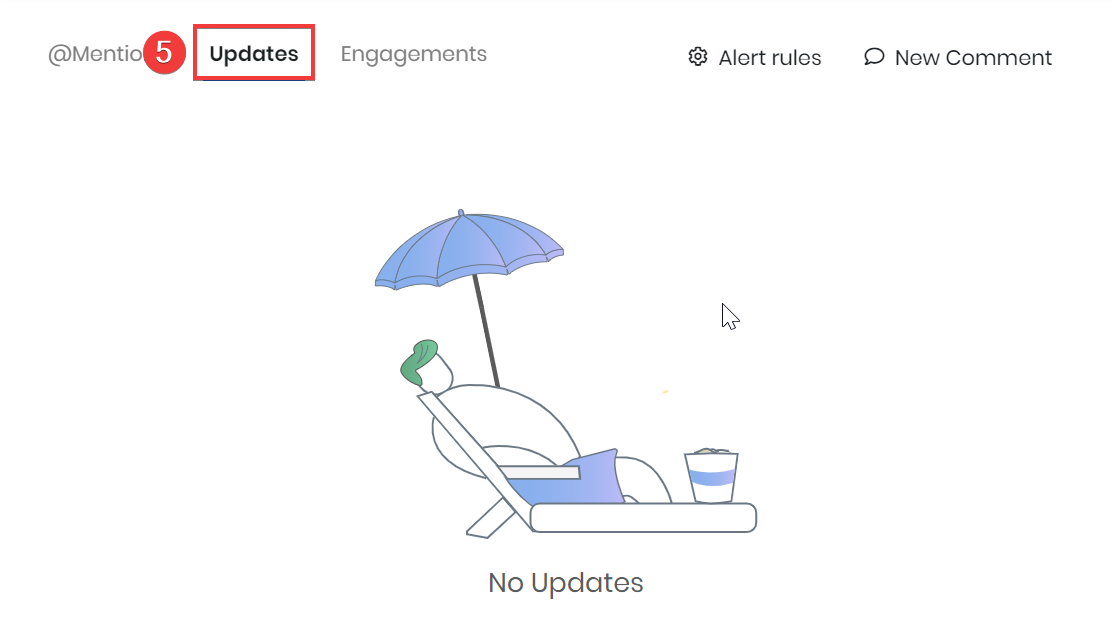
- Click Updates. You will see all the updates done in this tab.
Note: You can now dismiss all update notifications in the Actions > Updates section using the Dismiss All option. The system will display a confirmation message when this request is made.
The Engagements tab
Engagement alerts notify you based on your contact's action on your emails. Provides alerts for customer interactions, such as when they open an email, download a document, reshare it, or send it.
Follow these steps to view the Engagements tab:
- Log in to the CRM.
- Click Main Menu.
- Go to Essentials.
- Go to Collaboration > Actions. The Actions page opens.
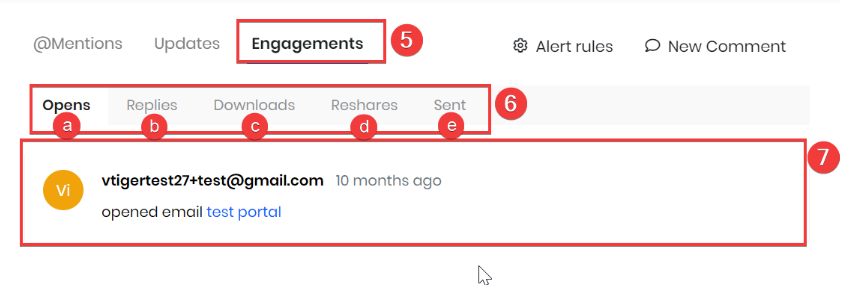
- Click Engagements. The following Engagement Alerts are displayed.
- Engagement Alerts are categorized into:
- Opens - You will be notified and can view when the recipient opens your mail.
- Replies - You will be notified and can view the receiver's replies.
- Downloads - You will be notified and can view the document downloads done by the receiver.
- Reshares - You will be notified and can view when any reshare is done, including document reshares.
- Sent - You can view all the sent emails here.
- Click on the particular alert to learn more about it, such as email details.
Note:
- You can now dismiss all engagement alerts in the Actions > Engagements section by using the Dismiss All option. The system will display a confirmation message when this request is made.
- You can customize your Alert preferences in the Configuration settings. This will be explained later in the article.
The My Actions tab
You can see all activities – Events, Calls, and Tasks assigned to you under the My Actions tab. You can mark activities as completed or reschedule them for a future date.
Rescheduling an Event - You can reschedule an event in the Actions tab. Rescheduling helps you to adjust the End Date automatically. The End Date will also determine if an Event needs to be displayed as Overdue on the Actions page.
Follow these steps to navigate the My Actions tab:
- Log in to the CRM.
- Click Main Menu.
- Go to Essentials.
- Go to Collaboration > Actions. The Actions page opens.
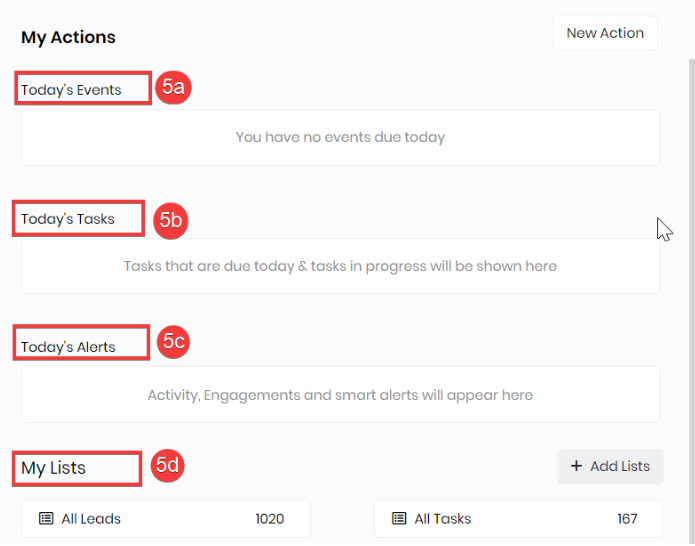
- You can see the following actions under the Actions tab:
- Today’s Events – View your scheduled events for the day.
- Today’s Tasks – View your assigned tasks and to-dos for the day.
- Today’s Alerts – View your important notifications and updates.
- My Lists – View your assigned tasks, deals, open cases, and custom lists as needed.
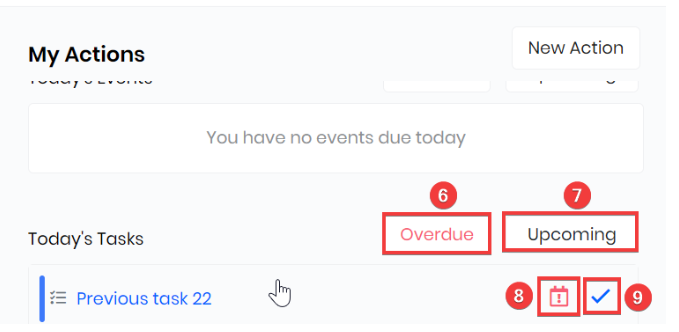
- Overdue - If a task is not completed by the assigned date, it will appear overdue.
- Upcoming - Check all your upcoming tasks by clicking on it.
- Rescheduling - Reschedule the task for any specific date you choose.
- Checklist - Click the icon to mark it as Complete or hover to change the status to pending, in progress, etc.
Adding a New Comment
The New Comment tab allows you to add and post comments with attachments.
Follow these steps to add a new comment:
- Log in to the CRM.
- Click Main Menu.
- Go to Essentials.
- Go to Collaboration > Actions. The Actions page opens.
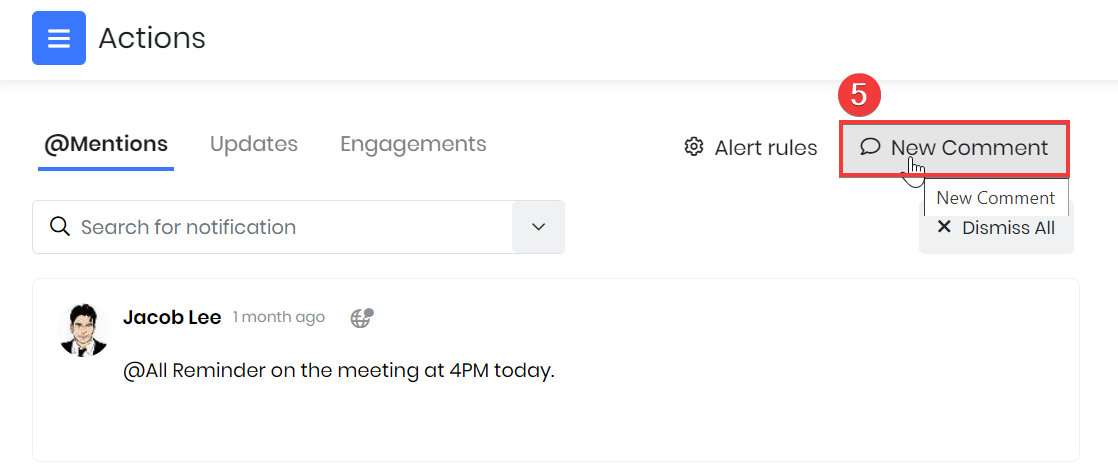
- Click the New Comment tab next to the Alerts tab. A New Comment window appears.
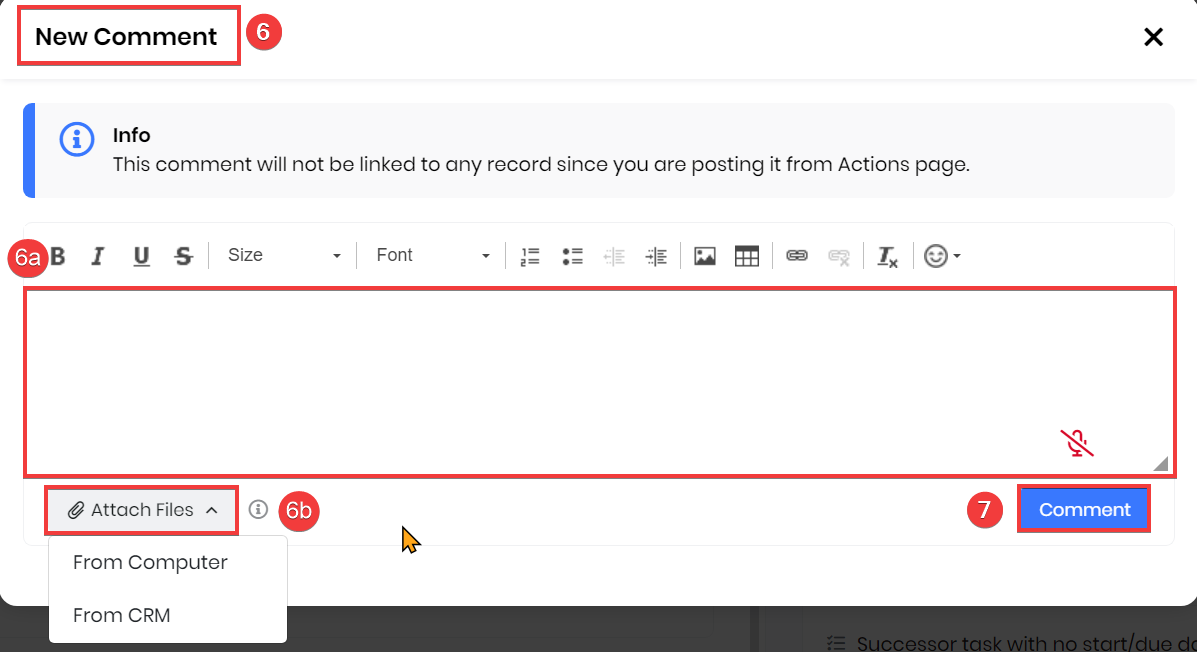
- Enter or select the following details in the New Comment Window:
- Textbox - Enter the comment in the comment text box.
- Attach Files - Click the dropdown to select the files from Computer or CRM. You can attach files with a maximum upload size of 50 MB.
- Click Comment.
Search for a Notification
You can search for notifications in the search bar.
Follow these steps to search for a notification:
- Log in to the CRM.
- Click Main Menu.
- Go to Essentials.
- Go to Collaboration > Actions. The Actions page opens.
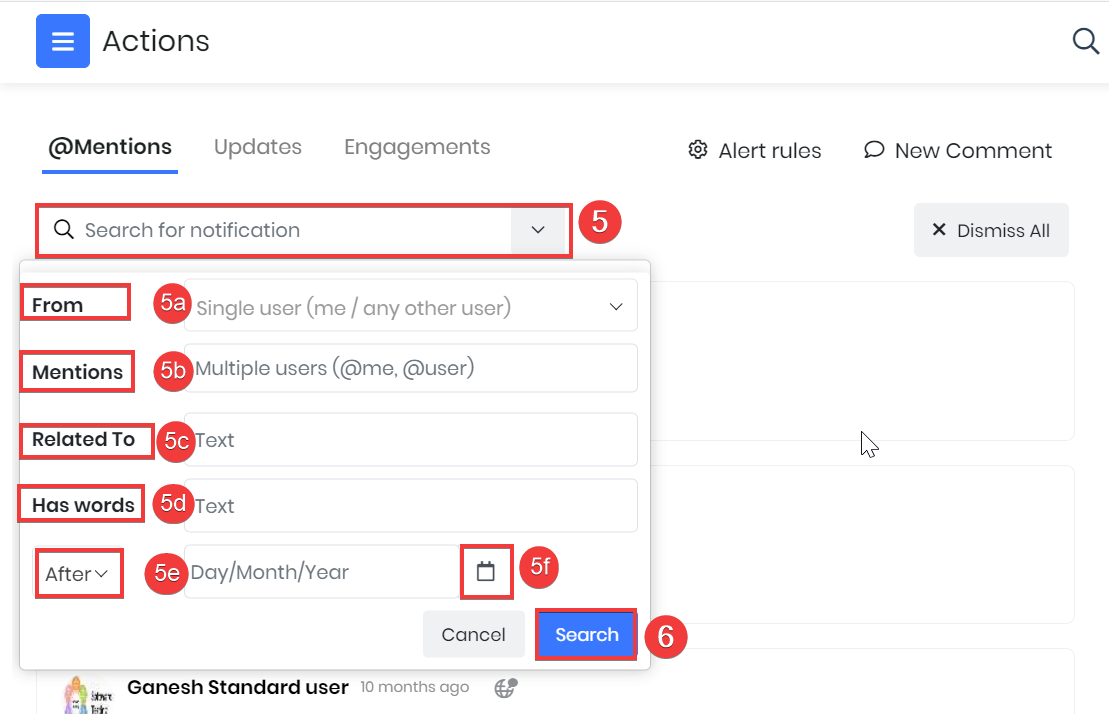
- Click the Search for notification drop-down. Enter or select the following information to search for a notification:
- From – Select the user who sent the message.
- Mentions – Find the user to whom the message was addressed.
- Related To – View messages exchanged between two users.
- Has Words – Fetch messages containing specific words.
- After – Fetch messages sent after a particular date.
- On – Fetch messages sent on a particular date.
- Before – Fetch messages sent before a particular date.
- Calendar – Select the date when the messages were exchanged.
- Click Search.
Accessing the New Action tab
The New Action Tab allows you to perform actions such as:
- Send an email
- Create a meeting
- Create a task
- Get on a phone call
- Send an SMS message
- Send a WhatsApp message
- Send a Telegram message
We will learn about each action below.
Sending an email
Follow these steps to send an Email:
- Log in to the CRM.
- Click Main Menu.
- Go to Essentials.
- Go to Collaboration > Actions. The Actions page opens.
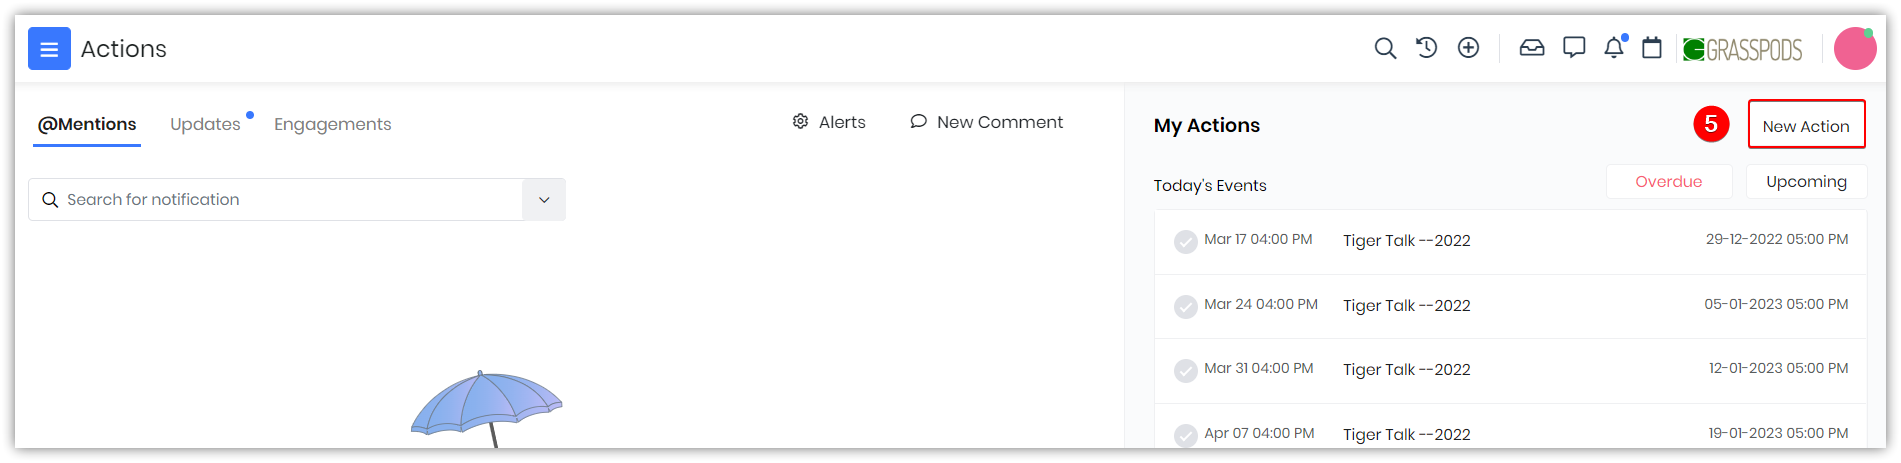
- Click New Action on the top right corner of the page.
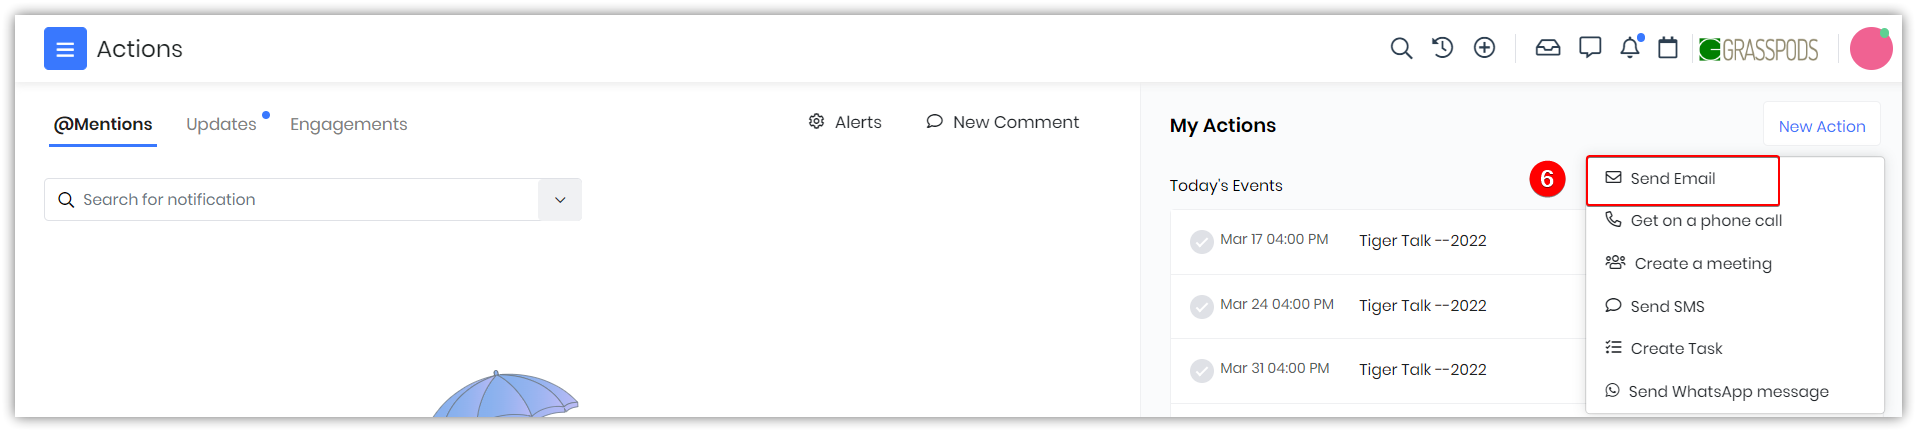
- Select Send Email from the drop-down. A Compose Email window opens.
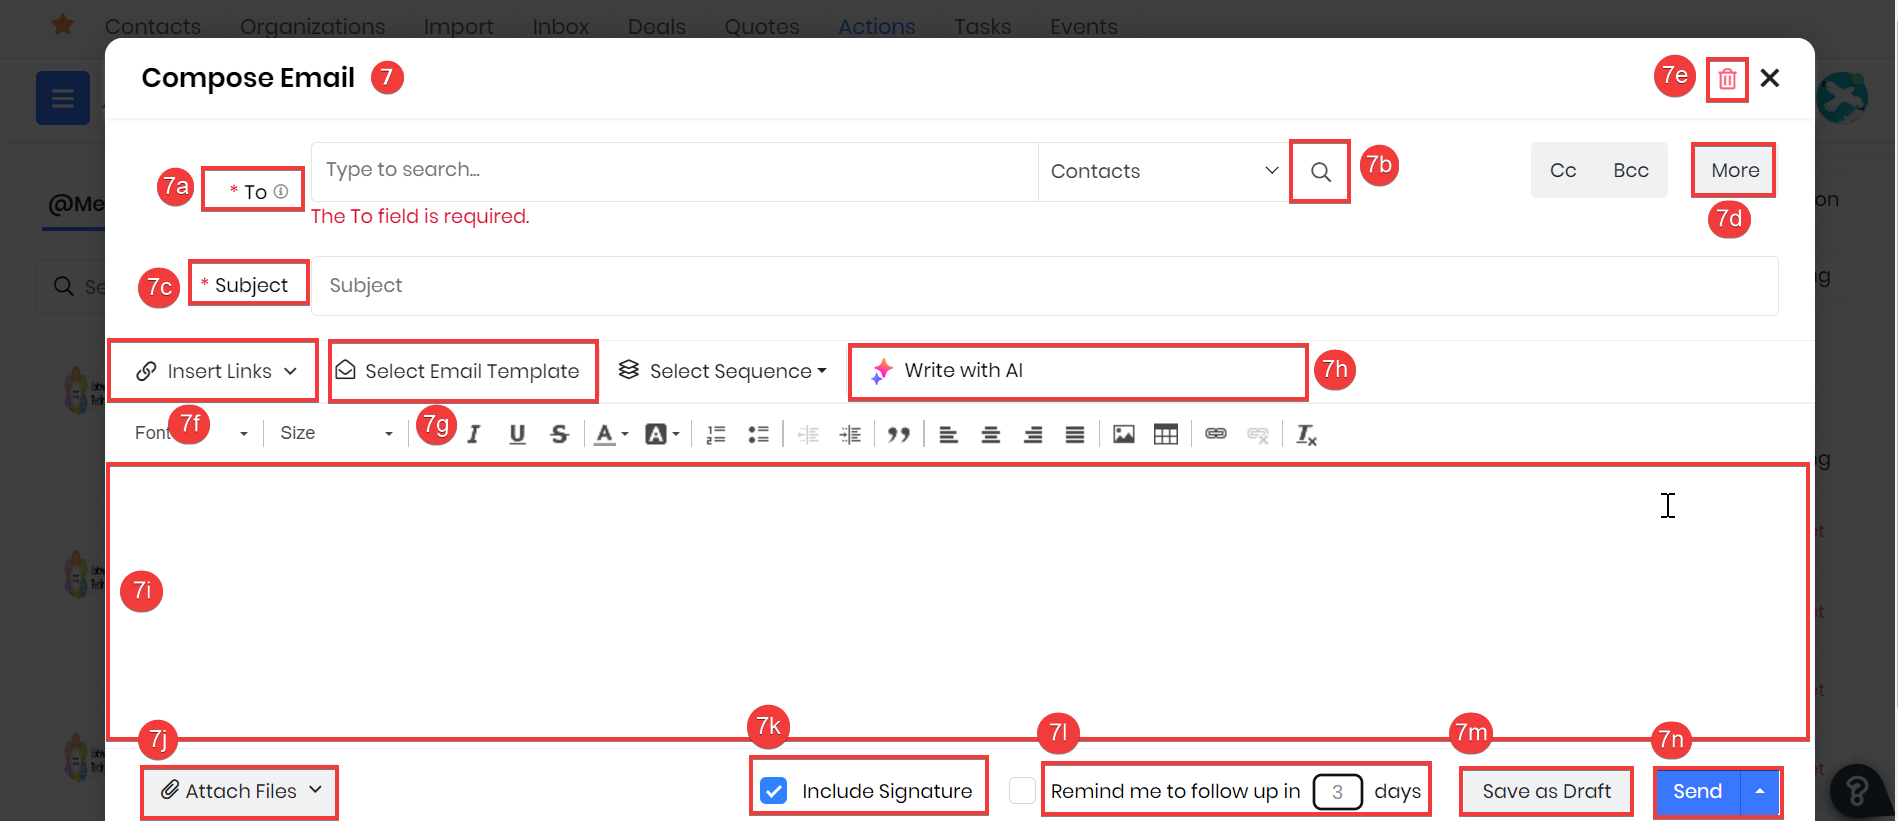
- Enter or select the following information to Compose Email:
- To – Enter the email address of the recipient. Suggestions will appear after entering the first three characters.
- Contact Search – Search for a contact in the Contact Search bar.
- Subject – Provide a short description in the subject line of the email.
- More – Click the More option to access mandatory fields like From and Reply.
- Delete – Click the Delete button. A pop-up confirmation showing Discard Mail will appear. Click Discard to delete the mail or Go Back to cancel.
- Insert Link – Insert links into the email, such as an appointment, survey, or landing page link.
- Select Email Templates – Add a pre-defined template to the email.
- Write With AI – Get suggestions from AI on how to compose your email.
- Body of the Mail – Type the content of the email here.
- Attach Files – Attach files, documents, pictures, etc.
- Attach Signature – Enable the checkbox to attach a signature.
- Reminder – Set a reminder to follow up with the recipient by entering the number of days.
- Draft – Save the email as a draft.
- Click Send – Send the email.
To learn more about Emails, click here.
Calling from the New Action tab
Follow these steps to make a phone call:
- Log in to the CRM.
- Click Main Menu.
- Go to Essentials.
- Go to Collaboration > Actions. The Actions page opens.
- Click New Action on the top right corner of the page.
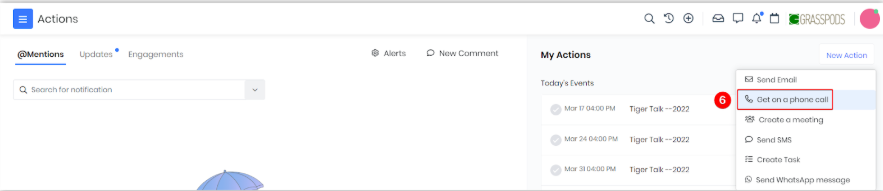
- Select Get on a phone call from the drop-down. The Whom do you want to call? window opens.
- Type the name of the contact you want to call in the Search bar and click StartCall.
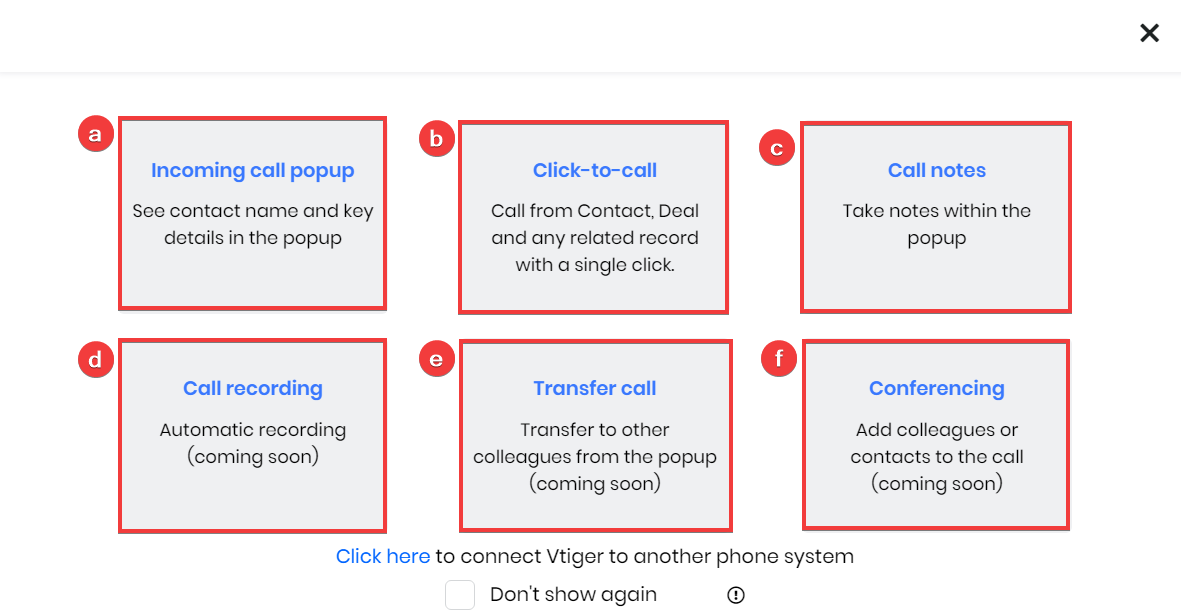
- A popup window opens with the following options:
- Incoming call popup
- Click-to-call
- Call notes
- Call recording
- Transfer call
- Conferencing
- Select the Click to call option.
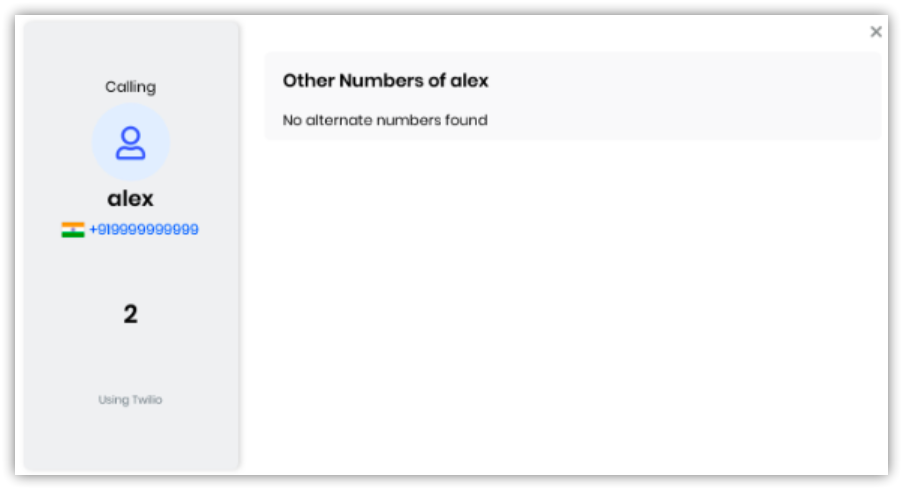
- A calling window appears. Select the contact.
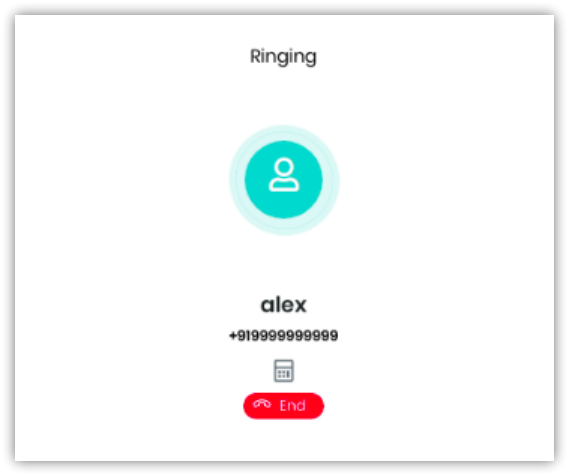
- The call gets connected. Click on the End button to end the call.
To learn more about Phone calls, click here.
Note: You can make a call only if you have integrated a service provider for the contact and the phone call gateway is active.
Creating a meeting
Follow these steps to Create a meeting:
- Log in to the CRM.
- Click Main Menu.
- Go to Essentials.
- Go to Collaboration > Actions. The Actions page opens.
- Click New Action on the top right corner of the page.

- Select Create a meeting from the drop-down. The Add Event window opens.
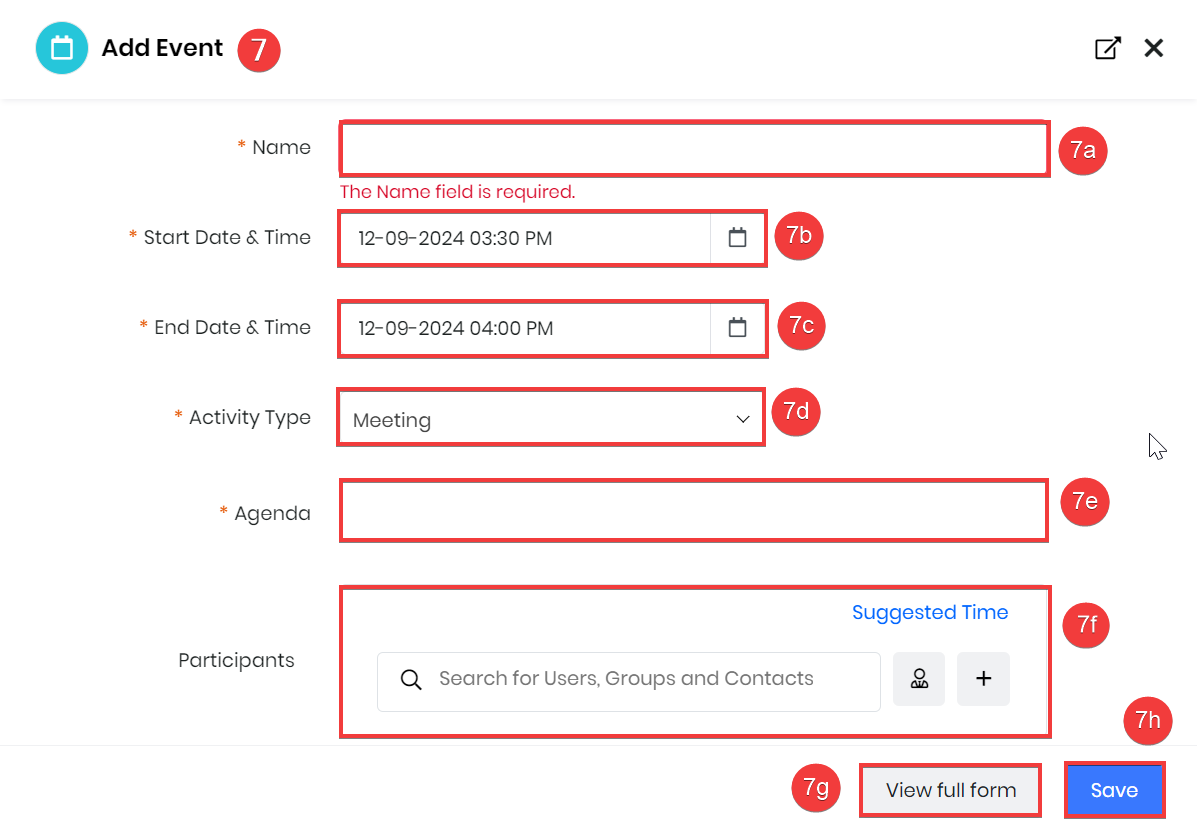
- Enter or select the following information to add an Event:
- Name – Enter the title of the meeting in the Subject textbox.
- Start Date and Time – Specify the start time and date of the meeting.
- End Date and Time – Specify the end time and date of the meeting.
- Activity Type – Choose the type of event from the drop-down, such as Zoom Meeting, Mobile Call, Google Meet, or Teams Meeting.
- Agenda – Provide a short explanation of the meeting’s purpose.
- Participants – Select a contact by entering the name in the search bar or by clicking the contacts icon. You can also create a quick contact list by clicking the plus icon.
- View Full Form – Click to add details in the following sections:
- Event Details
- Reminder Details
- Recurrence Details
- Related To
- Description Details
- Invitees
- Save – Click to save the meeting.
To learn more about Events, click here.
Sending an SMS
Follow these steps to Send SMS:
- Log in to the CRM.
- Click Main Menu.
- Go to Essentials.
- Go to Collaboration > Actions. The Actions page opens.
- Click New Action on the top right corner of the page.
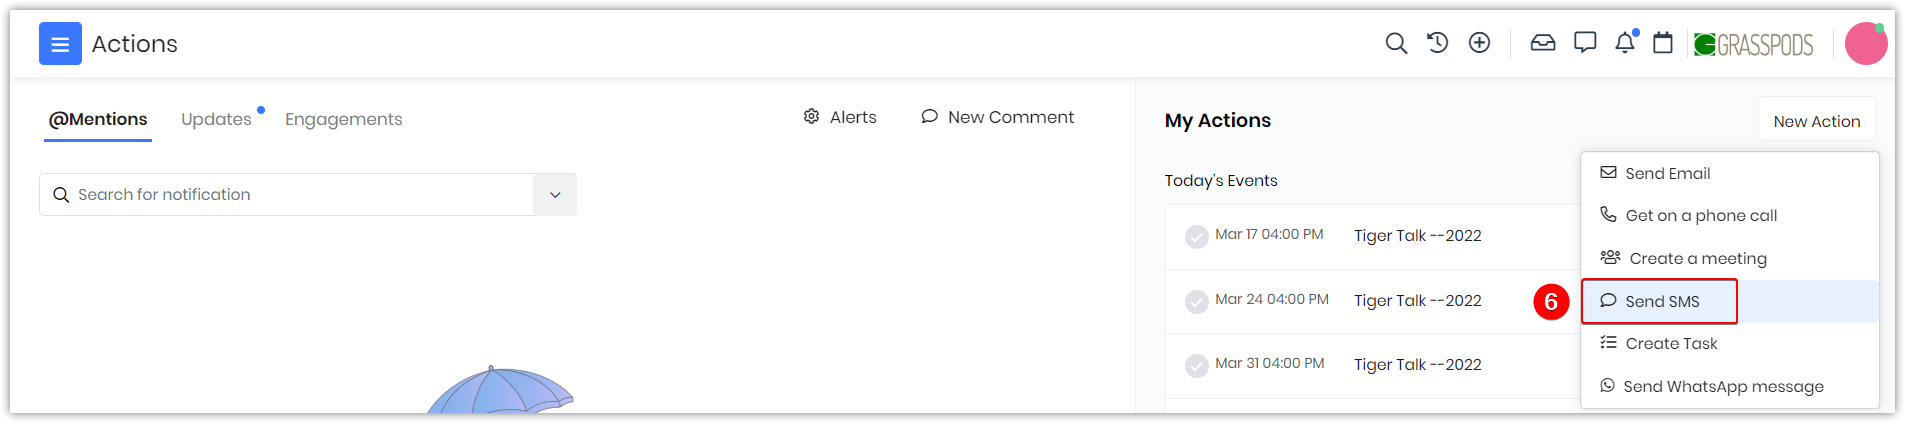
- Select Send SMS from the drop-down. The Whom do you want to send SMS? window opens.
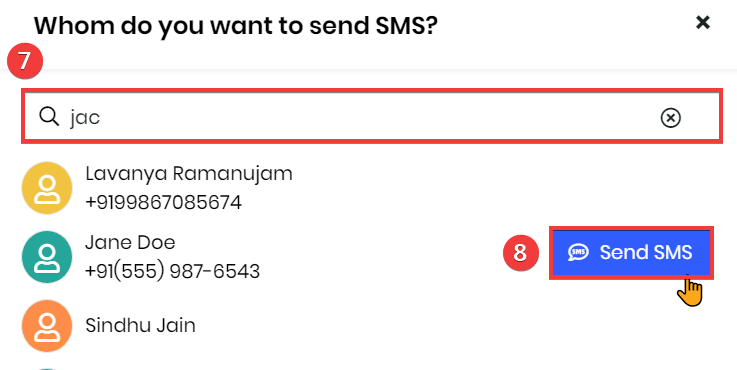
- Type the name of the contact you choose to SMS in the Search bar and press Enter.
- Click Send SMS. The Send SMS window opens.
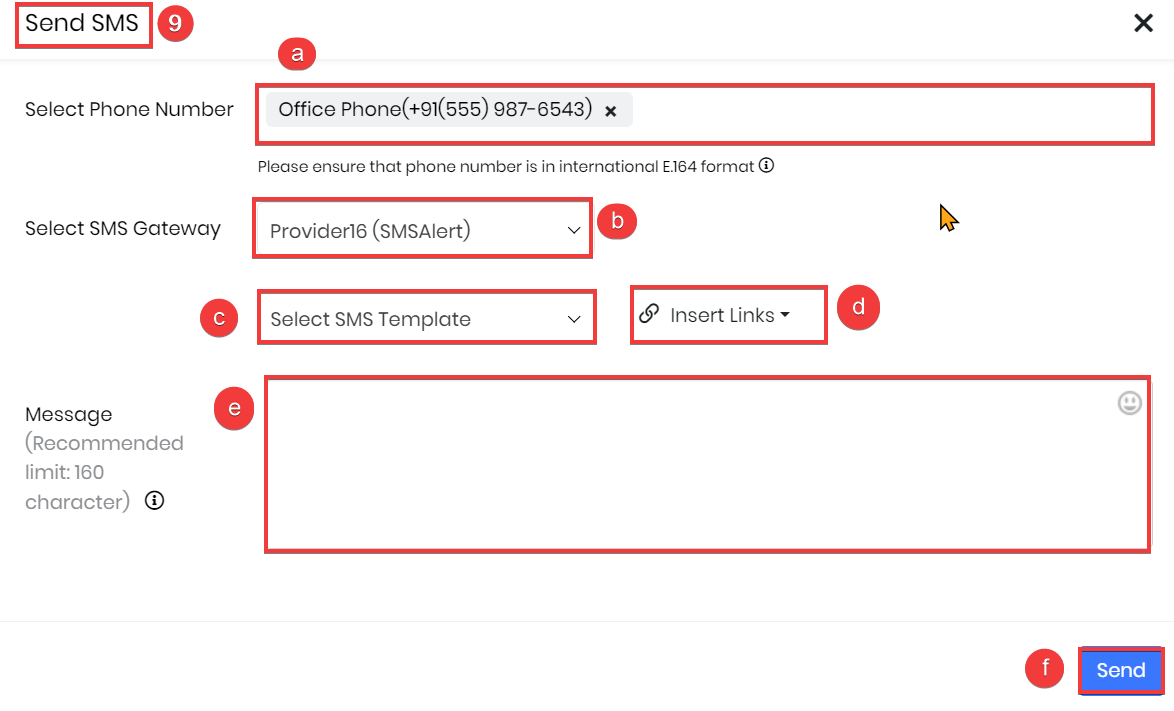
- Enter or select the following information to Send SMS:
- Select Phone Number - Select the phone number from the drop-down.
- Select SMS gateway - Select the required gateway from the drop-down menu. All activated gateways will be shown.
- Select SMS template - If you want to add a template to the message, select it from the drop-down.
- Insert Links - Insert links into the SMS, such as an appointment, survey, or landing page link.
- Message - Type the message in the textbox.
- Send - Click to send the SMS.
To learn more about SMS, click here.
Creating a Task
Follow these steps to Create a Task:
- Log in to the CRM.
- Click Main Menu.
- Go to Essentials.
- Go to Collaboration > Actions. The Actions page opens.
- Click New Action on the top right corner of the page.
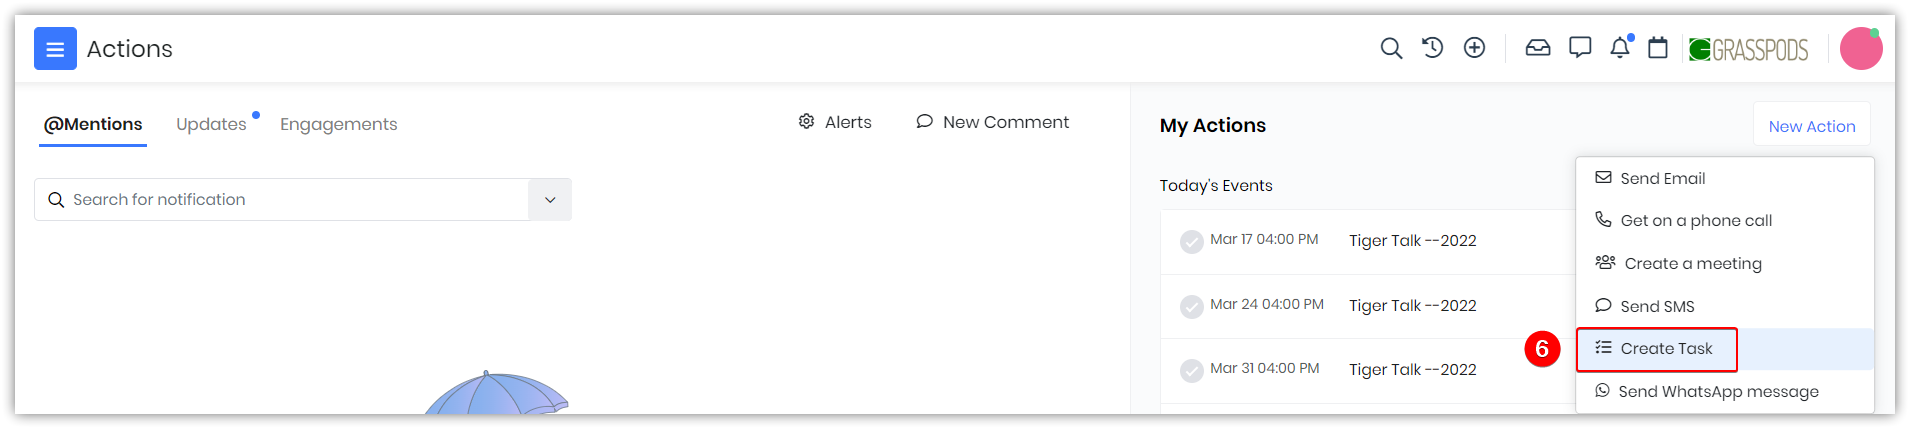
- Select Create Task from the drop-down. The Add Task window opens.
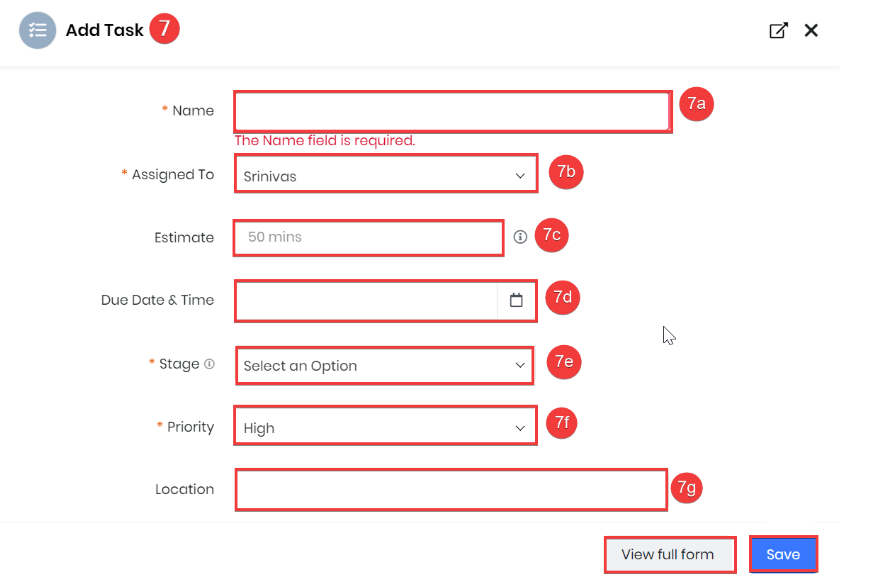
- Enter or select the following information to add a Task:
- Name – Add the task title to the Subject textbox.
- Assigned To – Select the name of the person to whom you want to assign the task.
- Estimate – Add your estimated time for completing the task.
- Due Date & Time – Select the date and time by clicking the calendar icon.
- Stage – Select the current status of the task from the drop-down (e.g., Pending, In Progress, etc.).
- Priority – Select the task's priority from the drop-down (High, Medium, Low, or Urgent).
- Location – Add the location name if required.

- Milestone – Enter the project's milestone name in the search bar or select it by clicking the project milestone icon. You can also add a new project milestone by clicking the + icon next to the milestone icon.
- Previous Task – Add your previous task by entering its name, or search by clicking the icon next to the search bar.
- Parent Task – Add the parent task by entering its name or search by clicking the icon next to the search bar.
- Task Type – Select the type of task from the drop-down menu.
- Project Name – Enter the project name or search by clicking the icon next to the search bar. You can also create a new project by clicking the + icon.
- Description – Add the description of the task.
- View Full Form – Click to add details in the following sections:
- Task Details
- Description Details
- Service Details
- SLA Information
- Save – Click the button to save the task.
To learn more about Tasks, click here.
Sending a Whatsapp message
Follow these steps to send a WhatsApp message:
- Log in to the CRM.
- Click Main Menu.
- Go to Essentials.
- Go to Collaboration > Actions. The Actions page opens.
- Click New Action on the top right corner of the page.
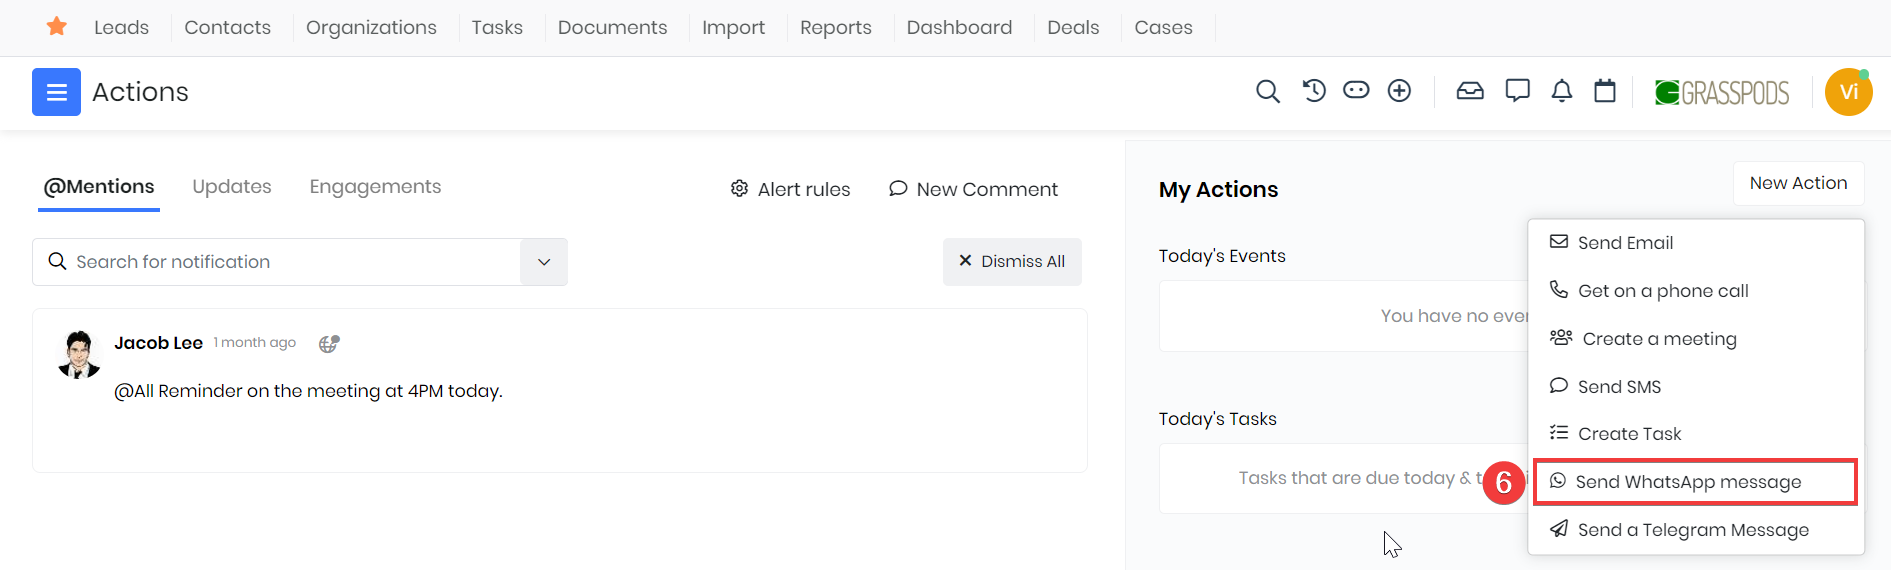
- Select Send Whatsapp Message from the drop-down. The Whom do you want to send a WhatsApp message? window will appear.
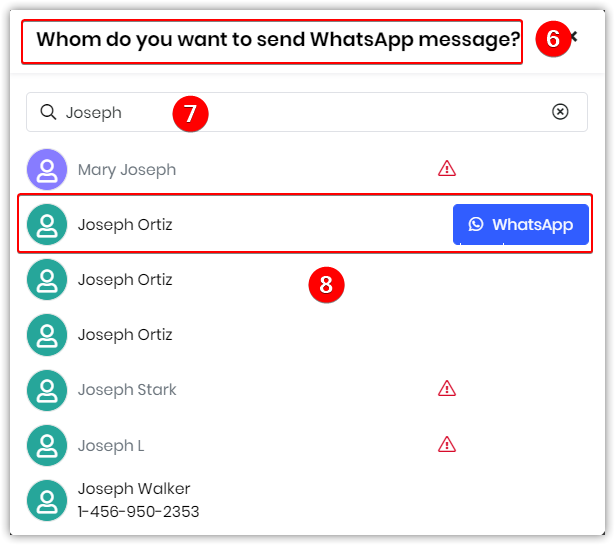
- Type the name of the contact you choose to send a WhatsApp message in the Search bar.
- Select the Contact and click WhatsApp. The Send Whatsapp Message window opens.
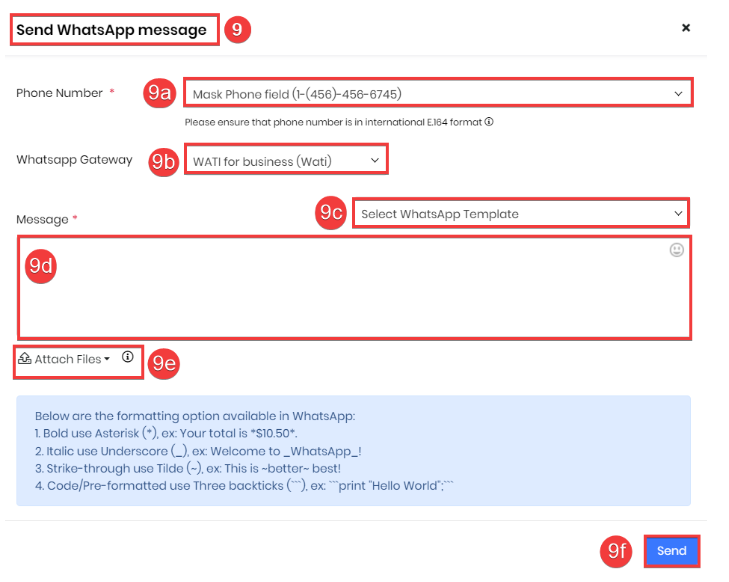
- Enter or select the following information to Send a WhatsApp message:
- Phone Number – Select the number from the drop-down.
- WhatsApp Gateway – Select the required gateway from the drop-down menu. All activated gateways will be shown.
- Select WhatsApp Template – If you want to add a template to the message, select it from the drop-down.
- Message – Type the message in the text box.
- Attach Files – Attach files with a maximum upload size of 16 MB.
- Send – Click to send WhatsApp message.
To learn more about Tasks, click here.
Sending a Telegram Message
Follow these steps to Send a Telegram Message:
- Log in to the CRM.
- Click Main Menu.
- Go to Essentials.
- Go to Collaboration > Actions. The Actions page opens.
- Click New Action on the top right corner of the page.
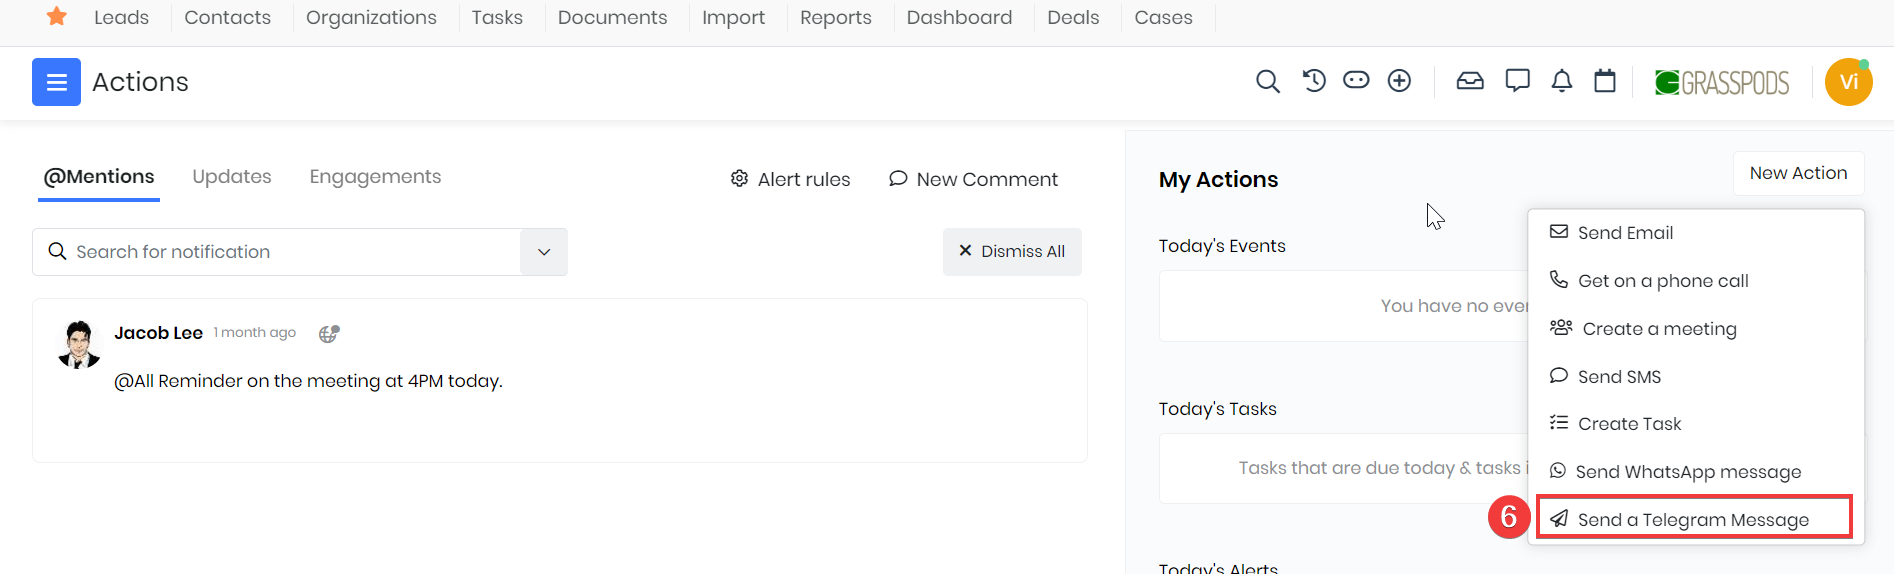
- Select Send a Telegram Message from the drop-down. The Whom do you want to send Telegram message? window opens.
- Type the name of the contact you choose to send a Telegram message in the Search bar.
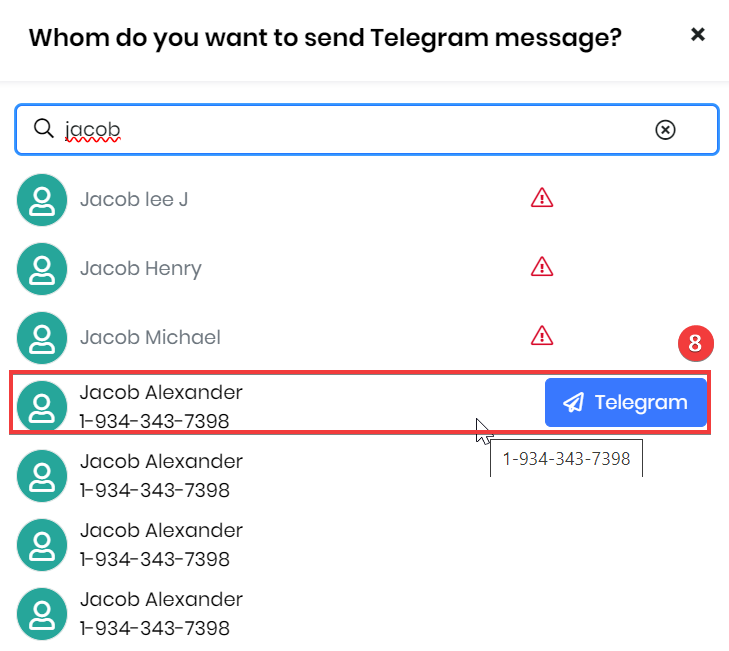
- Select Contact and click Telegram. The Send Telegram Message window opens.
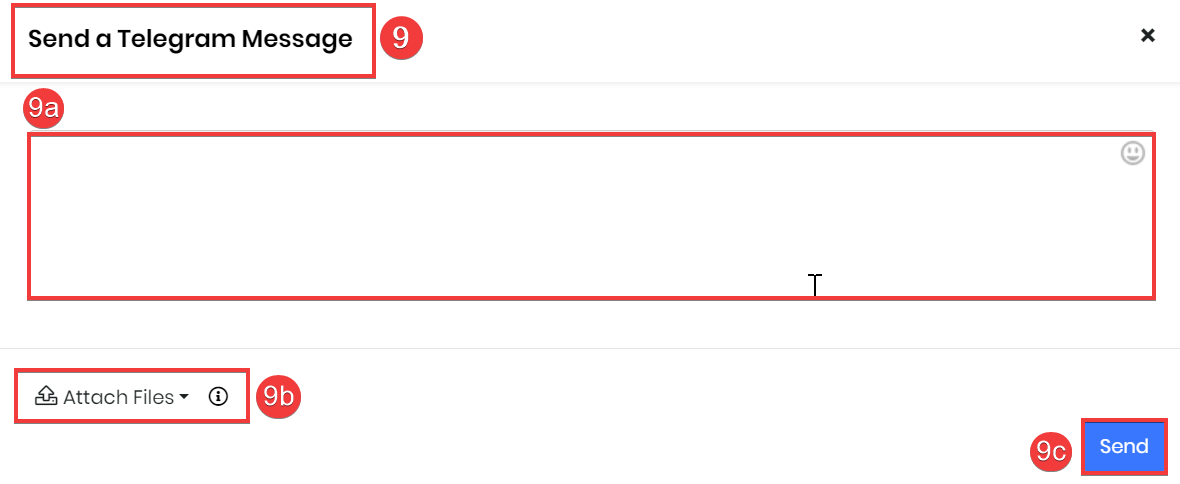
- Enter or select the following information to Send a Telegram Message:
- Text Box - Type the message in the message text box.
- Attach Files -Attach the files with a maximum upload size of 5 MB.
- Send - Click to send the Telegram message.
Accessing the Alert Rules
The default configurations for Actions are specified below. They are grouped as Activity Alerts, Engagement Alerts, Mentions, and Smart Alerts.
Depending on your user type, you have full or partial access to the Configuration page. As a Standard user, you can configure Activity Alerts, Engagement Alerts, and Mentions.
As an Admin user, you can configure Smart Alerts with the other three alert types.
To learn about Users, click here.
Types of Alert Rules
Follow these steps to access different types of alert rules.
- Log in to the CRM.
- Click Main Menu.
- Go to Essentials.
- Go to Collaboration > Actions. The Actions page opens.

- Click Alert rules. The Configure alert rules page opens.
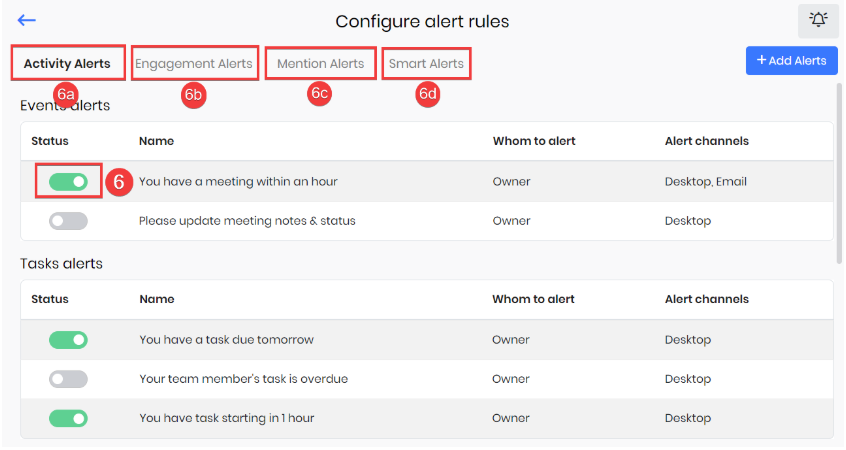
- Depending on your requirements, you can enable or disable the alerts by clicking the toggle button for each. The alerts are grouped into four, which are listed below.
- Activity Alerts.
- Engagement Alerts.
- Mentions Alerts.
- Smart Alerts.
Adding a new alert
You can add new alerts to Activity Alerts, Engagement Alerts, and Smart Alerts based on your requirements.
Follow these steps to add a new Alert.
- Log in to the CRM.
- Click Main Menu.
- Go to Essentials.
- Go to Collaboration > Actions. The Actions page opens.
- Click Alert rules. The Configure alert rules page opens.

- Click +Add Alerts. The Add Alert Rule window opens.

- Select Alert - Select any activity alert mentioned below from the drop-down menu.
- Activity Alerts.
- Engagement Alerts.
- Smart Alerts.
- Module - Select the module where you want to receive alerts like Deals, Contacts, etc.
- Alert channels - Choose how you want to be alerted—via Email, Desktop, or Microsoft Teams. You can also choose more than one channel by enabling the required checkbox.
- Save - Click to save the new alert rule.
You will get a detailed explanation of how to set up each alert in the upcoming sessions, one by one.
Setting up Activity Alerts
Activity Alerts notify you of overdue or upcoming tasks and events related to records assigned to you in the CRM. These alerts help you manage your time efficiently and ensure every important task is noticed.
Follow these steps to set up an Activity Alert:
- Log in to the CRM.
- Click Main Menu.
- Go to Essentials.
- Go to Collaboration > Actions. The Actions page opens.
- Click Alert rules. The Configure alert rules page opens.
- Click +Add Alerts. The Add Alert Rule window opens.

- Select Alert - Select Activity Alerts from the drop-down.
- Module - Select the module where you want to receive alerts like Deals, Contacts, etc.
- Alert message - Enter the text that you want to be displayed in the alerts.
- All conditions -Click the + Add Conditions and select the Field and Conditions. Alerts are displayed when all the conditions are true.
- Any conditions -Click the + Add Conditions and select the Field and Conditions. Alerts are displayed when at least one of the conditions is true.
- Alert Channels - Choose how you want to be alerted—via Email, Desktop, or Microsoft Teams. You can also choose more than one channel by enabling the required checkbox.
- Click Save.
Setting up Engagement Alerts
Engagement alerts notify you based on your contact's action on your emails.
For example, you will receive alerts when a customer views an email you sent or downloads a document you shared with them. This helps you follow up on engagement promptly.
Follow these steps to set up an Engagement Alert:
- Log in to the CRM.
- Click Main Menu.
- Go to Essentials.
- Go to Collaboration > Actions. The Actions page opens.
- Click Alert rules. The Configure alert rules page opens.
- Click +Add Alerts. The Add Alert Rule window opens.
- Select Alert - Select Engagement Alerts from the drop-down.
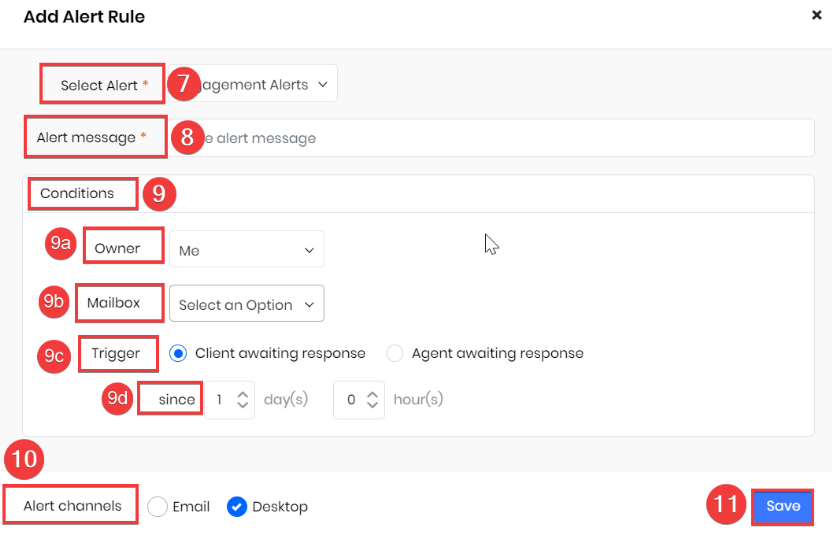
- Alert Message - Enter the text to be displayed in the alerts.
- Conditions:
- Owner - Select who needs to be alerted.
- Mailbox - Choose a mailbox whose emails the alerts must be sent to.
- Trigger:
- Client awaiting response - If you want to enable alerts for client emails that you have not responded to.
- Agent awaiting response - If you want to enable alerts for your emails to which a client has not responded.
- Since - Specify when you want to receive alerts. For example, if a client is awaiting a response for five days and 12 hours.
- Alert Channels - Choose how you want to be alerted—via Email, Desktop, or both.
- Click Save.
Setting up Smart Alerts
Follow these steps to set up Smart Alert:
- Log in to the CRM.
- Click Main Menu.
- Go to Essentials.
- Go to Collaboration > Actions. The Actions page opens.
- Click Alert rules. The Configure alert rules page opens.
- Click +Add Alerts. The Add Alert Rule window opens.
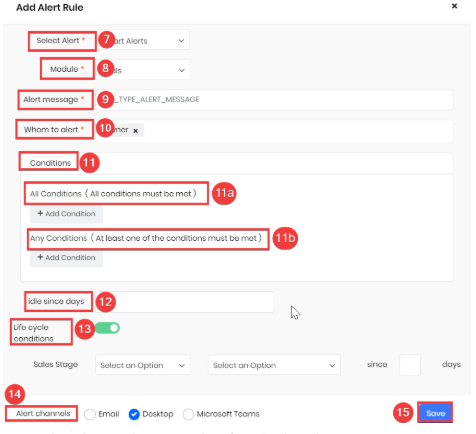
- Select Alerts - Select Smart Alerts from the drop-down.
- Module - Select the module where you want to receive alerts like Deals, Contacts, etc.
- Alert message - Enter the text you want displayed in the alerts.
- Whom to Alert - Specify the users who should receive alerts.
- Conditions - Select All Conditions, Any Conditions, or both.
- All conditions -Click the + Add Conditions and select the Field and Conditions. Alerts are displayed when all the conditions are true.
- Any conditions -Click the + Add Conditions and select the Field and Conditions. Alerts are displayed when at least one of the conditions is true.
- Idle since days - Receive an alert when a contact has been inactive for a specified number of days.
- Life cycle conditions - Enable the toggle button to add life cycle conditions, then select the sales stages from the drop-down menu.
- Alert channels - Choose how you want to be alerted—via Email, Desktop, or Microsoft Teams. You can also choose more than one channel by enabling the required checkbox.
- Click Save.
Setting up Alert Preferences
You can choose how and when to receive the alerts you set up in Actions.
Follow these steps to set up Alert Preferences:
- Log in to the CRM.
- Click Main Menu.
- Go to Essentials.
- Go to Collaboration > Actions. The Actions page opens.
- Click Alert rules. The Configure alert rules page opens.
- Click the Preferences icon. The Preference page opens.
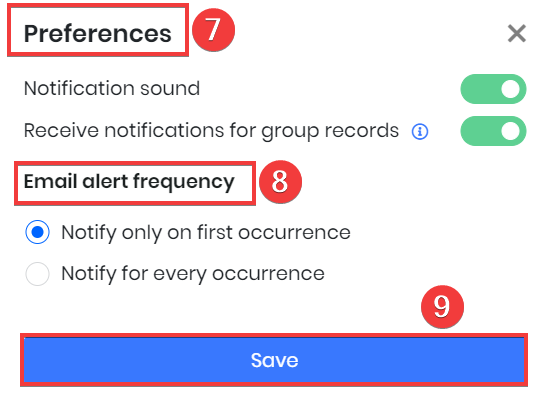
- Preference - You can enable or disable the Notification sound and Notification for group records.
- Email alert frequency - You can choose whether you want to Notified only on the first occurrence (only first-time conditions are met) or Notify on every occurrence (every time conditions are met).
- Click Save.
Actions in an alert
You can perform various actions in an alert, such as editing, duplicating, and deleting.
Follow these steps to perform the actions in an alert:
- Log in to the CRM.
- Click Main Menu.
- Go to Essentials.
- Go to Collaboration > Actions. The Actions page opens.
- Click Alert rules. The Configure alert rules page opens.
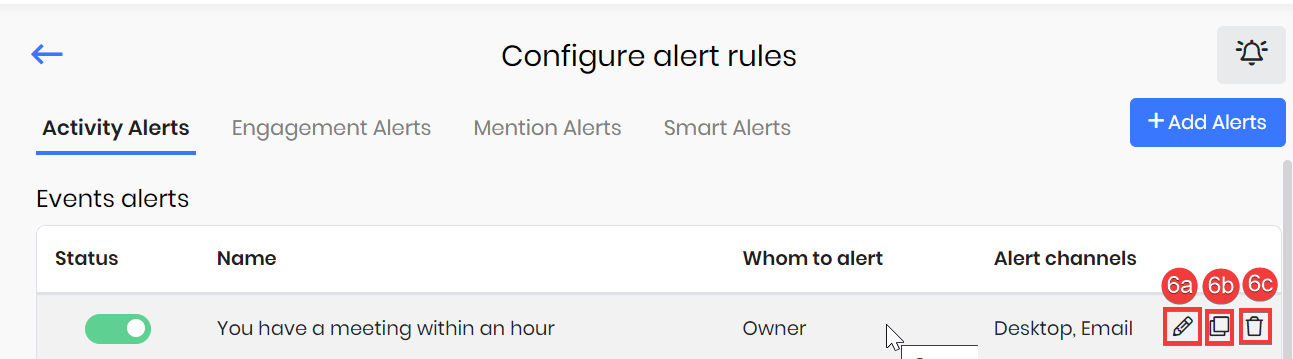
- Hover over a particular alert to perform the following quick actions.
- Edit - You can edit the alert as per your requirements.
- Duplicate - You can duplicate the alert and save it.
- Delete - You can delete the alerts if you don't want them anymore.
Note: Any changes made to alert rules, such as creating, editing, enabling, disabling, or deleting, are automatically tracked under User Management > Settings Log.
To learn more about the Settings Log, click here.