Articles in this section
Managing Subscriptions in Vtiger CRM
Feature Availability
Vtiger Editions: One Professional | One Enterprise
Introduction
The Subscriptions module in Vtiger CRM automates invoice generation and payment processing for subscription-based services. Subscriptions in Vtiger CRM have two payment methods: Manual pay and Autopay. A transaction record is created to track every payment you receive for a subscription.
Key Features
The key features of the Vtiger Subscriptions are:
- Automated recurring invoicing based on defined billing frequency.
- Manual Pay and Autopay subscription options.
- Integration with payment gateways such as Authorize.Net and Stripe.
- Transaction tracking across subscriptions, invoices, and payments.
- Flexible tax, discount, and pricing configurations.
- Support for multiple invoices and payments per subscription.
- Customer activation via secure email link.
- Export, print, and share subscription records.
Payment Methods in Subscriptions
Here are two payment methods supported in subscriptions:
- Manual Pay - If the subscription mode is set to Manual Pay:
- An invoice and a payment record are created, but the payment is not processed automatically.
- You have to go to the payment record, manually enter the customer's bank details, and complete the payment. To learn more about Payments, click here.
- Autopay - If the subscription mode is set to Autopay, the system ensures invoices are paid on time.
- When an invoice is generated, the due date is set, and the system charges the customer automatically via the payment gateway (Currently, Vtiger CRM supports Authorize.Net and Stripe). To learn more about Autopay, click here.
Activating a Subscription
When you create a subscription, an email link is sent to the contact to provide the payment details and activate the subscription. You can send the activation link to a customer by clicking the Send Activation Link button in the Summary View of any subscription record.
Activation process
- Initially, when the subscription is created, it is set to Activation Pending until the customer enters their account details in the payment link sent to them via email.
- Depending on the Subscription Scheduler:
- An invoice record is created with the status as Auto-created
- A payment record is created with the status Pending
- You can find the related payments and invoices under the One View widget of the summary view of the Subscription record.
- After your customer configures his payment details in the Authorize.Net gateway, the subscription status changes to Active.
- Vtiger CRM will now process the transaction and receive the payment amount from the customer's account on the specified billing date. You can learn more about subscription transactions in the later sections.
Note:
- If a subscription record reaches its end date, the status will automatically change to expired, with the account owner's name attached.
- However, if the account owner wants to keep it in 'Suspended' status, they can request an extension of the end date or keep it as 'No expiry'.
- A subscription can have multiple invoices related to it. In turn, an invoice can have multiple payments and related transactions.
Defining Taxes and Discounts
You can configure Taxes, Tax regions, Shipping Charges (if any), and Terms and Conditions from the Settings > Inventory Management section.
Note: Only those with the Admin role can configure these fields.
Refer to the Tax Management article to learn how to set up taxes and other configurations.
- Tax regions: Taxes are set by region. Regions are configured on the Tax Settings screen.
- Currency: It is the same as the currency defined in the Deal. The subscription line item currency is the same as the record-level currency.
- Tax mode:
- Group Taxes: If multiple products or services are in inventory, group taxes help populate tax rates based on specific tax calculations.
- Individual Taxes: You can enable this option when creating a subscription. You can apply taxes for individual items in a subscription by clicking the Configure button in the subscription.
- Note: The default Tax mode is set by the administrator on the Tax Management page. This can be overridden at the subscription level in the Subscription Configuration pop-up.
- Price Books: Price Books let you set different prices for Products and Services. The prices of the items can vary at any time depending on customer demand and needs.
- When a Price Book is selected or changed, the system updates the unit prices of all line items based on the selected Price Book.
- To know more about Price Books, click here.
- Discounts:
- Group Discounts: Similar to Group Taxes, Group Discounts are applied to products (or) services on the subscription level.
- Individual Discounts: Unlike group discounts, Vtiger CRM allows you to apply discounts to an individual item based on its List Price.
- Shipping Charges: Shipping Charges are the additional amount the company's sales team charges for shipping the product to a customer.
- Adjustments: This option allows you to round off the total amount to the next or previous value based on the decimal number.
Note: You can customize and add or remove fields by going to the Module Layouts and Fields under Settings.
Transactions in Subscriptions
Transactions are a very special feature available only in the Subscriptions module.
When a subscription is active, a transaction record is created in the payment and invoice records related to the subscription. You can find all the transactions related to Subscriptions in the Transactions widget in the Summary View of any subscription record. Going forward, you will learn about the relationship among transactions, payments, and invoices for a subscription.
While creating a subscription, you can add the frequency and recurrence fields. You can choose from yearly, monthly, weekly, and daily. The Invoice created automatically will display the frequency, Billing date from, and Billing date to fields.
When a transaction is successful
If a payment transaction is successful, then:
- A transaction record is created in the related subscription, payment, and invoice records with the status of Success.
- The status of the related payment record is set to Received Invoice.
- The status of the related invoice record is set to Paid.
When a transaction fails
Based on Autopay Configuration, further actions take place.
- If a payment transaction fails the first time, the transaction record status changes to Failure after the first retry attempt.
- The Invoice is marked Overdue even after the first failed attempt because the payment was not received by the due date.
- If all retry payments fail, then:
- The status of the related payment record is set to Failure.
- The status of the related invoice record is set to Overdue.
Note: Transaction records are created in payments and invoices only if they are related to a subscription.
Benefits of Subscriptions
The benefits of using Vtiger Subscriptions are:
- Automated Subscription Management: The subscription module automates and streamlines your subscription management processes.
- Improved Customer Retention: With the subscription module, you can effectively manage customer subscriptions and ensure timely renewals.
- Flexible Billing Options: Vtiger CRM's subscription module offers a range of billing options.
- Integrated Payment Processing: The subscription module seamlessly integrates with the payments module in Vtiger CRM.
- Customer Self-Service Portal: Vtiger CRM provides a self-service portal where customers can manage their subscriptions.
- Analytics and Reporting: The subscription module offers robust reporting and analytics capabilities.
- Integration with CRM Functions: The subscription module integrates seamlessly with CRM functions, including sales, marketing, and customer support.
In this article, you will learn how to:
- Installing the Subscription add-on
- Creating a subscription
- Adding line items to a subscription
- Other actions in a subscription
Key Terminology
|
|
|
|
|
|
|
|
|
|
|
|
|
|
|
|
|
|
|
|
|
|
|
|
Installing Subscriptions
The Subscriptions module is not available by default. You must install the add-on from the Vtiger Extension Store to use the Subscriptions module. Before that, make sure you have configured the following prerequisites:
- Install the Payments module and configure Autopay
- Authorize.Net
- Paypal (Optional)
- Stripe (Optional)
Follow these steps to install the Subscriptions module:
- Log in to your CRM account.
- Go to the main Menu.
- Click Add-ons. The Add-ons page opens.
- Search for Subscriptions.
- Click Install.
After successful installation, you will see a success message on the screen. You can access the Subscription module under the main Menu > Inventory > Subscriptions.
Creating a Subscription
You can create a subscription from the List View or from a quote record.
From Subscriptions' List View
Follow these steps to create a new subscription:
- Log in to your CRM account.
- Click the main Menu.
- Go to Inventory.
- Click Subscriptions. The Subscriptions module's List View opens.
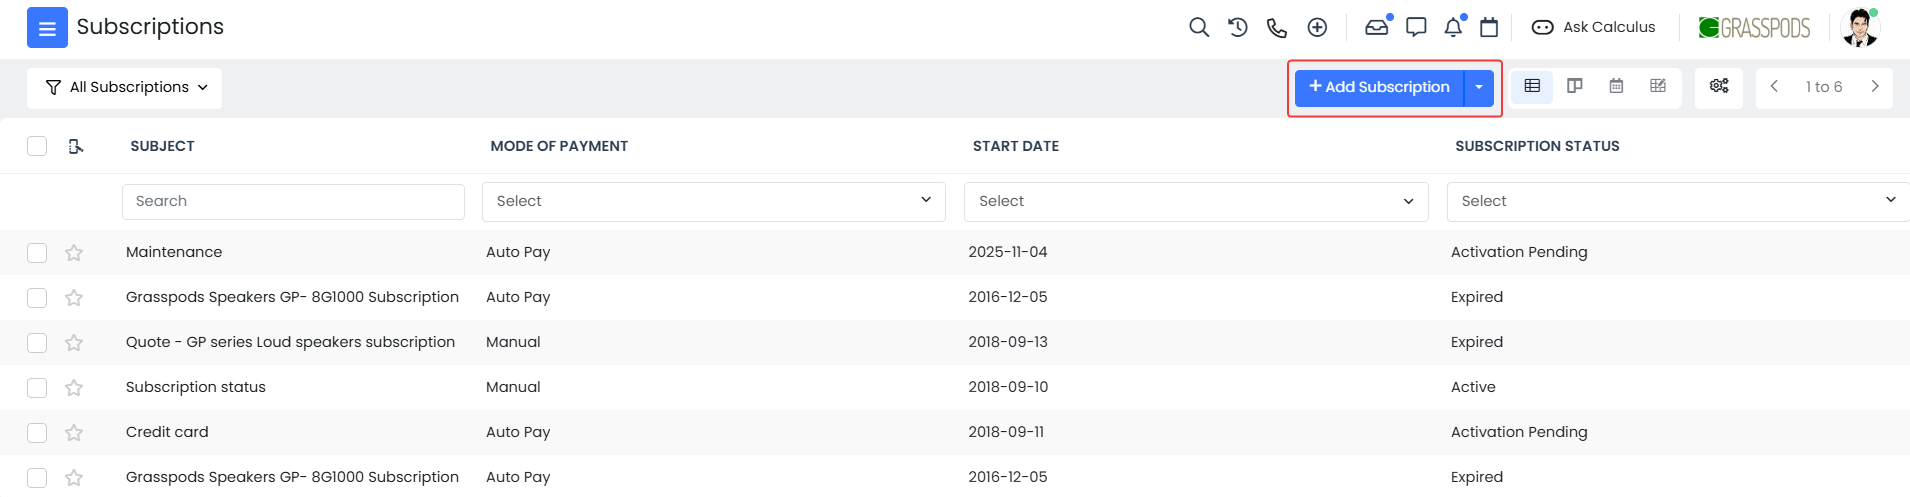
- Click +Add Subscription.
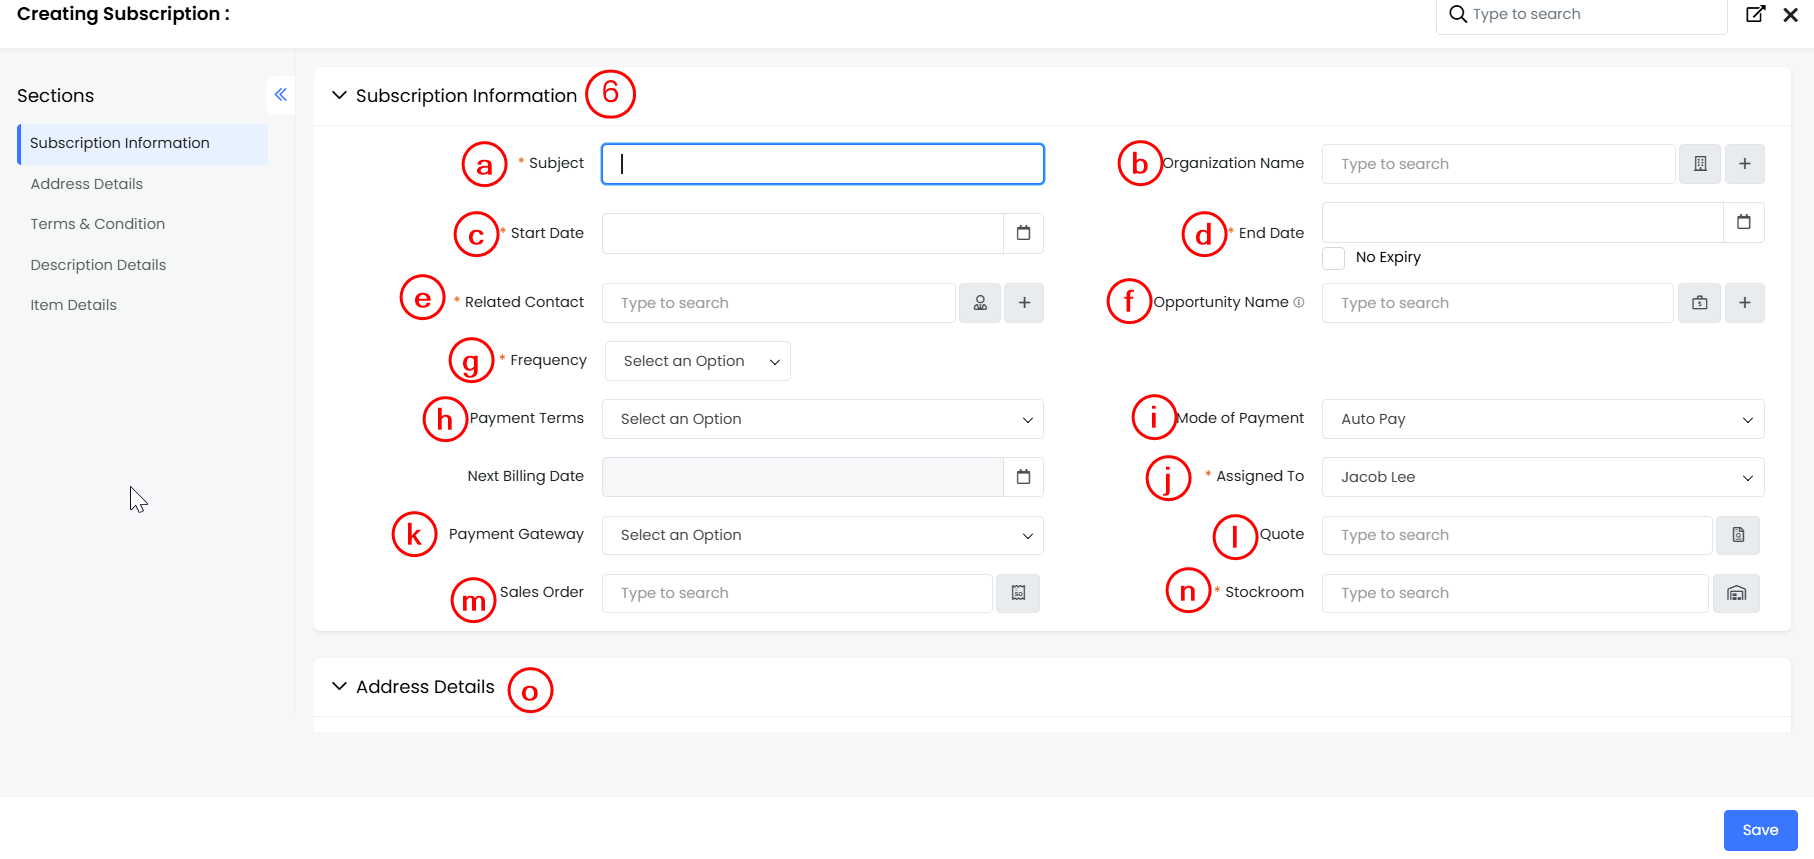
- Enter the following details:
- Subject: Enter the Subscription name.
- Organization Name: Select the related Organization record.
- Start Date: Enter the subscription start date.
- End Date: Enter the subscription end date. Enable the No Expiry checkbox if there is no end date.
- Related Contact: Link the related Contact record.
- Opportunity/Deal Name: Link the related Deal record.
- Frequency: Mention the subscription frequency - Yearly, Monthly, Weekly, or Daily.
- Payment Terms: Enter the net days for the payment term. For example, Net 15 days.
- Mode of Payment: Select the payment mode - Manual or Auto pay.
- Assigned To: Enter the user the Subscription record is assigned to.
- Payment Gateway: Select Gateway - Authorize.net, Stripe, etc.
- Quote: Link the related Quote record.
- Sales Order: Link the related SO.
- Stockroom: Select the Stockroom for the Inventory.
- Address Details: Enter the billing and shipping address details.
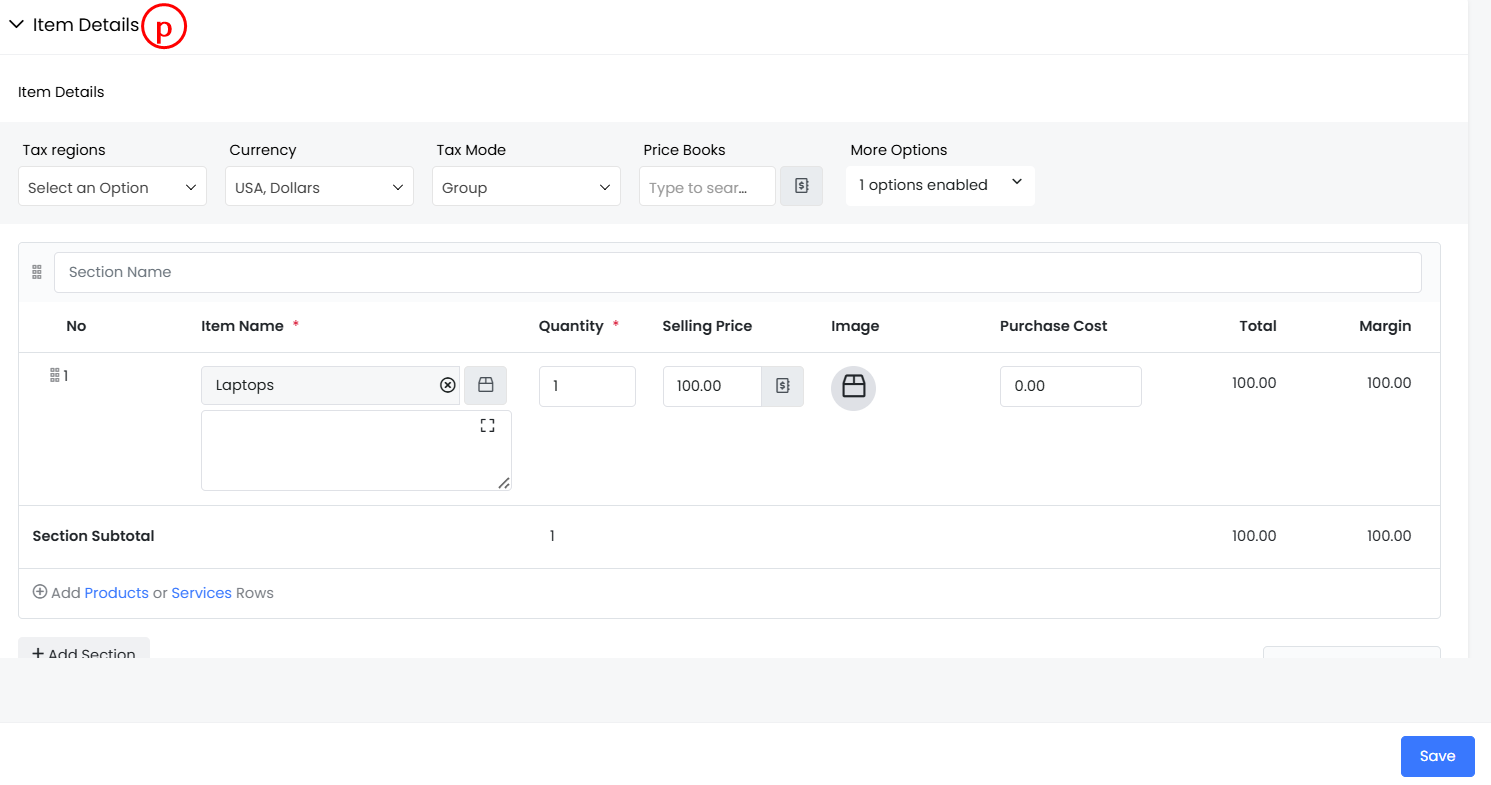
- Item Details: Enter the item details, such as the product, service, tax mode, discounts, and other relevant information.
- Click Save.
Note:
- While creating a subscription, you can add the frequency and recurrence fields and choose from yearly, monthly, weekly, and daily options. The Invoice created automatically will display the frequency, Billing date from, and Billing date to fields.
- You can create a bi-weekly subscription, i.e., once in two weeks, by setting the frequency as weekly and recurrence as every two weeks.
Viewing Subscription Details
List View in Subscriptions
By default, the List View is the screen that is visible when you click the Subscriptions module. This view sorts and lists all subscriptions by the last-modified subscription record.
Columns in the List View: The columns that are visible by default in the List View are:
- Subject - Displays the name of the subscription.
- Mode of Payment - Displays the method used to make the payment.
- Start Date - Displays the date the subscription will start.
- Subscription Status- Displays the current status of the subscription record.
Actions in List View: You can perform quick actions such as Edit, Delete, Export, and Comment on the invoice records in the List View. To learn more about List View actions in Vtiger CRM, click here.
Other Actions in Subscriptions
Sharing a Subscription
You can share a subscription with a customer by sending a link or attaching it.
As a link
Follow these steps to share the subscription as a link:
- Log in to your CRM account.
- Click the main Menu.
- Go to Inventory.
- Click Subscriptions. The Subscriptions module's List View opens.
- Select and open the required subscription record.
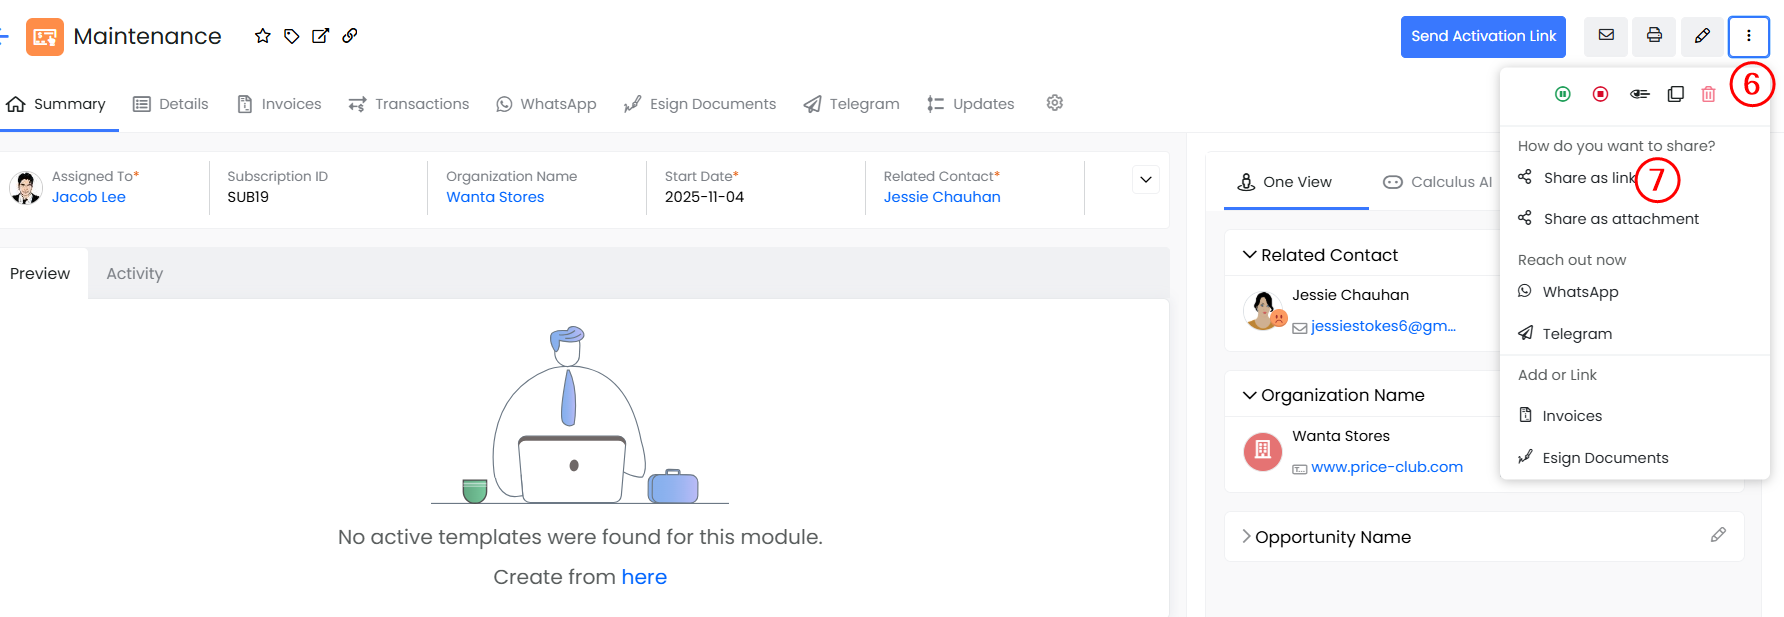
- Click More.
- Select Share as a link. A mail compose window opens with the subscription link.
- Enter the recipient's details.
- Click Send.
As an Attachment
Follow these steps to share the subscription as an attachment:
- Log in to your CRM account.
- Click the main Menu.
- Go to Inventory.
- Click Subscriptions. The Subscriptions module's List View opens.
- Select and open the required subscription record.
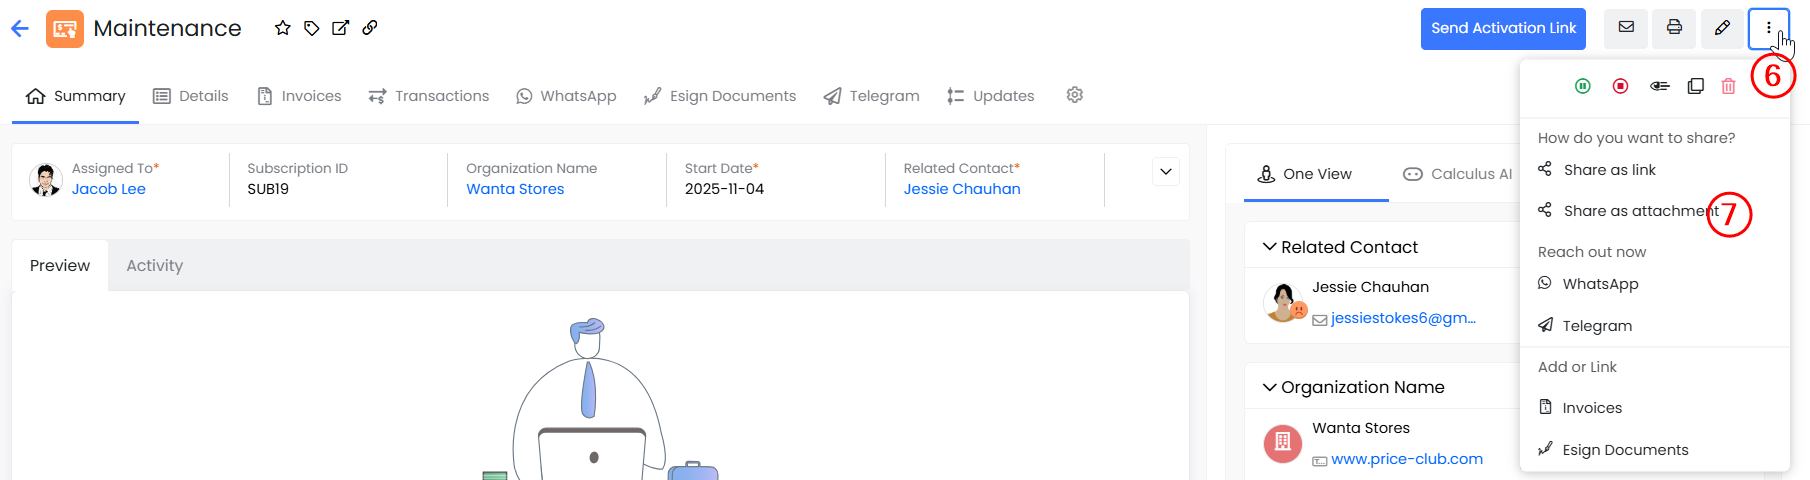
- Click More.
- Select Share as attachment. A mail compose window opens with the subscription attachment.
- Enter the recipient's details
- Click Send.
Generating an invoice
Vtiger CRM allows you to link the Invoice to a subscription.
Follow these steps to generate an invoice:
- Log in to your CRM account.
- Click the main Menu.
- Go to Inventory.
- Click Subscriptions. The Subscriptions module's List View opens.
- Select and open the required subscription record.
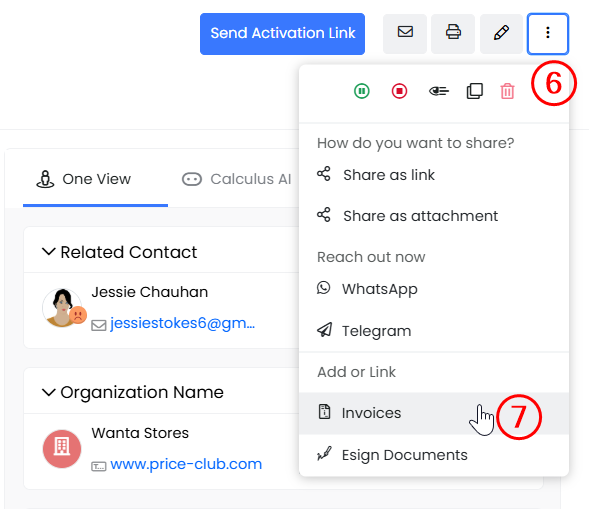
- Click More.
- Click Invoices.
- Click Yes to copy the subscription details to the Invoice.
- Fill in all the necessary details.
- Click Save to create the invoice record.
The Invoice will be created and linked to the subscription.
Export
You can use the Export option to save the subscription as a PDF on your local system or send the subscription link as a PDF via email.
Follow these steps to export a subscription:
- Log in to your CRM account.
- Click the main Menu.
- Go to Inventory.
- Click Subscriptions. The Subscriptions module's List View opens.
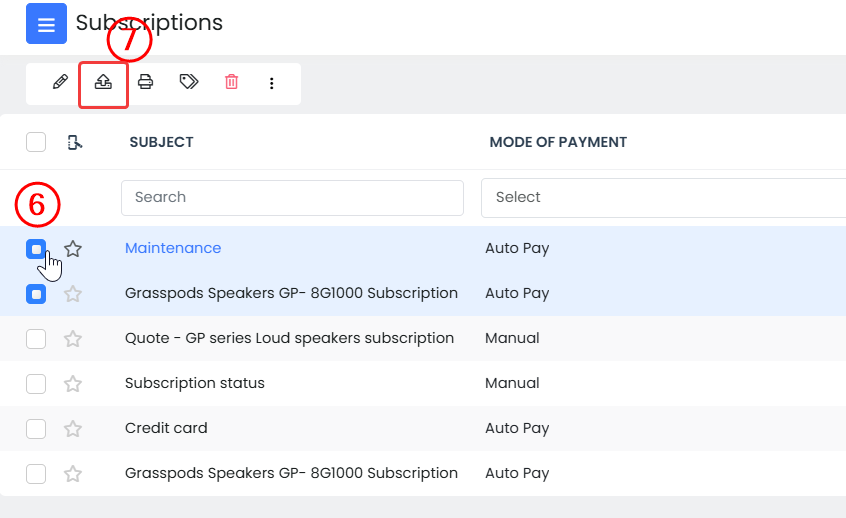
- Select the records to export.
- Click Export. The Export window opens.
- Enter or select information for the following:
- Select the type of export:
- Export selected records
- Export records on the current page
- Export all the records
- Select a type of currency:
- My preferred Currency
- Currency specified in Record
- Select the type of export:
- Click Export.
The exported record will be saved on your local system.
You can use the Print action to print the subscription record as a hard copy.
Follow these steps to print a subscription:
- Log in to your CRM account.
- Click the main Menu.
- Go to Inventory.
- Click Subscriptions. The List View opens.
- Select and open the required subscription record.
- Click More.
- Click Print.
- You can perform any of the following actions:
- Edit & Export - You can edit the subscription and export it to your local system.
- Email with PDF - You can email the subscription record as a PDF to the contact.
- Print - You can print the subscription and keep a hard copy.
- Save as PDF - You can save the subscription as a PDF on your local system.
When you try to print a subscription, you can see that it uses a specific template. Vtiger CRM offers a set of templates to select if the default template is not to your liking. To learn about Print Templates, click here.