Articles in this section
Vtiger Inbox
Feature Availability
| One Pilot | One Growth | One Professional | One Enterprise | One AI | |
|---|---|---|---|---|---|
| Feature Availability | |||||
| Personal Inbox | ✓ | ✓ | ✓ | ✓ | ✓ |
| Group Inbox | ✓ | ✓ | ✓ | ✓ | |
Introduction

The Inbox allows you to manage all your emails from the CRM. You can easily establish a two-way sync with multiple email accounts and receive emails (from them) in the Inbox. You can also create individual or group inboxes.
It removes some of the typical constraints of regular email clients, such as:
- Emails are not assigned to any user on receipt.
- Closed conversations take up space in the inbox.
- Setting up reply-to email IDs is difficult.
- Collaboration with the team must happen outside email conversations.
- Managing separate mailboxes is tedious.
- Emails are not linked to CRM records directly.
With Vtiger CRM’s Inbox, you can do much more than send and receive emails! It puts you at ease with the following possibilities:
- Email assignment: Team members can view their emails in group mailboxes. These emails can be assigned to a group member directly from the mailbox.
- Marking emails as Done: When work on an email is complete, mark the email as ‘Done’ and move it out of your inbox. Emails marked as Done go to the Done folder.
- Reply-to email IDs: Select reply-to email IDs dynamically while composing emails! You can select any of your email IDs set up in your Inbox as a reply-to email.
- Comments in emails: Collaborate with your team members on a group mailbox through comments! Mention your team members in an email, and they can view it when they open the email.
- Email syncing: Two-way sync makes it easy to sync emails between your CRM inbox and email client and view them all in the CRM.
- Automated email linking: When an email is received, you can automatically link it to the contact who sent it by setting up Mailroom rules.
In Vtiger CRM, you can configure and set up the following in Mailbox Settings.
- My Mailbox: To configure your inbox as an individual user and receive emails to your inbox.
- Group Mailboxes: To configure a shared mailbox for your team and receive group emails.
Inbox Features
The Vtiger inbox offers the following key features:
- Folders: The Inbox has separate folders for different email categories.
- Open: Emails that have just arrived or emails that have not been opened stay in this folder.
- Drafts: Emails that are composed but not sent are present in the Drafts folder.
- Done: Emails marked as Done are sent to this folder. When work on an email is complete, or an email conversation is closed, it is marked as done. When a reply comes to a conversation in the Done folder, it is reopened and moved to the Open folder.
- Sent: Emails that were sent can be viewed in this folder.
- Reminders: Emails with reminders are sent to the Reminders folder.
- Trash: Deleted emails go to the Trash folder. Skip the ‘Email Actions’ section to learn more about deleting emails. When a reply comes to a conversation in the Trash folder, it is reopened and moved to the Open folder.
- Filters: Use the Search bar at the top of the email list to find an email. You can type keywords such as the sender’s name, email subject, etc., to find emails.
- Mass-select: You can select all emails on the current page by clicking the Mass-select radio button and perform actions such as Mark as Done, Assign, Mark as Read, Mark as Unread, and Delete.
Synced folders
Along with the default folders mentioned above, you can view the folders you selected for syncing during My Mailbox's setup.
The Sync icon
Members
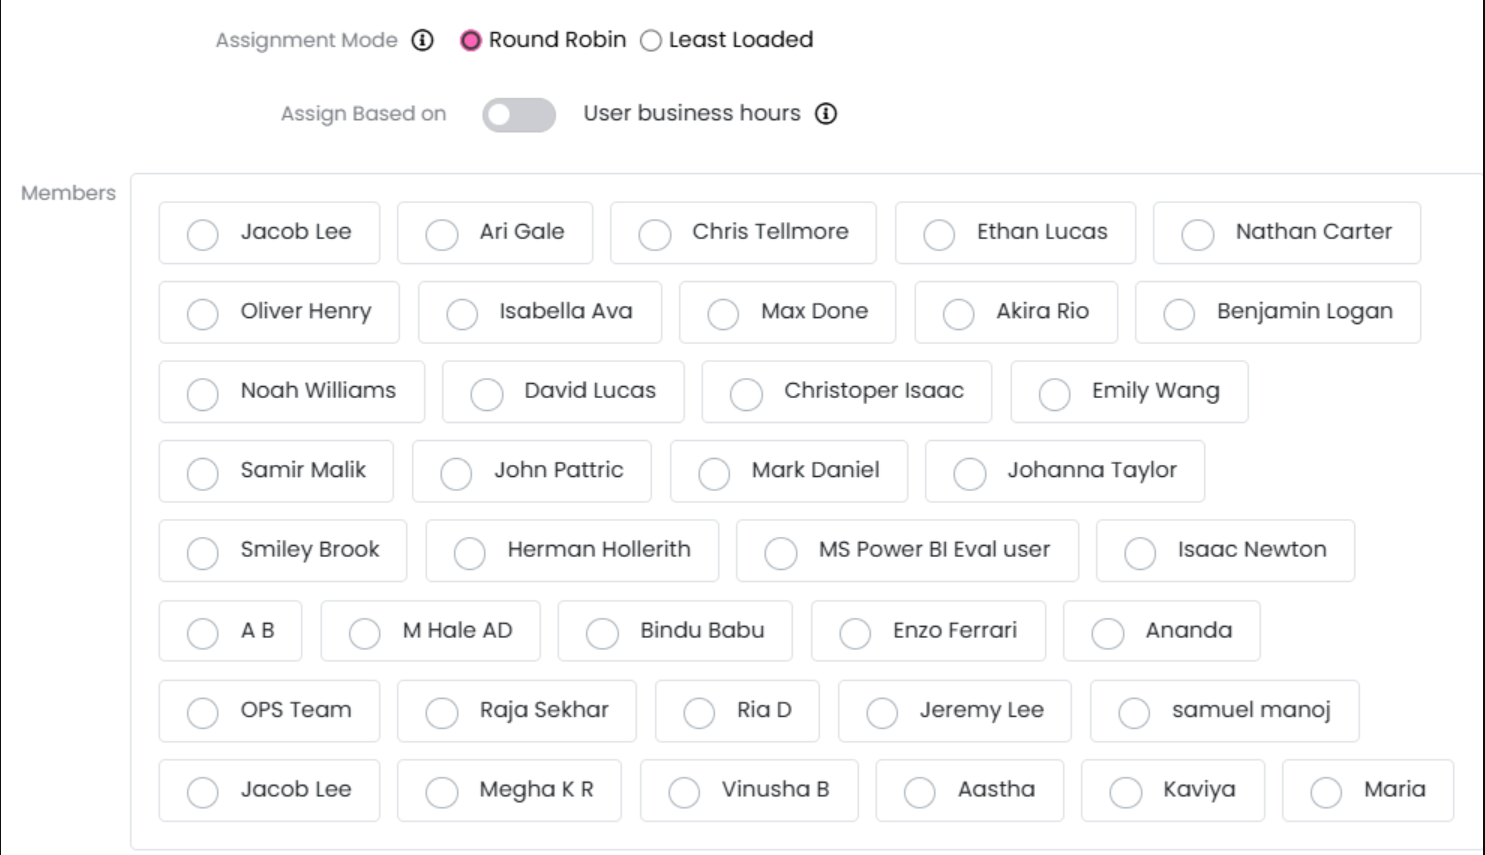
For group mailboxes, you can view the mailbox members under the Members heading below the default folders.
Filters
Use the Search Bar at the top of the email list to look for an email. You can type keywords such as the sender’s name, email subject, etc., to find emails.
Mass-select
You can select all emails on the current page by clicking the Mass-select radio button and perform actions such as Mark as Done, Assign, Mark as Read, Mark as Unread, and Delete.
Assign
When an email arrives from a customer, you can assign it to a user, which means that the user will be responsible for following up with the customer. You can mass-select emails and assign them to any user.
Note:
- You cannot assign emails to a group.
- A user with no assigned email can create a record or link an email to a record. But, he cannot mark an email conversation as Read, Unread, Public, Private, or Done. He also cannot delete an email.
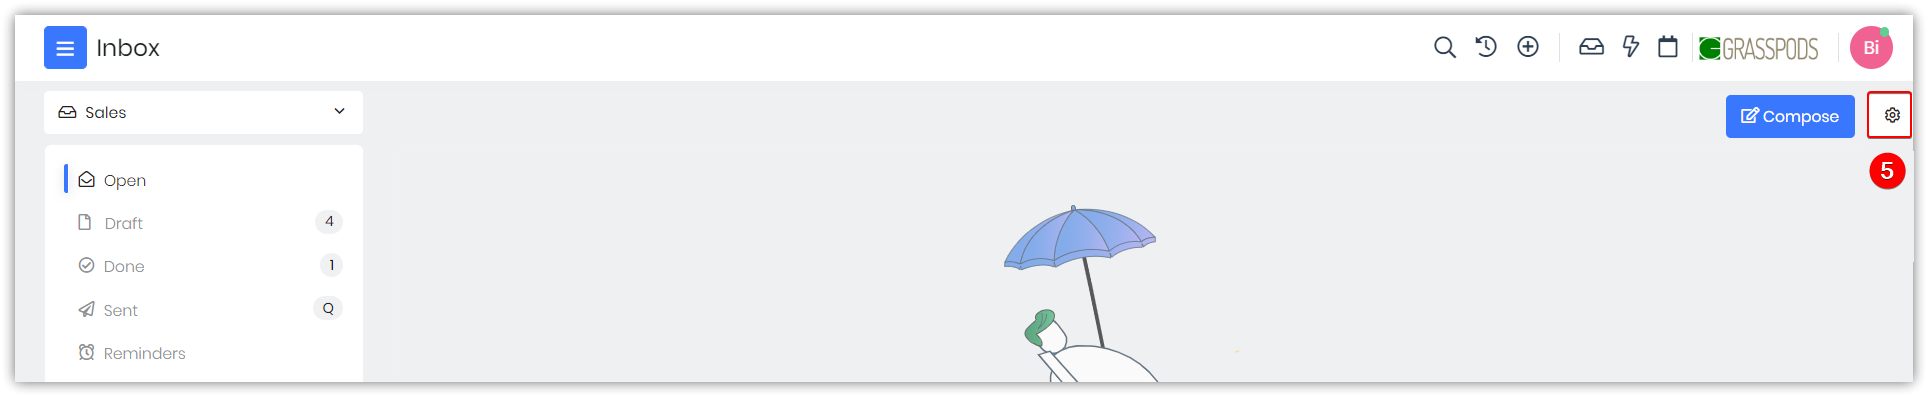
Configuration
The Settings icon is in the top-right corner of a mailbox. You can add or delete personal and group mailboxes, edit mailbox settings, and view or edit mailroom rules by clicking the button.
Drop-down
The drop-down on the top left allows you to switch between My Mailbox and group mailboxes. Click the drop-down and select a mailbox to view emails.
Pagination
Your search for specific emails becomes easy with pagination in Vtiger CRM. You can find it located in the top-right corner above the email list.
Here is how you can use it:
- Click on the page numbers.
- Insert the destination page number.
- Click Go.
Benefits
The benefits of using the Vtiger inbox are:
- All emails from multiple accounts can be managed in a single location.
- Seamlessly synchronize emails between your CRM and email client.
- Share emails with team members for collaborative work and better communication.
- Assign emails to specific team members for efficient task accountability.
- Automatically associate incoming emails with relevant contacts.
- Organize emails by status to quickly identify completed tasks.
In this article, you will learn about:
- Email Actions
- Setting up an Inbox
- Setting up a Group Inbox
- Establishing Two-Way Sync Between Vtiger and IMAP Providers
- Automating tasks in a Mailroom
- Deleting a Mailbox
- Editing a Mailbox
- Composing an email
- Troubleshooting common inbox issues
Key Terminology
|
|
|
|
|
|
|
|
|
|
|
|
|
|
|
|
|
|
|
|
|
Email Actions
The following are the actions possible in the Inbox:- Assign option: When an email arrives from a customer, you can assign it to a user who will be responsible for following up with the customer. You can mass-select emails and assign them to any user.
- Configuration: The Settings icon is on the top-right corner of a mailbox and lets you add or delete personal and group mailboxes, edit mailbox settings, and view or edit mailroom rules.
- Drop-down: The drop-down on the top left allows you to switch between My Mailbox and group mailboxes. Click the drop-down and select a mailbox to view emails.
- Pagination: Your search for specific emails becomes easy with the pagination in Vtiger CRM. You can find it in the top right corner, above the email list.
Actions you can perform in an email
- Reassign email: You can assign emails to another user by using the option displayed beside the email subject.
- Open contact record: This option is visible beside the reassign email option only if you have the sender’s details saved as a contact. You can use it to open the contact record.
- Edit Reminder: You can create a reminder to reply to or follow up with an email by clicking the Edit Reminder option. Emails with reminders appear at the top of the email lists in a folder.
- Mark as Done: After an email conversion ends, you can mark it as done using the Mark As Done option. Emails marked as Done are moved to the Done folder.
- Mark as Read: You can use the Mark as Read option to mark an email as Read.
- Make Private: Mark a conversation as Private by using the Make Private option displayed under the ellipsis. Private conversations are only viewable for users of the mailbox. You can identify private conversations with a Lock icon when you hover over them.
- Delete: This option deletes a conversation. Deleted conversations are sent to the Trash.
- Create or link record: This option helps you use the details in the email; you can create a record in the CRM or link the email to a record in the CRM.
Apart from the actions mentioned above, you have options such as Reply, Reply All, Forward, and Comment on an email.
The Comment is a convenient option to have on an email because you do not need to go offline to have an internal interaction regarding the email.
- For instance, a customer requests a discount greater than the usual discount margin. As a sales rep, you can directly mention your sales manager in the email conversation, which benefits from transparency.
- Your manager will get a notification under the @mentions tab on the Actions page. They can reply to your comment directly from the notification in @mentions.
To learn more about comments and @mentions in Vtiger CRM, click here.
Setting Up Your Inbox
Before you set an individual or group Inbox:- You must have configured the Server Type and Server Name in Vtiger Mail Server Settings.
- If you have configured your email server provider, details such as user names will automatically be filled in.
- In case the name of the email service provider is not displayed on the screen, then select Other. If you select other, the system will fetch the username that you have provided while configuring email settings (Settings > Email Settings > Mail Server Settings (SMTP)).
- Log in to the CRM.
- Click the main Menu.
- Go to Sales.
- Select Inbox.
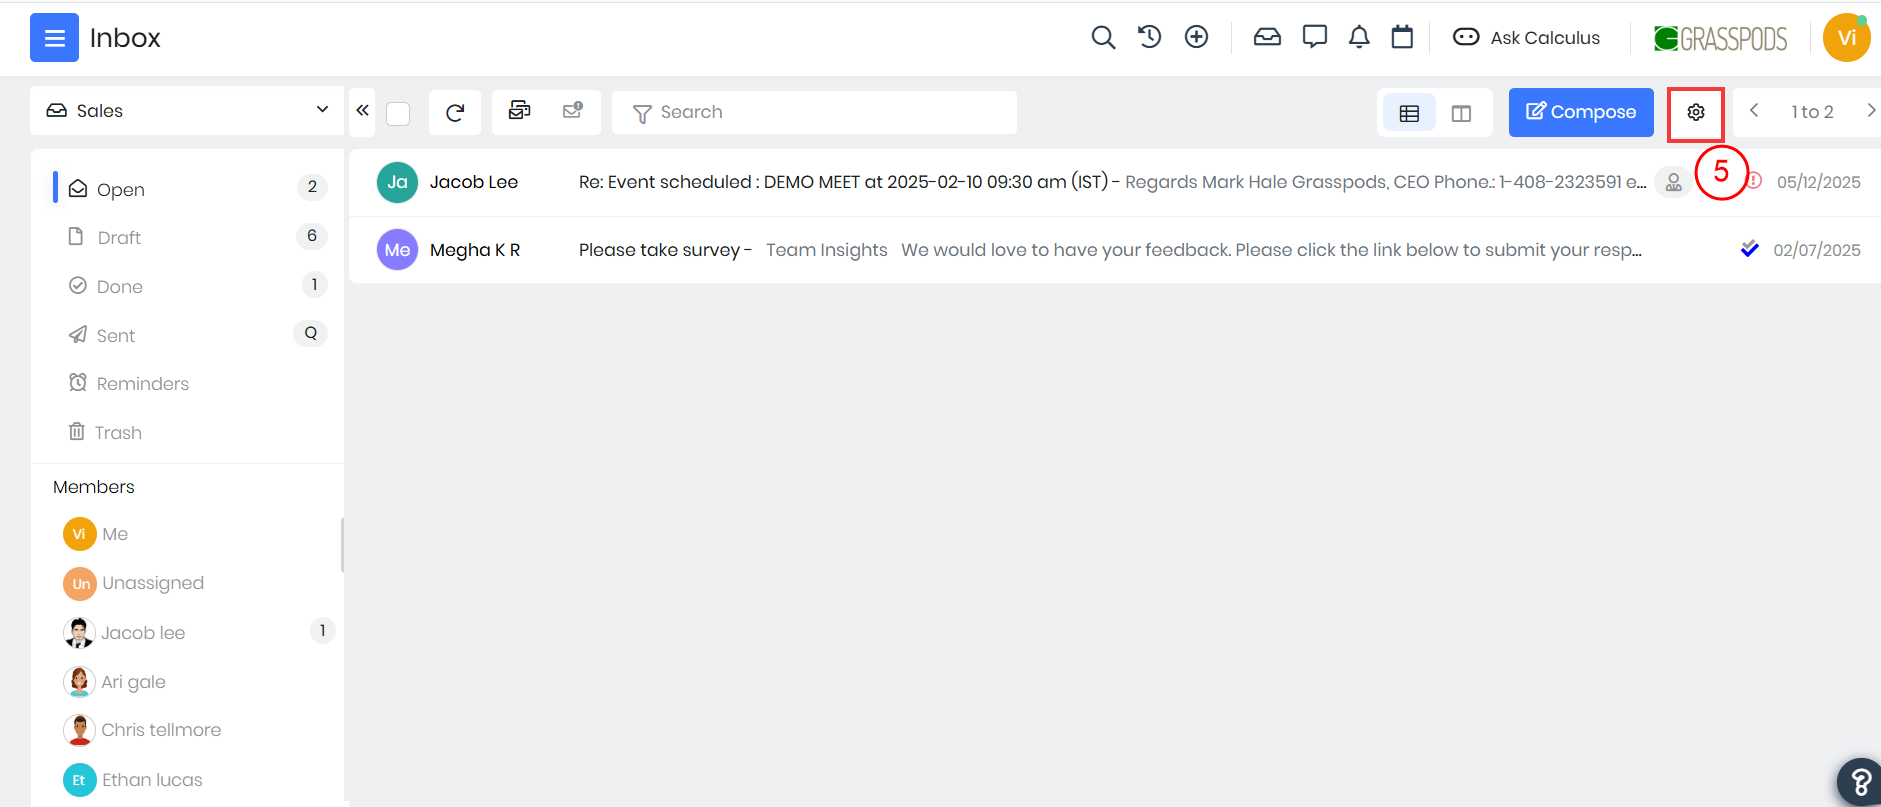
- Select the Configuration icon in the top right corner. The Mailbox Settings window opens.
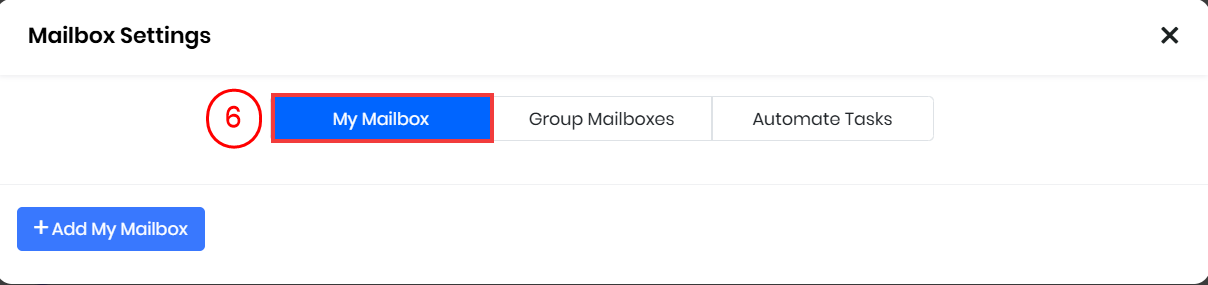
- Select one of these options:
- My Mailbox - To configure your inbox as an individual user and receive emails in your inbox.
- Group Mailboxes - To configure a shared mailbox for your team and receive group emails.
Let us first learn how to set up My Mailbox.
Setting up My Mailbox
You can set up your mailbox in two ways:
- Auto-forwarding (or one-way sync)
- Two-way sync
Setting up My Mailbox with auto-forwarding or one-way sync
Auto-forwarding or one-way sync brings emails from your email client into Vtiger CRM. Emails forwarded from your email client are received by Vtiger CRM through Mailroom.Follow these steps to set up auto-forwarding in Vtiger CRM:
- Log in to the CRM.
- Click the main Menu.
- Go to Sales.
- Select Inbox.
- Select the Configuration icon in the top right corner. A Mailbox Settings Dialog box opens.
- Click My Mailbox.
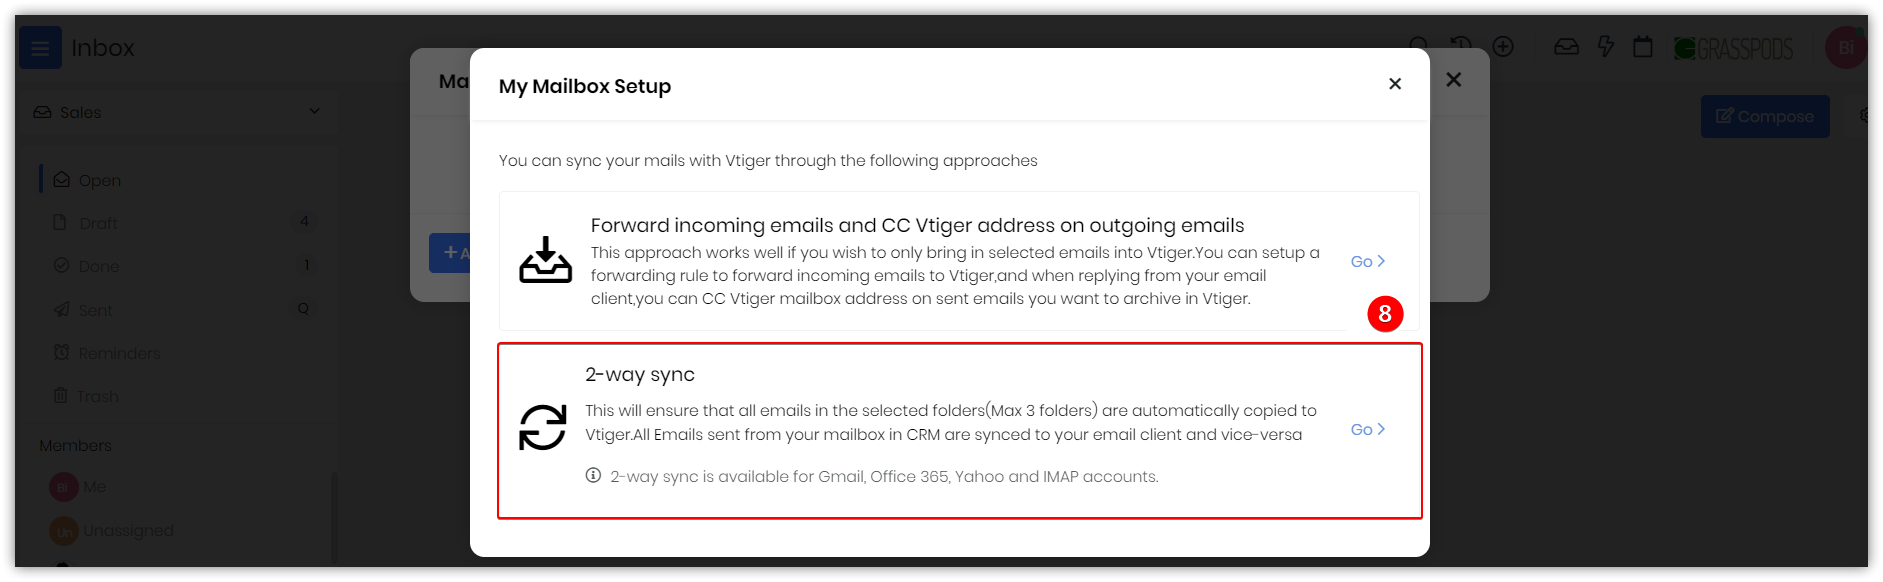
- Click +Add My Mailbox. The My Mailbox Setup window opens.
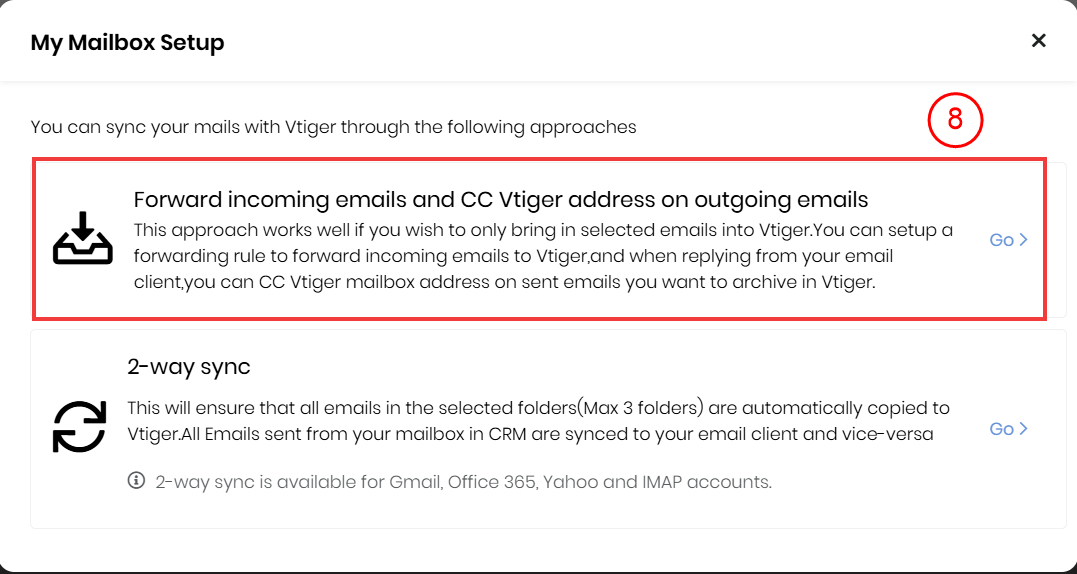
- Choose the Forward incoming emails and CC Vtiger address on the outgoing emails option and click Go >. An Adding My Mailbox dialog box appears.
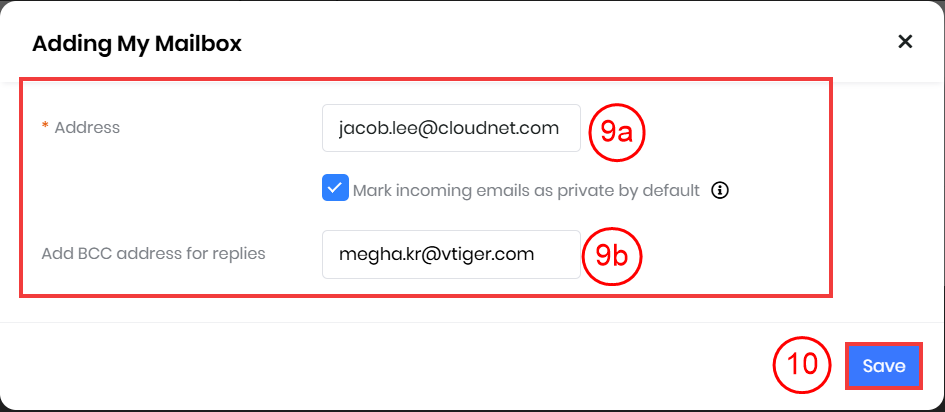
- Select or enter the following details in the Adding My Mailbox dialog box:
- Address: Enter your email address.
- Add BCC address for replies: Enter your BCC email address (optional).
- Click Save.
OAuth for SMTP Outgoing Server
OAuth has been enabled for the SMTP Outgoing server and the Inbox (IMAP sync) configuration of public email service providers like Gmail, Outlook, and Yahoo.
While configuring the SMTP details (username and password), you can use the OAuth login feature for app-specific passwords.
Setting up My Mailbox with Two-Way sync
Two-way sync syncs emails between your email client and Vtiger CRM. By enabling two-way sync, you can bring emails from your email client into your mailbox and emails from your mailbox into your email client. This makes accessing your emails easy for you.Follow these steps to set up two-way sync:
- Log in to the CRM.
- Click the main Menu.
- Go to Sales.
- Select Inbox.
- Select the Configuration icon on the top right corner. A Mailbox Settings Dialog box opens.
- Select My Mailbox.
- Select +Add My Mailbox.
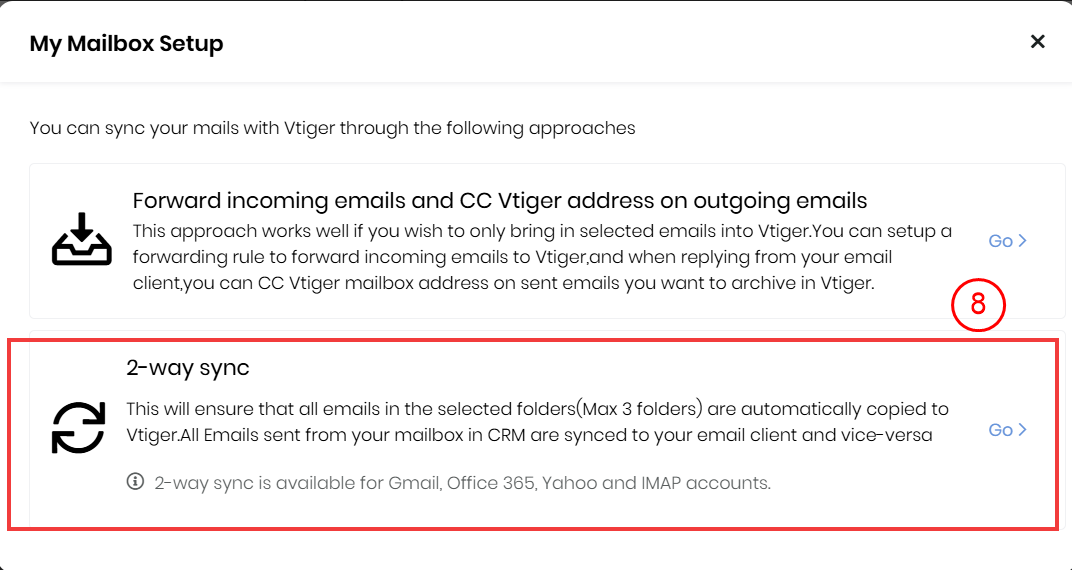
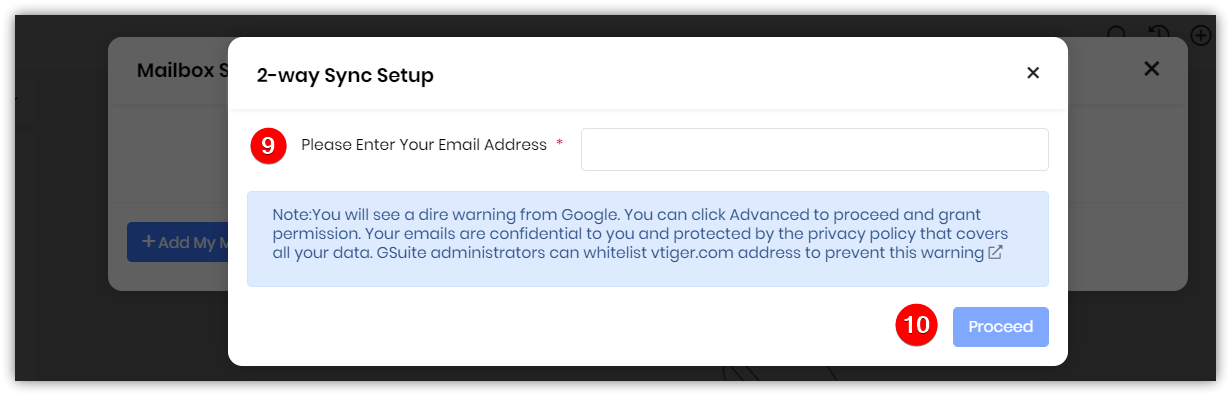
- Choose 2-way sync and click Go>. The 2-way Sync Setup window opens.
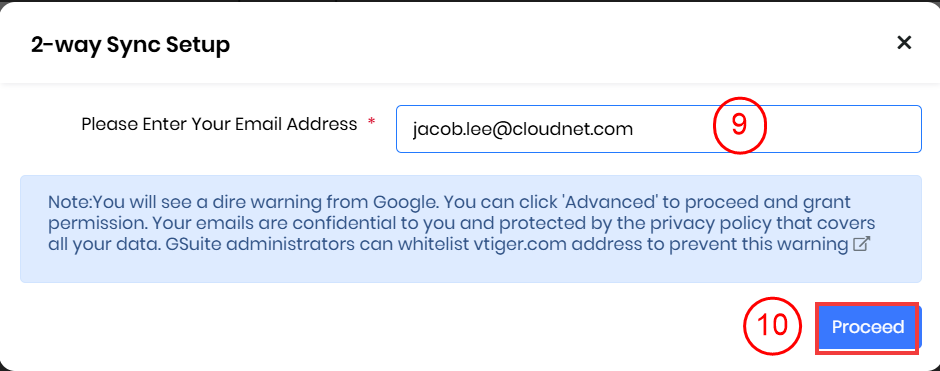
- Enter your email address.
- Click Proceed. The Email Client page opens.
- Click Allow in the window that opens to grant access to the account.
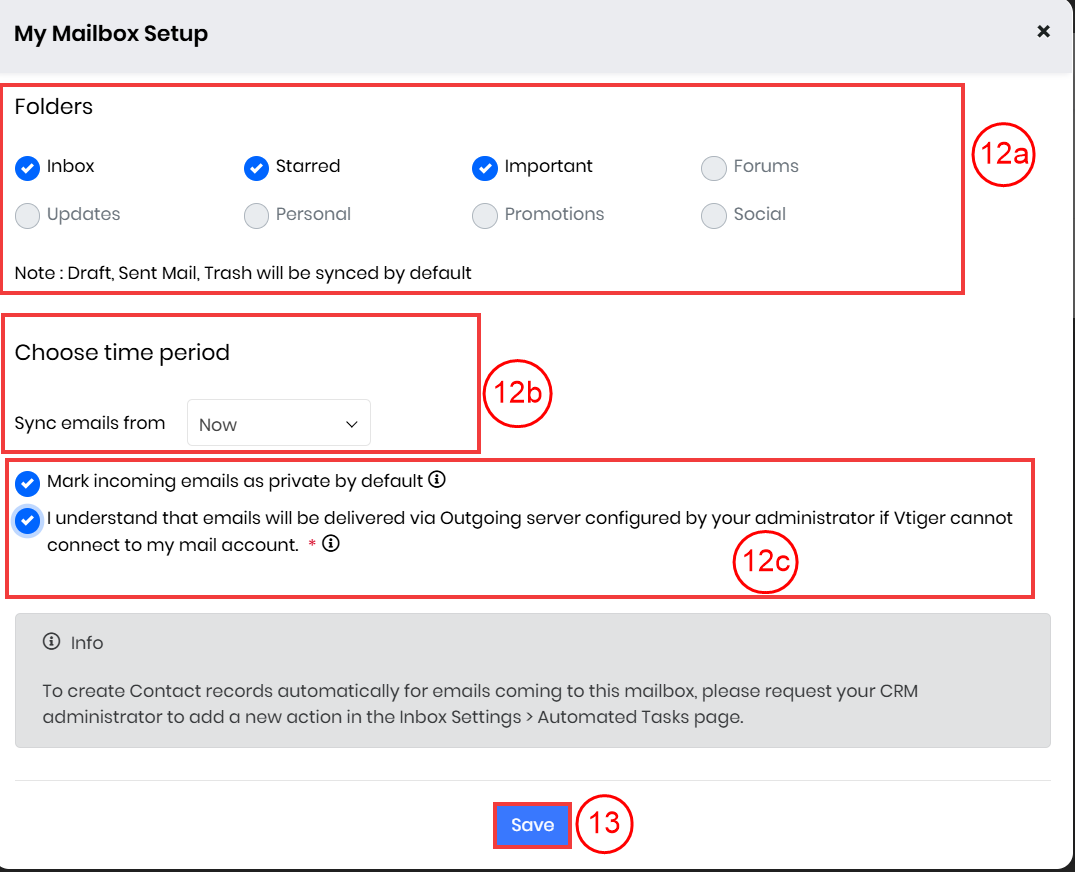
- Choose your inbox settings in My Mailbox Setup.
- Folders: The folders you want to see in your inbox.
- Choose time period: The period from which you want to sync emails.
- Select other mandatory fields. Note: The information you enter in this step depends on the email client.
- Click Save.
Note:
- Two-way sync is available in Vtiger CRM for Gmail, Office 365, Yahoo, and IMAP accounts.
- You can connect your Gmail or Google Workspace account to 2-Way Inbox Sync. Both personal and business accounts are supported, and the configuration steps remain the same for all account types.
- My Mailbox can be deleted if no conversations are linked to other mailboxes or entity modules.
- 2-way sync is unavailable in any Help Desk editions.
Let us learn how to set up a Group Mailbox.
Setting up a Group Mailbox
You can have a default name for your Group Mailbox. You can allow users to set a default From name when creating and editing a Group Mailbox and allow the From name to be overwritten from the mail composer window for ad-hoc emails.
If a default name is not set, the system will display the user's First and Last names. You can set the Default name when adding a New Group Mailbox.
Follow these steps to set up a group mailbox:- Log in to the CRM.
- Click the main Menu.
- Go to Sales.
- Select Inbox. The Inbox dashboard opens.
- Select the Configure icon in the top right corner. The Mailbox Settings window opens and displays My Mailbox and Group Mailbox options.
- Select Group Mailboxes (If you want configure a shared mailbox for your team to send and receive emails for your group).
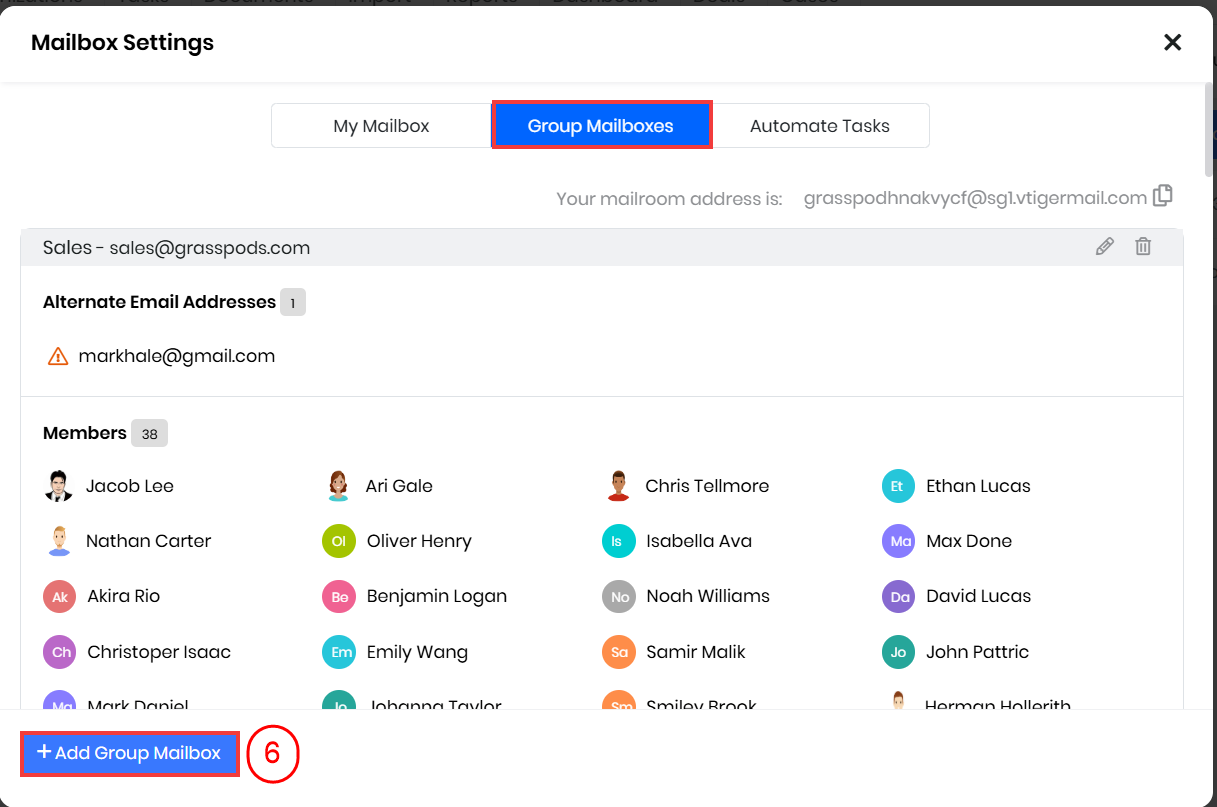
- Click +Add Group Mailbox. The Adding new group Mailbox window opens.
- Enter or select the following details in the Adding New Group Mailbox window:
- Address - The email ID of the group.
- You can enable the Mark incoming emails as private by default checkbox to ensure that private emails to group members are visible only to the receivers.
- Mailbox name - The group name.
- Who should have access to this group mailbox? - The users or teams that have access to the mailbox
- Default Name: Give a default name to your group mailbox.
- Does this account have a password? - Select No, the second option, as Group Inboxes do not have passwords.
- Yes (Individual accounts have passwords).
- No (Group accounts and aliases do not have a password)
- Add BCC address for replies - Add a BCC address.
- Automation Assignment: Enable the checkbox to automatically assign the emails to the group members. You can choose between Round Robin and Least Loaded assignment modes to assign emails automatically.
- Click Save.
- On enabling the Automation Assignment checkbox, all the users added to a Group will be displayed.
- If no users are available during business hours, all selected users are considered.
- If an email is sent to multiple group addresses, the first one in the TO field is prioritized.
Establishing Two-Way Sync Between Vtiger and IMAP Providers
You can sync your emails with Vtiger and IMAP providers and access your conversations easily without losing connectivity.Before you begin the process of configuring (establishing) a two-way sync between Vtiger and IMAP providers, note that not all email service providers are displayed on the screen. Select Other if your email service provider is not displayed.
Follow these steps to set up a two-way sync between Vtiger and IMAP providers:
- Log in to the CRM.
- Click the main Menu.
- Go to Sales.
- Select Inbox.
- Click the Settings icon on the top right corner.

- A Mailbox Settings window appears.
- Click Add My Mailbox.
- Select 2-way sync and click Go >.
- Enter the Email address.
- Click Proceed.
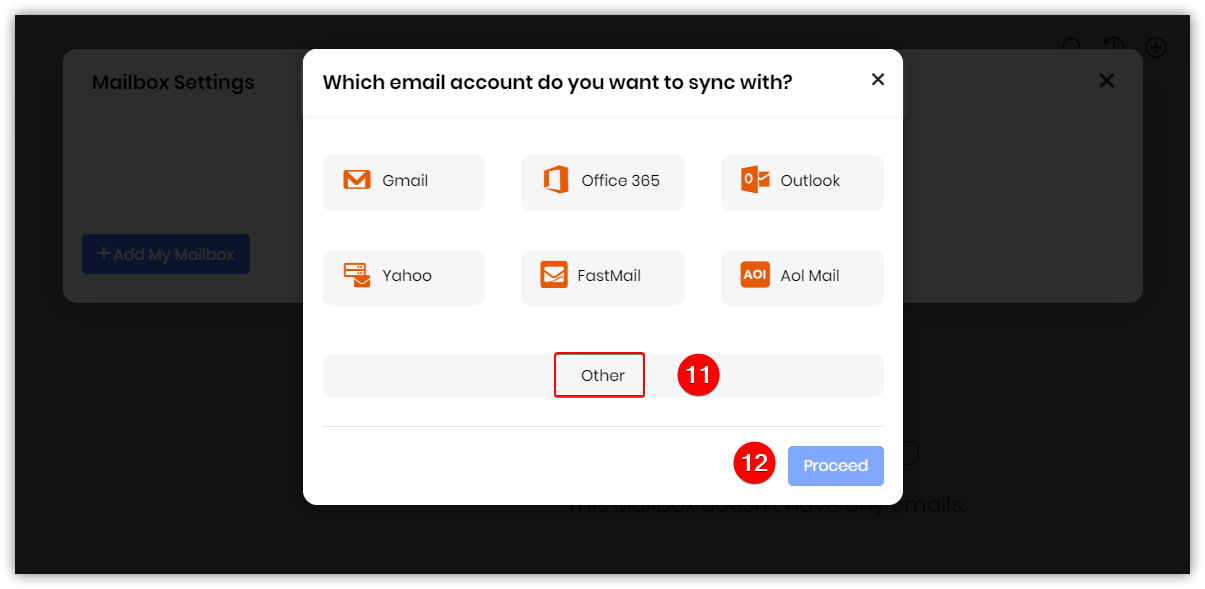
- Click Other.
- Note: The screen displays different email accounts listed with Vtiger CRM. If your email service provider is not listed on the screen, click Other.
- Click Proceed. My Mailbox Setup window opens.
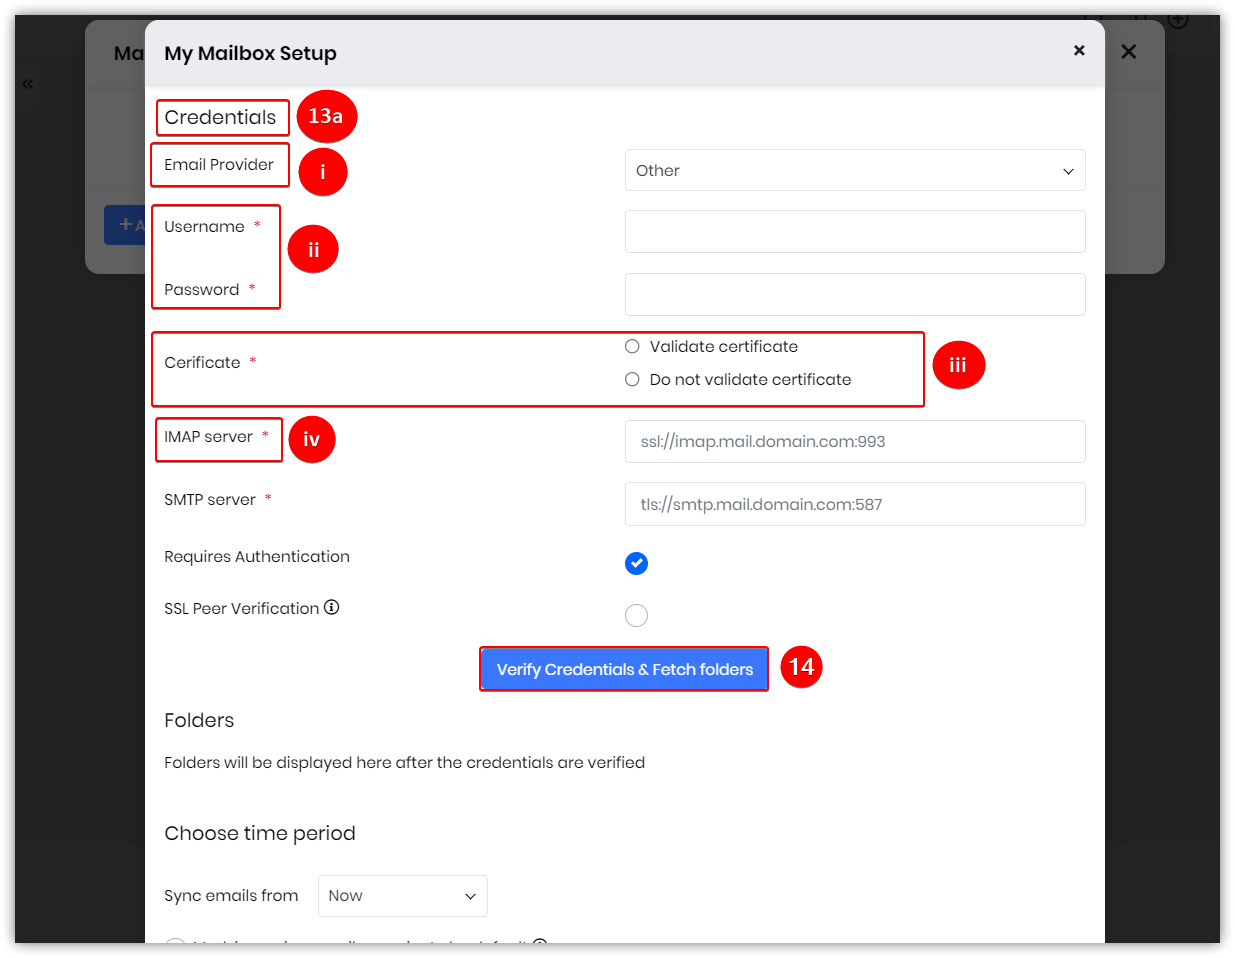
- Enter or select the following information:
- Credentials
- Email Provider: Choose your email provider.
- Username: Enter your username.
- Password: Enter your password.
- Certificate: Choose Validate certificate or Do not validate the certificate.
- Validate certificate: You can choose this option if your email server is with an external service provider. Vtiger CRM will validate your credentials with the email service provider to enable the sync process.
- Do not validate the certificate: You can choose this option if your server is hosted internally, as the email server domain is not accessible to outside resources.
- IMAP Server: Enter IMAP server information.
- SMTP server: Enter SMTP server information.
- Requires Authentication: Select this option if you have chosen Other as the service provider. The CRM will validate your credentials with the service provider.
- SSL Peer Verification.
- Credentials
- Click Verify Credentials & Fetch Folders.
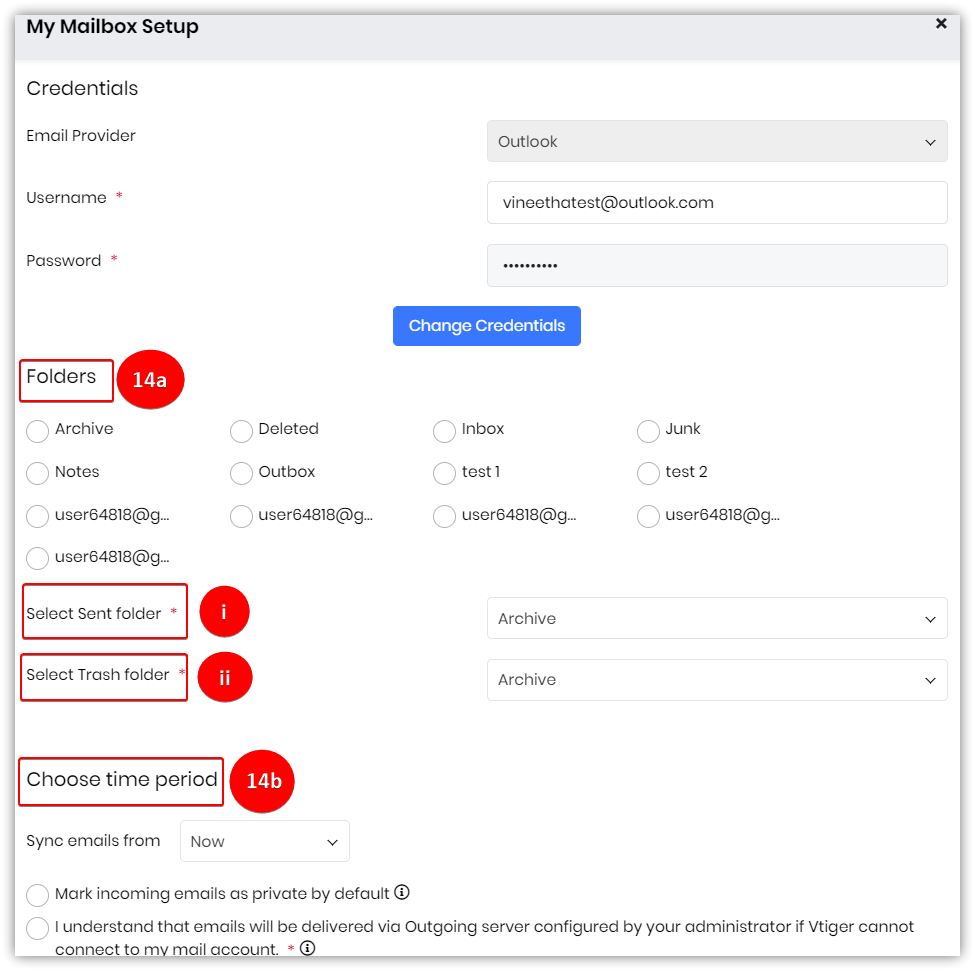
- Enter or select the following information:
- Folders (Folders will be displayed only if your credentials are validated. The folders displayed are the folders available in the Inbox of your email service provider. For example, the folders in your Aruba email account will appear here.)
- Choose the folders that you want to sync with the Drafts, Sent, and Trash folders.
- Select the Sent folder.
- Select the Trash folder.
- Note: By default, Vtiger will provide 5 folders in your Inbox. You can select three more.
- Choose a time period
- Sync emails from - Select from the following options:
- Now - to receive emails from the time and date you set up, the Inbox.
- 1 month - to receive emails from the past month (from the date of Inbox setup).
- 3 months - to receive emails from the past 3 months (from the date of Inbox setup).
- 6 months - to receive emails from the past 6 months (from the date of Inbox setup).
- Mark incoming emails as private: Selecting this option will ensure only the designated Inbox user will be able to see Activity section updates. Else other users will also be able to see the updates to the Activity section.
- Note: You need to provide consent for emails being delivered by the Outgoing Server configured by your admin if Vtiger cannot connect to your email account.
- Sync emails from - Select from the following options:
- Folders (Folders will be displayed only if your credentials are validated. The folders displayed are the folders available in the Inbox of your email service provider. For example, the folders in your Aruba email account will appear here.)
Now that you have learned about the different functions of the Inbox, you can start receiving your emails. You can also send emails to others from your Inbox using the Compose button.
Automating Mailroom Tasks (Mailroom Automation)
You can automate certain Mailroom tasks, such as the creation of CRM records, using emails coming into your mailbox. This is possible only when auto-forwarding is set up in your email client.
Vtiger CRM uses email information to create deals, leads, contacts, organizations, cases, and other records when you set up auto-forwarding in your email client and mailroom rules. You can access the mailroom by going to Settings > Automation > Mailroom.
Setting up mailroom rules from the Inbox
Follow these steps to set up mailroom rules:- Log in to the CRM.
- Click the main Menu.
- Go to Essentials.
- Select Inbox.
- Click the Settings icon in the top right corner.
- Click the Automate Tasks tab in the Mailbox Settings window.
- Click:
- Add New Action to add a new mailroom rule.
- The Edit icon to edit a mailroom rule.
Editing or Adding Mailboxes
You can edit your mailbox settings by following these steps:
- Log in to the CRM.
- Click the mainMenu.
- Go to Essentials.
- Select Inbox.
- Click Configure in the top-right corner of the screen.
- Click on Edit.
- Edit the required details.
- Click Save.
You also have the option to add a mailbox under Mailbox Settings.
Deleting Mailboxes
Deleting My Mailbox Address
Follow these steps to delete My Mailbox:- Log in to the CRM.
- Click the main Menu.
- Go to Essentials.
- Select Inbox.
- Click the Settings icon in the top right corner.
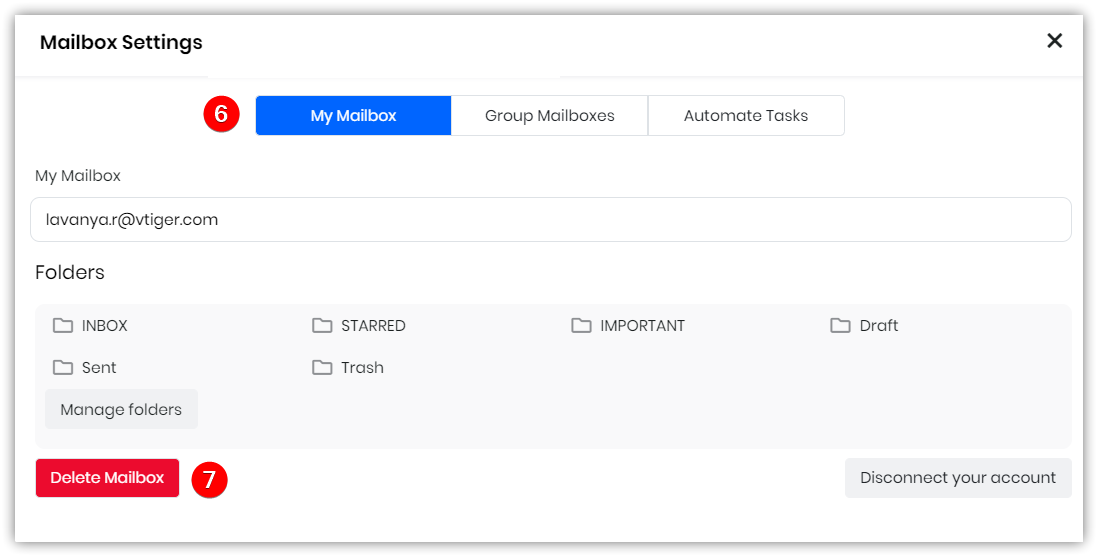
- Click the My Mailbox tab in the Mailbox Settings window.
- Select Delete Mailbox.
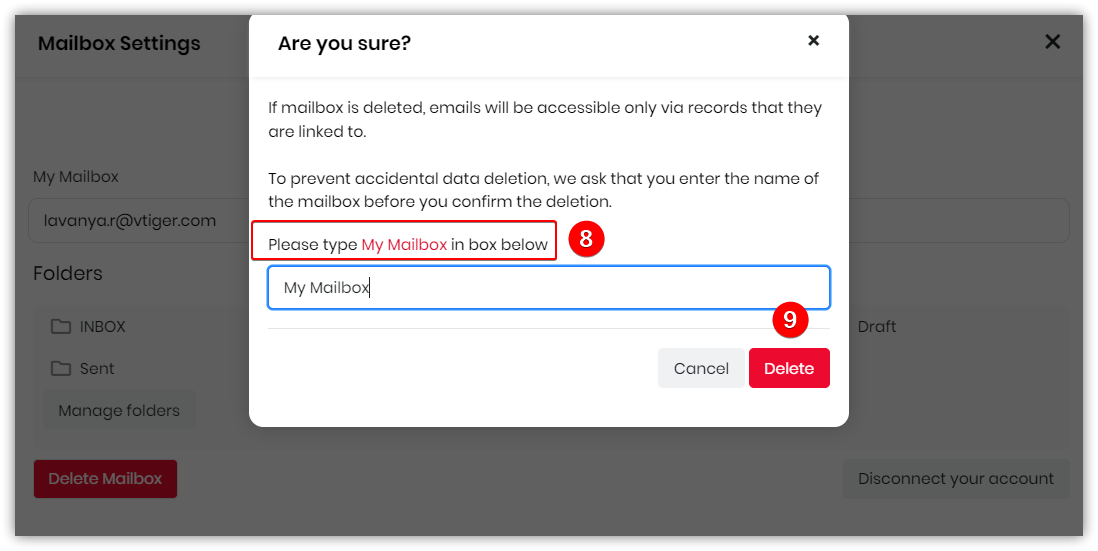
- Type ‘My Mailbox’ in the textbox provided.
- Click Delete.
Deleting a Group Mailbox Address
Follow these steps to delete a group mailbox:- Log in to the CRM.
- Click the main Menu.
- Go to Essentials.
- Select Inbox.
- Click the Settings icon in the top right corner.
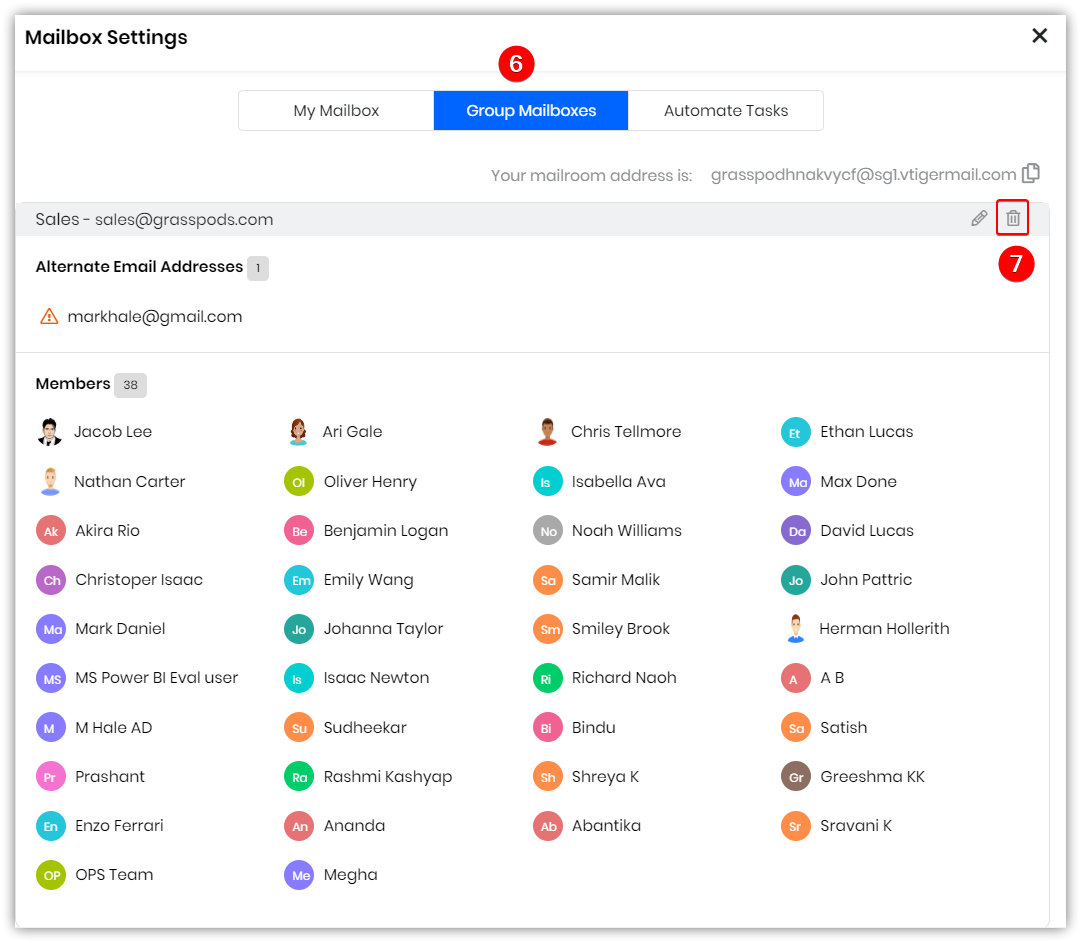
- Click the Group Mailboxes tab in the Mailbox Settings window.
- Click the Delete icon located on the right. Note: To prevent accidental deletion, transfer emails to another group mailbox address.
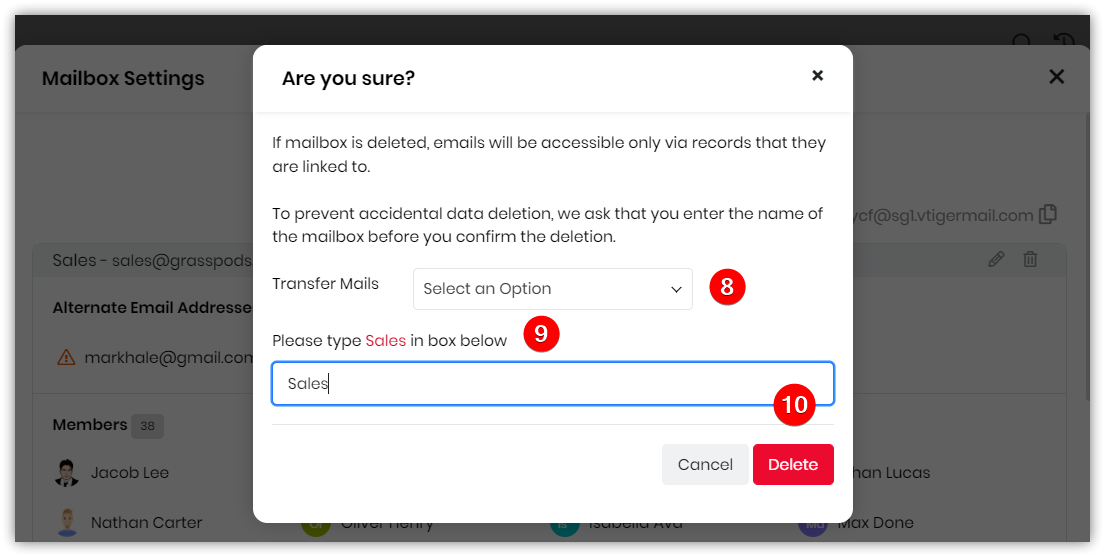
- Select an email address from the Transfer Mails drop-down to transfer your emails.
- Type the mailbox name in the textbox to confirm the deletion.
- Click Delete.
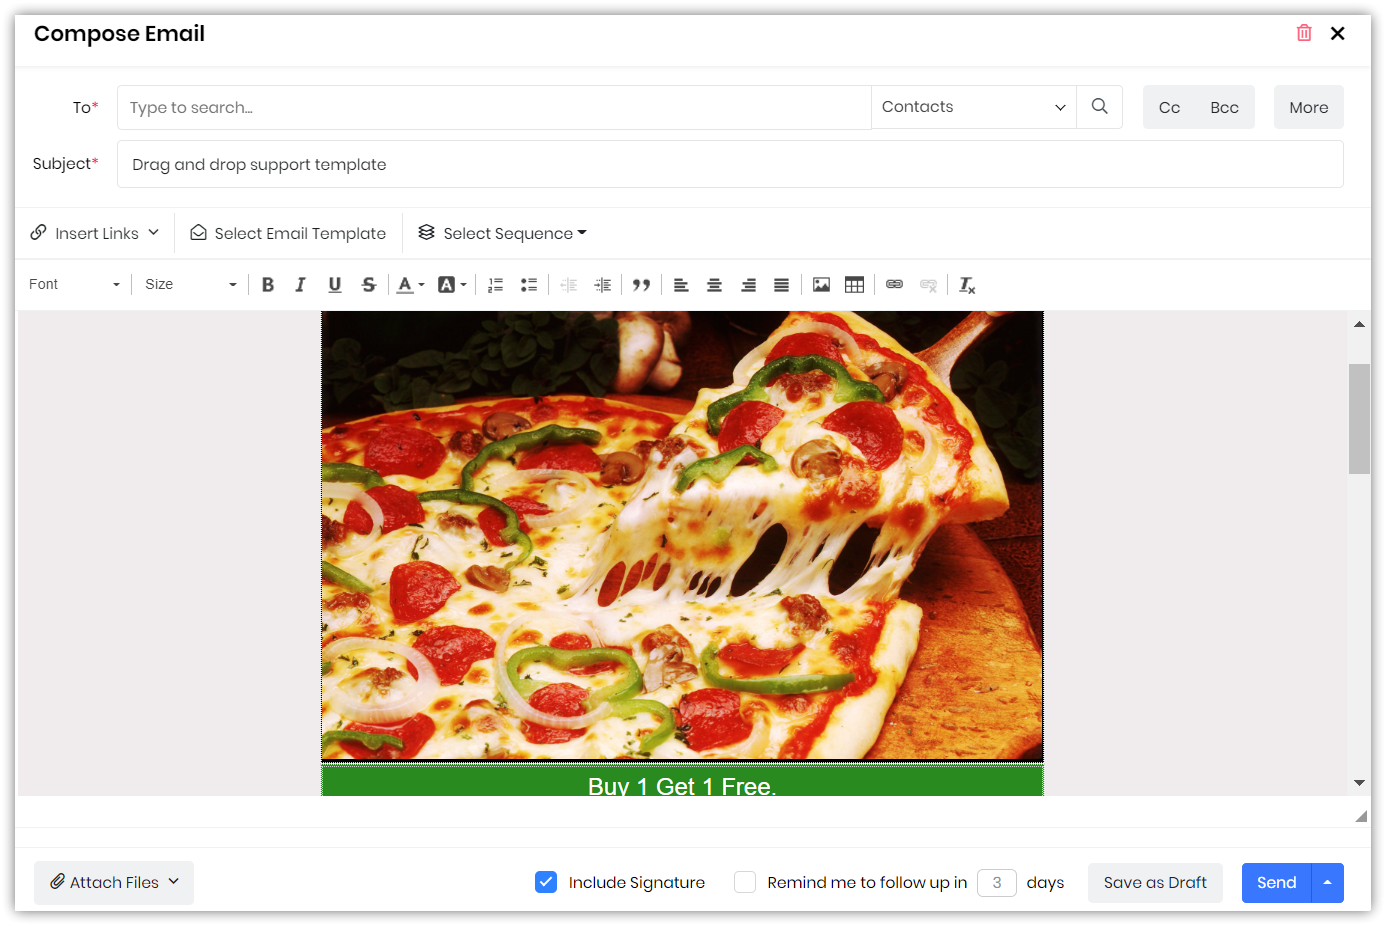
Composing an Email
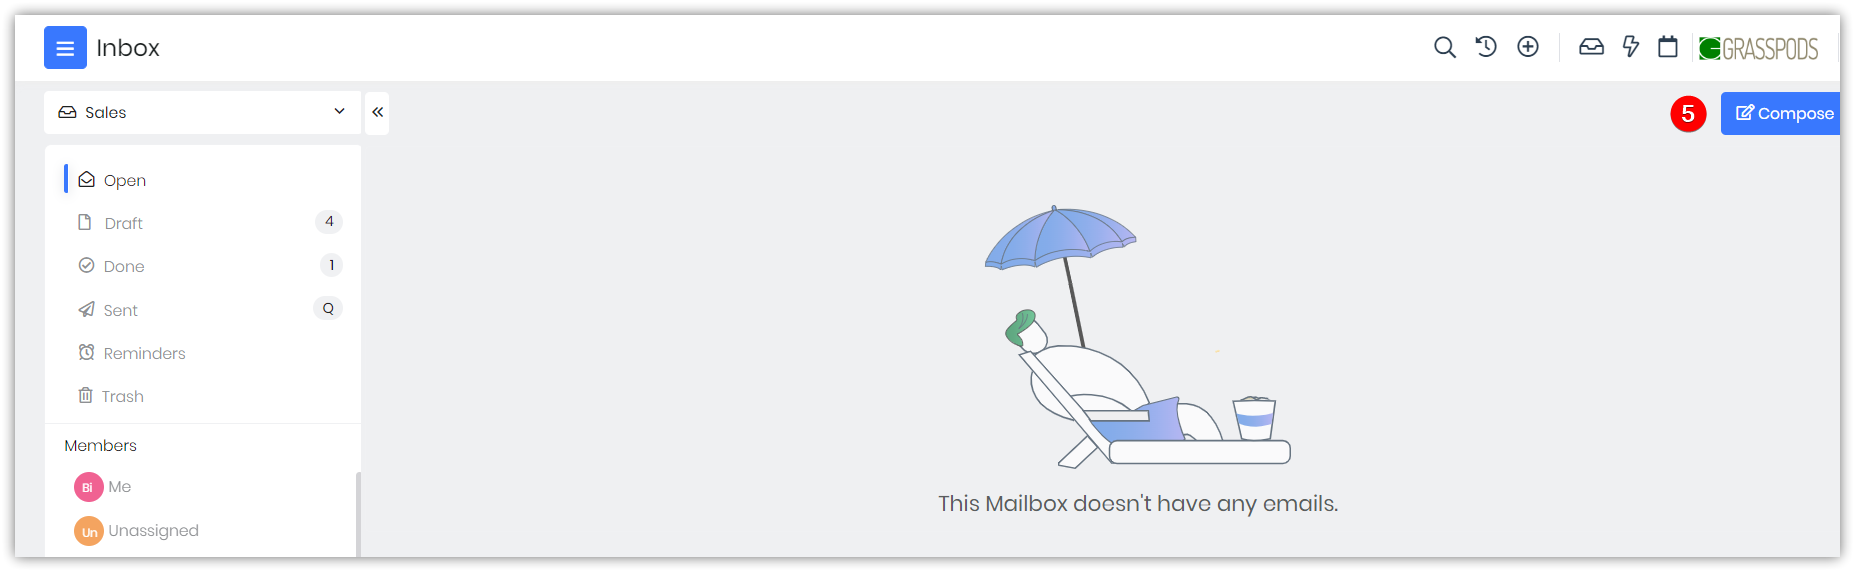
To compose an email, click the Compose button located at the top of the mailbox.
The Compose Email window has the following actionable items:
Step 1: Selecting modules for the To email address
You can manually enter the recipient’s email ID for the To address or use the drop-down to select a CRM record to fetch the email ID.
Follow these steps to insert a To address using the drop-down:
- Log in to the CRM
- Click the main Menu.
- Go to Sales.
- Select Inbox.
- Click the Compose button.
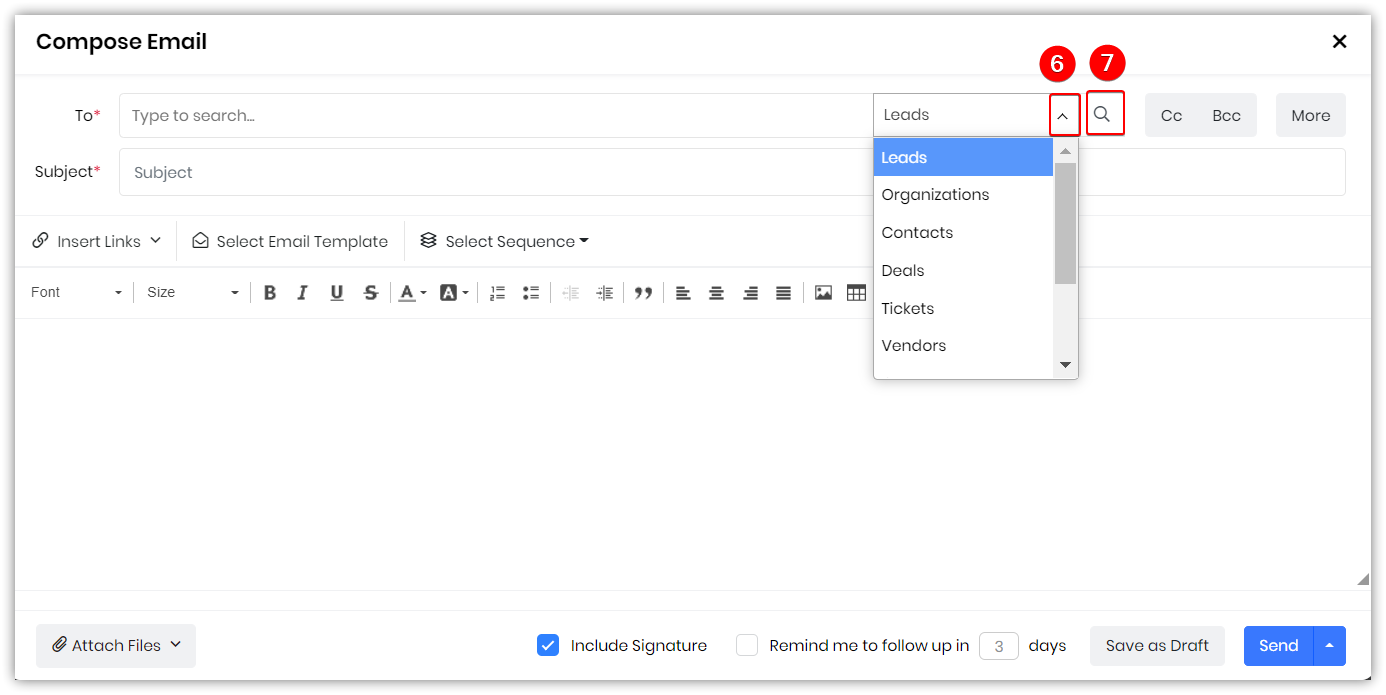
- Click the drop-down located beside the To address in the Compose Email window.
- Click the Magnifier icon to view records in the selected module.
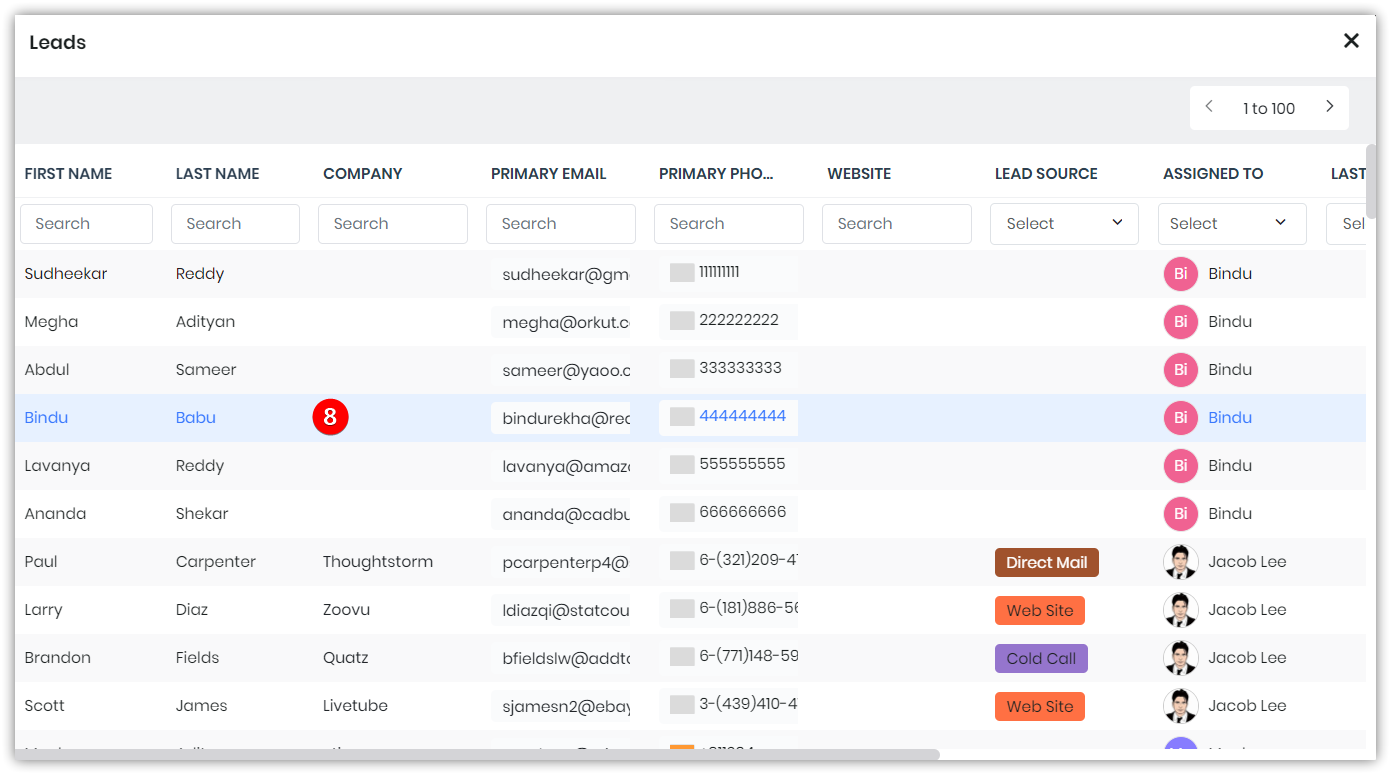
- Click on a record to select it as the To address.
Step 2: Setting up From and Reply To emails
Follow these steps to add From and Reply To addresses:
- Log in to the CRM.
- Click the main Menu.
- Go to Essentials.
- Select Inbox.
- Click the Compose button.
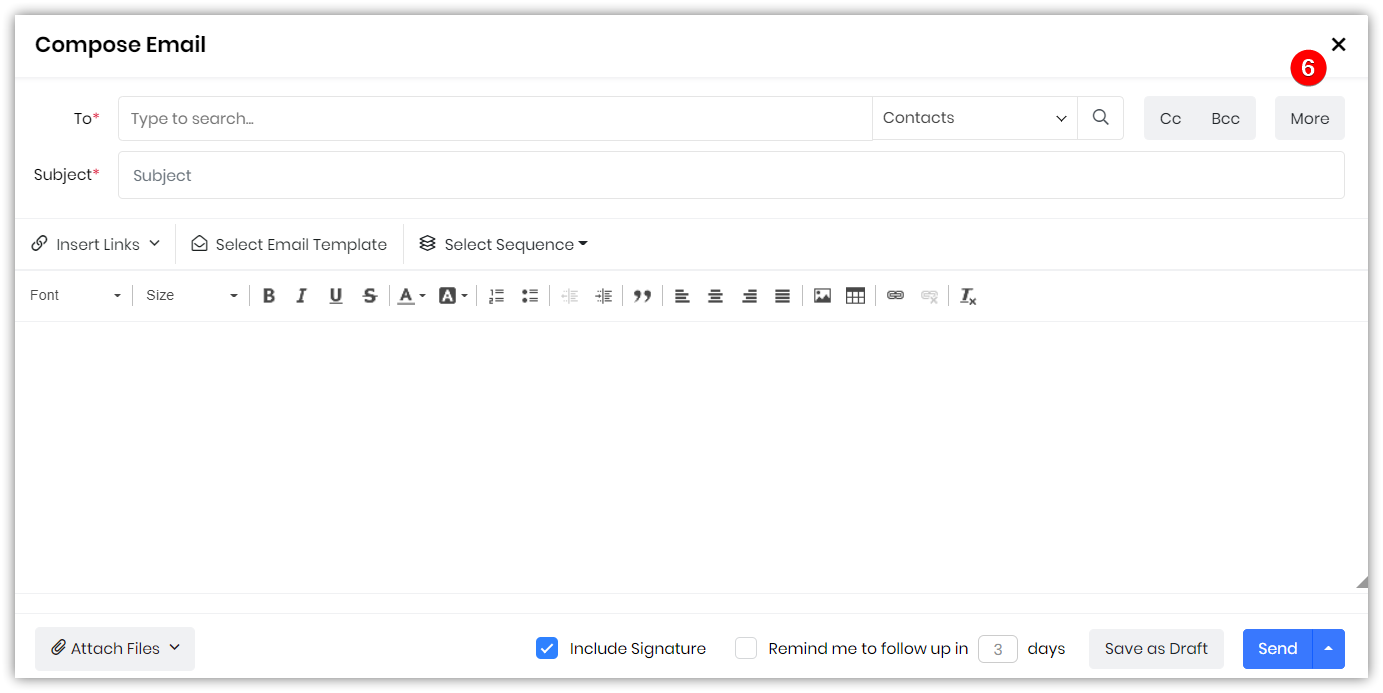
- Click the More button on the right side.
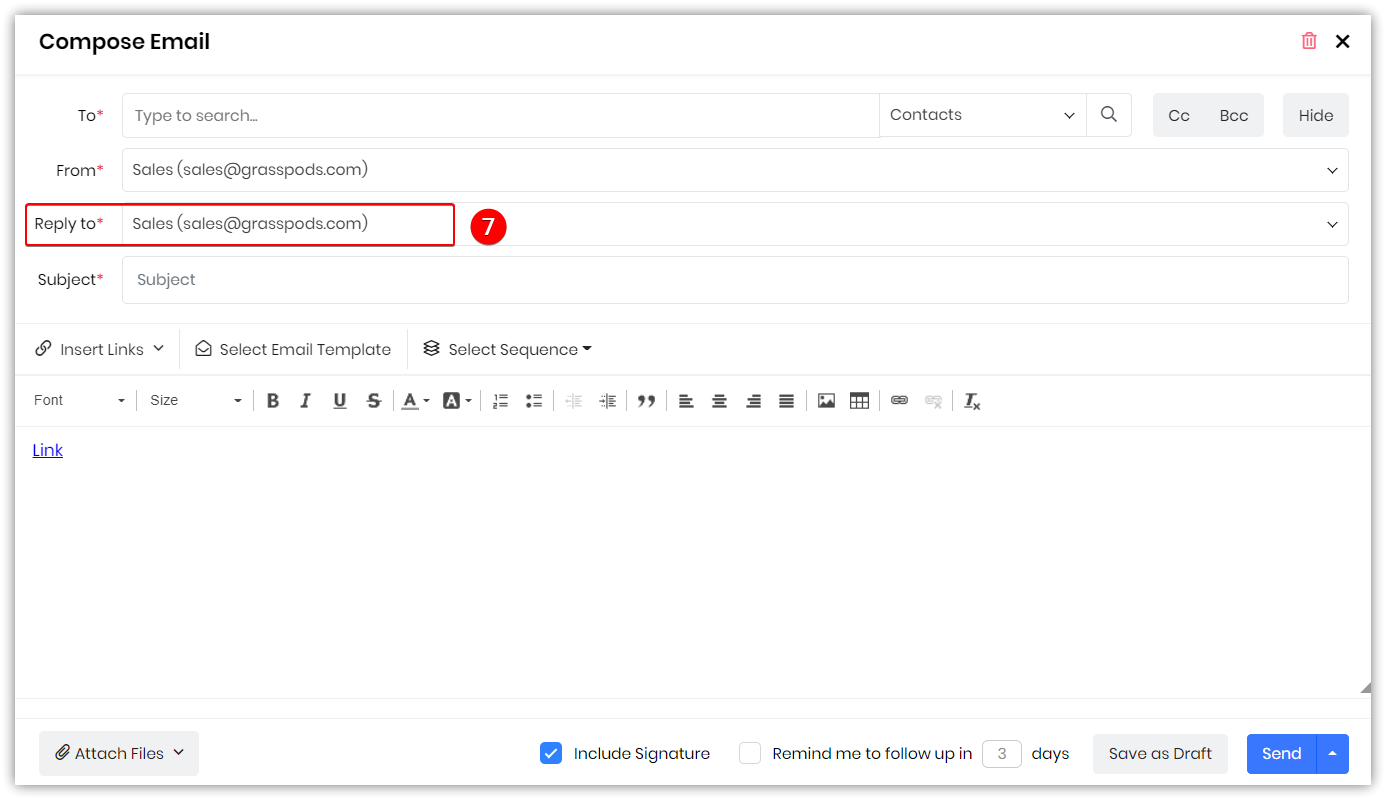
- Click the Reply to drop-down to choose a Reply To email address.
Step 3: Inserting Links
You can insert links to appointment pages, surveys, and documents in your email by clicking the Insert Link drop-down in the Compose Email window.
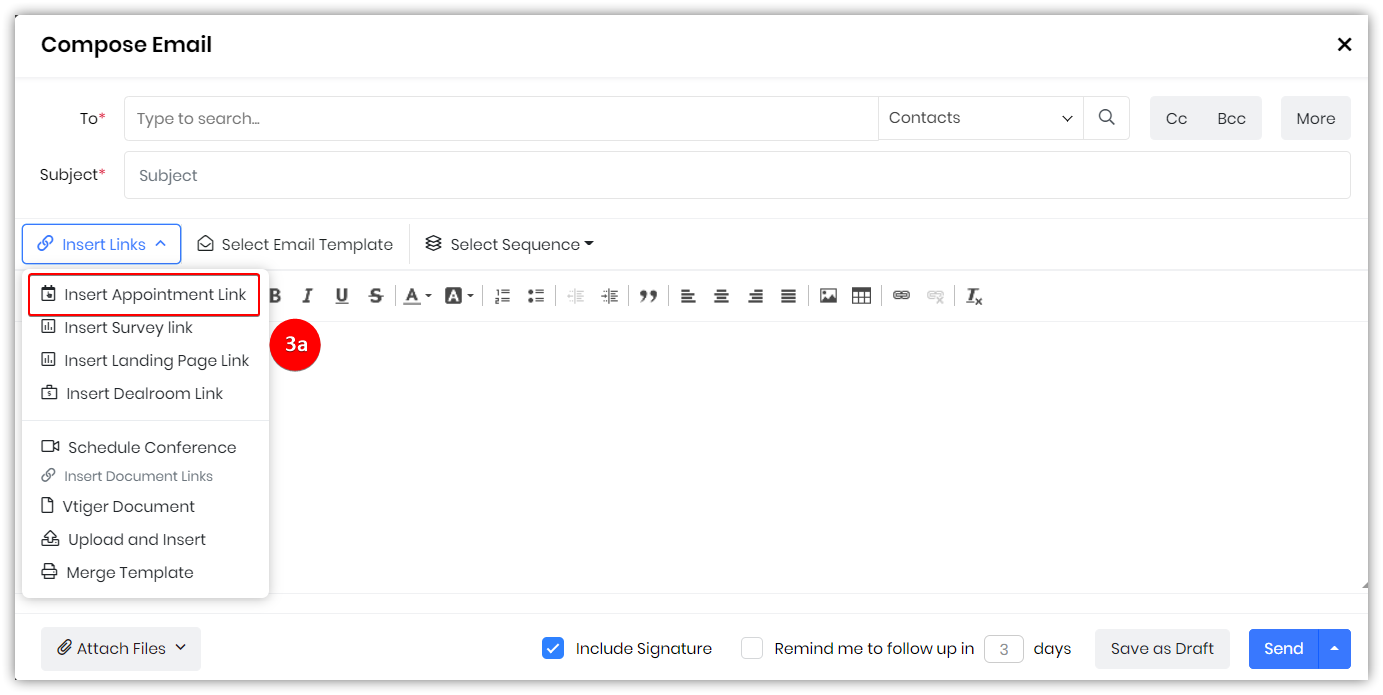
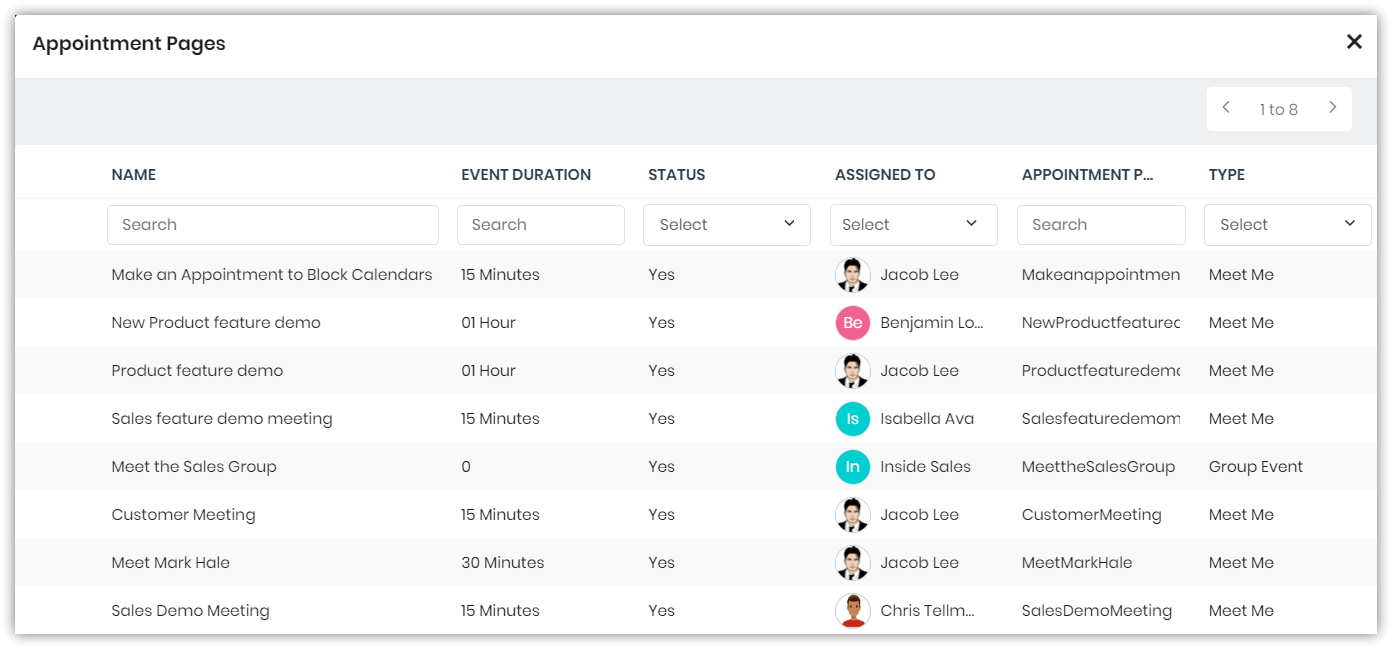
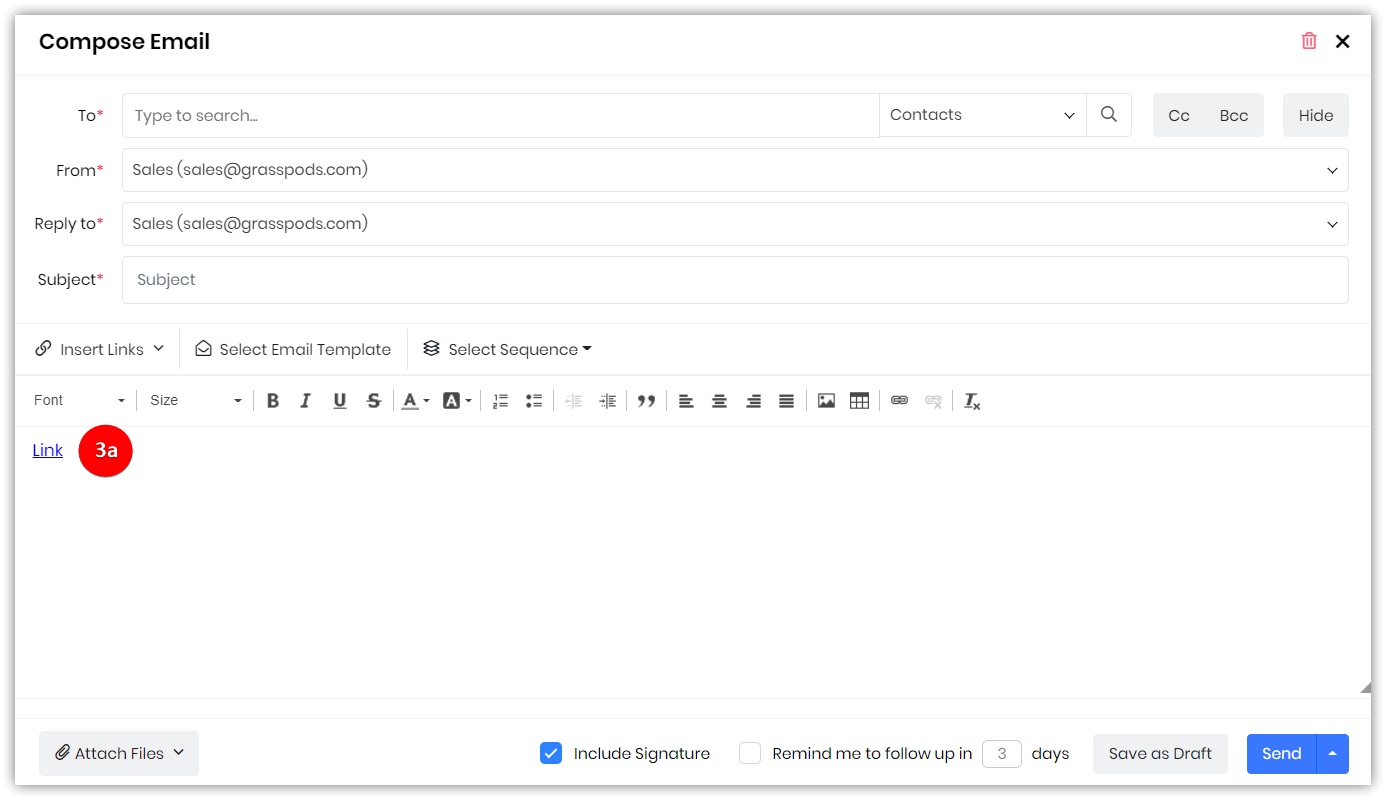
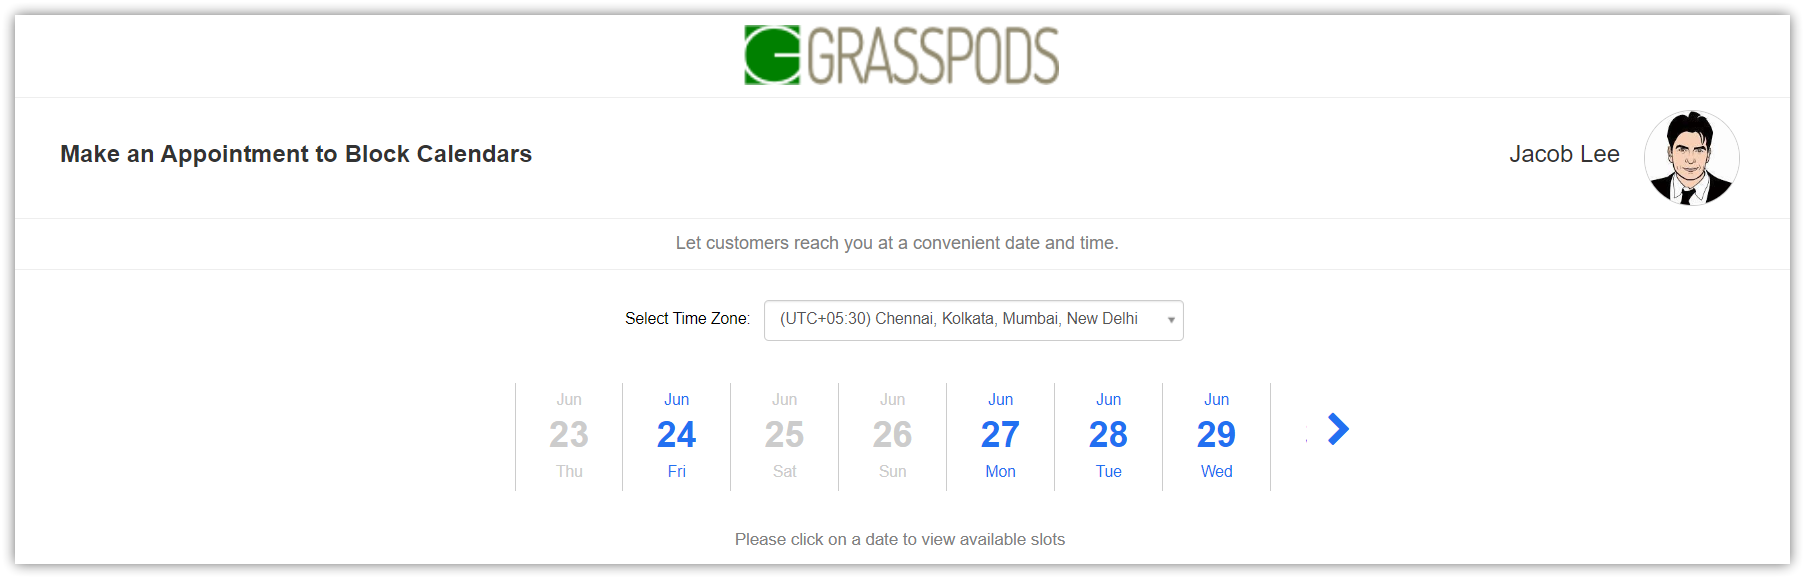
- Insert Appointment Link
- Log in to your CRM account.
- Click the Main Menu.
- Go to Sales.
- Select Appointment Pages.
- Insert Survey Link
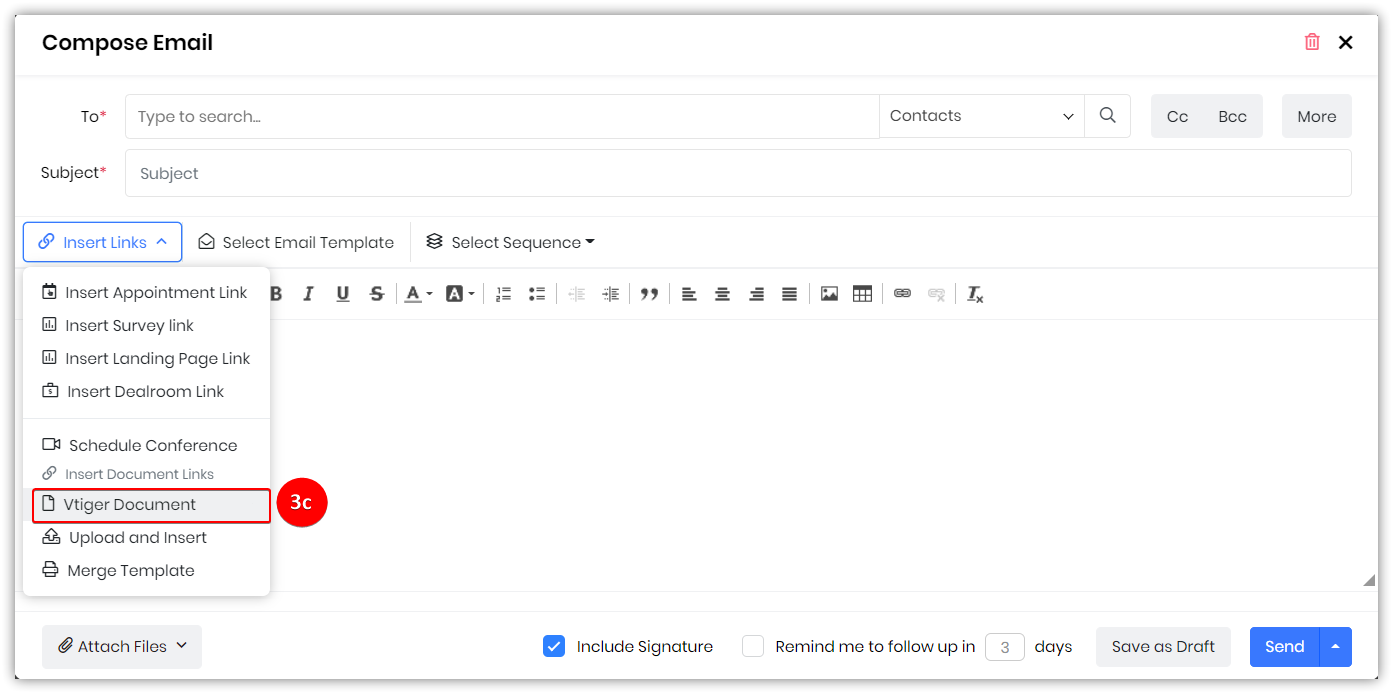
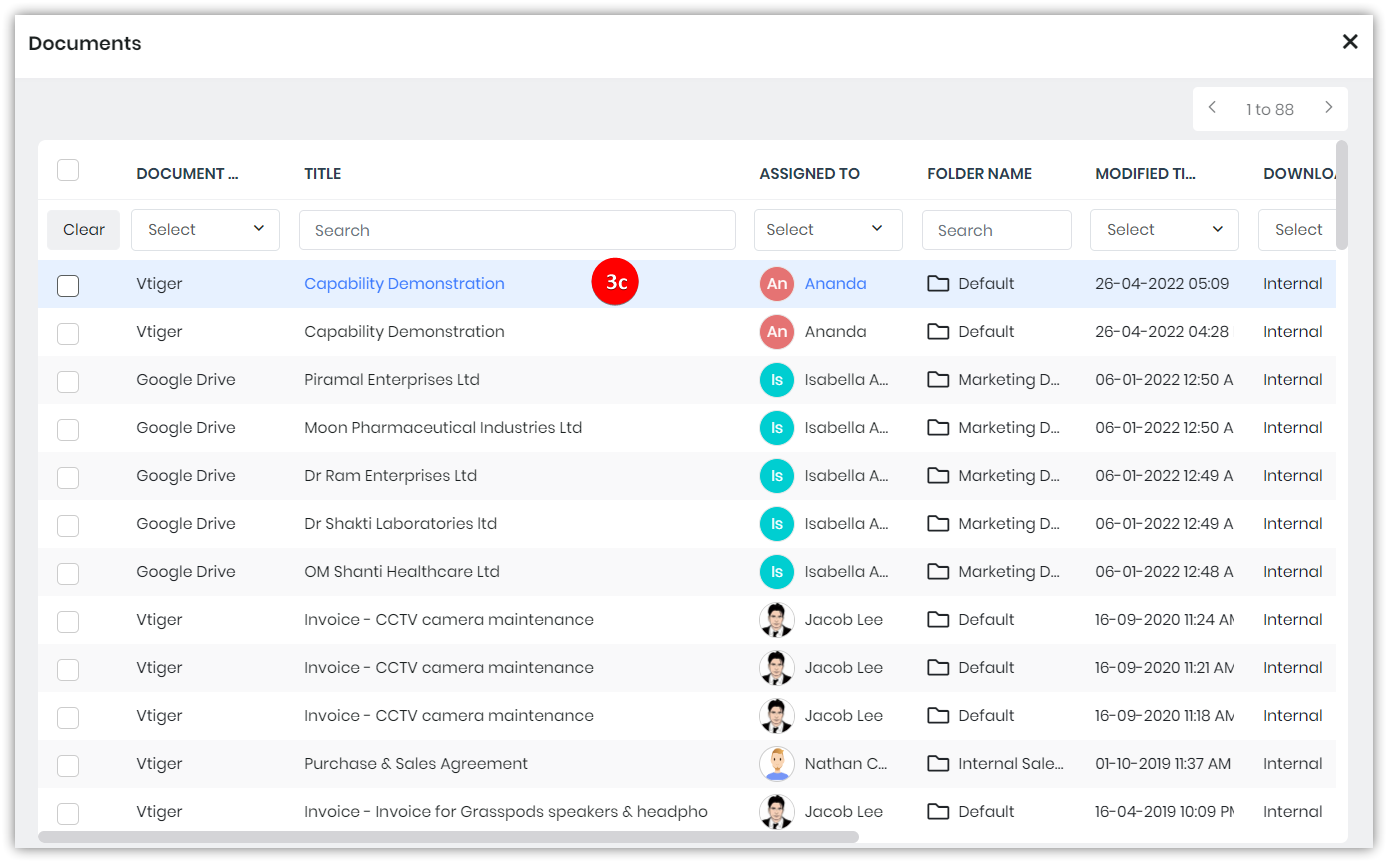
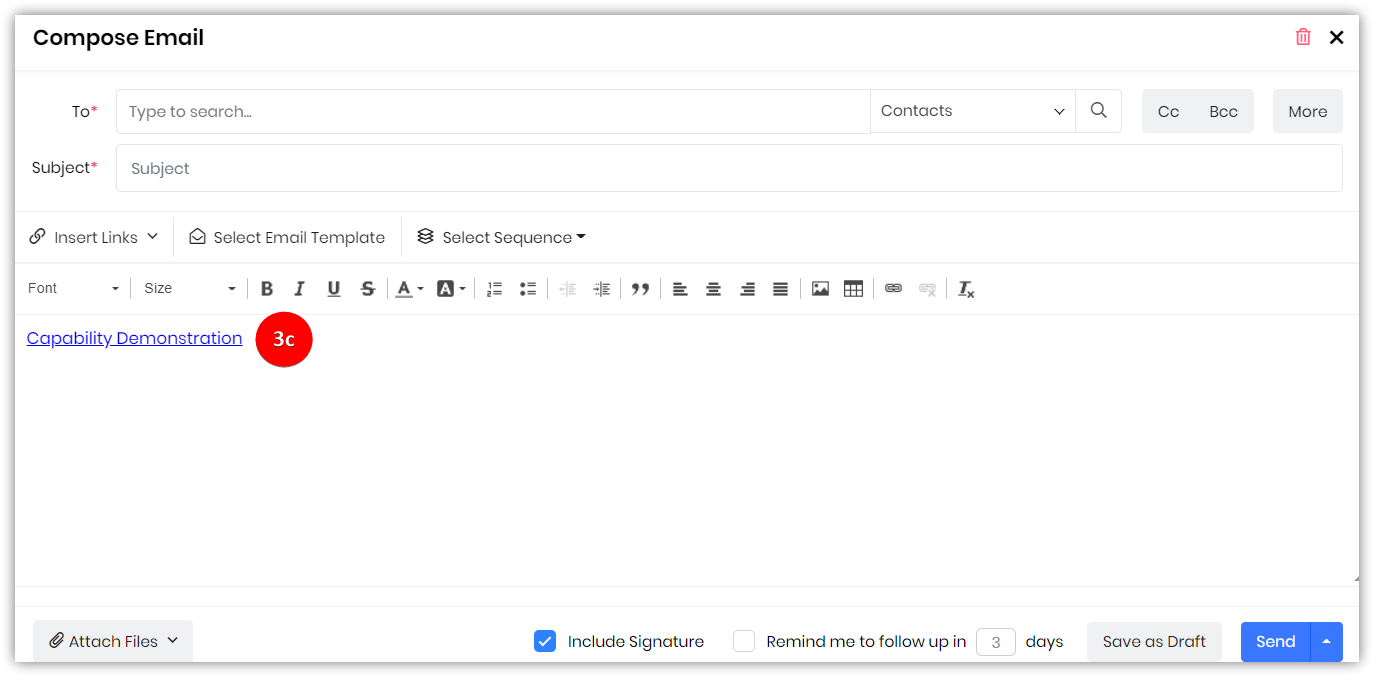
- Vtiger Document
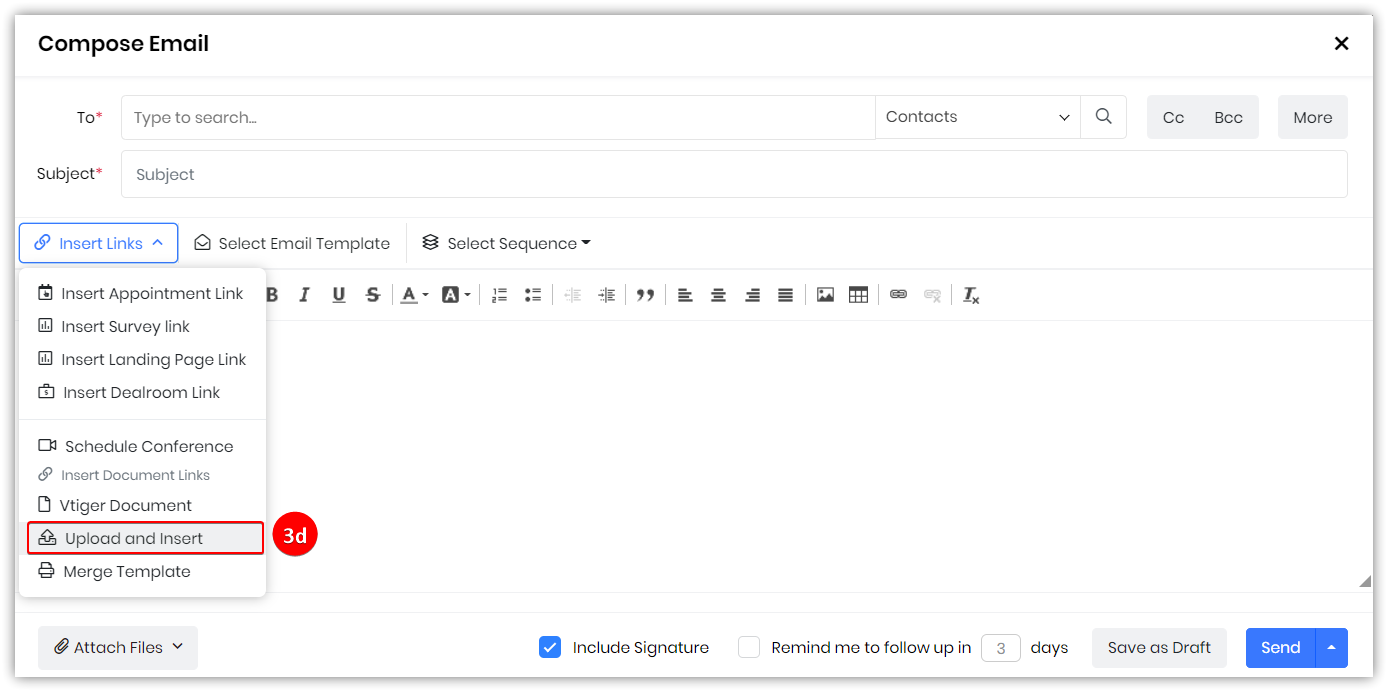
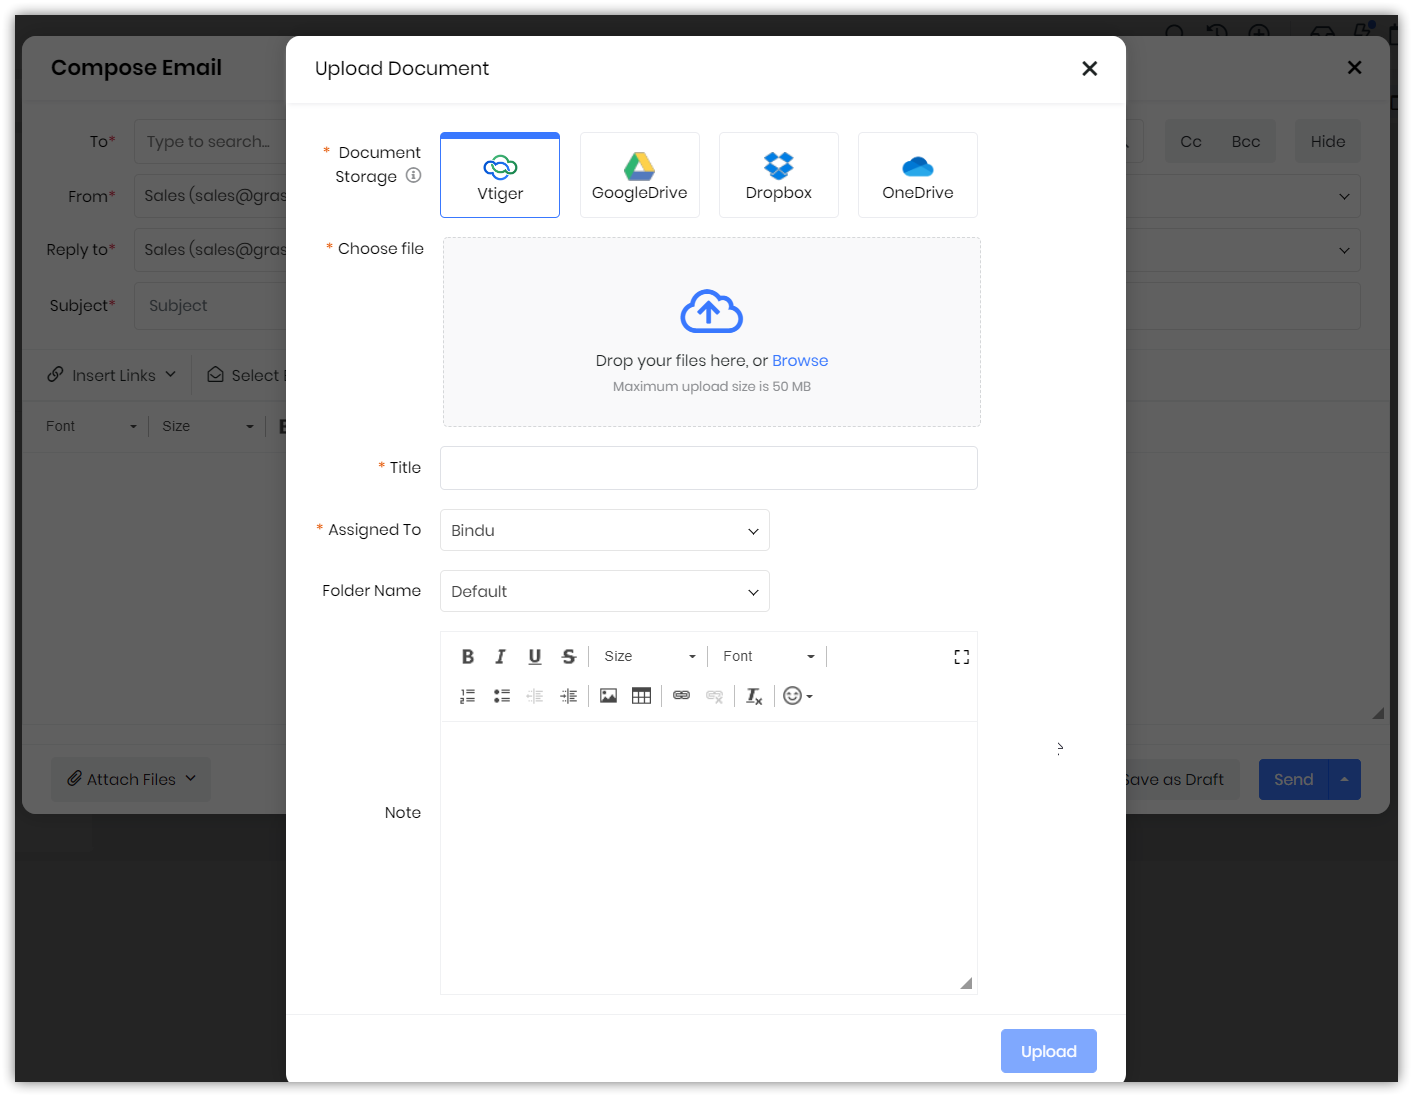
- Upload and Insert
To learn more about Document Viewer in Vtiger CRM, click here.
- Merge Template
- Log in to the CRM.
- Click the main Menu.
- Go to Essentials.
- Select Inbox.
- Click the Compose button.
- Click Insert Link in the Compose Email window.
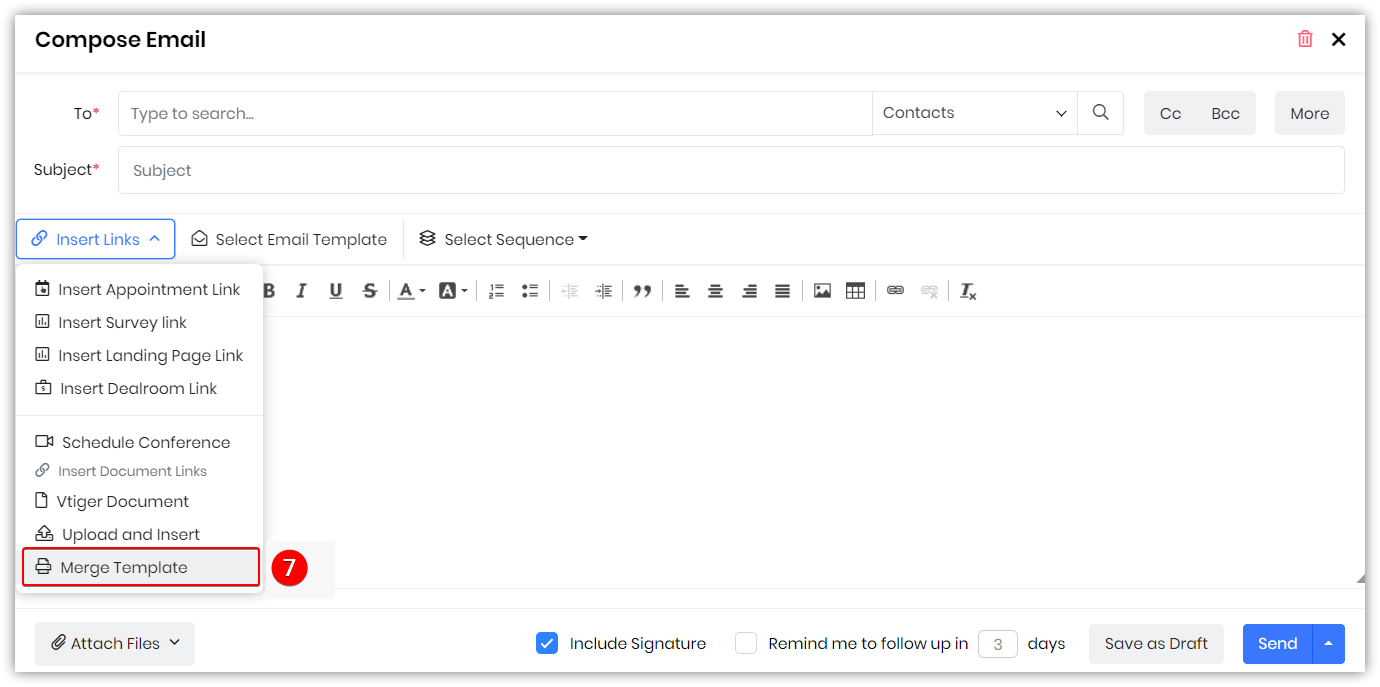
- Select Merge Template.
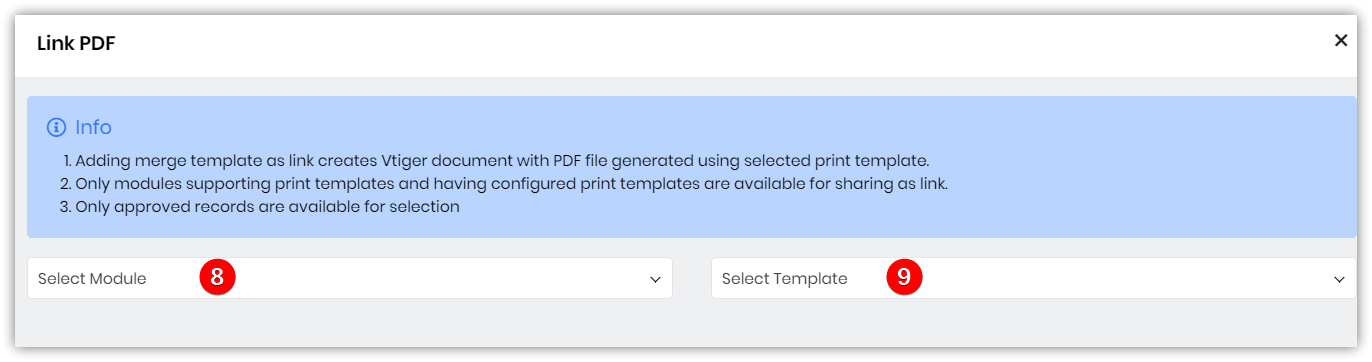
- Choose a module from the Select Module drop-down.
- Choose a template from the Select Template drop-down.
Step 4: Selecting email templates
Vtiger CRM provides a default set of pre-built email templates that save you time composing emails. You can create an email template by going to the main Menu > Tools > Email Templates.
Follow these steps to add an email template to the email body:
- Log in to the CRM.
- Click the main Menu.
- Go to Essentials.
- Select Inbox.
- Click the Compose button.
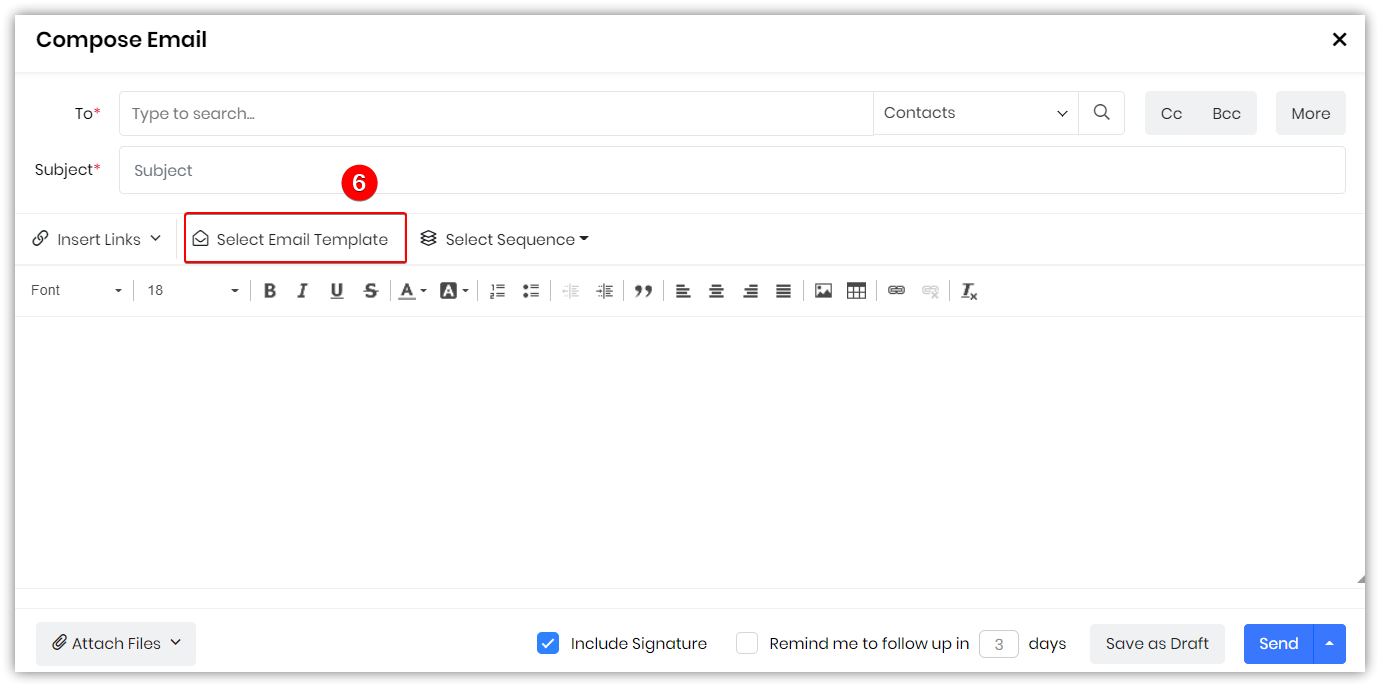
- Click Select Email Template.
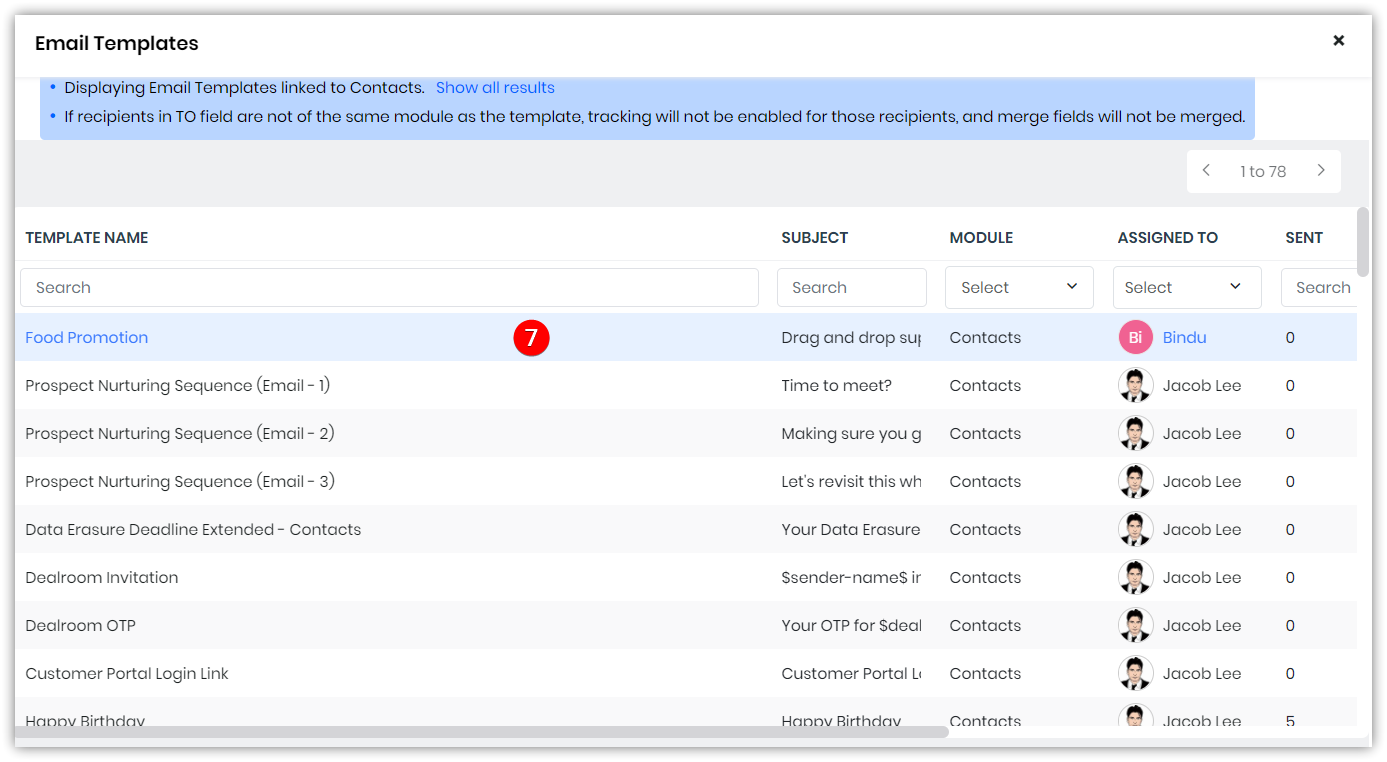
- Select the parameter you want to base your search on; for example, module name, template subject, and template description.
- Select an email template.
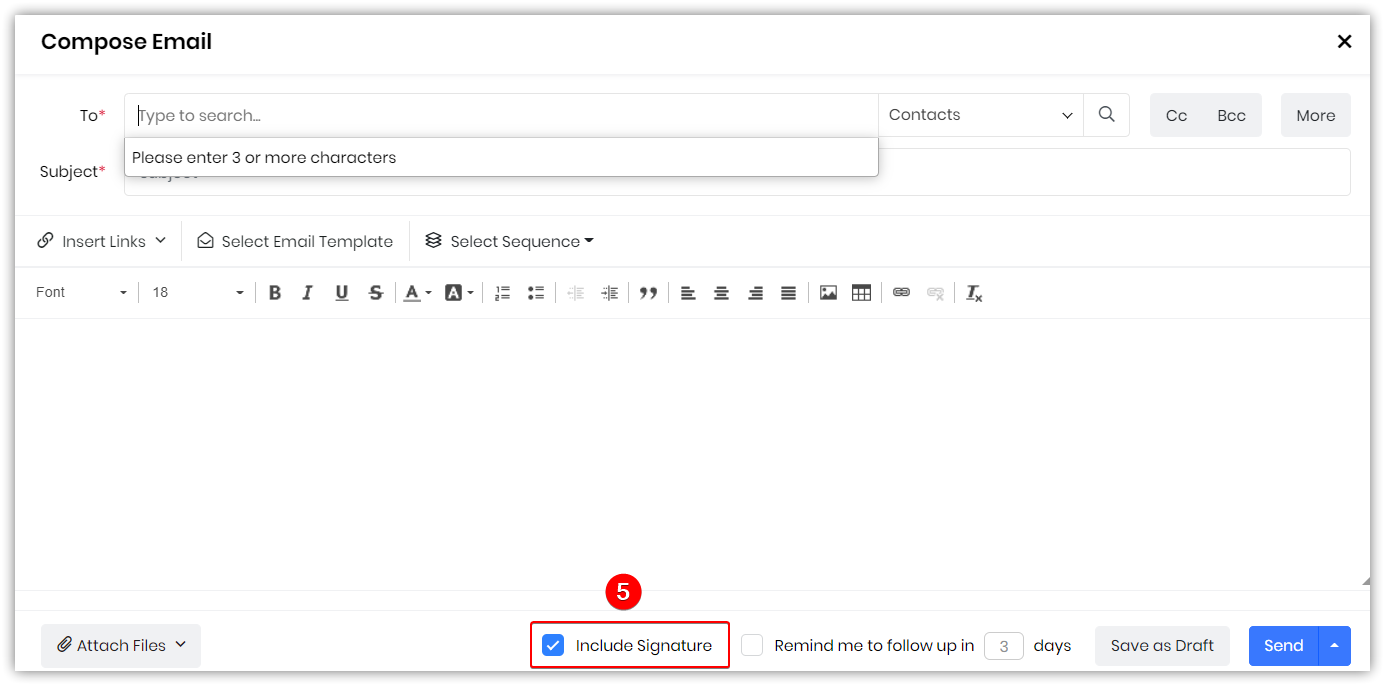
Step 5: Including Signature
- You can set up email signatures by going to My Preferences.
- By enabling or disabling the checkbox for Include Signature in the Compose Email window, you can add or remove your signature from the email.
- Disabling the checkbox will let you send emails without your signature.
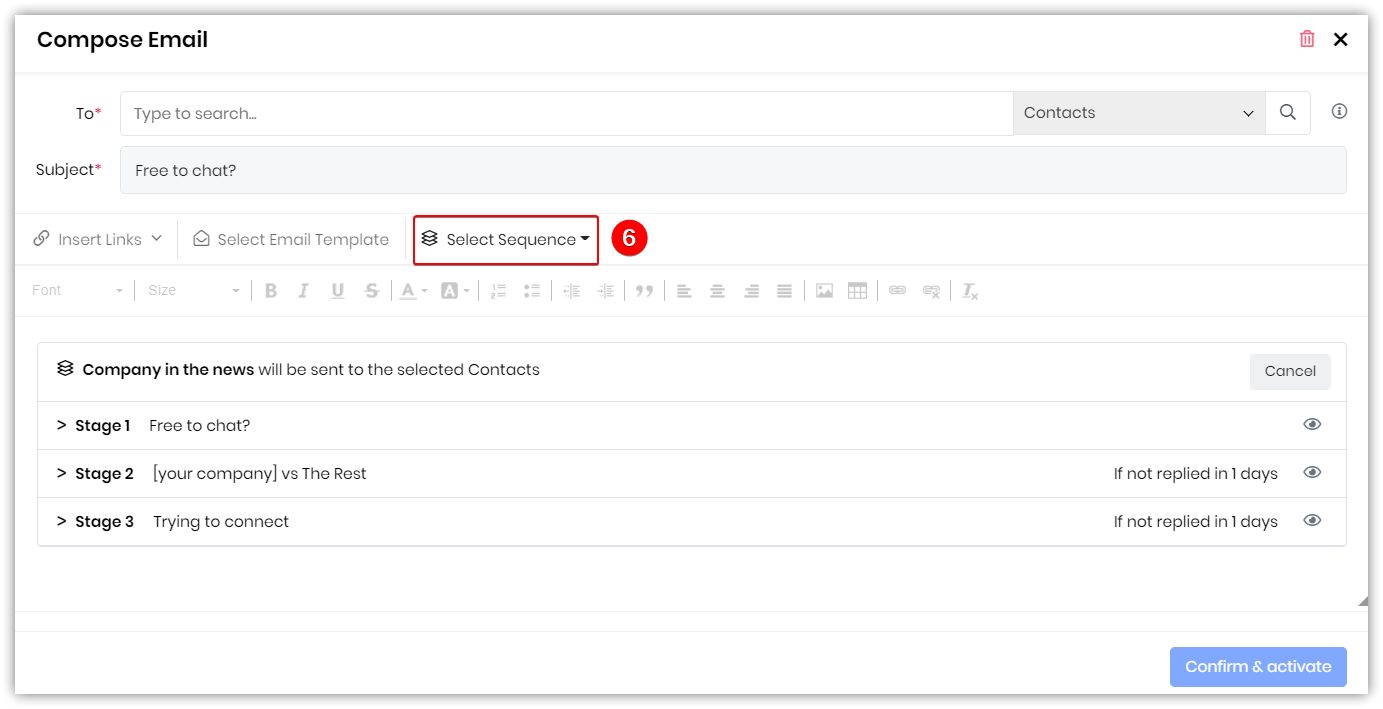
Step 6: Selecting an email sequence
The Select Sequence drop-down allows you to select and embed an email sequence into the email body. Email sequences is an outbound sales campaign tool that enables you to send a predefined sequence of emails to a prospect.
You can view email sequences by going to Main Menu > Sales > Email Sequences.
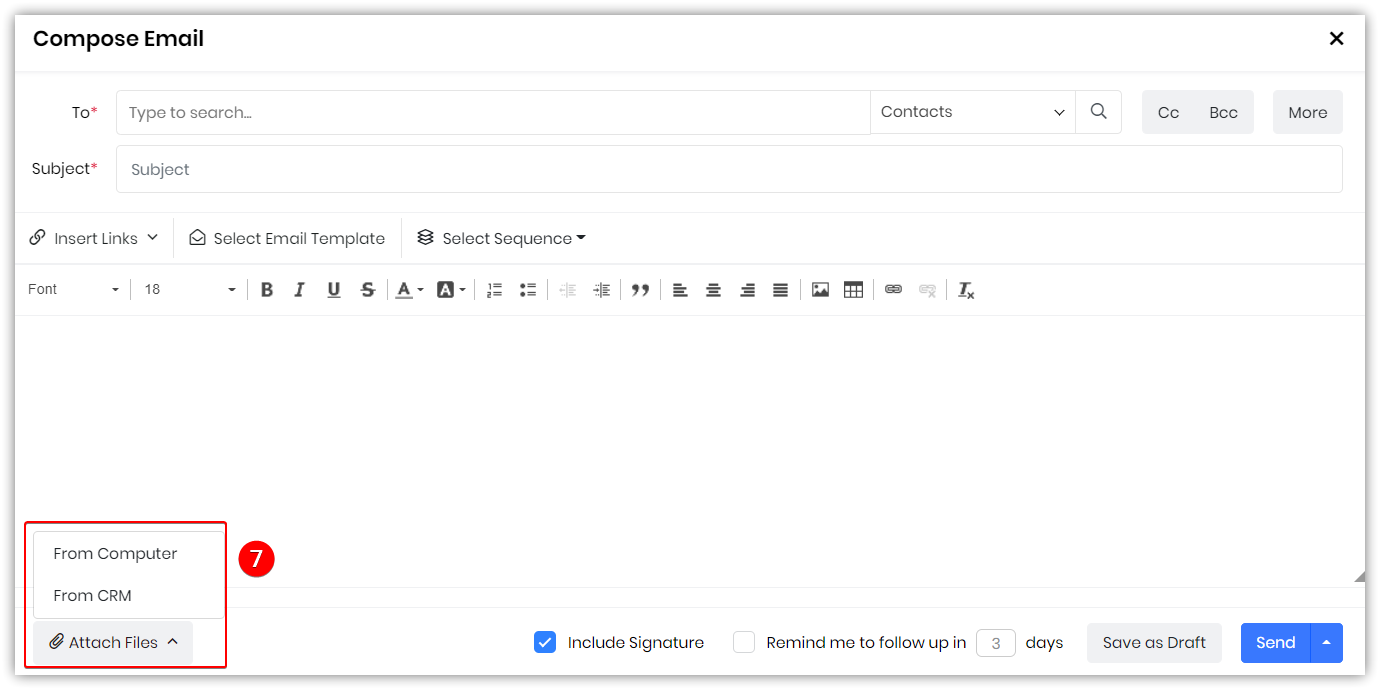
Step 6: Attaching files
You can attach files to your email from your local computer or from Documents in the CRM. Follow these steps to attach a file to your email:
- Log in to the CRM.
- Click the main Menu.
- Go to Essentials.
- Select Inbox.
- Click the Compose button.
- Click the Attach Files drop-down.
- Choose:
- From Computer to browse to your local computer to attach a file
- From CRM to browse through your documents in the Documents module
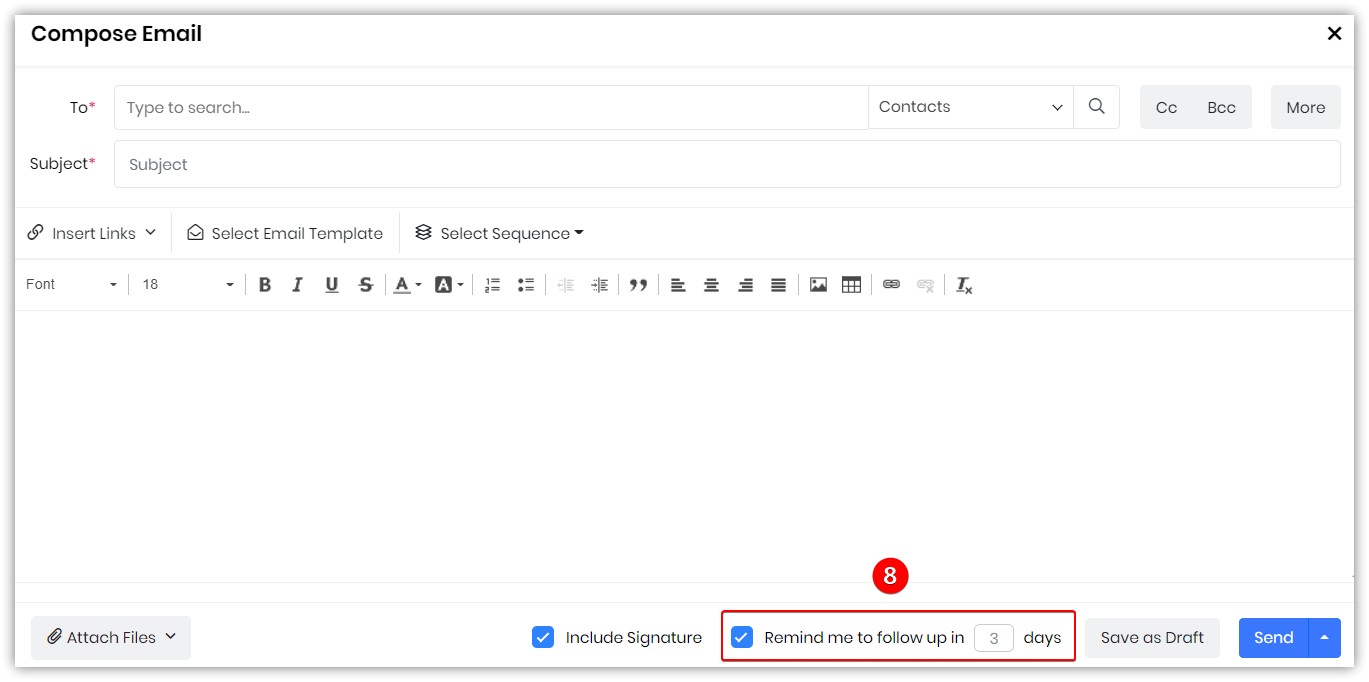
Step 8: Setting a reminder
You can set a reminder for yourself to follow up with the email recipient within a specific period. For example, if you set a reminder, ‘Remind me to follow up in 3 days', you will get a reminder notification.
You can set up email reminder alerts and alert channels by going to Main Menu > Essentials > Actions.
Step 9: Email tracking
When tracking is turned on for an email, you will receive notifications when the recipient opens the email, clicks a link present in the email, and replies to the email.
You can set up email tracking by going to Main Menu > Essentials > Actions, with options to select alert channels and whom to alert.
Step 10: Scheduling emails
You can pre-compose an email and send it later by scheduling it. Follow these steps to attach a file to your email:
- Log in to the CRM.
- Click the main Menu.
- Go to Essentials.
- Select Inbox.
- Click the Compose button.
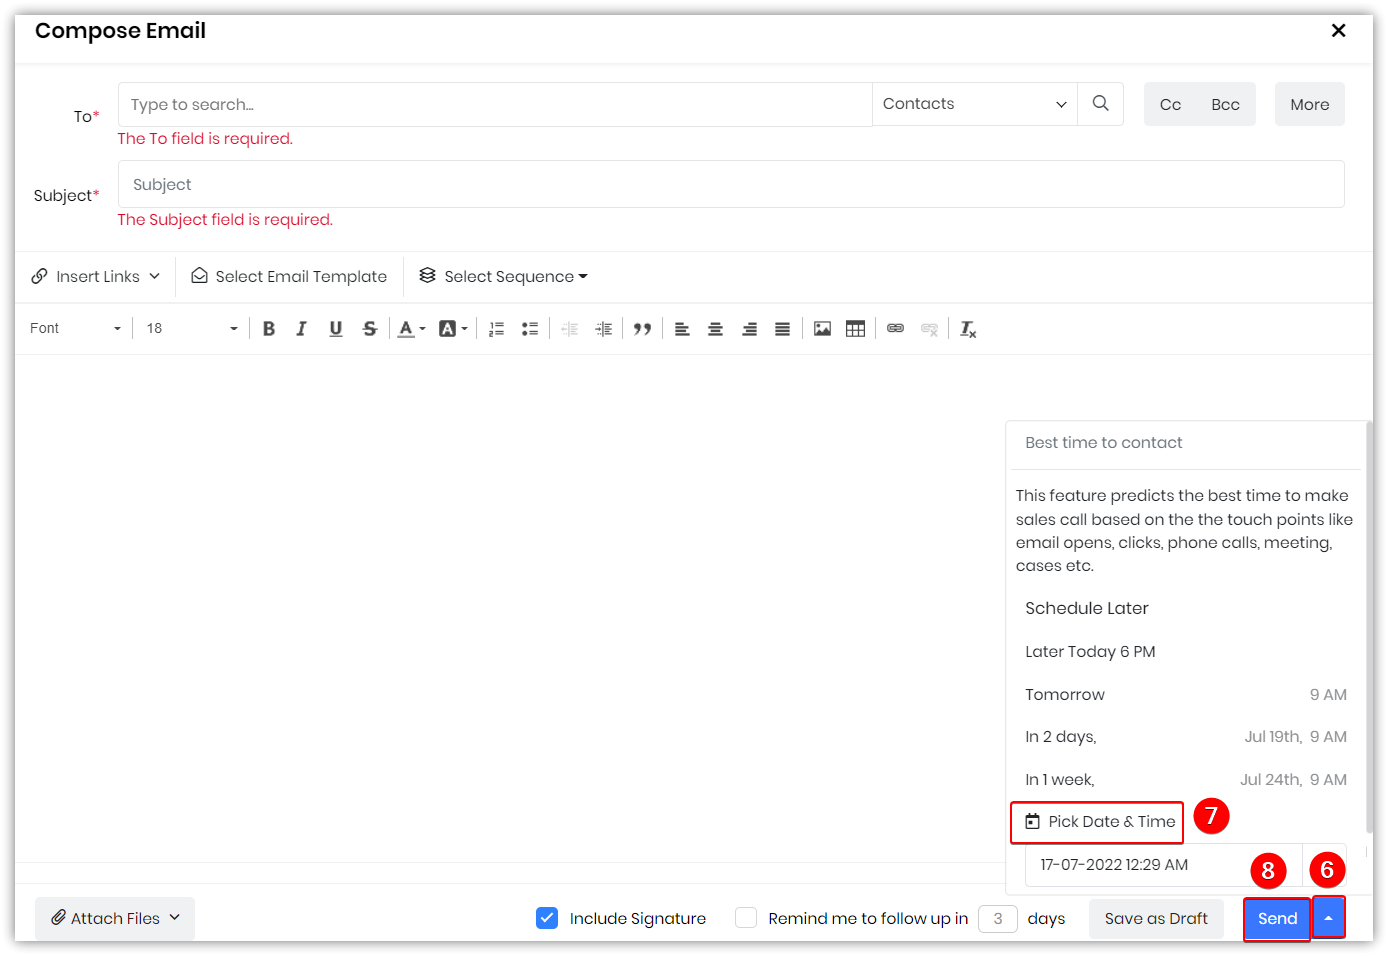
- Click the drop-down beside the Send button.
- Pick a date and time.
- Click Send.
The email gets scheduled for the date and time you select.
The Undo option lets you retract an email shortly after clicking Send, giving you time to correct mistakes or add missing content.
- After sending an email, an Undo button appears for a limited time.
- Click Undo to stop the send action and return the email to Drafts.
- You can then edit and resend the email.
Follow these steps to configure the Undo Send action:
- Log in to the CRM.
- Click the User Menu on the top-right of the screen.
- Click the Settings button. You will land on the Settings page.
- Select Email Settings under Configuration.
- Configure the time window for the Undo Send button (e.g., 30 seconds) to define how long it remains available after sending an email.
Troubleshooting Tips
Here are some common issues users encounter while using a Vtiger Inbox.
- If a user changes their password for a linked account or severs their connection to Vtiger, they will need to reauthorize their access.
- Go to Inbox.
- Click on the reauthorize button.
- Add the email and password in the pop window that appears.
Now, it will redirect you to the inbox and be ready to sync again.
- When a user enables auto-forwarding on their inbox, but isn’t verified by the email client.
- Go to the client email.
- Open Sent email.
- Click on the Activate button.
- The inbox will now be verified.
- While a user may have verified the auto-forwarding option in their email client, they must also set up a forwarding rule to redirect incoming emails to the desired address.
- Copy the mailroom address.
- Go to client email.
- Click on Settings.
- Go to forwarding and POP/IMAP settings.
- Add auto-forwarding mailroom address: This will send a verification email to the mailroom address.
- Go to the mailroom.
- Open Sent email
- Copy the link that appears in the window and paste it into a new tab.
- Click on the Confirm button.
- Go to email settings and refresh the page.
Now, it shows the mailroom address as an auto-forwarding address, and click on Save.
-
Only the inbox folder is synced when a user sets up auto-forwarding in the inbox.
Auto forwarding inbox syncs only the Gmail client's inbox folder. To sync all other folders, set up a two-way sync inbox.
-
For newly created records, the source is indicated as Gmail - inbox.
When a two-way sync inbox is set up, it will also check all the mailroom actions, and the record created will show the source as Gmail-inbox / Microsoft-Inbox. However, emails will not land in the mailroom.
-
Emails sent from the inbox are not delivered to the recipient’s inbox.
Users who haven't added Vtiger as a trusted application in G Suite will experience this problem. To resolve this, you'll need to whitelist Vtiger in G Suite.
-
Which email addresses are listed in the From and Reply To address drop-downs?
- The From tab displays the following email address: User’s primary email address, My mailbox email address, Group mailbox email address.
- The Reply to address will display the user’s primary email address, My mailbox email address, and Group mailbox email address.
- If the server is other than Vtiger, the From tab will show only the server-set email address.
- If a two-way sync inbox is set up, the From tab also shows the two-way sync inbox address.
-
Users are unable to map more than three folders.
Vtiger's two-way inbox synchronization feature automatically includes the draft, sent, and trash folders. Users can additionally choose to sync up to three other folders with their Vtiger inbox.
-
Users are facing issues in accessing the mailboxes.
The inbox will not be visible when accessing CRM settings and logging in as another user. To view the inbox, you must log in using your username and password.
-
Setting up automation from the inbox.
When an email is received in the inbox, it checks the mailroom actions, and if the received email satisfies the condition, it performs the actions.
Note: Emails received from the 2-way sync inbox will not show in the mailroom's show emails tab, but it will check the mailroom actions and perform them.
-
What actions can be performed in a received email?
Once an email is received, you can perform the following actions:
For personal inbox: Mark as done, set reminders, create and link records, delete emails, and Add comments in threads. Create draft records.
For the group mailbox: Assign to other members of the group, Mark as done, set reminders, create and link records, delete emails, Add comments in threads, create draft records, and move emails from one group inbox to another.