Articles in this section
Vtiger Mailroom
Feature Availability
Vtiger Editions: One Pilot | One Growth | One Professional | One Enterprise | One AI
Introduction

Vtiger Mailroom is a powerful automation feature that helps you centralize, manage, and act on incoming emails from various email providers, including Gmail, Outlook, and Yahoo.
With Mailroom, you can:
- Receive and view emails from multiple email service providers in one centralized place.
- Automatically create CRM records such as Cases, Contacts, Leads, Organizations, and Deals from incoming emails.
- Update existing records when customers reply to previous emails or notifications.
- Set up rules and conditions to automate actions based on the sender, subject, or email body.
Features
The following are the key features of Vtiger Mailroom:
- Centralized Email Intake: Mailroom lets you receive emails from multiple providers, including Gmail, Outlook, and other mail services, into a single, unified inbox in the CRM.
- Unlimited Virtual Email Addresses: Generate multiple virtual Mailroom addresses to categorize and process different types of incoming emails (e.g., support, sales, HR).
- Automated Record Creation: Automatically create CRM records such as Cases, Contacts, Leads, Opportunities, or Tickets based on incoming email content.
- Customizable Actions: Define specific actions and conditions based on subject line, sender, keywords, or email body to control how each email is processed.
- Body Rule Processing: Extract structured information from the email body using delimiters or keyword-based parsing, and auto-map it to CRM fields.
Benefits
The following are the benefits of using Vtiger Mailroom:
- Automates email processing, reducing manual work.
- Creates CRM records instantly (like Contacts, Leads, Cases, Deals) from incoming emails.
- Ensures no emails are missed by capturing all forwarded messages.
- Improves response time by automatically routing emails to the right module.
- Supports multiple email providers, making setup flexible.
- Allows easy sorting through virtual email addresses for different teams or purposes.
- Extracts data from email body, helping auto-fill CRM fields accurately.
- Simplifies case management by updating existing cases from replies
In this article, you will learn about:
- How the Mailroom works
- Accessing your Mailroom
- Setting up auto-forwarding for emails
- Mailroom actions
- Mailroom alerts
- Accessing Mailroom Logs
Key Terminology
|
|
|
|
|
|
|
|
|
|
|
|
|
|
|
|
|
|
How the Mailroom Works
Every business using Vtiger gets its own Mailroom address to which emails can be forwarded. For example, Grasspods might be assigned an address like [email protected].
Note: We will refer to the name before the @sign as the handle throughout this documentation.
In the Mailroom panel, the Administrator can configure actions to be performed on incoming emails. When an email is forwarded to Mailroom, the Mailroom will pick it up (within 2 minutes) and perform the actions configured on the Mailroom page
Virtual Email Address
Vtiger Mailroom streamlines email handling using unlimited virtual email addresses. You can forward emails to these unique addresses for easy processing.
Each virtual address serves as a dedicated entry point into the CRM. It can trigger actions, create new records, attach emails automatically, and update CRM data based on the configured Mailroom rules.
Mailroom makes sorting emails easier by providing virtual email addresses you can forward to. To create a virtual email address, add a + to the username and a suffix, for example: +support.
With this feature, it is easy to set up actions. For example, to create a case, you just need to forward an email to [email protected] and set up an action.
The Mailroom enables a separate mailbox for each record in the CRM. For example, to attach emails to record id #345, send an email to:
[email protected].
This feature is available for Contacts, Leads, Organizations, Cases, and the Deals module.
Accessing Your Mailroom
Follow these steps to access your Mailroom:
- Log in to the CRM.
- Click the User Menu in the top-right corner of the screen.
- Click Settings. The Settings page opens.
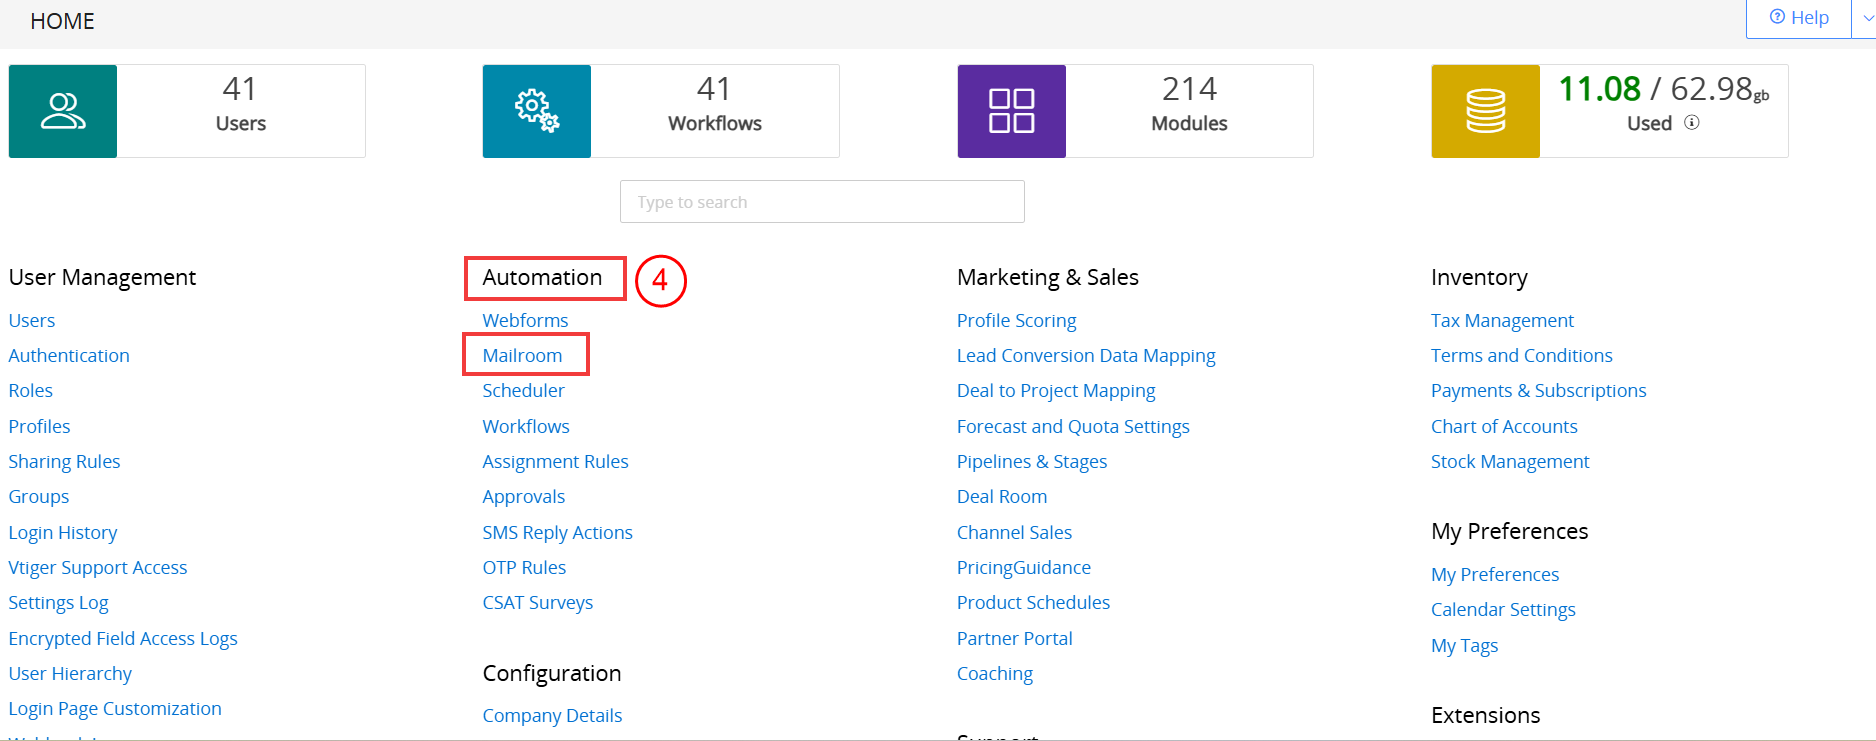
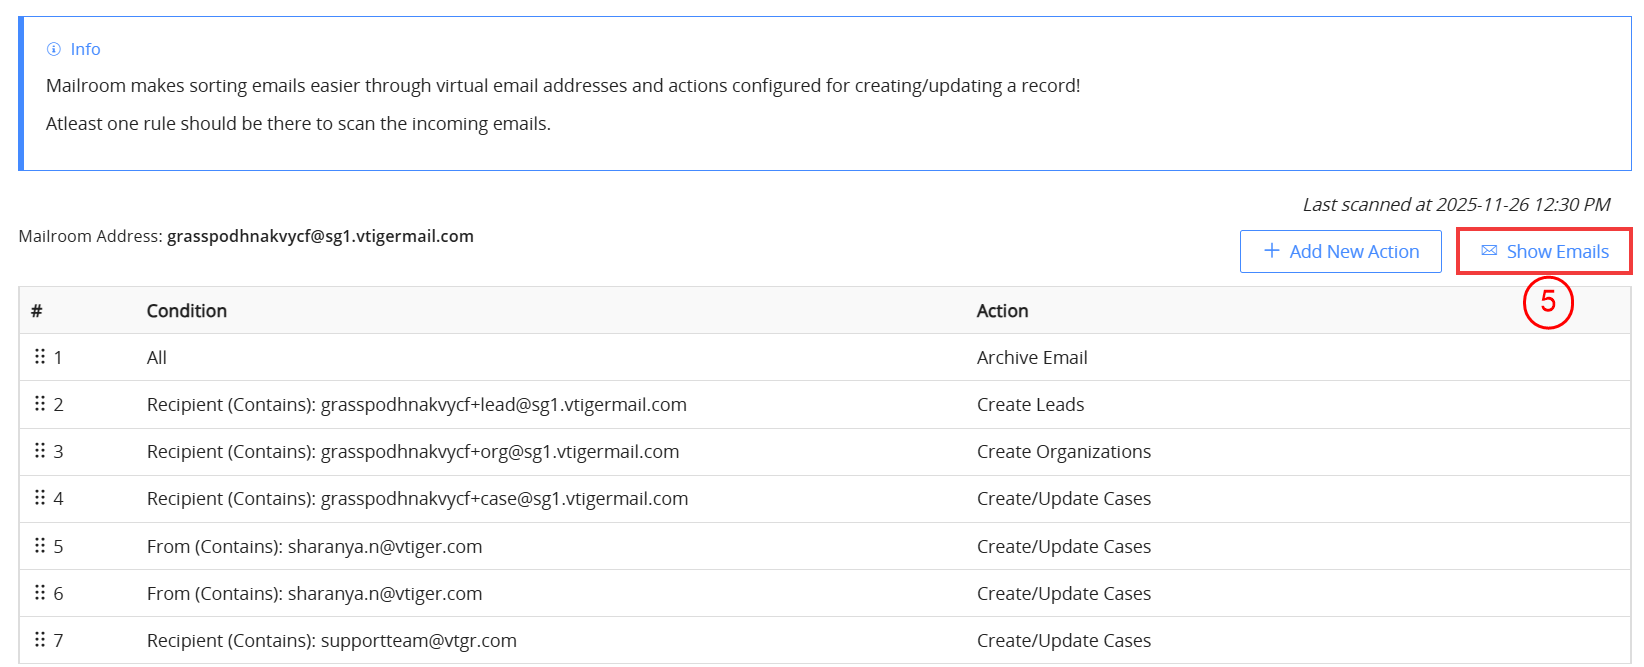
- Click Automation > Mailroom. The Mailroom page opens. On this page, you can:
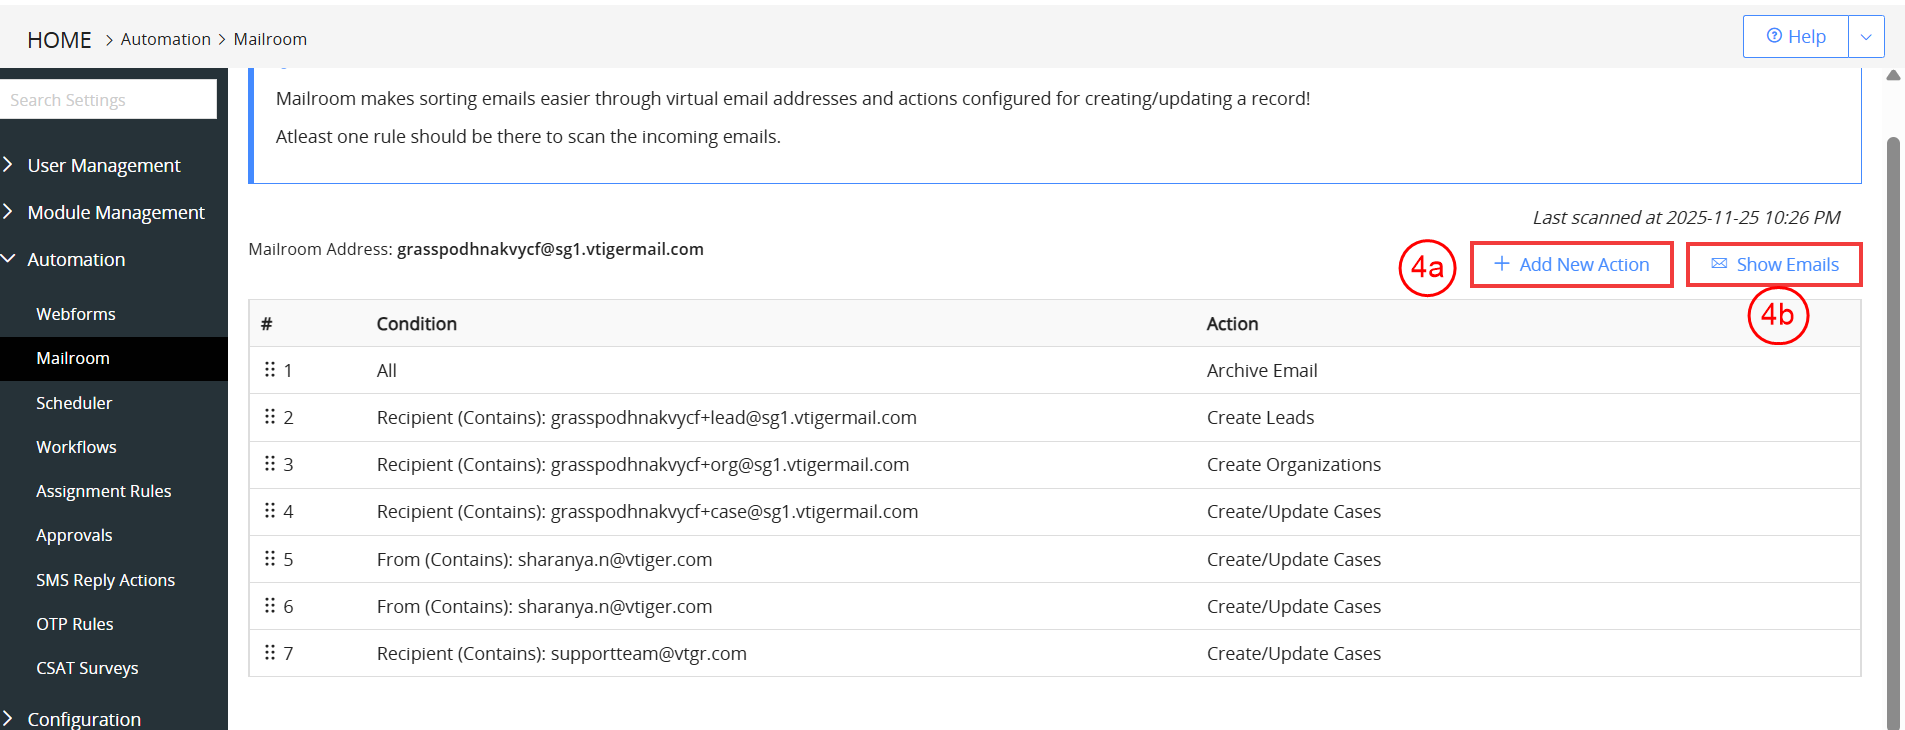
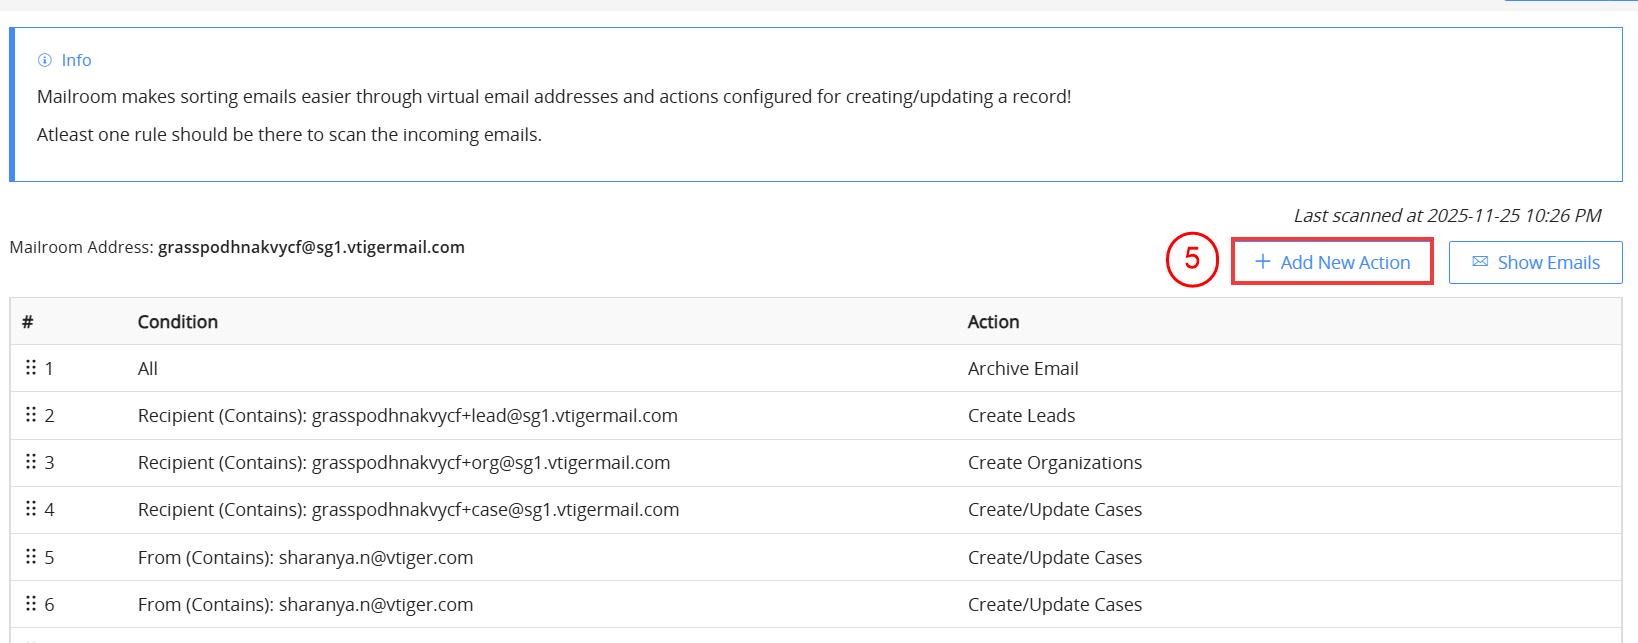
- Click the +Add New Action button to add new actions to the Mailroom.
- Click Show Emails to see the emails that have been set up in the Mailroom.
Setting up Auto-Forwarding
Auto-forwarding allows you to automatically send incoming emails from your personal or business email account to your Mailroom, ensuring that all messages are captured and processed in Vtiger. The steps to set up auto-forwarding can vary depending on the email service provider you use.
For example, Gmail, Outlook, and other services each have their own process for enabling forwarding. Here’s how you can auto-forward your emails from Gmail to Vtiger Mailroom.
Follow these steps to auto-forward your emails from your Gmail account to Vtiger Mailroom:
- Log in to your Gmail account.
- Go to Settings.
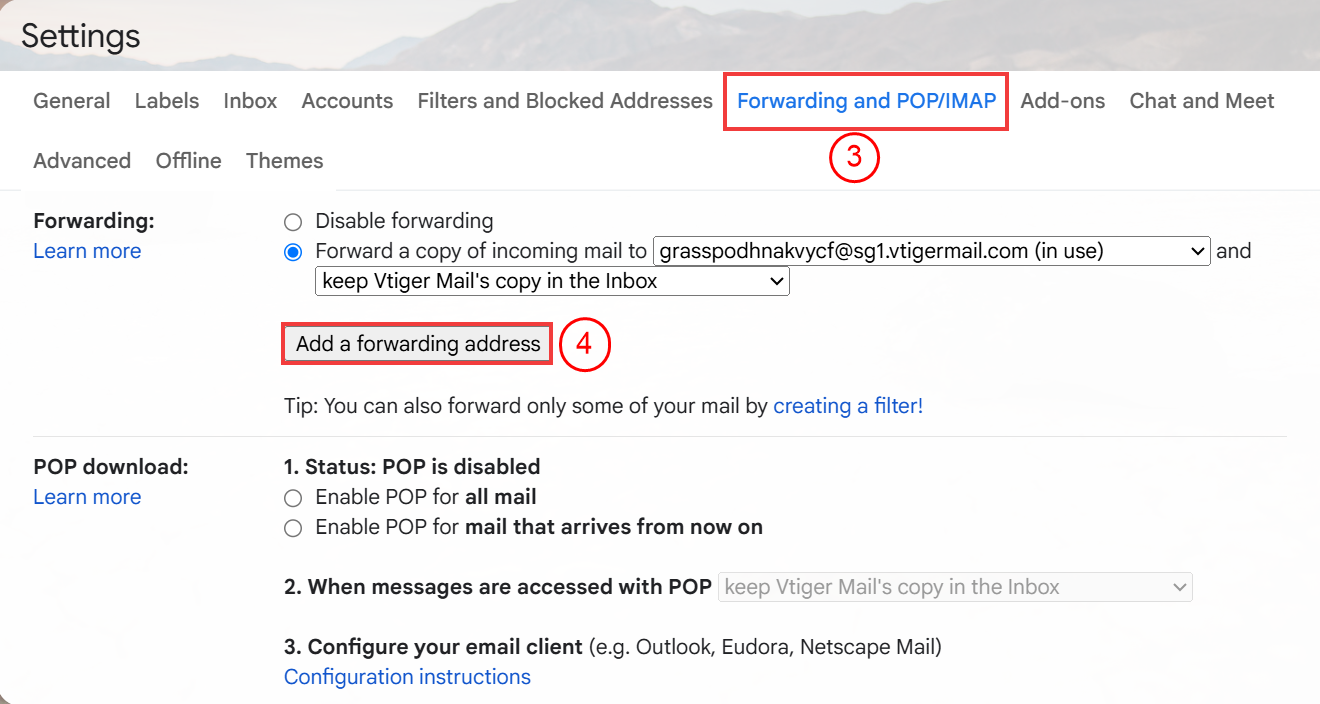
- Click on Forwarding and POP/IMAP.
- Click the Add a forwarding address button.
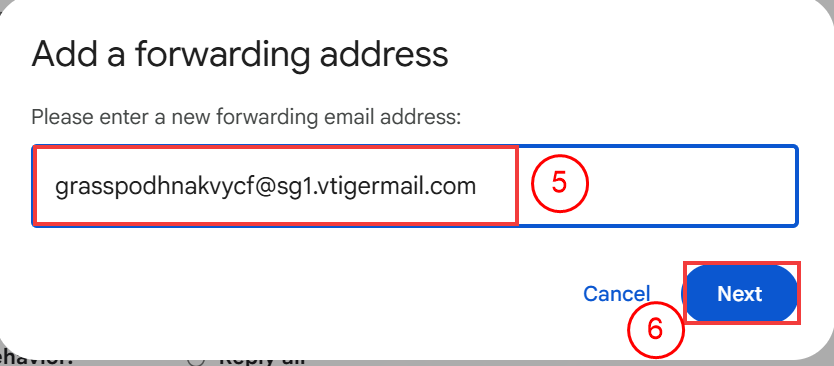
- In the pop-up, add your Mailroom address. Note: You can copy your Mailroom address directly from the Mailroom page.
- Click Next. You will be receiving an email with a verification code in your Mailroom.
- You can access it by clicking on the See your forwarded emails button or the Show Emails button.
- Enter the code in the verification field and click on the Verify button.
Once verification is done, the incoming emails will be sent to your Vtiger Mailroom.
Vtiger Mailroom Actions
Vtiger Mailroom offers a set of predefined actions to handle common email workflows efficiently. You can use these default actions or create new custom actions based on your business needs.
The following are the default actions in the Mailroom:
- To archive emails, just forward the email to: [email protected]
- To create/update the case, just forward the email to: [email protected]
- To create a lead, just forward the email to: [email protected]
- To create a deal, just forward the email to: [email protected]
- To create contact, just forward the email to: [email protected]
- To create an organization, just forward the email to: [email protected]
Adding New Actions
Follow these steps to add a new action:
- Log in to the CRM.
- Click the User Menu in the top-right corner of the screen.
- Click Settings. The Settings page opens.
- Click Automation > Mailroom. The Mailroom page opens.
- Click +Add New Action. The Configure Action page opens.
- Enter or select the following information:
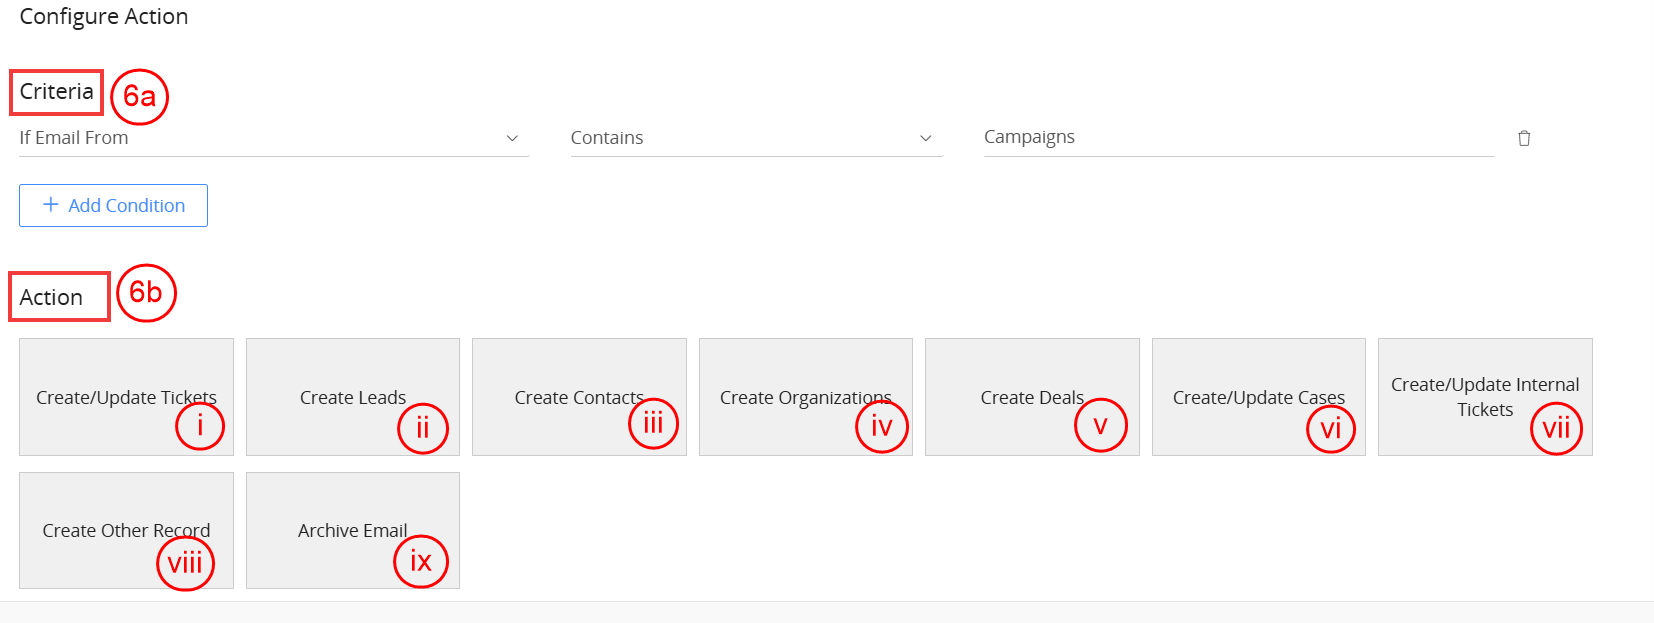
- Criteria section: Add conditions if you desire.
- Actions section: Choose an Action to be performed.
- Create Leads: Leads will be created only if the mail is from a new Sender. If the same sender sends a new email, then that email will be attached to the existing Lead record. Note: You can use Body Rule to create new Lead records for emails coming from the same Sender.
- Create Contacts: A Contact is created only if the mail is from a new Sender. If the same sender sends a new email, then that email will be attached to the existing Contact record. Note: You can use Body Rule to create new Lead records for emails coming from the same Sender.
- Create Organizations: A Contact is created only if the mail is from a new Sender.
- Create Deals: An Opportunity will be created if a new email is received from your contact. If you send an email from an Opportunity record and your contact replies to that email, then the Email will be attached to the existing Opportunity.
- Create/Update Cases: A Case will be created when a new email is received from your contact. If your contact replies to a previous case notification, then the existing case will be updated.
- Archive Email: This action will attach the email record to the existing Contact/Lead/Organization/Opportunity/Cases if the From email matches the primary email of a record. In some cases, if the From email is not found in any of the records, it will search for the To email address and attach the email to it. The Archive email action in the mailroom links emails to a Contact’s open Deal and the Contact. If a Contact has more than one open opportunity, then the email gets archived to the first open Deal in the related tab of the Contact.
- Create/Update Tickets: Creates a new ticket or updates an existing ticket when an email is received.
- Create/Update Internal Tickets: Creates or updates internal tickets for internal team workflows based on incoming emails.
- Create Other Record: Allows creation of other CRM records, such as Contacts, Leads, or Deals, depending on the email content and configured rules.
- Assigned To: Choose the user responsible for the action triggered by the Mailroom.
- Enable Autofill values from Email body: Automatically extracts information from the email body to populate relevant CRM fields.
- Delimiter: Character used to separate values in the email body for accurate data mapping.
- Sample Body Text: Example text from an email used to configure and test the Body Rule extraction.
- Click Save.
Note:
- If no matching Contact/Lead/Organization is found in the From or To email addresses, the email will be skipped.
- Mailroom can perform only one action at a time. If you add multiple actions, the mailroom will validate the conditions set and trigger actions that match first.
- For example: If you have set up an action, say, Any email coming to [email protected] should create a contact (positioned #1) and another action as Any email coming to [email protected] should create a case (positioned #6), then action 1 (Create Contact) will be triggered, as the Mailroom matches this action first.
Using the Body Rule
If your email body contains values that need to be extracted and populated in different fields of a record, then you can use the Body Rule.
For Example, you might receive Leads from an Agency via email. In such cases, the sender of the email is always the agency, but each email has information on a new Lead. With the Body Rule, you can extract values from the Email body and create a new Lead record for each email.
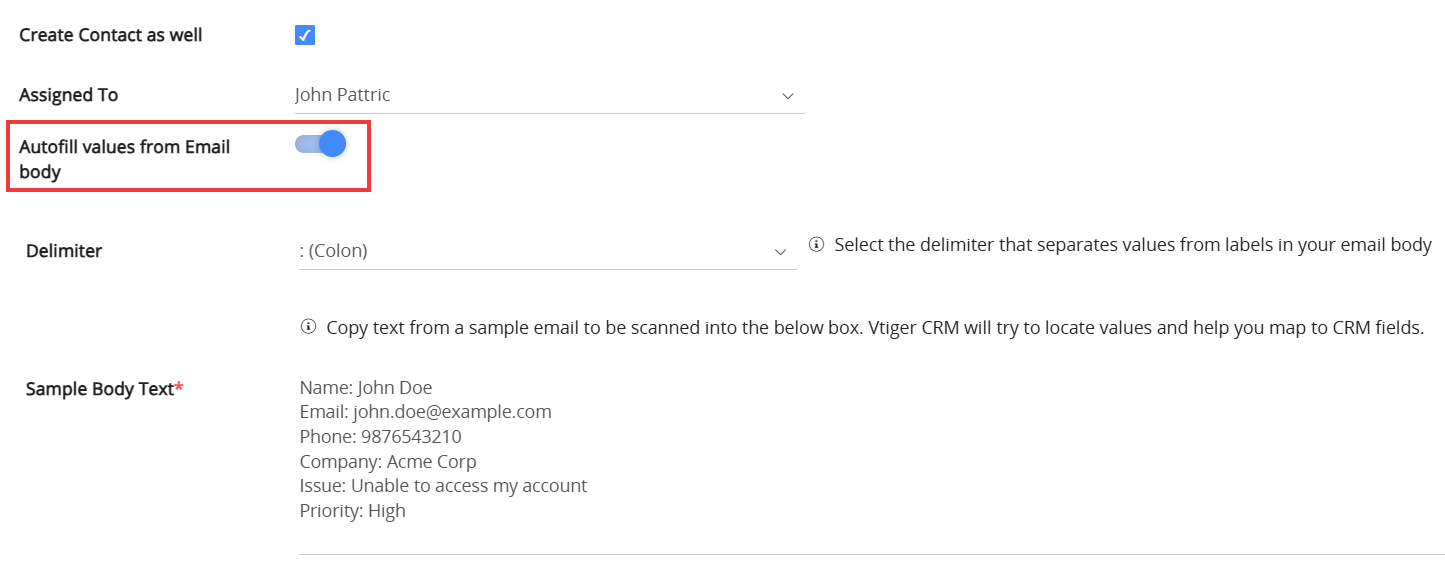
Enable Autofill values from the Email body to configure the body rule. If you have a sample text of an email that has the values, you can copy and paste that into the Sample body Text to let Vtiger pick up fields from the Body and allow you to map them to fields in the record.
Mapping Values to CRM Fields
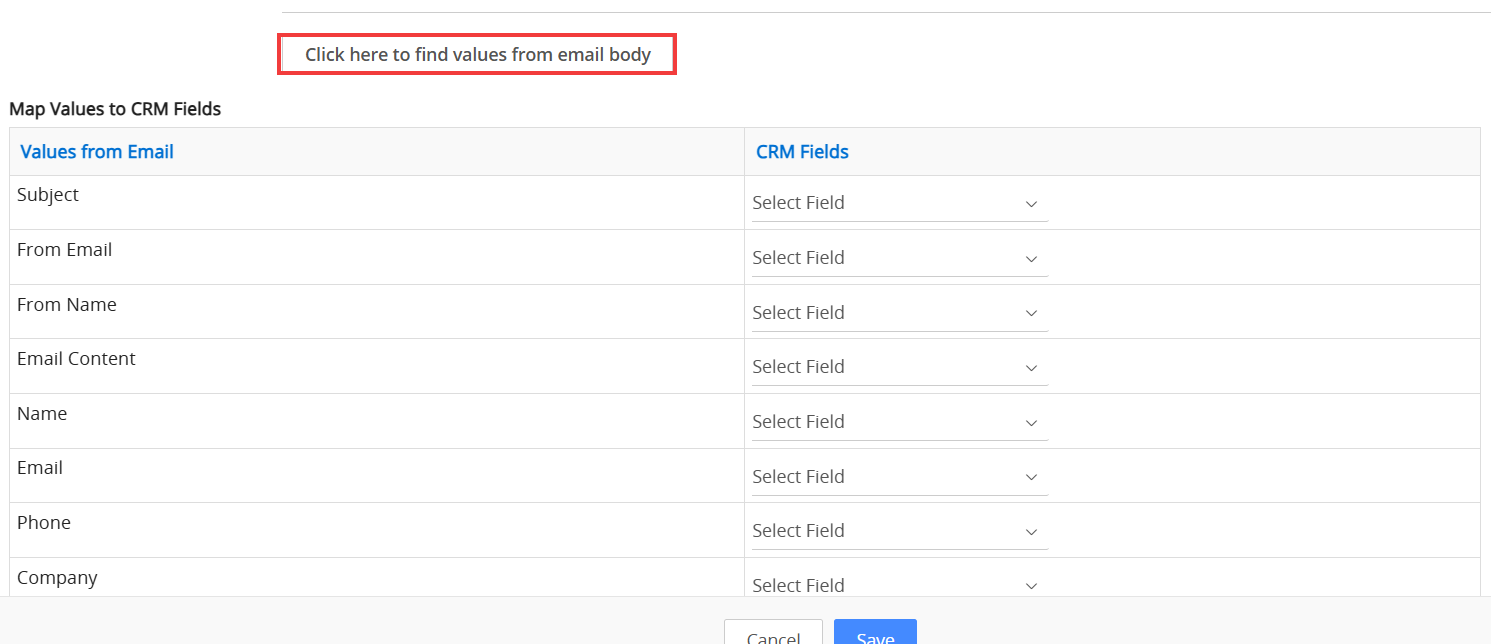
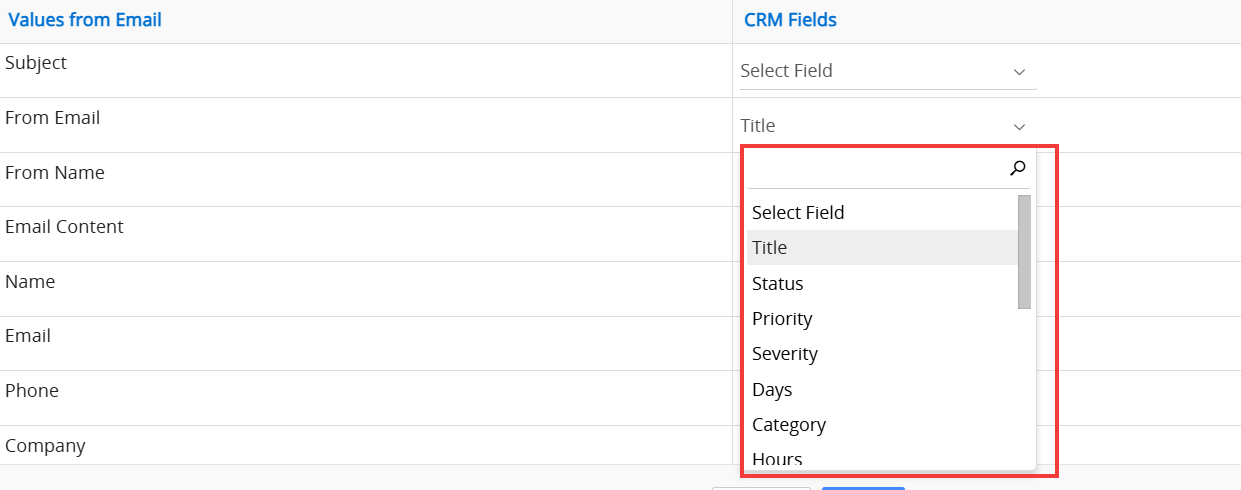
To extract information from an email body and create a Contact, Organization, Deal, etc., you need to map a lookup field’s duplicate handling fields in the mailroom’s body rule to the fields in the CRM.
Delimiter
A delimiter is a character or symbol used to separate field labels from their values in the email body. When configuring Body Rules in Mailroom, the delimiter tells the system how to identify and extract information from incoming emails.
For example, if your email body contains lines like Name: John Doe or Phone: 9876543210, the delimiter (: or -) helps Vtiger understand where the field name ends and the value begins.
By choosing the correct delimiter based on how your emails are structured, Mailroom can accurately map data to CRM fields and automate record creation or updates without manual entry.
Note: Mailroom supports attachments to records up to 10 MB.Mailroom Alerts
Vtiger can notify users when a Mailroom action is triggered. For example, when a Case or Lead is created from an incoming email, assigned users will receive an email alert if CRM notifications are enabled.
This ensures timely follow-ups and faster customer responses. Notifications can be managed through the user’s profile Preferences.Viewing Emails Sent to Mailroom
Follow these steps to view the emails sent to Mailroom:
- Log in to the CRM.
- Click the User Menu in the top-right corner of the screen.
- Click Settings. The Settings page opens.
- Click Automation > Mailroom. The Mailroom page opens.
- Click Show Emails from the right corner of the page.
You can access a complete list of messages processed by the system, allowing you to review activity, verify rule execution, and troubleshoot any issues.

Note: Admins are restricted from accessing confidential emails in the Mailroom to maintain privacy.
Accessing Mailroom Logs
Admins can track all processing activities through the Settings log. These logs include timestamps, action names, and details of created or updated records. Logs make it easy to verify if an email was processed correctly or identify whether an action needs adjustment.
Follow these steps to track the activities through Settings Log:
- Log in to the CRM.
- Click the User Profile in the top-right corner of the screen.
- Click Settings. The Settings page opens.
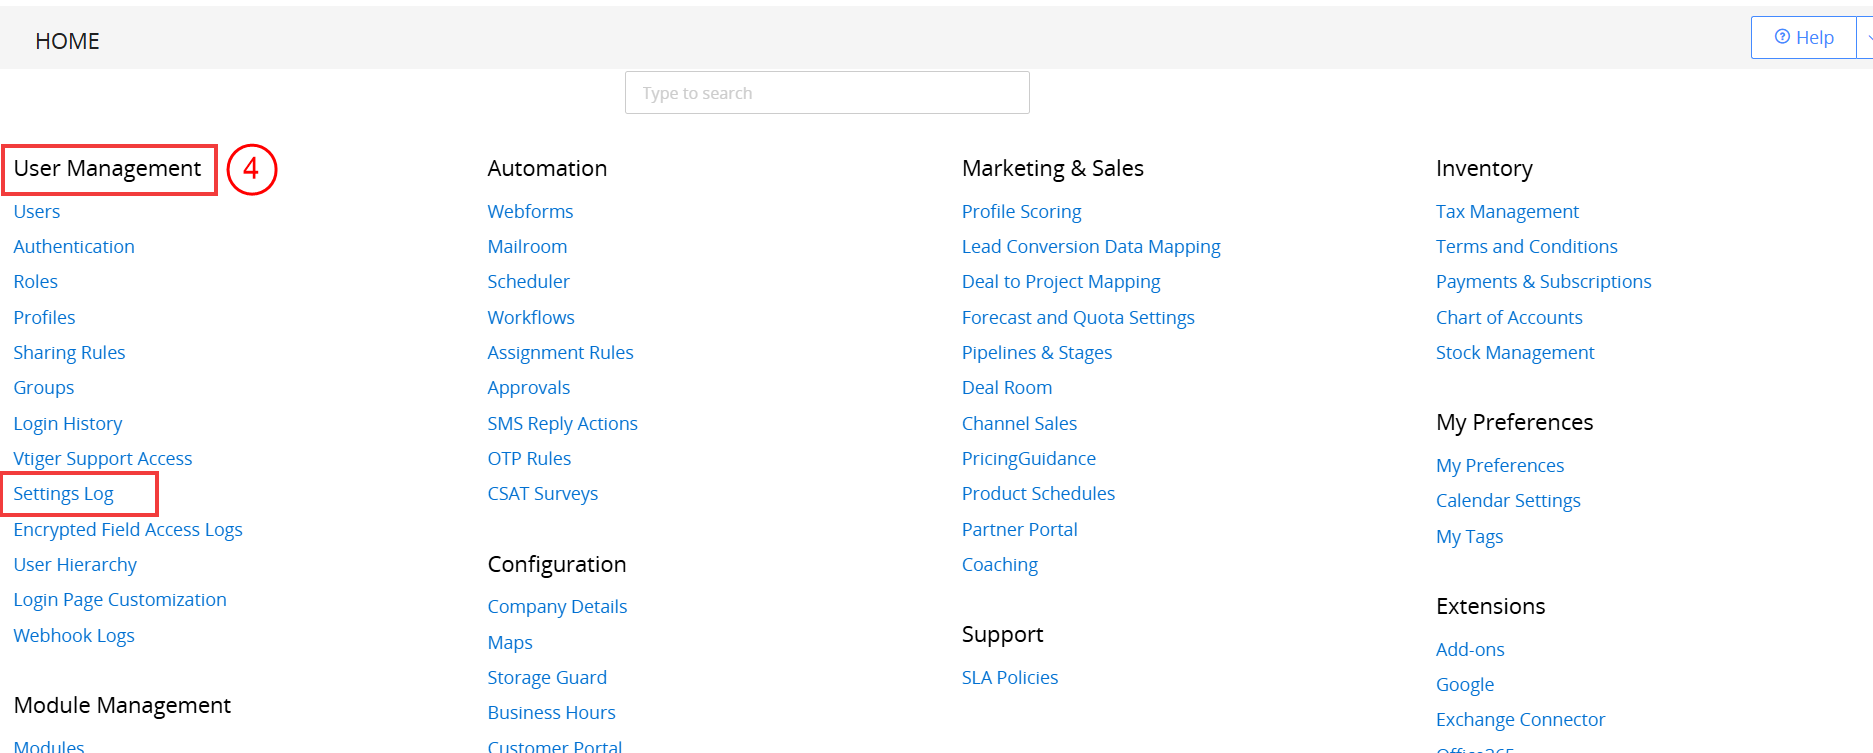
- Go to User Management > Settings Log. The Settings Log page opens.

- Enter or select the following information:
- Select User: Choose the user whose activity you want to review.
- Select date range: Specify the time period during which the action occurred.
- Select Settings: Choose Mailroom to filter actions related to Mailroom configuration.
- Click Search.
The system will display all actions performed in the Mailroom for the selected criteria, along with the User Name, Record ID, Record Label, and the Status of each action.