Articles in this section
User Management - Roles
Introduction
A role defines the part that a user plays in an organization’s hierarchy. You can mimic your organization-wide role hierarchy in Vtiger CRM with the help of Roles.
|
|
Default roles
Let’s take an example of Grasspods as a company. Vtiger CRM provides the following role hierarchy for a company by default:
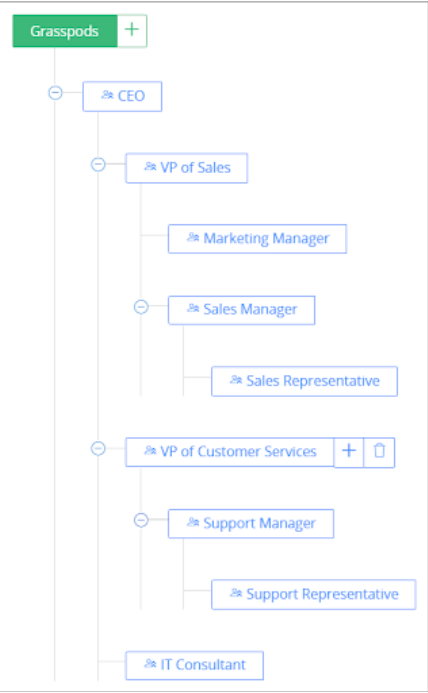
To learn how to set up the name of your company and other details, click here.
|
) icon to view the roles in the form of a list in the List View. You cannot create roles from the List View. The Search option in the Settings List View helps you quickly find specific records. |
Feature Availability and Limits
|
|
|
|
|
| |
|
|
|
|
|
|
|
|
| |||||
|
|
|
|
|
|
|
|
|
|
|
|
|
|
|
|
|
|
|
|
|
|
| |||||
|
|
|
|
|
|
|
Note:
- There should be atlease one standard user to add a Light Agent or Single App user.
- The maximum number of roles in Help Desk Starter and Help Desk Professional are 5 and 25 respectively.
Important Fields in Roles
|
|
|
|
|
|
|
|
|
|
|
|
|
|
|
|
|
|
Creating a User Role
You can create a user role under any role listed in the hierarchy.
Follow these steps to create a role:
- Log in to your CRM account.
- Click the User Menu on the top right corner of the CRM screen.
- Click Settings.
- Look for the User Management section.
- Select Roles.
- Hover over a role and click the + icon located on the right side to create a subordinate role under it.
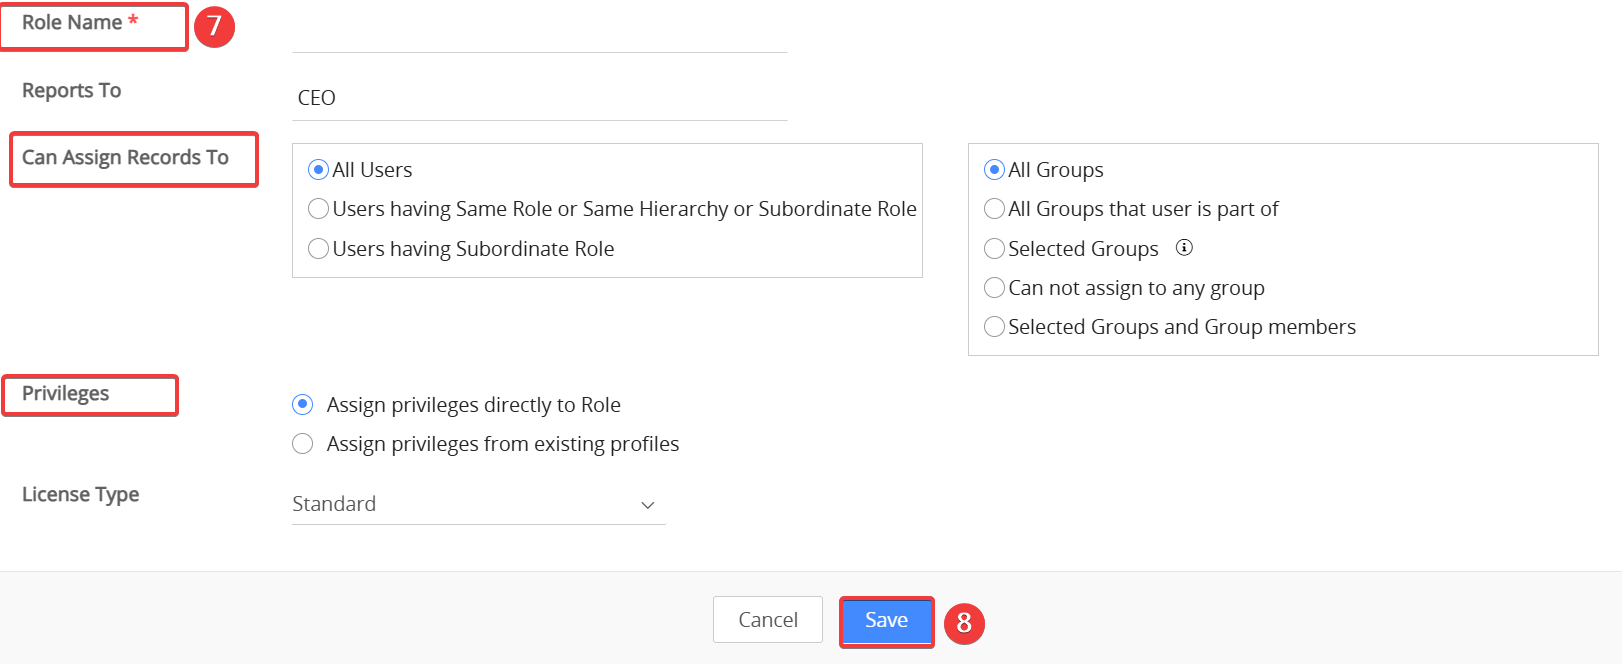
- Enter the details such as role name, record assignment, module/field-level privileges, etc.
- Click Save.
Creating a role hierarchy
If the hierarchy of your organization is not set up as per the CRM’s default hierarchy, you can recreate it. For this, you must delete the existing roles. However, you cannot delete the first role in the hierarchy.
Skip to this section to learn how to delete a role.
Drag and drop a role to move it in the hierarchy. For example, if you drag and drop Sales Manager on CEO, then Sales Manager becomes a subordinate role of CEO.
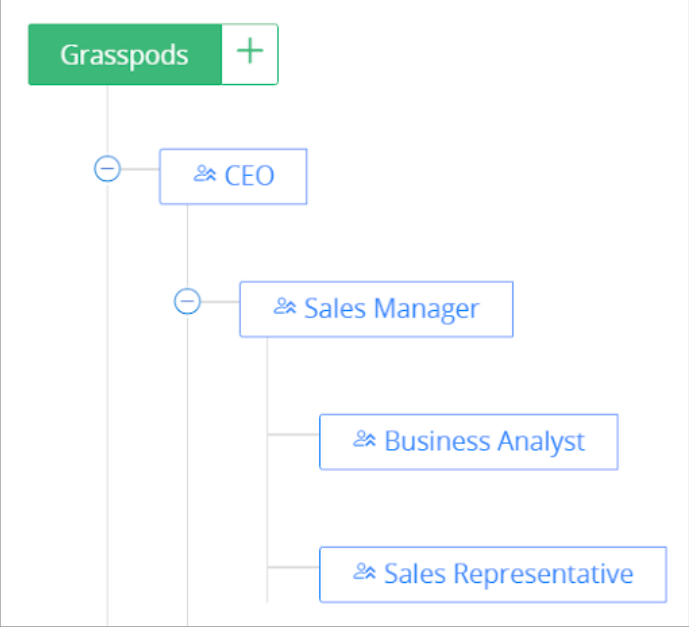
If Sales Manager has subordinate roles, then the entire hierarchy of Sales Manager is moved under CEO.
Setting Privileges to a Role to Assign Records
You can set up privileges for a role to assign records to other users. For example, a user with the role of VP of Sales can be given permission to assign records to all the CRM users or groups.
You can set up permissions while creating or editing a role. You have the following options:
- For users:
- All Users - Can assign records to all the CRM users
- Users having Same Role or Same Hierarchy or Subordinate Role - Can assign records having the same role, users in the role hierarchy, or users who have subordinate roles
- Users having Subordinate Role - Can assign records to users who have subordinate roles
- For groups:
- All groups - Can assign records to all groups in the CRM
- All Groups that user is part of - Can assign records to all the groups that the user belongs to
- Selected Groups - Can assign records to select groups (You need to select groups in this case.)
- Cannot assign to any group - Cannot assign records to any group
Follow these steps to set the privileges for a role to assign records:
- Log in to your CRM account.
- Click the User Menu on the top right corner of the CRM screen.
- Click Settings.
- Look for the User Management section.
- Select Roles. You will land on the Roles page.
- Click on a role in the hierarchy to edit it.
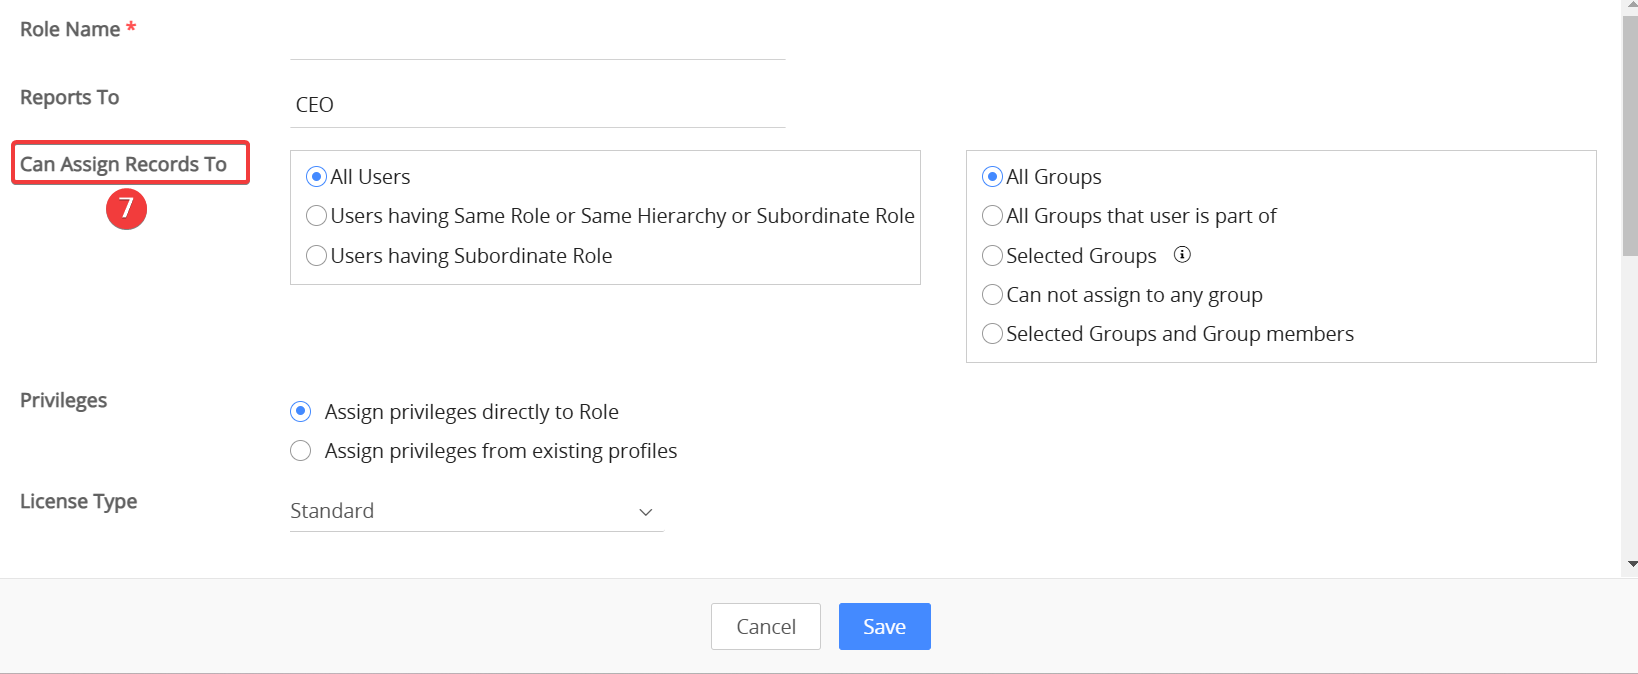
- Go to the Can Assign Records To field.
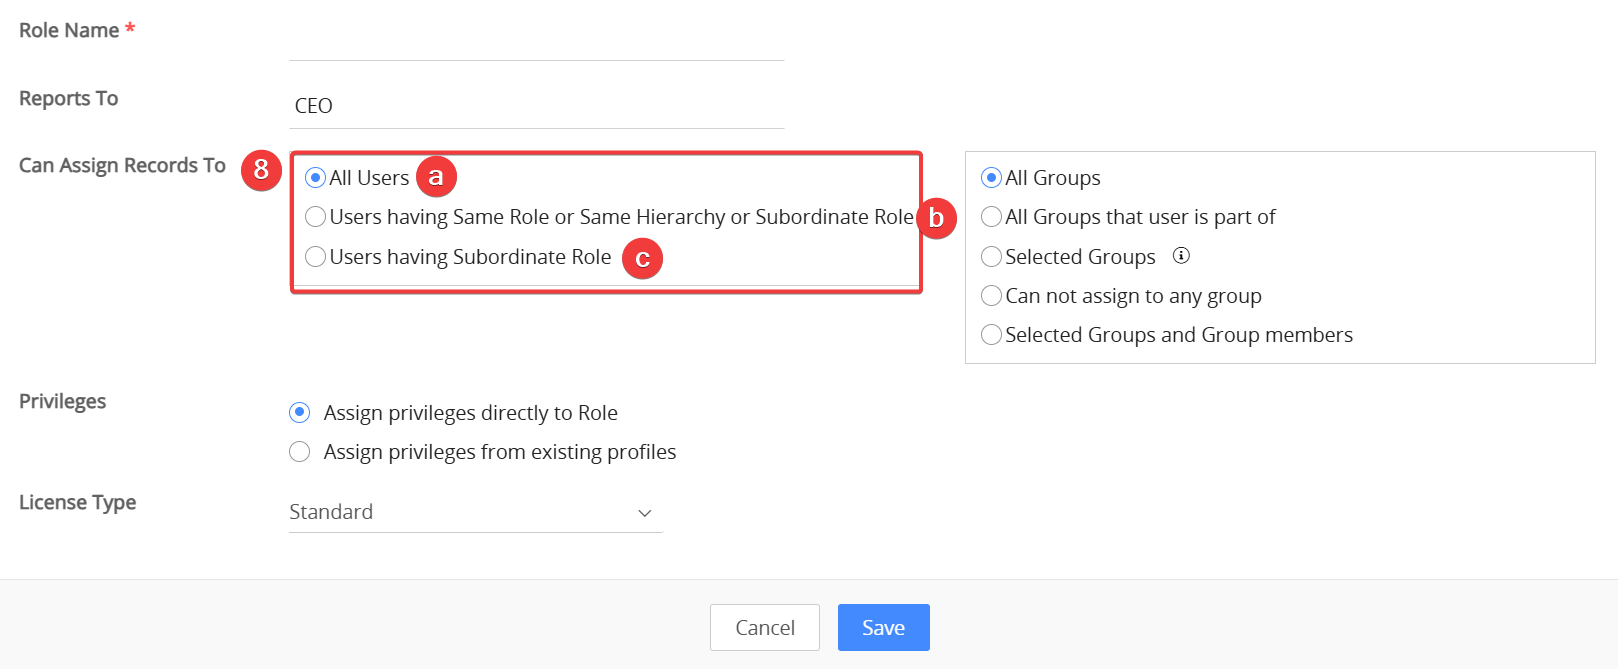
- Select one of the following options for users:
- All Users
- Users having Same Role or Same Hierarchy or Subordinate Role
- Users having Subordinate Role
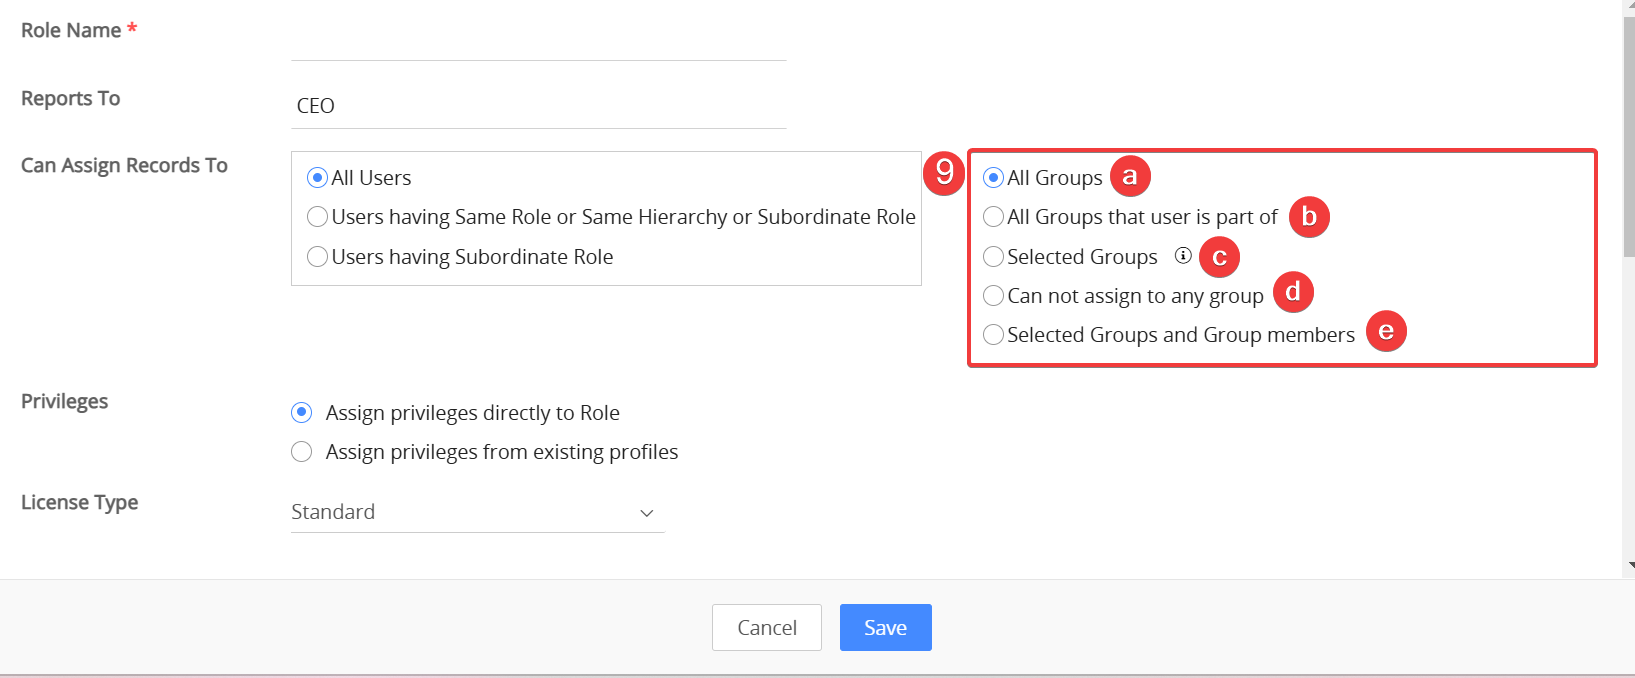
- Select one of the following options for groups.
- All groups
- All Groups that user is part of
- Selected Groups
- Cannot assign to any group
- Selected Groups and Group Members
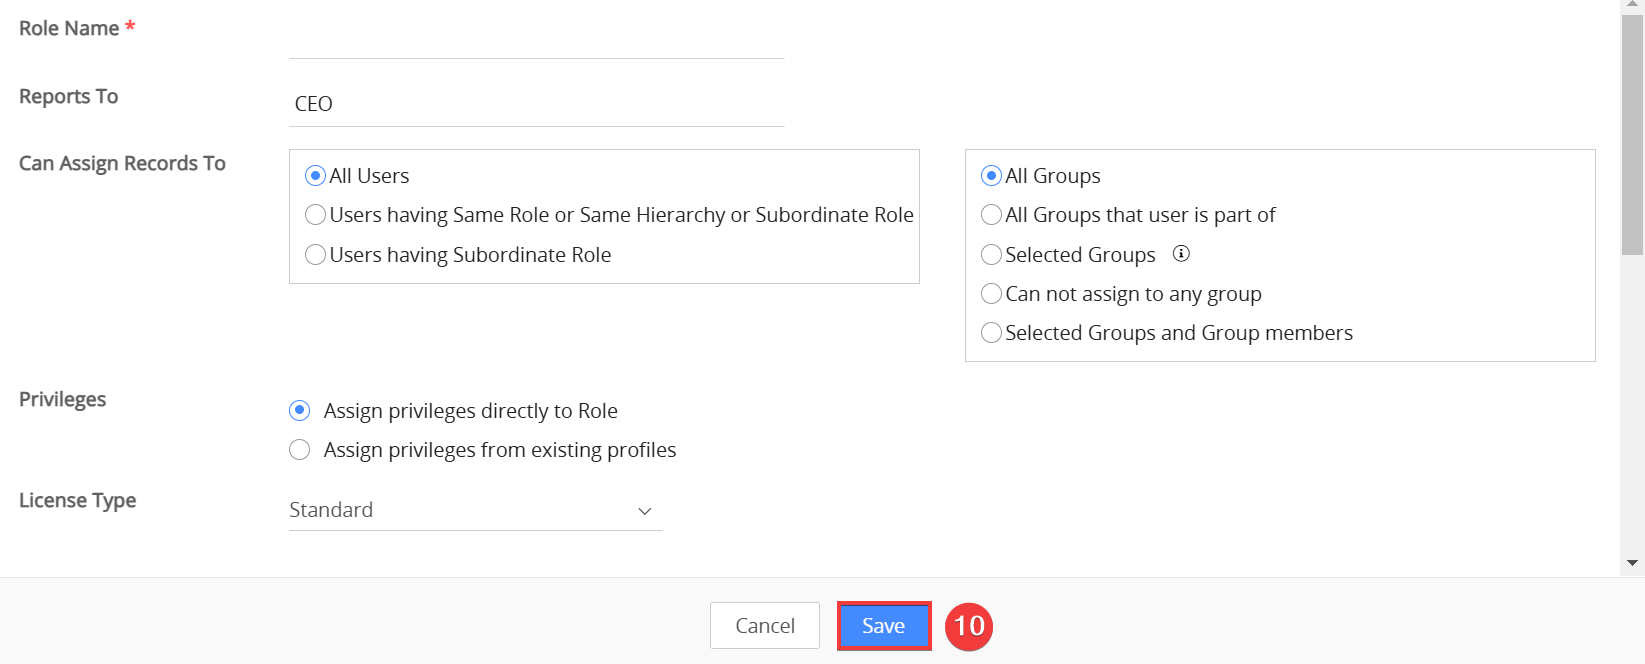
- Click Save.
Assigning Other Privileges to a Role
Privileges such as editing a record, deleting a record, viewing personal fields, etc. can be set at the profile level or role level.
Follow these steps to assign privileges to a role:
- Log in to your CRM account.
- Click the User Menu on the top right corner of the CRM screen.
- Click Settings.
- Look for the User Management section.
- Select Roles. You will land on the Roles page.
- Click on a role in the hierarchy to edit it.
- Go to the Privileges field.
- Select one of the following options:
- Assign privileges directly to Role -This option lets you assign privileges to the role you are creating. When you select this option, the Copy privileges from and Edit privileges of this profile sections appear.
- Select a profile in the Copy privileges from dropdown. The privileges from the profile that you select are shown in the Edit privileges of the profile section.
- Choose an app (Inventory, Sales, etc.) from the Edit privileges of the profile section and click the downward arrow on it.
- Choose a module. Enable or disable the checkbox for View, Create, Edit, or Delete to provide or revoke the respective permissions for the module.
- Click the downward arrow on a module. All the fields in the module are shown in the Fields section.
- Move the toggle button beside a field to the left to make it invisible, center to make it read-only, or right to make it writable.
- Note: You cannot change permissions for mandatory fields.
- Scroll down to the Tools section. Enable the checkbox to provide access to a tool. Disable it otherwise.
- Click Save.
- Assign privileges from existing profiles -This option lets you select profiles from which you want to copy the privileges to the role. When you select this option, the Assign Profiles section appears.
- Click inside the text area in the Assign Profiles section. All the profiles set up in the CRM are shown.
- Select the profile whose privileges you want to copy.
- Assign privileges directly to Role -This option lets you assign privileges to the role you are creating. When you select this option, the Copy privileges from and Edit privileges of this profile sections appear.
- Note: You can select multiple profiles here.
- Click Save.
|
|
Deleting a Role
Similar to how an employee transfers their responsibilities to another employee when leaving a company, you must transfer ownership of records to another role when you are deleting one.
Follow these steps to delete a role:
- Log in to your CRM account.
- Click the User Menu on the top right corner of the CRM screen.
- Click Settings.
- Look for the User Management section.
- Select Roles.
- You will land on the Roles page.
- Hover on a role in the hierarchy.
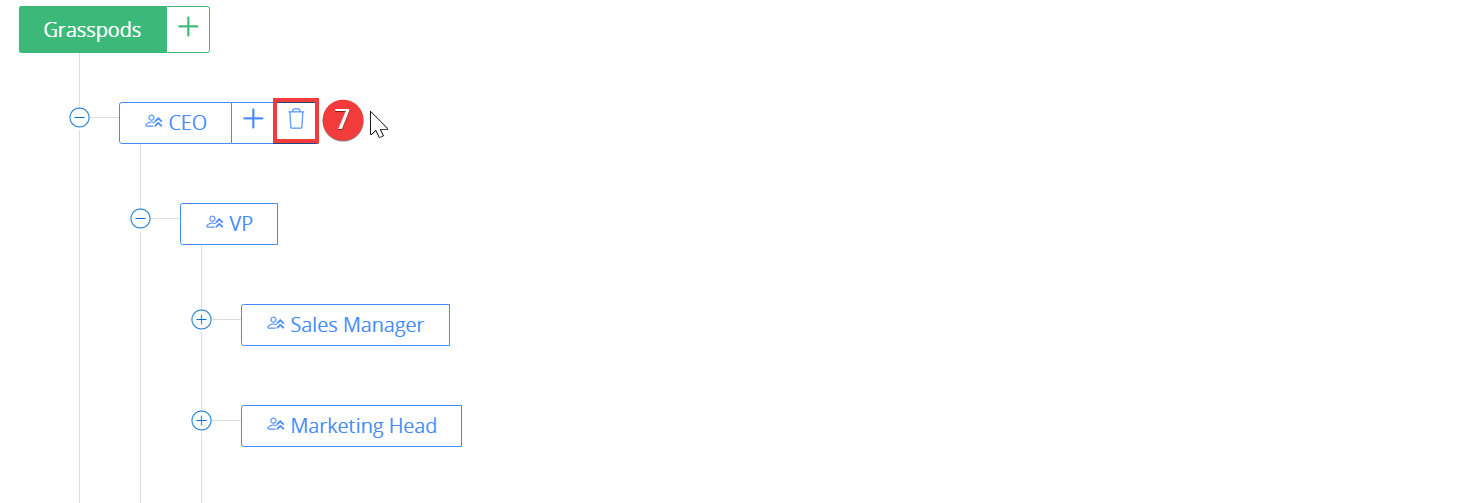
- Click the Delete icon.
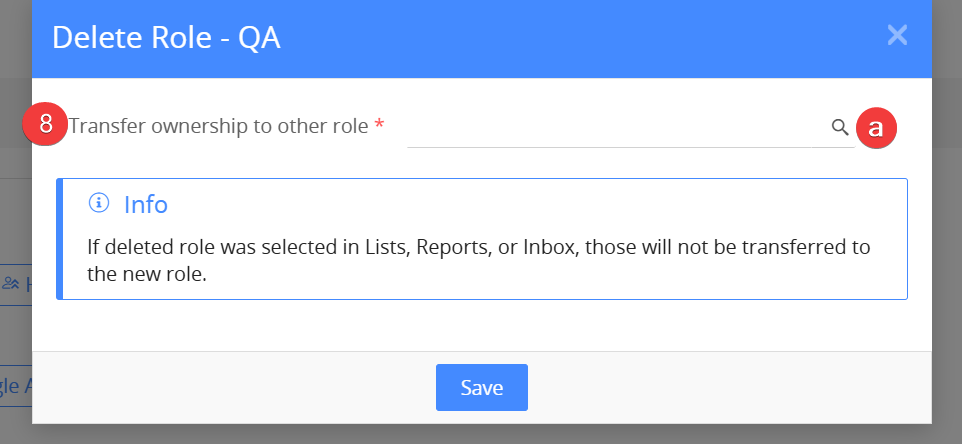
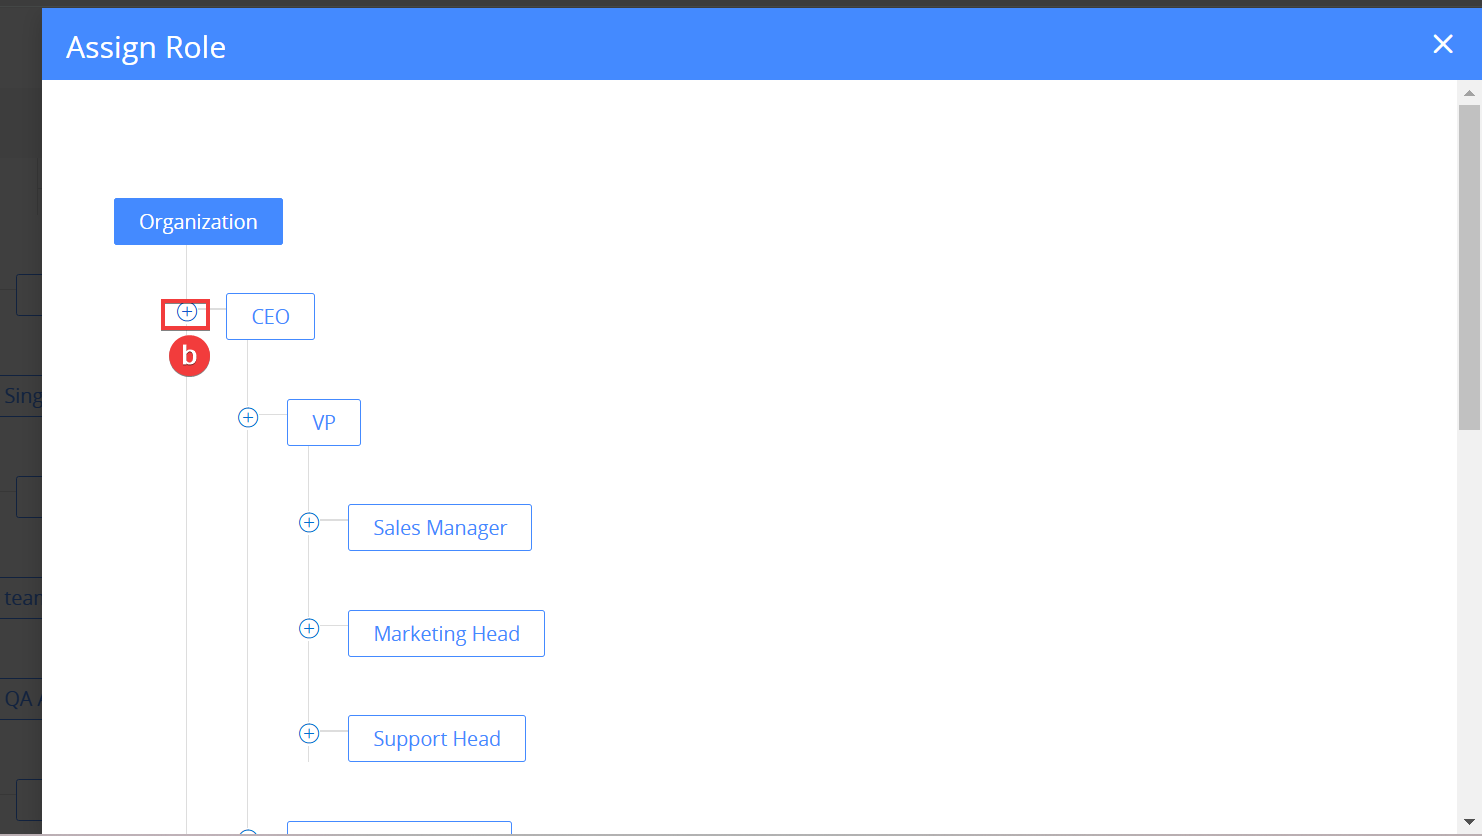
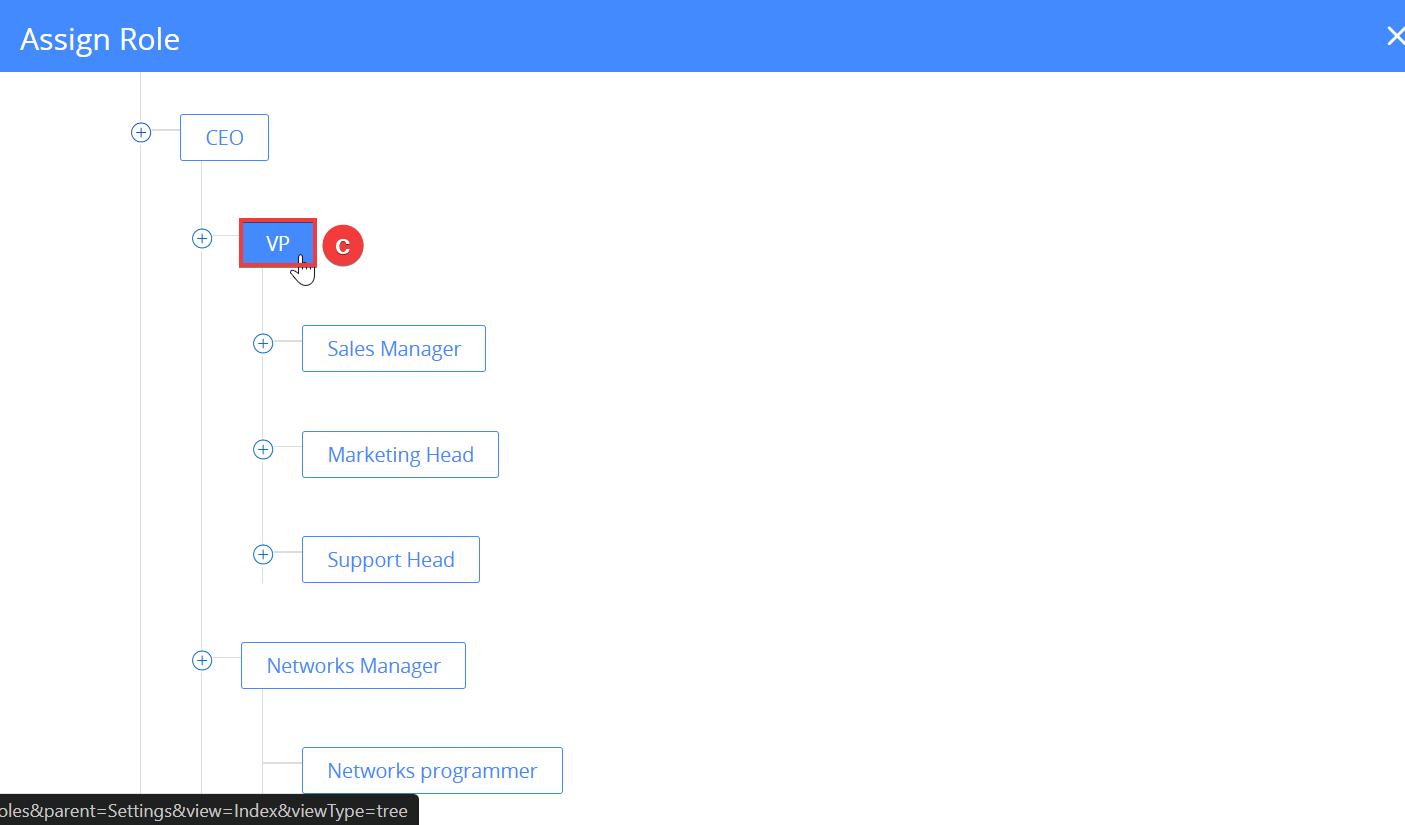
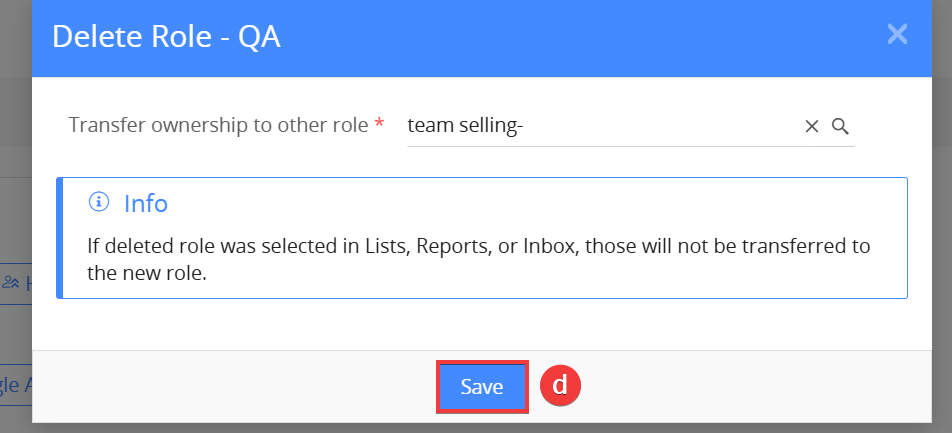
- Select another role to transfer ownership of the role being deleted.
- Click the Search icon under Transfer ownership to other role.
- Click the + icon on the left side of a role to view its subordinate roles.
- Select a role by clicking on it.
- Click Save.
|
|
Understanding Different License Types
License types determine how much access to the CRM users must get. It classifies users as Standard, Single App, and Light Agent. Each user type provides a different level of access.
- Standard: This gives users access to all the modules. You can control access through profiles.
- Single App User: This gives users complete access to one of the five apps – Marketing, Sales, Help Desk, Projects, Inventory, and read-only access to records in other apps.
- Light Agent: This gives users complete access to Organizations, Contacts, Comments, and Calendar, and view and create access to Cases and Internal tickets.
Assigning license type to a role
Follow these steps assign the license type to a role:
- Log in to your CRM account.
- Click the User Menu on the top right corner of the CRM screen.
- Click Settings.
- Look for the User Management section.
- Select Roles.
- Click on a role to edit it.
- Select Assign Privileges Directly to Role from Privileges.
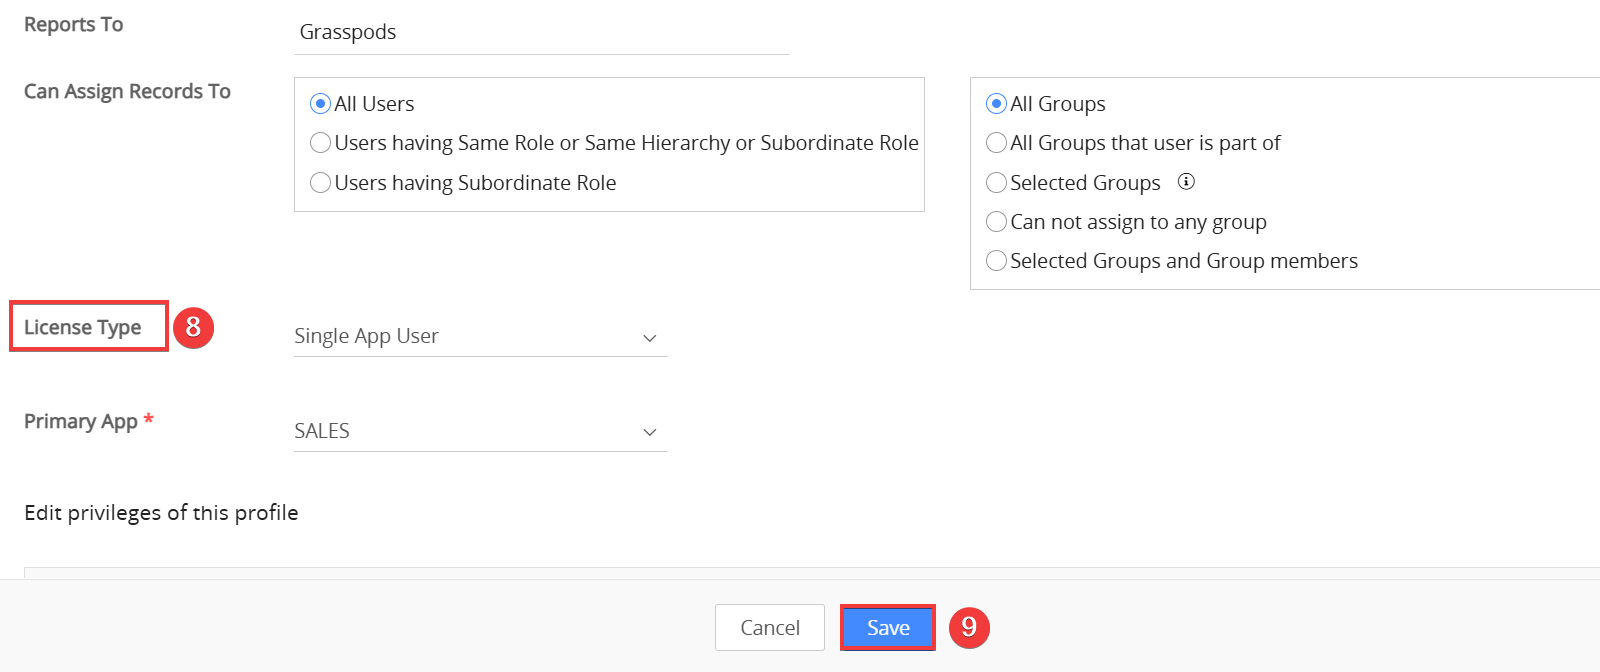
- Select the license type from the License Type field.
- Click Save.
|
|
Dependency of roles on license types
Users of type Light Agent or Single App can have a role with license type Light Agent or Single App User only.
For instance, you create a role, say Sales Specialist, with License Type = Light Agent. When you add a user of type Light Agent, you can only assign the Sales Specialist role to them. Same is the case with Single App User license type.
|
|
Restrictions During Role Changes
- When transferring ownership: You can select only Standard or Admin users when you transfer ownership of related records from a contact or organization record.
- When deleting a role: Only roles of the same type can be selected to transfer users when you are deleting a role. For example, when you try to delete a Standard role, you can transfer its ownership only to another Standard role.
- When transferring ownership during user suspension: When suspending a user, you can transfer ownership of records to another user of higher level or the same level.
- When assigning Profile Privileges: When you select 'Assigning privileges from existing profiles’, you can only choose the Standard role type. You cannot copy privileges from other profiles for Single App and Light Agent roles.
|
|
Assigning a Role to a User
You can assign a role to every CRM user. When you assign a role to a user, they get all the privileges that the role has.
Follow these steps to assign a role to a user:
- Log in to your CRM account.
- Click the User Menu on the top right corner of the CRM screen.
- Click Settings.
- Look for the User Management section.
- Select Users. You will land on the Users page.
- Click on a user record to assign a role.
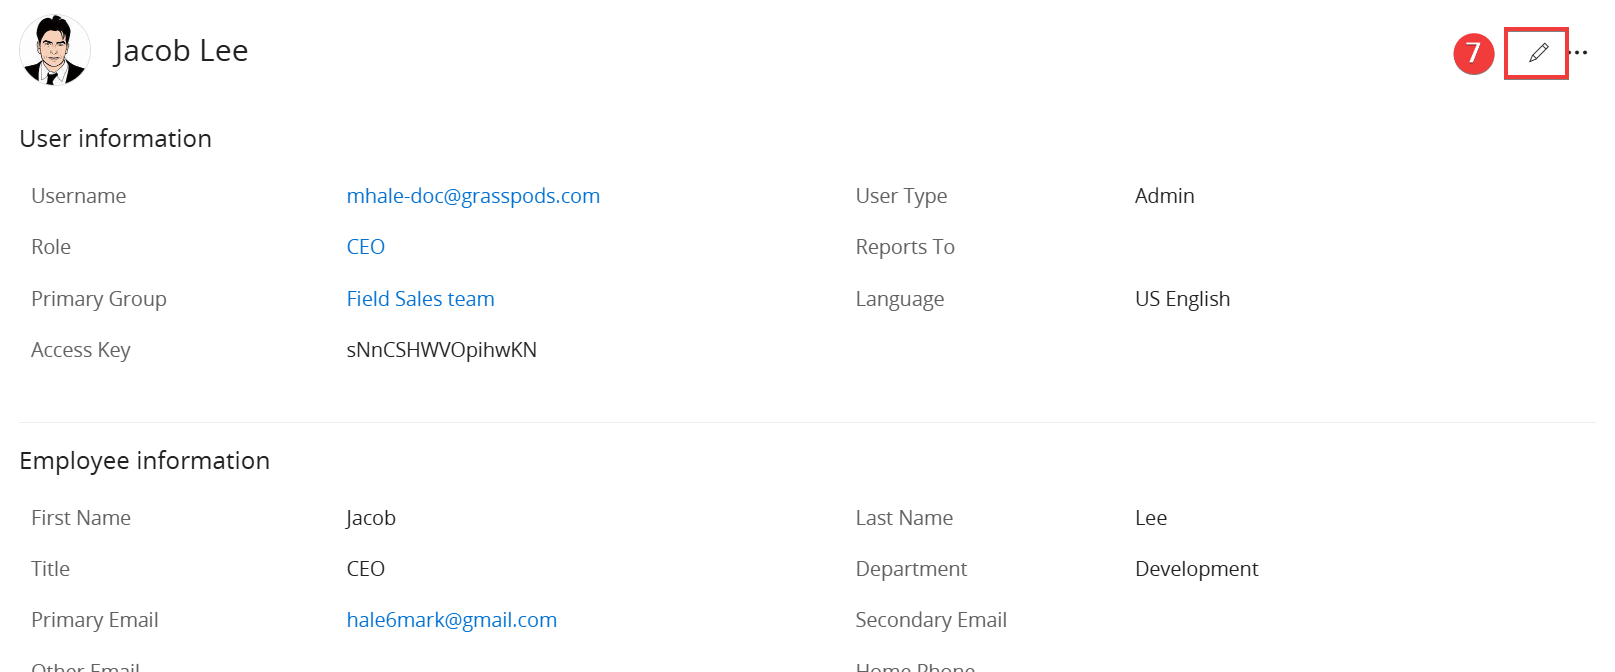
- Click the Edit icon on the top right.
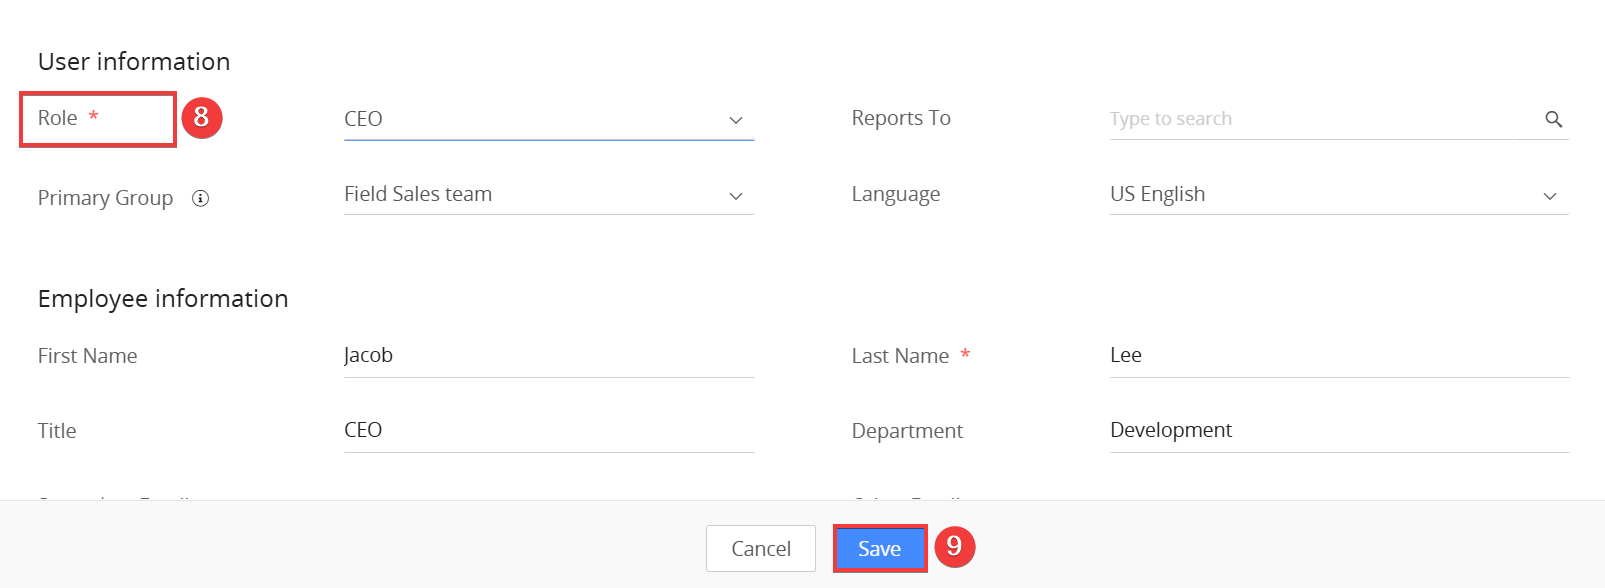
- Look for the Role field and select a role from the drop-down.
- Click Save.
Note: Sharing Rules, Profiles, and Roles pages now display information regarding Sharing Rules, Profiles, and Roles, making it easier for you to distinguish each of them.
To learn more about Users in Vtiger CRM, click here.
|
|
 - Light Agent User