Articles in this section
Automation - SMS Reply Actions
Feature Availability
Vtiger Editions: One Professional | One Enterprise | One AI
Introduction
SMS Reply Actions allow Vtiger CRM to automatically perform specific actions whenever a recipient replies to an SMS campaign. Instead of manually processing each response, you can configure the CRM to take predefined actions based on incoming replies.
For example, when a recipient responds to an SMS campaign, Vtiger can automatically:
- Create or update a Contact
- Create or update a Lead
- Create or update an Organization
- Archive the SMS
- Send an automated reply
To learn more about SMS Campaigns, click here.
Benefits
The benefits of Automating SMS Reply Actions are:
- Improved Efficiency - Automation leads to faster response times, especially for routine queries and tasks.
- Customer Engagement - Automated SMS replies ensure that customers receive timely responses, which can improve their overall experience with your business.
- Time and Cost Savings - By automating SMS replies, businesses can free up staff time that would otherwise be spent on repetitive tasks, allowing employees to focus on more strategic and high-value activities.
- Consistency - Automated replies provide a consistent message and tone in responses, ensuring that customers receive uniform and accurate information.
In this article, you will learn about:
- Setting up Create or Update Actions
- Setting up Archive SMS Action
- Setting up Send Reply Action
Key Terminology
|
|
|
|
|
|
|
|
|
|
|
|
|
|
|
Setting up Create or Update Actions
The Create or Update reply actions allow you to create lead, contact, and organization records using the replies sent to your SMS campaigns. Creating or updating lead, contact, and organization records in the CRM from SMS replies is similar. So, let us take an example to learn about the setup.
Consider sending an SMS campaign that talks about your upcoming product to all your leads. You mention in the SMS that recipients must reply with their name and a ‘Yes’ or ‘No’ to confirm if they want a demo of the product. If a lead responds with a ‘Yes’, you can create a contact record with the help of reply actions.
Let us look at how to configure reply actions.
Follow these steps to set up a reply action:
- Log in to the CRM.
- Click the User Menu in the top right corner of the screen.
- Click Settings. The Settings page opens.
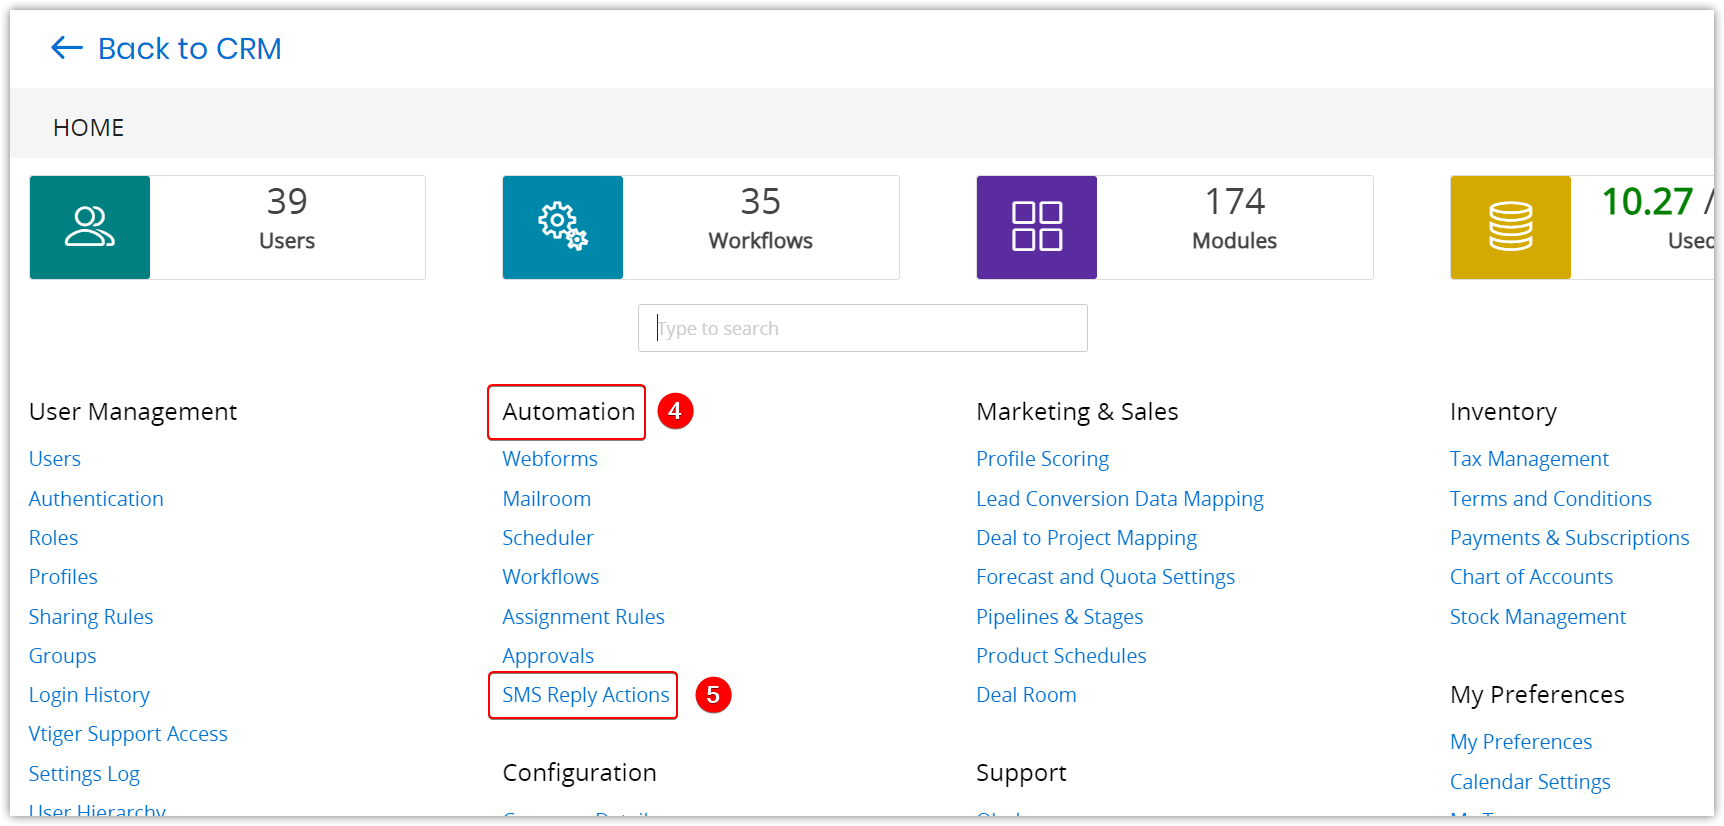
- Look for the Automation section.
- Click SMS Reply Actions.
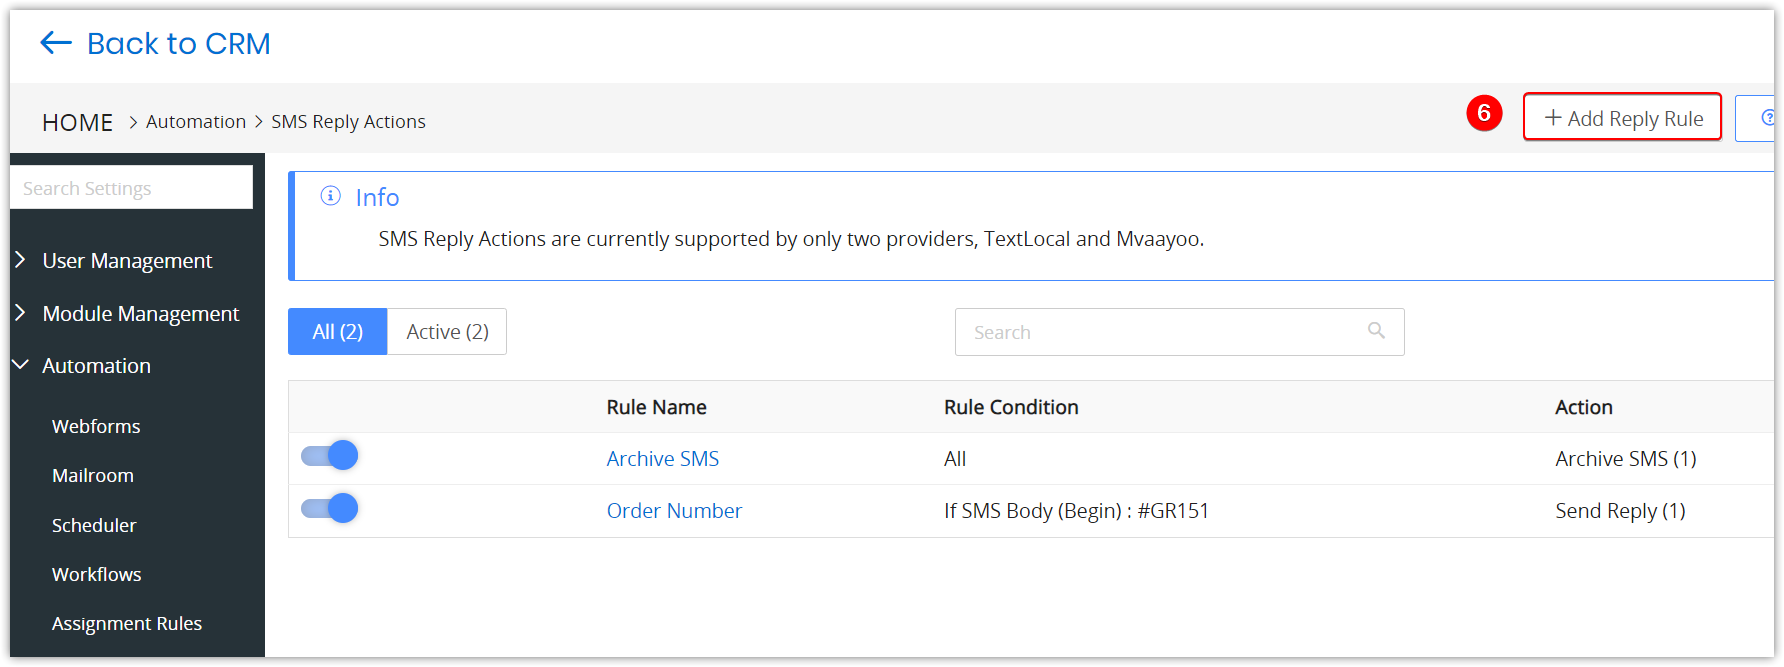
- Click +Add Reply Rule.
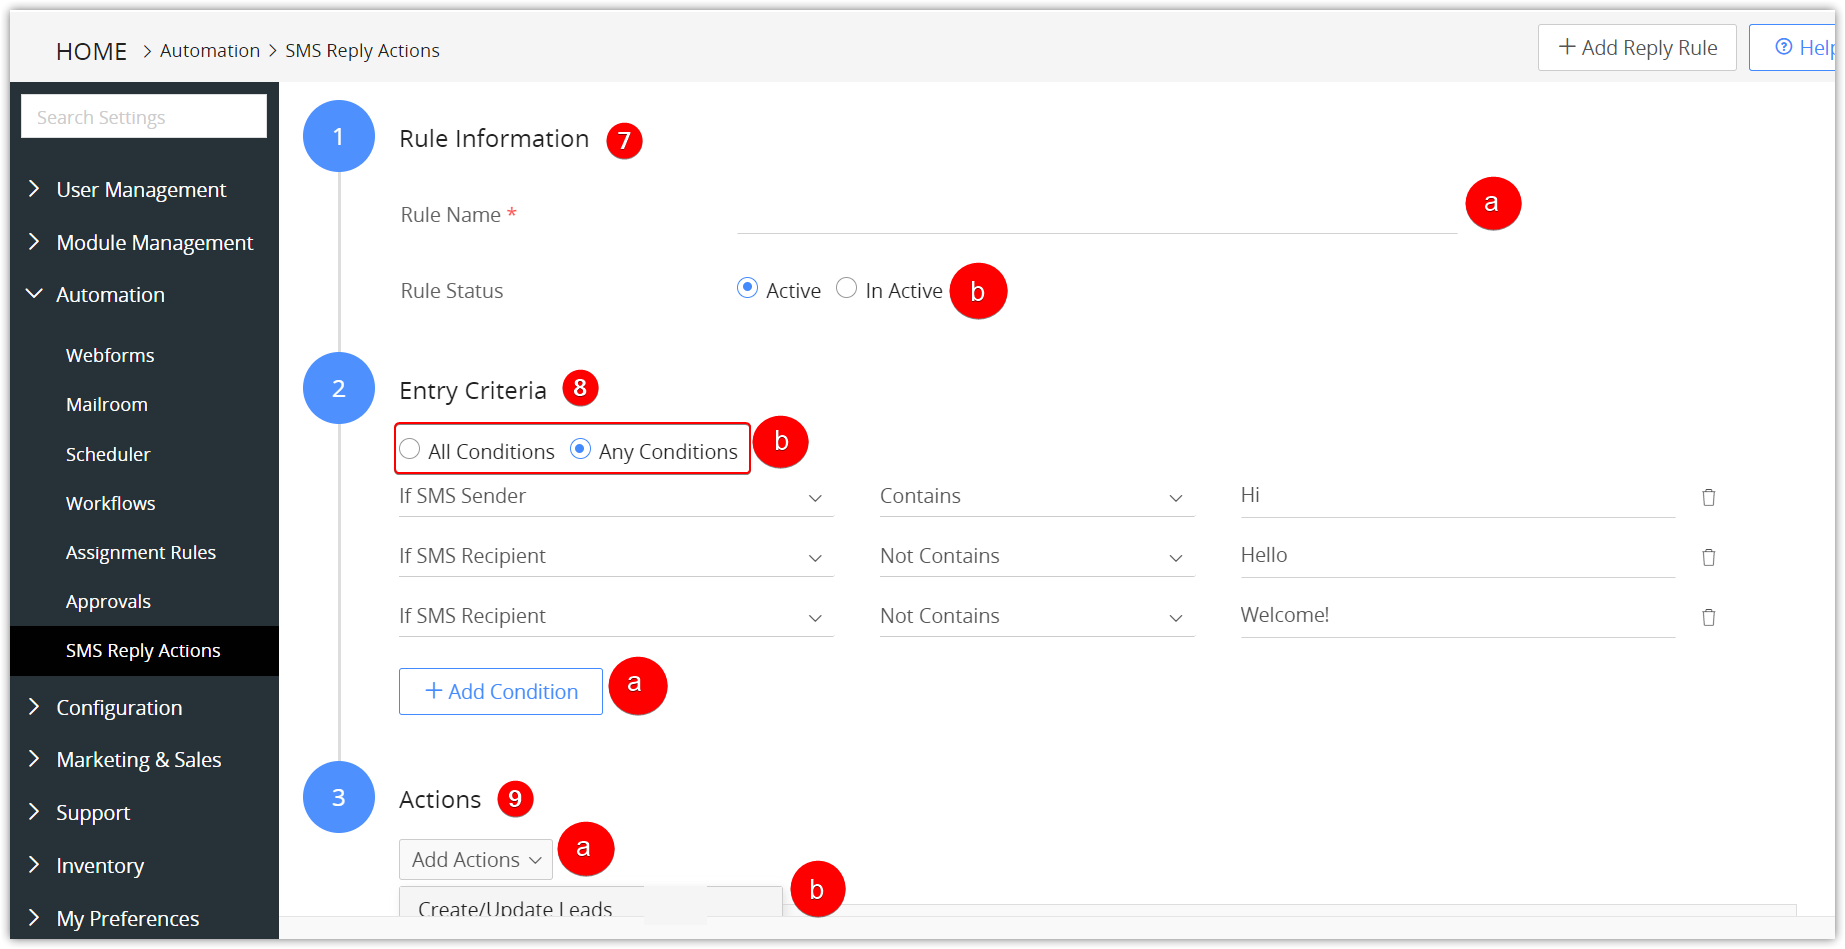
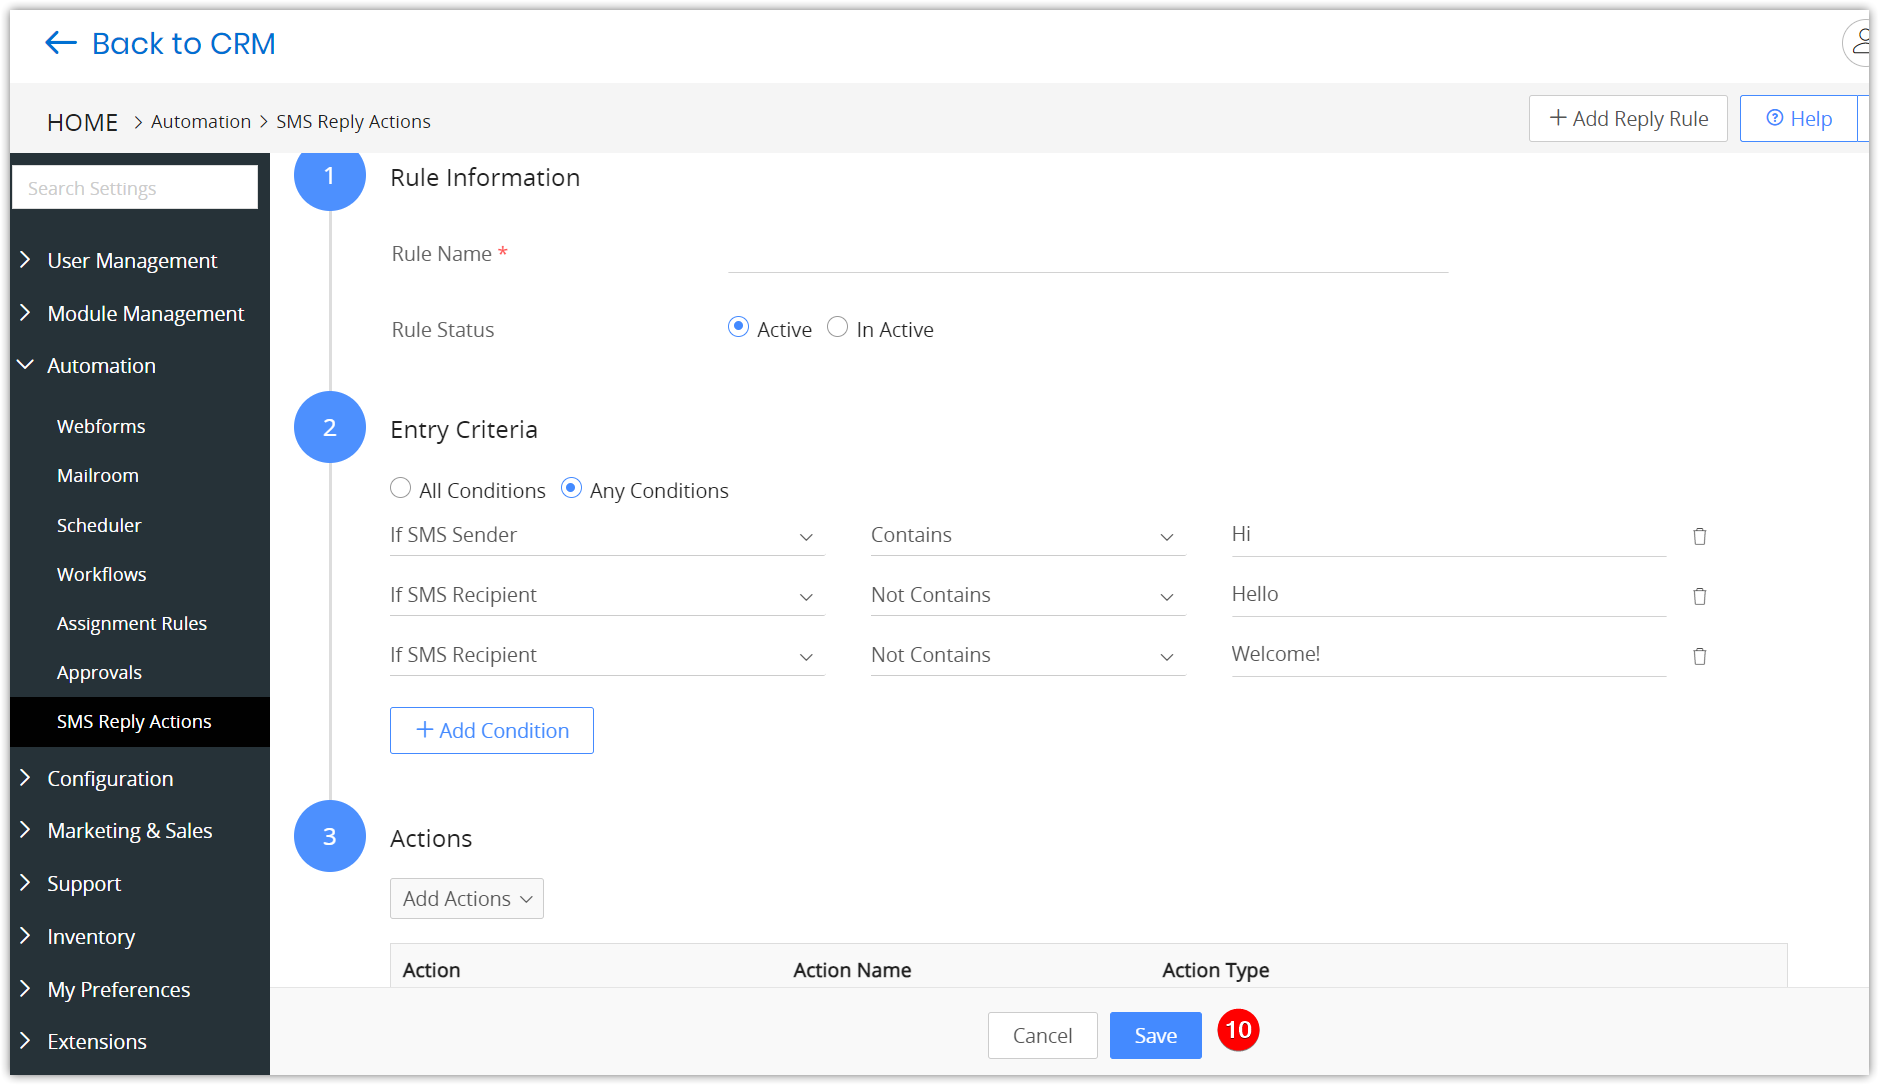
- Enter or select the following Rule Information:
- Rule Name - Enter a rule name, for example, Reply for New Product Demo.
- Rule Status - Enable the Active radio button to enable the reply action
- Specify the Entry Criteria. For example, If SMS Body Contains Yes.
- Click the +Add Condition button to add multiple conditions.
- Choose All Conditions if all the conditions must be met to execute the reply actions, or choose Any Condition if at least one of the conditions must be fulfilled.
- Set up the Actions
- Click the Add Actions drop-down.
- Select Create/Update Contacts. A Create/Update Contacts window opens.
- Enter or select the following information:
- Enter the Action Name.
- Enable the Active radio button in the Action Status.
- Note: An action is not executed if marked as Inactive.
- Enable the Duplicate Prevention toggle button to check for duplicate records when creating new ones. This works only when duplicate prevention is enabled. To learn more about it, click here.
- Enable the Autofill values from the SMS body toggle button to use the text in the SMS body to fill out CRM fields. For example, if the SMS body contains Yes, you can copy it to the Campaign Response (custom) field by enabling the autofill option.
- Choose a Delimiter that separates labels from values in the SMS body. For example, if the SMS body contains First Name: John, then: is the delimiter, First Name is the label, and John Doe is the value that must be copied to a CRM field.
- Enable or disable the radio button for Ignore the first word if you do not wish to consider the first word in the reply message to autofill values. For example, if a reply contains Hi, First Name : John, the word Hi is ignored. However, this option can be disabled if you are providing a sample SMS body.
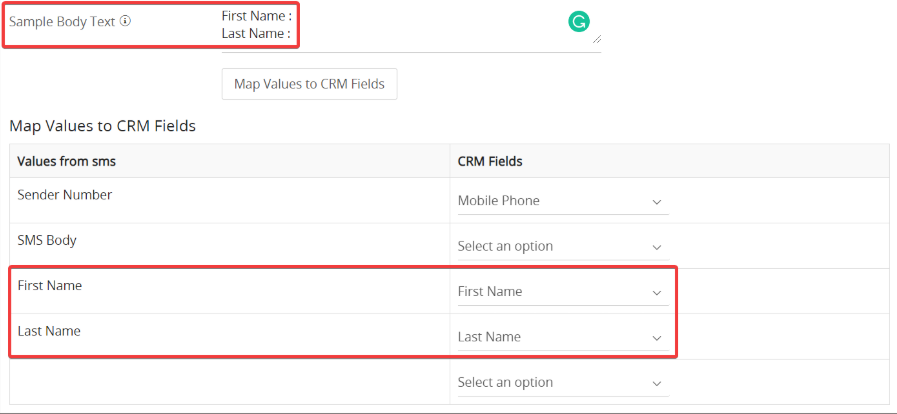
- Add the Sample Body Text.
- Click the Map Values to CRM Fields button.
- Map the SMS body to the CRM fields.
- Click Save. For example, if the SMS body contains First Name: John, Last Name: Doe, then you can map First Name to the contact record’s First Name field and Last Name to the contact record’s Last Name field.
-
Click Save to save the reply action.
Setting up the Archive SMS Action
The Archive SMS action saves incoming messages as an SMS record in the CRM. You can find these records under the main Menu > Essentials > Conversations.
Follow these steps to set up Archive SMS:
- Log in to the CRM.
- Click the User Menu in the top right corner of the screen.
- Click Settings. The Settings page opens.
- Look for the Automation section.
- Click SMS Reply Actions.
- Click the +Add Reply Rule button.
- Enter or select the following Rule Information:
- Rule Name - Enter a rule name, for example, Reply for New Product Demo.
- Rule Status - Enable the Active radio button to enable the reply action
- Specify the Entry Criteria. For example, if SMS Recipient Contains John Doe.
- Click the +Add Condition button to add multiple conditions.
- Choose All Conditions if all the conditions must be met to execute the reply actions, or choose Any Condition if at least one of the conditions must be fulfilled.
- Set up the Actions
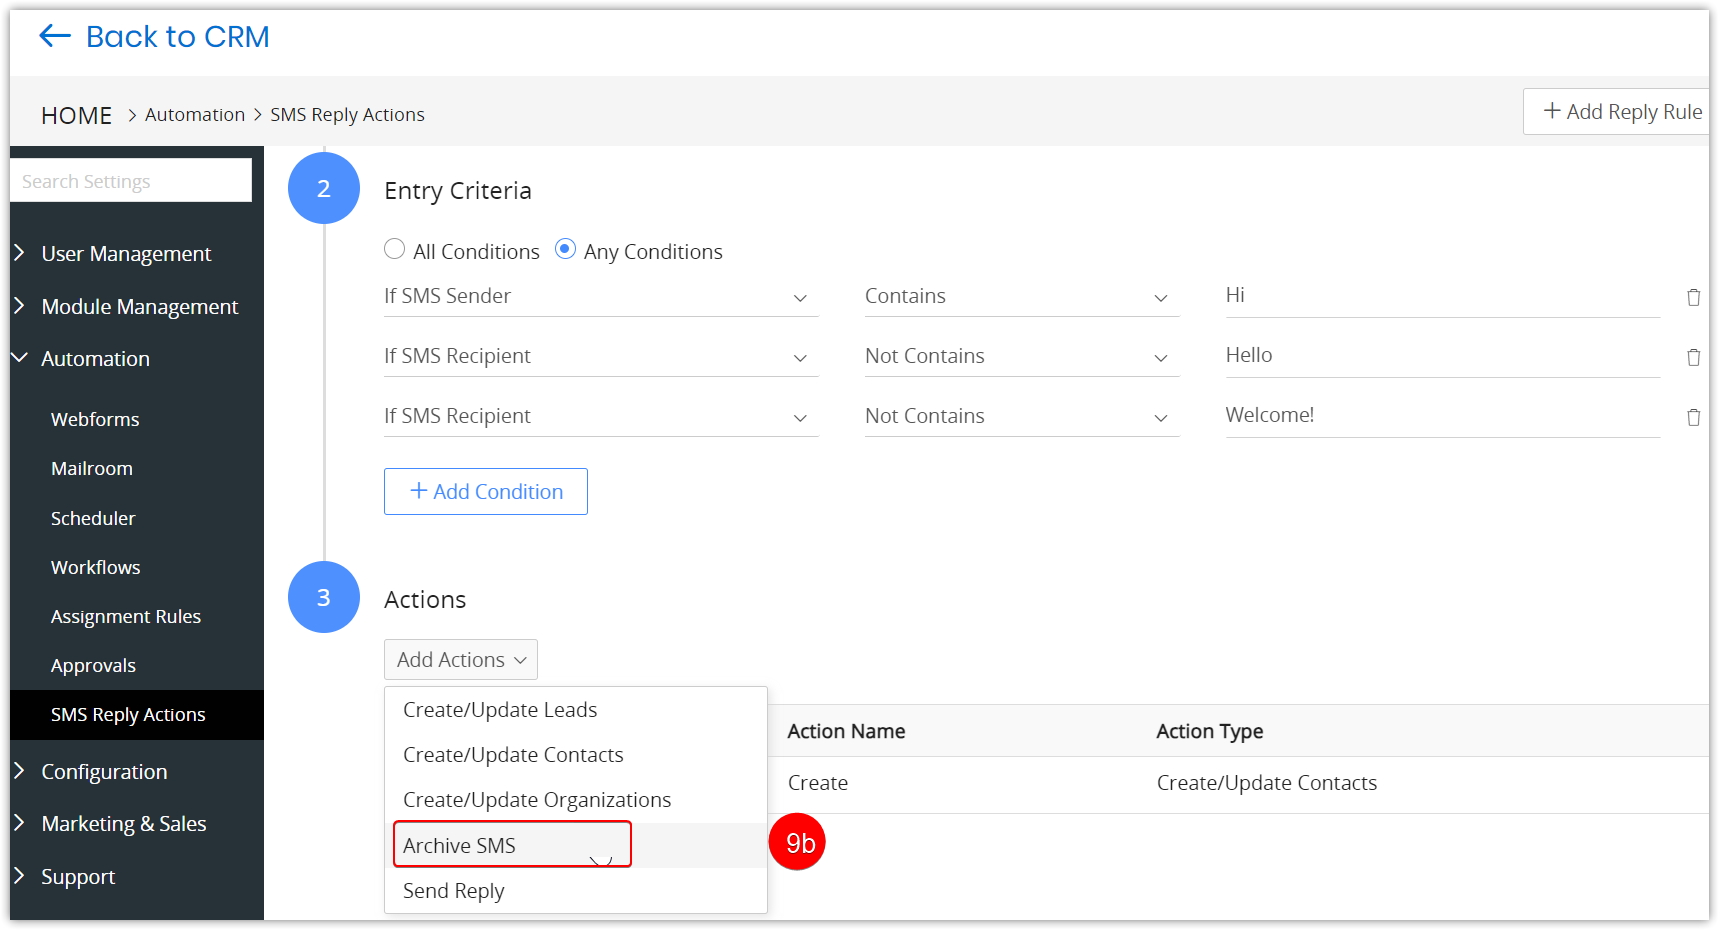
- Click the Add Actions drop-down.
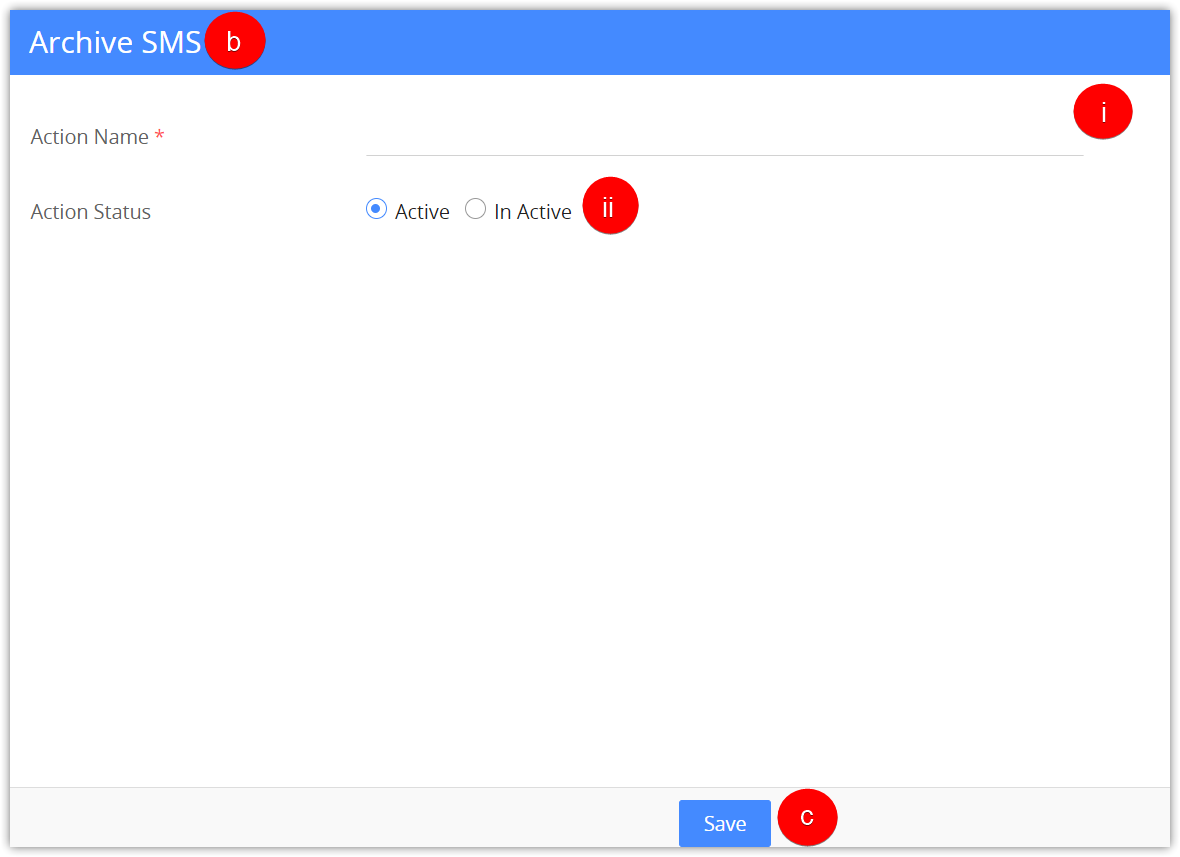
- Select Archive SMS. An Archive SMS window opens.
- Enter the Action Name.
- Set Action Status to Active if you want to archive SMSes. Otherwise, set it to Inactive.
- Click Save to save the reply action.
Field mapping
When an inbound SMS is processed, Vtiger automatically maps the SMS details to the corresponding fields in the SMS record. This ensures that the record is created with the required information without any manual input.
The following field mappings are applied automatically:
- Message: Stores the content of the incoming SMS.
- Assigned To: Stores the owner of the SMS campaign.
- Direction: Automatically set to Inbound to indicate that the message was received.
Setting up the Send Reply Action
The Send Reply action allows you to automatically send a predefined SMS whenever an incoming message is received
Follow these steps to set up the Send Reply action:
- Log in to the CRM.
- Click the User Menu in the top-right corner of the screen.
- Click Settings. The Settings page opens.
- Look for the Automation section.
- Click SMS Reply Actions.
- Click the +Add Reply Rule,
- Enter the following Rule Information:
- Rule Name - Enter a rule name, for example, Reply for New Product Demo.
- Rule Status - Enable the Active radio button to enable the reply action.
- Specify the Entry Criteria. For example, If SMS Body Contains No.
- Click the +Add Condition button to add multiple conditions.
- Choose All Conditions if all the conditions must be met to execute the reply actions, or choose Any Condition if at least one of the conditions must be fulfilled.
- Set up the Actions
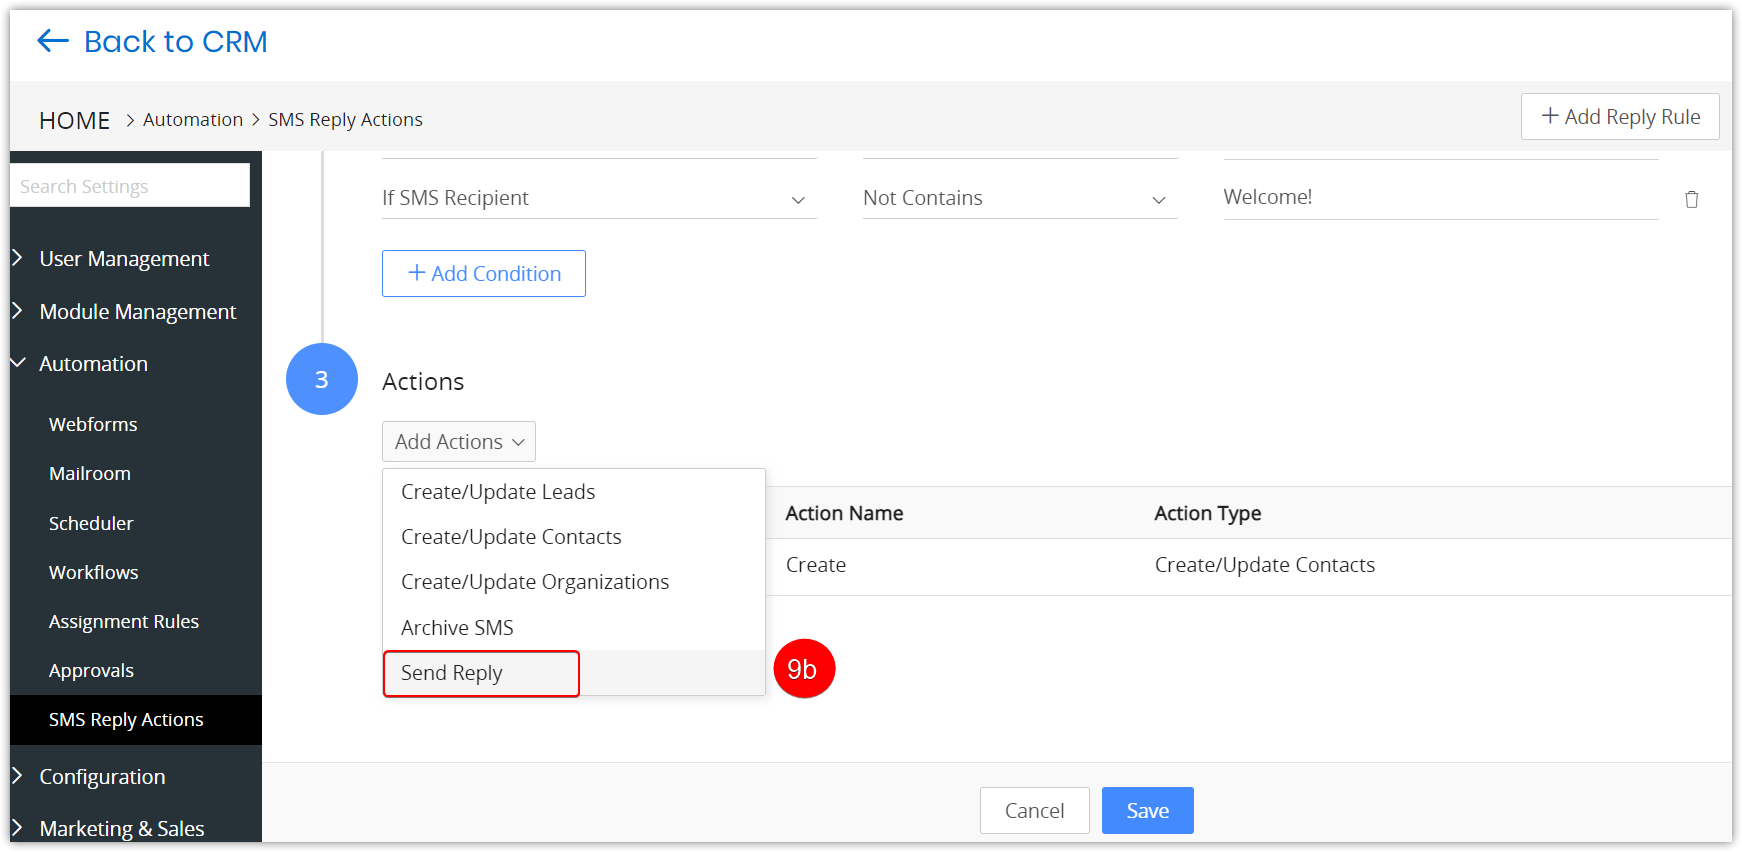
- Click the Add Actions drop-down.
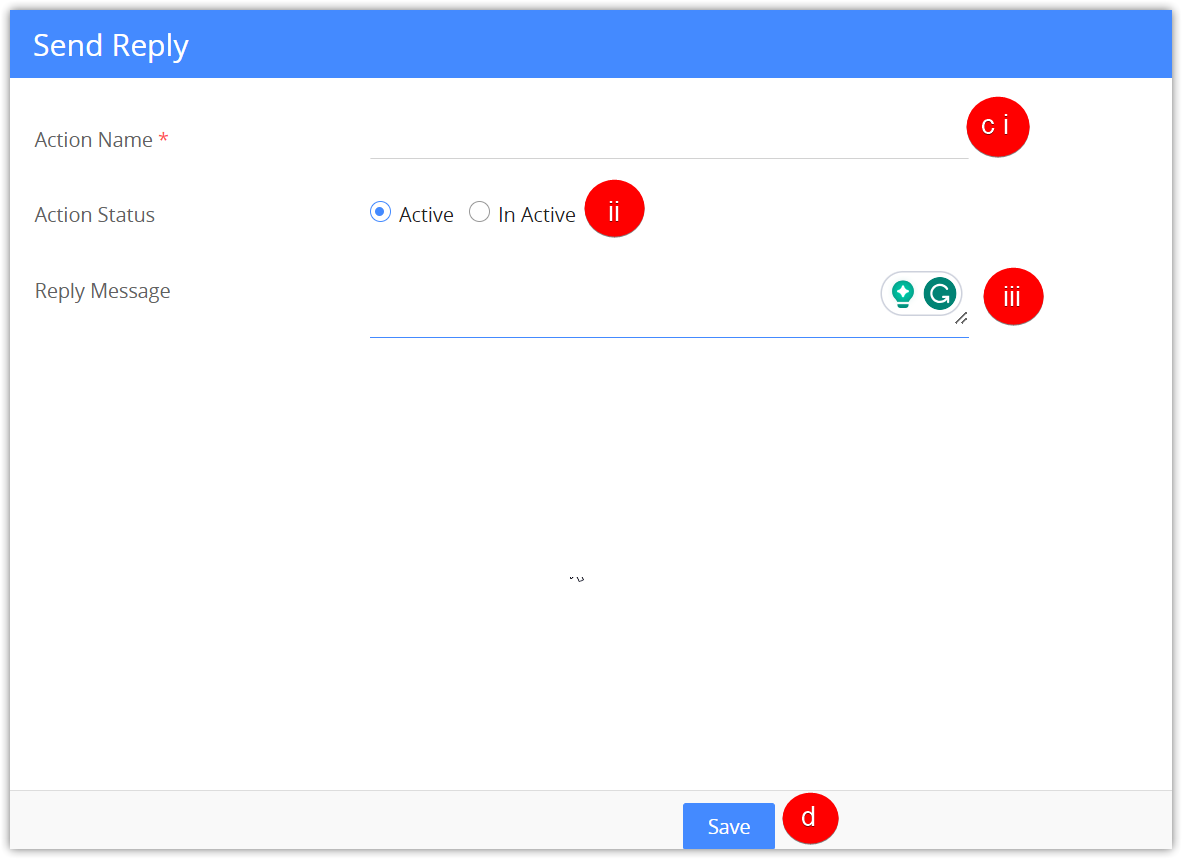
- Select Send Reply.
- Enter or select the following information:
- Enter the Action Name.
- Set Action Status to Active if you want to archive SMSes. Otherwise, set it to Inactive.
- Type your message in the Type Message field
- Click Save.
- Click Save to save the reply action.
Once configured, Vtiger automatically sends the specified reply message whenever an incoming SMS matches the configured conditions.