Articles in this section
Authenticate Emails with SPF, DKIM, and SenderID Auto forward your emails to Vtiger Managing User Profiles Automate Outgoing Emails in Email Settings Automation - Approvals Automation - Assignment Rules Set up Multi-path Workflows Creating a Scheduled Workflow Automation - Scheduler Creating a Workflow Webforms in Vtiger CRM Set up a Workflow Action to Create Event Set up a Workflow Action to Create Records Set up a Workflow Action to Create Task Set up a Workflow Action to Invoke Custom Function Set up a Workflow Action to Create an SMS Task Set up a Workflow Action to Send Mails Set up a Workflow Action to Update Fields Automation - Workflow Action - Webhook Automation - Workflows - Vtiger Expressions Configuration - Business Hours Configuration - Company Details Configuration - Consents Configuration - Customer Portal Maps in Vtiger CRM Configuration - Usage Details Configuring Encrypted Data Fields in Vtiger CRM Configure Picklist Dependencies Considerations for Deactivating Vtiger Users Control Fields and Record Displays using Configuration Editor Create Reminders for Records and Inbox Create a field of a Grid type Dealing with Currencies and Taxes Enable Desktop Notifications on Chrome Web Browsers Vtiger CRM Add-ons IMAP Configuration - 2-way sync between Vtiger and IMAP providers Setting up Autopay & Payment Gateways Inventory - Tax Management Inventory - Terms and Conditions Login to Vtiger on SSO SAML using ADFS Mailroom Functionality for Different Scenarios Manage Multiple Currencies Marketing and Sales - Deal to Project Mapping Marketing and Sales - Lead Conversion Data Mapping Marketing and Sales - Profile Scoring Module Management - Labels Editor Module Management - Module Numbering Configure My Preferences Feature My Preferences - Calendar Settings Tags in Vtiger My Preferences - Notification Preferences SAML Support in Vtiger CRM Vtiger Mailroom Settings - Configure Module Settings Settings - Create Dynamic Fields and Layouts Module Management - Creating a Relationship Between Modules Settings - Customize Records and Fields for your Business Settings - How to set email autoresponder to Webform submission? Settings - Left Menu Settings - Manage Global Picklists in Vtiger Settings - Set up your Support Team Settings - Start Up Page Settings - Working with Picklist Values Module Management - Module Builder Support - SLA Policies Troubleshooting Login Issues Add-Edit Unsubscribe Links in your Email Template User Management - Authentication User Management - Encrypted Field Access Logs User Management - Groups User Management - Login History User Management - Profiles User Management - Roles User Management - Settings Log User Management - Sharing Rules User Management - Users User Management - Vtiger Support Access Vtiger Buzz - Chrome Extension for Notifications Vtiger Implementation wizard Vtiger Language Support Configuring Websense Trackers Websense - Widgets Module Management - Module Layouts & Fields Generate and Manage Third-party App Passwords in Yahoo Configuring App Passwords for Gmail Outgoing Server and Yahoo Mail Configuration - Storage Guard Customizing your Self-Service Portal Theme Using CSS Styles Automation - SMS Reply Actions Adding Hidden Fields to a Webform Configuring Dependent Fields and Blocks for Modules Auto forward Emails from Microsoft Office 365 Adding Custom Module Login Page Customization Settings - Personalize Module Layouts Module Management - Modules Duplicate Prevention in Modules Formula Fields Creating Custom Filters

Adding a local DNS Entry

S
Sreenivas K
19 Jul, 2021 - Updated  3 years ago

Adding a DNS entry

In case you are not able to access your CRM due to a DNS issue, please do the following

Step 1 - Copy your instance URL.  If you do not know it, it might be in your browser history. If you type vtiger.com in the browser URL page, you might see the pages you visited which will include the CRM pages.


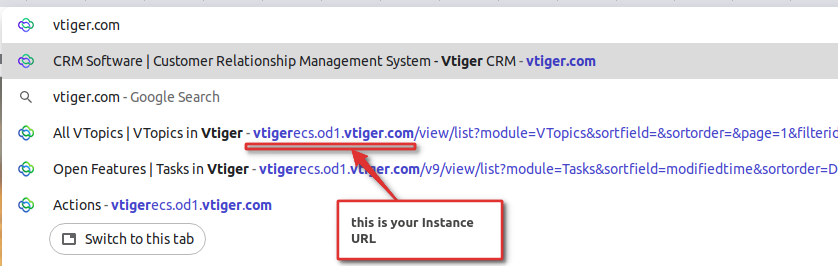
Note: If you are not able to get the instance URL. please reach us on chat or email us and we can get it for you. 

Step 2 - Find the IP Address for your CRM instance.  For this, copy the instance URL to the end of this address and open it in the browser.

https://www.whatsmydns.net/#A/

Ex: https://www.whatsmydns.net/#A/vtigerecs.od1.vtiger.com


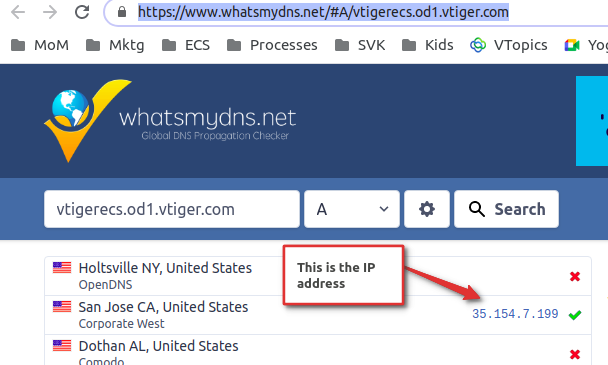
Step 3 : Add a new line in your "hosts" file with the IP Address followed by your instancel URL as shown in the picture below (The IP address and URL pointed are only for illustration. Please add the IP Address of your instance and the Instance URL of your CRM). You will need to have admin privileges 

If you are in Windows - C:\Windows\System32\drivers\etc (Run it as administrator)
If you are in Mac or Linux -/etc/hosts  


Step 4 - Login with your username and password from vtiger.com/login


Home Privacy Policy Terms of Service Security Center Policy & Legal Center Contact Us
© Copyright 2025 Vtiger. All rights reserved.
Powered by Vtiger
Facebook Twitter Linkedin Youtube