Articles in this section
Authenticate Emails with SPF, DKIM, and SenderID Auto forward your emails to Vtiger Managing User Profiles Automate Outgoing Emails in Email Settings Automation - Approvals Automation - Assignment Rules Set up Multi-path Workflows Creating a Scheduled Workflow Automation - Scheduler Creating a Workflow Webforms in Vtiger CRM Set up a Workflow Action to Create Event Set up a Workflow Action to Create Records Set up a Workflow Action to Create Task Set up a Workflow Action to Invoke Custom Function Set up a Workflow Action to Create an SMS Task Set up a Workflow Action to Send Mails Set up a Workflow Action to Update Fields Automation - Workflow Action - Webhook Automation - Workflows - Vtiger Expressions Configuration - Business Hours Configuration - Company Details Configuration - Consents Configuration - Customer Portal Maps in Vtiger CRM Configuration - Usage Details Configuring Encrypted Data Fields in Vtiger CRM Configure Picklist Dependencies Considerations for Deactivating Vtiger Users Control Fields and Record Displays using Configuration Editor Create Reminders for Records and Inbox Create a field of a Grid type Dealing with Currencies and Taxes Enable Desktop Notifications on Chrome Web Browsers Vtiger CRM Add-ons IMAP Configuration - 2-way sync between Vtiger and IMAP providers Setting up Autopay & Payment Gateways Inventory - Tax Management Inventory - Terms and Conditions Login to Vtiger on SSO SAML using ADFS Mailroom Functionality for Different Scenarios Manage Multiple Currencies Marketing and Sales - Deal to Project Mapping Marketing and Sales - Lead Conversion Data Mapping Marketing and Sales - Profile Scoring Module Management - Labels Editor Configure My Preferences Feature My Preferences - Calendar Settings Tags in Vtiger My Preferences - Notification Preferences SAML Support in Vtiger CRM Vtiger Mailroom Settings - Configure Module Settings Settings - Create Dynamic Fields and Layouts Module Management - Creating a Relationship Between Modules Settings - Customize Records and Fields for your Business Settings - How to set email autoresponder to Webform submission? Settings - Left Menu Settings - Manage Global Picklists in Vtiger Settings - Set up your Support Team Settings - Start Up Page Settings - Working with Picklist Values Module Management - Module Builder Support - SLA Policies Troubleshooting Login Issues Add-Edit Unsubscribe Links in your Email Template User Management - Authentication User Management - Encrypted Field Access Logs User Management - Groups User Management - Login History User Management - Profiles User Management - Roles User Management - Settings Log User Management - Sharing Rules User Management - Users User Management - Vtiger Support Access Vtiger Buzz - Chrome Extension for Notifications Vtiger Implementation wizard Vtiger Language Support Configuring Websense Trackers Websense - Widgets Module Management - Module Layouts & Fields Generate and Manage Third-party App Passwords in Yahoo Configuring App Passwords for Gmail Outgoing Server and Yahoo Mail Configuration - Storage Guard Customizing your Self-Service Portal Theme Using CSS Styles Automation - SMS Reply Actions Adding Hidden Fields to a Webform Configuring Dependent Fields and Blocks for Modules Auto forward Emails from Microsoft Office 365 Adding Custom Module Login Page Customization Settings - Personalize Module Layouts Module Management - Modules Duplicate Prevention in Modules Formula Fields Creating Custom Filters Adding a local DNS Entry

Module Management - Module Numbering

This article will help you change the numbering and sequence of your CRM records.
R
Rashmi Kashyap
29 Apr, 2024 - Updated  11 months ago

Introduction


Do you want the records under each module to be listed in a sequence?


Vtiger CRM offers default numbering that corresponds with every module and every record. The fun part is you can customize and create a record number sequence as per your business needs. Whenever you create a new record, a unique number will be automatically assigned to it.

Do not worry; this process will not affect your existing records. The new numbering will be applied only to records created in the future.


Don’t slip; take this tip!

If you wish to maintain consistency in your CRM, you can configure this setting as soon as you create the CRM account before adding records to your CRM account.

Feature Availability

One Growth

One Pilot

One Professional

One Enterprise

Feature Availability

Module Numbering


Benefits

The following are the benefits of Module Numbering:

  • Organizational Structure: Using module numbers helps organize the different components in the CRM. This makes it easier to find and access specific modules.
  • Ease of Navigation: Using numbers to label different sections in a CRM makes it easy to find what you need quickly. This means you can jump directly to the right section without wasting time searching through everything.
  • Consistency: Numbering ensures consistency in the module hierarchy, making it easier for new users to familiarize themselves with the CRM's layout and structure.
  • Customization: Assigning numbers to modules can be part of customizing the CRM interface, allowing administrators to arrange modules in a specific order that aligns with the organization's workflow.
 

In this article, you will learn about:

  • Editing the Numbering

Key Terminology

Key Term

Definition

Module Numbering

It is a feature that allows administrators to assign numerical identifiers to modules within the CRM interface.

Prefix

It is a customization option that allows administrators to add a text-based identifier before the numerical identifier is assigned to modules.

Start Sequence

It allows administrators to specify a starting number for the sequence of numerical identifiers assigned to modules.


Editing the Numbering

If you know what sequence you want in the CRM records, then changing them in the CRM is not a tedious job.

Follow these steps to edit the numbering of records:

  1. Log in to the CRM account.
  2. Click the User Menu on the top right corner of the page.
  3. Click the Settings button.
  1. Look for the Module Management section.
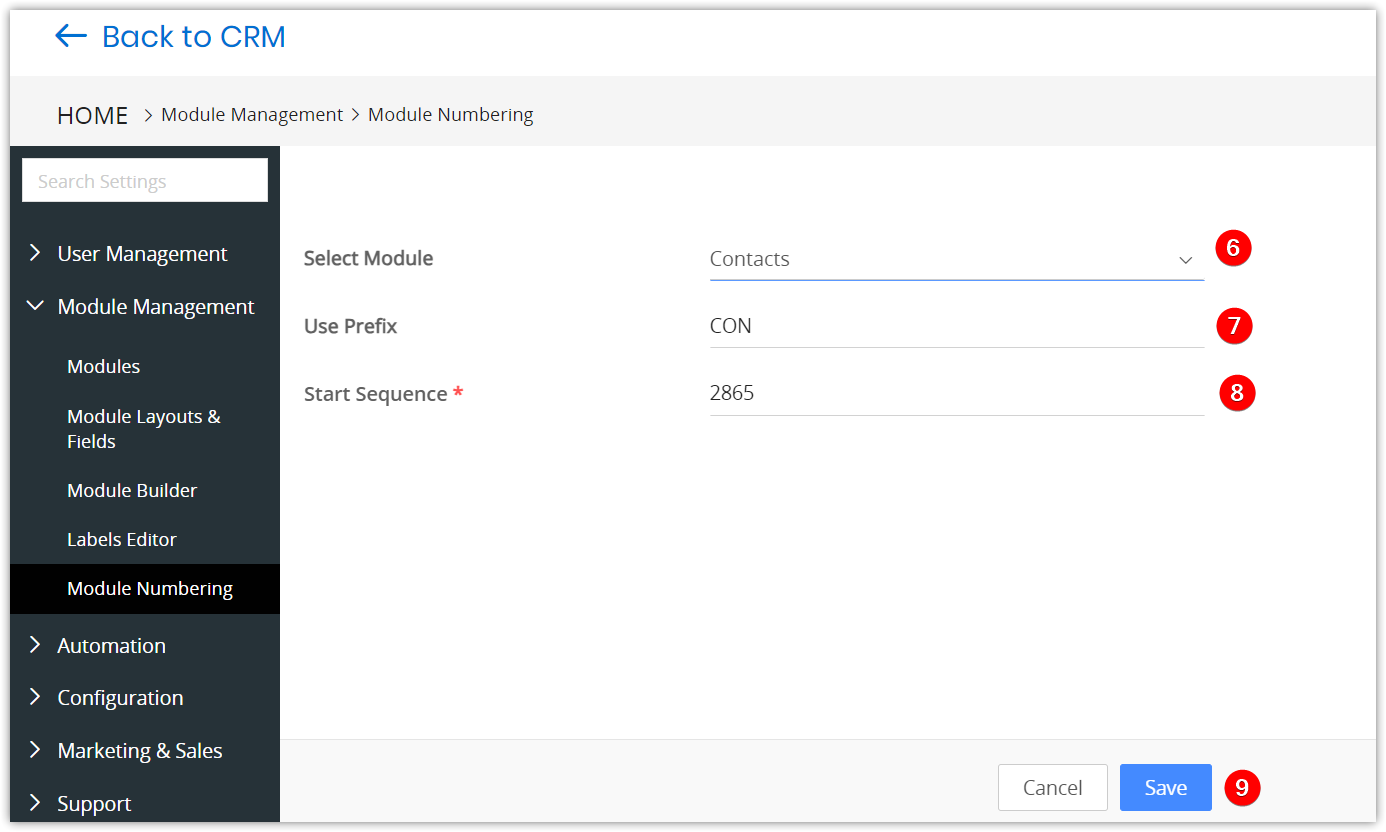
  2. Click Module Numbering. Select the Module from the drop-down. You will see the previous Prefix and Start Sequence numbers.
 
  1. Select the Module from the drop-down. You will see the Prefix and Start Sequence numbers.
  2. Enter the prefix of your choice in the Use Prefix field. 
  3. Enter the number of your choice in the Start Sequence field. This number will be the start of the sequence of numbering the newly created records.
  4. Click Save.
Click Cancel to discard all changes.

The sequence is changed successfully. You can now see that the sequence numbering will start creating a new record or when new records are imported.

This sequence is updated chronologically in the Detail View > [Module] Number field of any newly created record. This field is not editable in the record.


Note:

  • Once you save the sequence number, it cannot be changed to any lower value, irrespective of whether you create a record or not.
  • The newly created records will have a new sequence number.
  • To start a new sequence numbering, you need to provide a different prefix. For example, in Invoices, instead of INV, you can use the prefix INV-OCT-2020.
Related articles
Module Management - Labels Editor Duplicate Prevention in Modules AI Widgets in Vtiger CRM
Home Privacy Policy Terms of Service Security Center Policy & Legal Center Contact Us
© Copyright 2025 Vtiger. All rights reserved.
Powered by Vtiger
Facebook Twitter Linkedin Youtube