Articles in this section
Managing your Vtiger CRM Subscriptions & Billing
Introduction
When you sign up for a free 15-day trial, you will have complete access to the features of the Vtiger CRM On-Demand application. If your free trial ends and you haven’t thoroughly tested the product, you can extend the trial for seven more days.
Are you satisfied with the product? Then go for a paid subscription. Select the edition that suits your business and activate the plan today.
After the payment, the data you entered during the trial period will automatically be transferred to your paid account. An admin can subscribe to Vtiger by making payments using credit or debit cards or through online portals.
This article will take you through the complete billing process in Vtiger, making your payment process more straightforward.
Vtiger accepts the following currencies for subscription and billing:
- SGD - Singapore Dollar ($)
- CAD - Canadian Dollar ($)
- GBP - British Pound (£)
- EUR - Euro (€)
- AUD - Australian Dollar ($)
- BRL - Brazilian Real (R$)
- ZAR - South African Rand (R)
Choosing a Plan
So how do you know which plan is right for you? Is it sufficient to meet your business needs? Is it within your budget?
We recommend you pick the plan closest to what you think helps your business. During your trial period, you can still explore the product and see which plan suits your requirements.
Before you subscribe to Vtiger CRM, you should know all the apps and editions we provide. If you are a new user, you can visit our website and read about different plans and their pricing.
If you use the Vtiger On-Demand trial version, you can access all the modules and features in the CRM. But if you wish to choose another plan, you must follow these steps.
Follow these steps to choose another plan:
- Log in to your CRM account.
- Click the User Menu on the top right corner of the page.
- Click the Billing button. Now you are in the Subscriptions details tab. Here you will see the CRM Plan.

- Click Change Plan to see the following details:
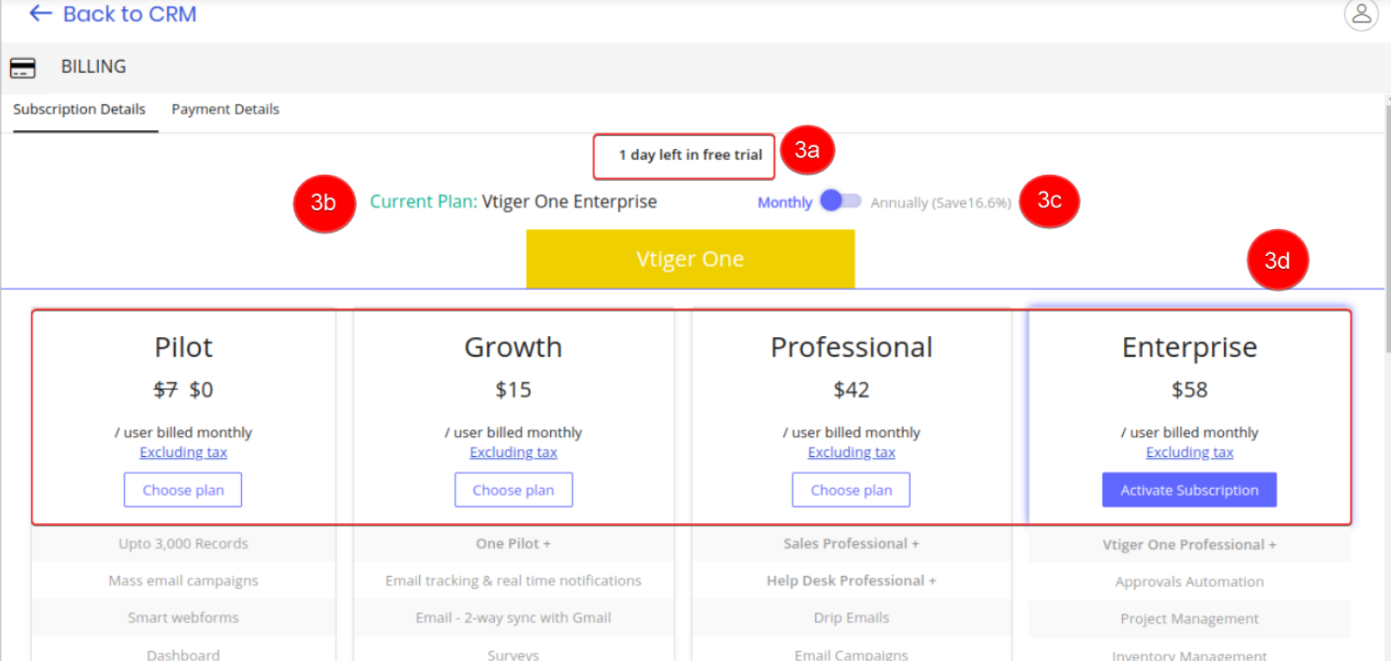
- The number of days left in your trial account.
- The current plan you are using.
- Monthly or Annual subscription.
- Different editions and their pricing.
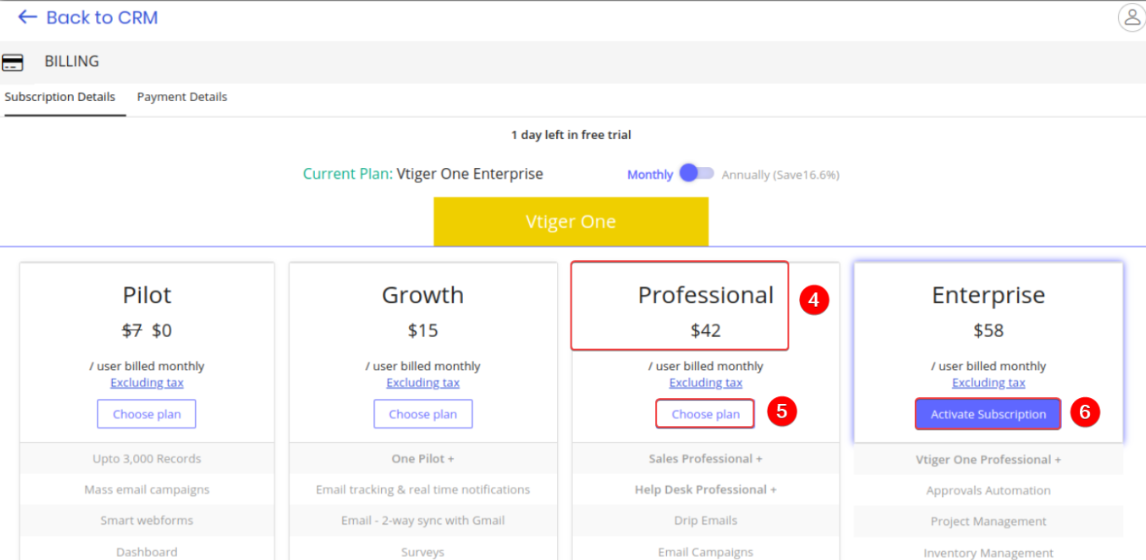
- Select the app and the edition you want to subscribe to.
- Click the Choose Plan button.
|
|
- Click the Activate Subscription button to subscribe to the edition of your choice.

- Click Cancel Subscription to cancel the subscription.
Making the Payment
You have chosen the plan and the edition that suits your needs. Let us move on to the next step, which is paying for the subscription. If you want more information on All-in-One pricing, click here.
After choosing the subscription, you will be redirected to the Payments page, where you will pay.
|
|
Follow these steps to enter your card details to make the payment:

- Click the Payment Details tab.
- Here you will see the following:
- Billing Details section.
- Payment Method section.
- The amount that you will be billed for.
- The number of users who can use the product.
- The plan that you have chosen.
- The date on which the first invoice was generated
- The date on which the next invoice will be created.
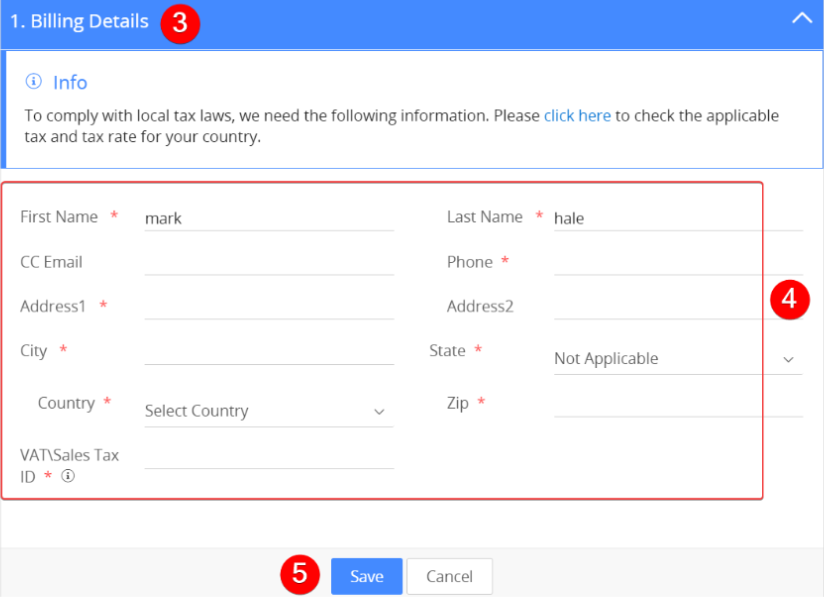
- Click the Billing Details section.
- Enter all the necessary information.
- Click Save.
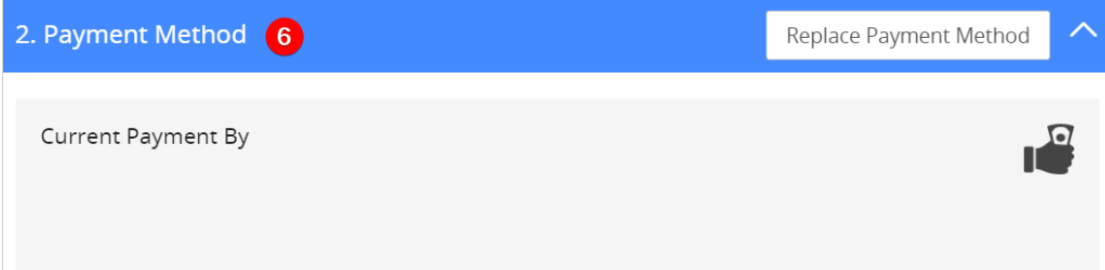
- Click the Payment Method section.
- Select Replace Payment Method.
- Enter Card details.
- Click Add Payment.
We have two different payment methods based on whether you are an Indian or non-Indian customer.
For non-Indian customers
If you are a non-Indian customer, you have the options listed below to finish your payment.
Pay via debit or credit card
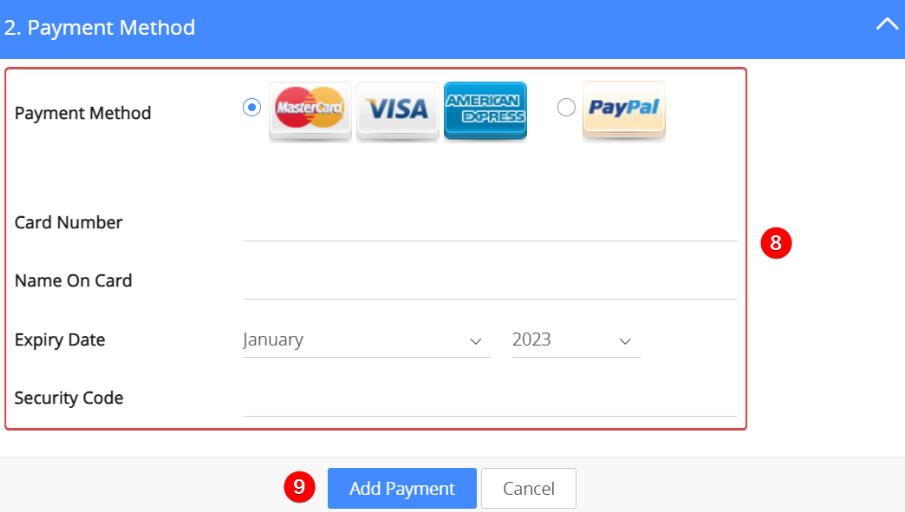
You can pay using MasterCard, Visa, or American Express cards. To do so, select the corresponding radio button, provide your card details, and click the Add Payment button.
|
|
Pay via PayPal
If you would like to pay via PayPal, then follow the instructions:
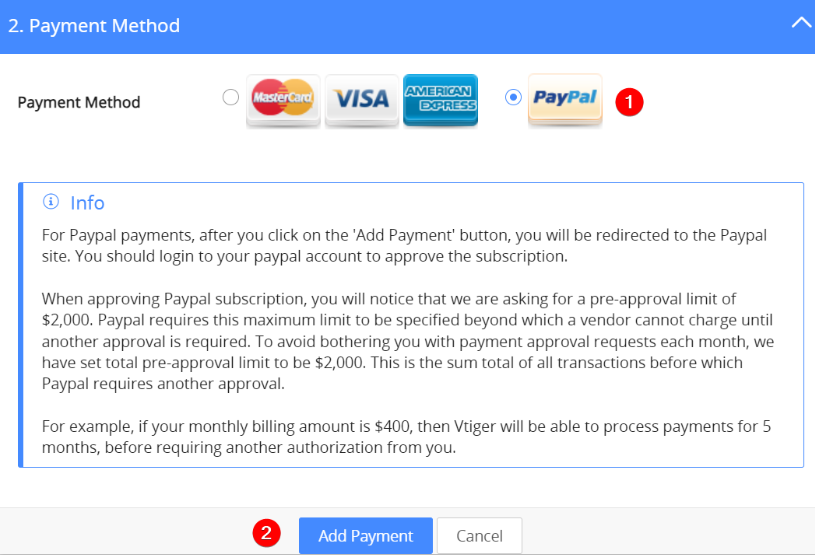
- Click the corresponding radio button.
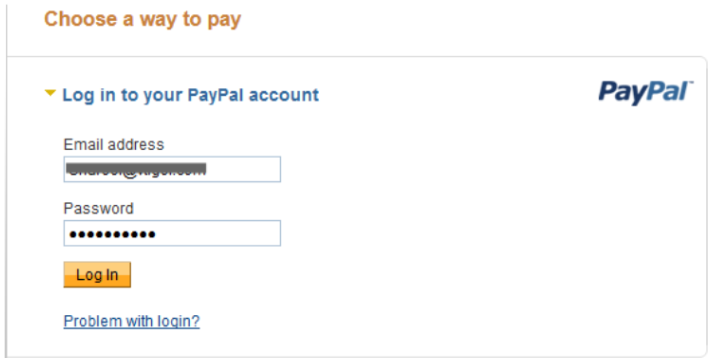
- Click the Add Payment button. A Paypal log in page opens.
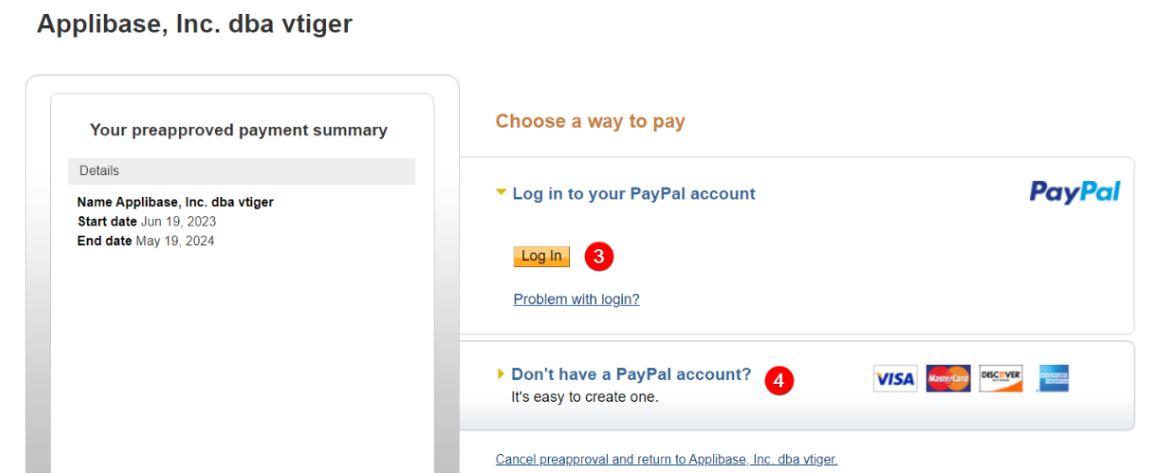
- Click the login button if you have PayPal credentials.
- Click Don’t have a Paypal account section to create one.
- Provide payment details.
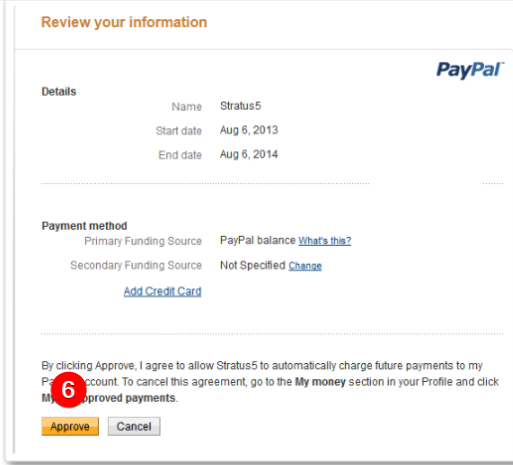
- Click the Approve button after reviewing the details.
|
|
After you confirm your subscription and the preferred payment method, you will be billed monthly for the total number of active users in your Vtiger CRM account.
For Indian Customers
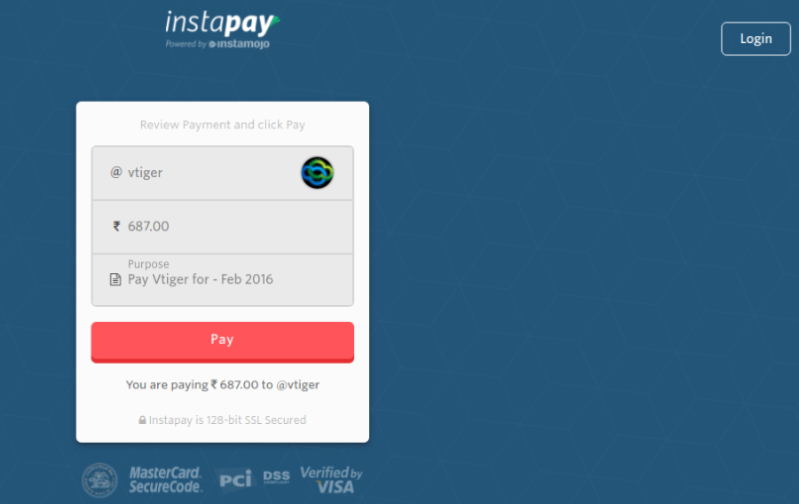
If you are an Indian customer, you can now make payments in Indian Rupees (INR). You must first register for Web Pay, after which you will get an email every month. This email contains the invoice details and a payment link to help you complete the payment.
Register for Web Pay
Follow these steps to register for Web Pay:
- In the Payment Details tab, view all the billing details.
- Click Proceed.
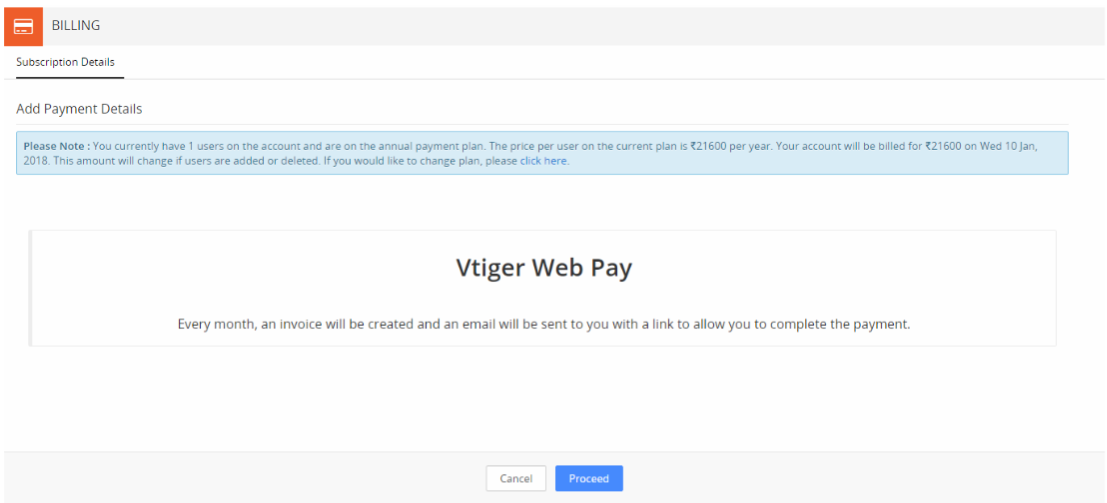
An email will be sent to your email ID from which you can make the payment.
Pay via Instapay
Follow these steps to complete the payment for your subscription:
- View your bill details sent in the email.
- Click the link in the mail.
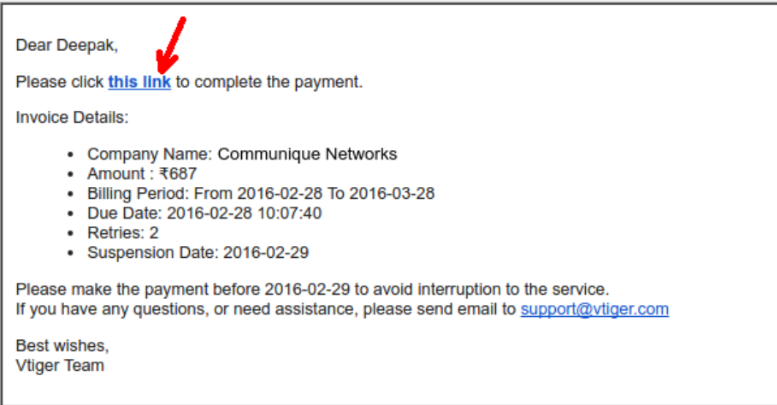
- Review your payment details and click Pay.
- Enter your billing details - Name, Email ID, and Phone Number.
- Click Confirm.
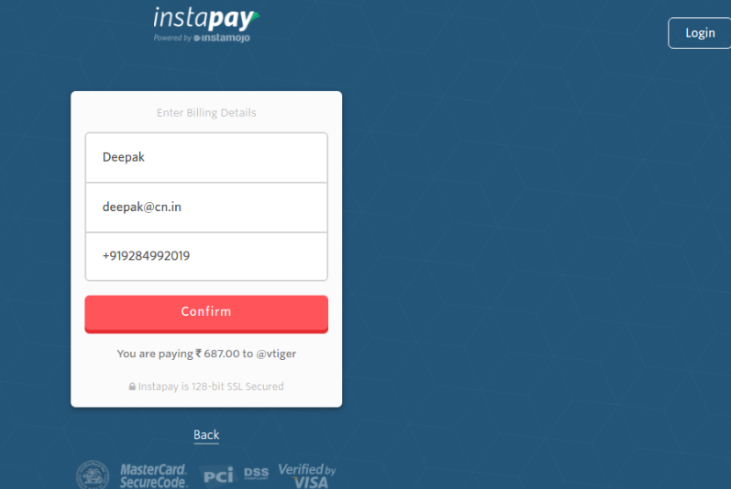
- Choose your payment method. You can pay your bill with the following:
- Credit Card
- Debit Card
- Net Banking
- Add your payment details.
- Click Checkout.
The payment will be updated in your account.
|
|
Taxes applied to your invoice
Vtiger will apply a GST of 10% if your business address is in Australia. Whereas, if your business address is in India, then Vtiger will apply a GST of 18%
Downloading the Invoice
Once you complete the subscription process, the Invoices tab is displayed in the billing section to help you download invoices for your payment.
Follow these steps to download an invoice:
- Log in to your CRM account.
- Click the User Menu icon.
- Click the Billing button.
- Click the Invoices tab.
- In the List View, click the Invoice button on the corresponding record.
The invoice will be downloaded in PDF format.
This is how your invoice will look like:
Editing the Billing Information
Has your address or phone number changed? Don’t worry.
You should know that the billing information you provided at the time of billing is not written in stone. You have the option to change the billing information
if you wish to.
Follow these steps to edit your billing information:
- Log in to your CRM account.
- Click the User Menu icon.
- Click the Billing button.
- Go to the Payment Details tab.
- Go to the Billing Details section.
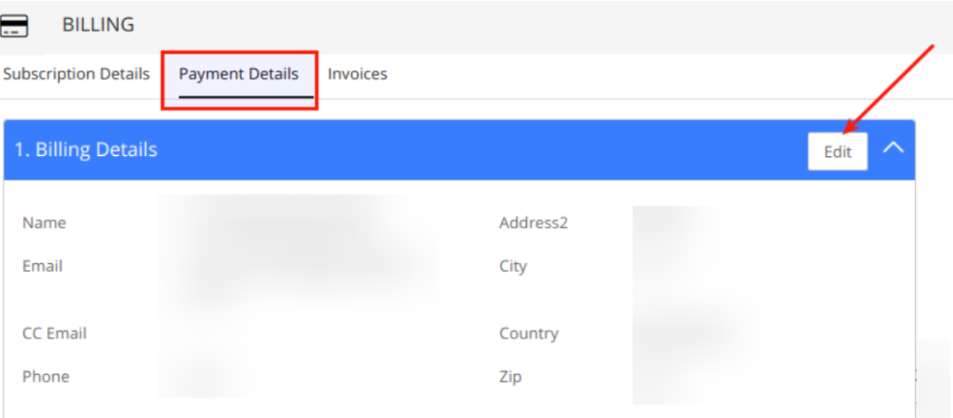
- Click the Edit button.
- Enter the details.
- Click Save.
All the details you have entered will be saved successfully.
Changing the Mode of Payment
Has your credit card expired? Are you wondering how billing will take place now?
In Vtiger CRM, you have the option to change your payment method according to your convenience.
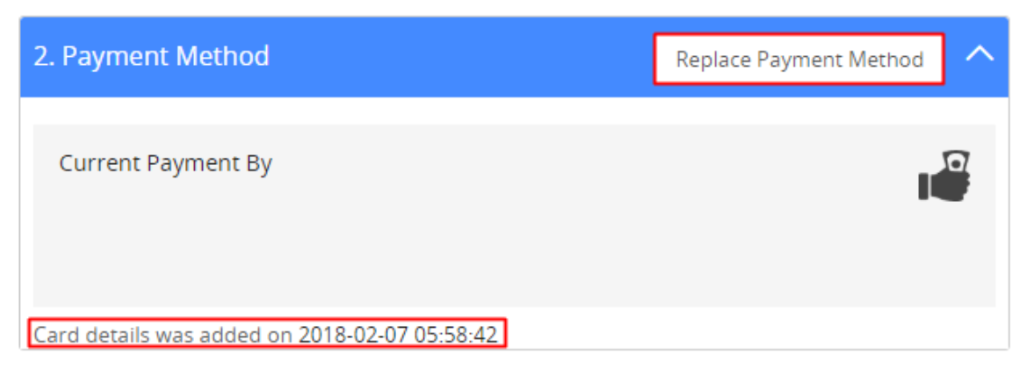
Follow these steps to change the mode of payment:
- Log in to your CRM account.
- Click on the User Menu icon.
- Click on the Billing button.
- Go to the Payment Details tab.
- Click on the Payment Details section.
- Click on the Replace Payment Method button.
- Enter your payment details.
- Click Add Payment.
All the payment details you entered will be saved successfully and used for the billing.
|
|
Changing the Number of Users
|
|
All the above questions will be answered in this section. This section will help you understand how to add or remove users and how Vtiger will charge you if you make any changes to your subscription in between billing cycles.
Adding or removing Users
Follow these steps to add or remove users:
- Log in to your CRM account.
- Click the User Menu icon.
- Click the Billing >Payment Details tab.
-
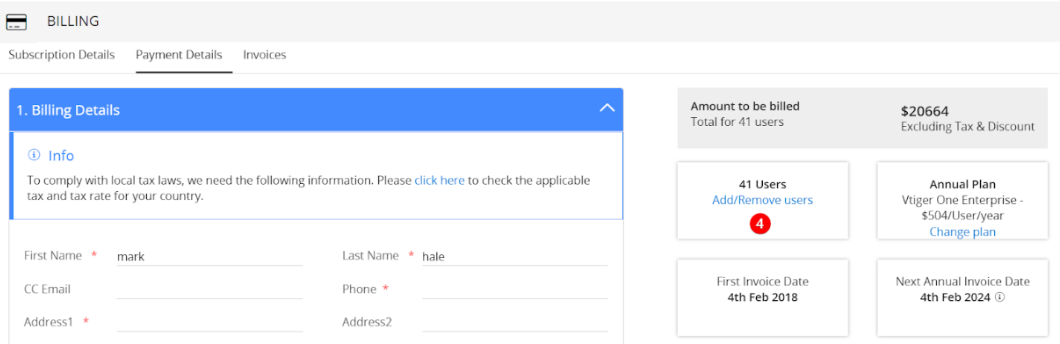
- Click Add or Remove users on your current plan. You will be redirected to the Users page.
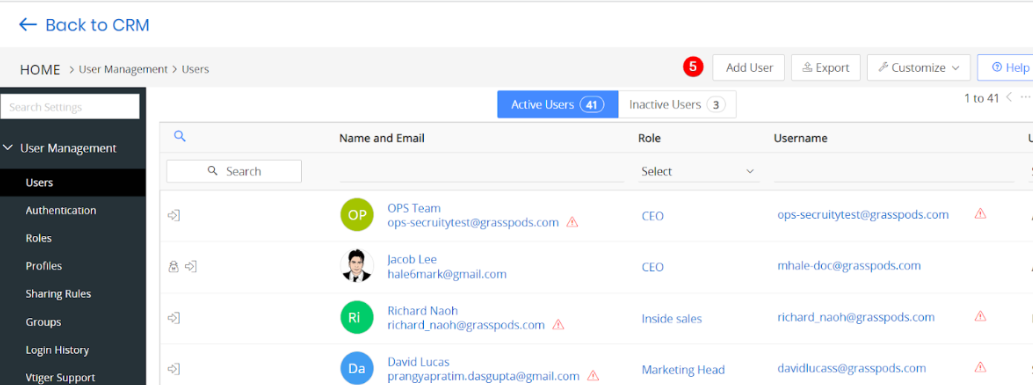
- Click the +Add User button on the right side in the List View. Add user information.
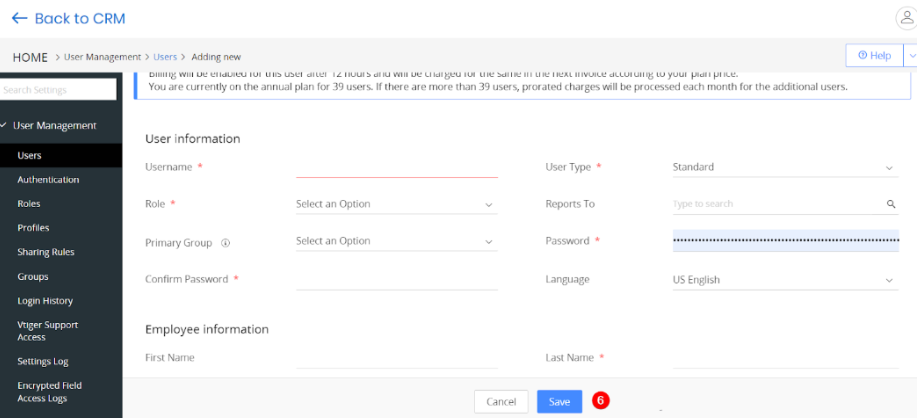
- Click Save.
The user will be added to the plan.
|
|
Vtiger Calculations
Listed below are a few cases that show how Vtiger charges you based on the changes made in the invoice:
Adding users to a monthly subscription
If you add new users between your billing cycles, you will be charged pro-rata for that month, which will be reflected in the next month’s invoice.
|
Here is the formula for calculation pro-rata charge - No. of days the user is active / No. of days in the month |
Adding users to an annual subscription
For annual subscriptions, when you add new users, you'll only be charged a prorated amount on the first invoice after they're added. After that, monthly charges apply to the annual price.
At the end of the year, Vtiger automatically renews the subscription for all active users for the next year.
Deleting users
If you suspend or delete a user during the billing cycle, charges will be dropped from the next invoice.
|
|
Changing the Existing Plan
Vtiger CRM allows you to modify your subscription plan at any time based on your evolving business needs. Whether you're looking to access more advanced features or reduce your usage, you can easily upgrade or downgrade your current plan.
Upgrading the Plan
Follow these steps to upgrade your plan:
- Log in to the CRM.
- Click on the User Menu.
- Click Billing. The Billing page opens.
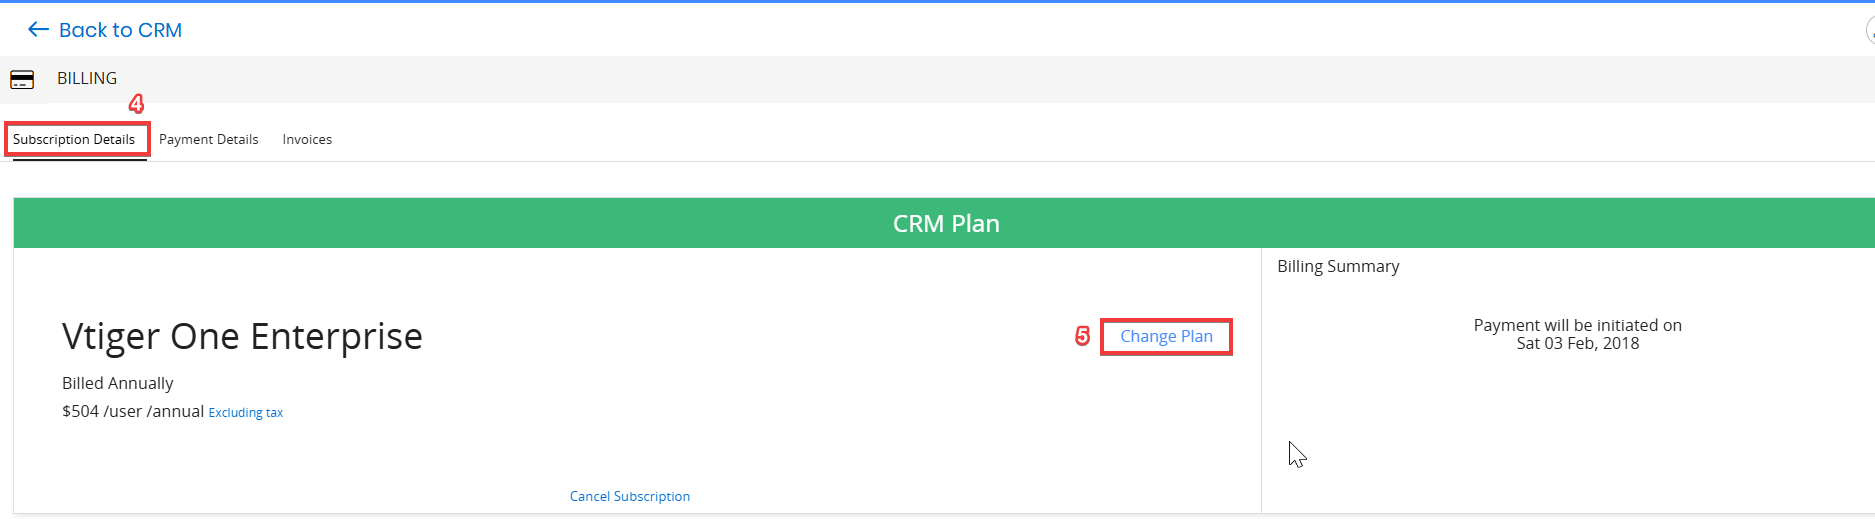
- Go to the Subscription Details tab.
- Click Change Plan.
- Choose the plan on a Monthly or Annual basis and select from these editions:
- One Pilot
- One Growth
- One Professional
- One Enterprise
- One AI
- Activate the subscription for the selected higher edition.
Downgrading the Plan
Follow these steps to downgrade your plan:
- Log in to the CRM.
- Click on the User Menu.
- Click Billing. The Billing page opens.
- Go to the Subscription Details tab.
- Click Change Plan.
- Choose the plan on a Monthly or Annual basis and select a lower edition:
- One Pilot
- One Growth
- One Professional
- One Enterprise
- One AI
- Activate the subscription for the selected lower edition.
Note:
- When downgrading to a lower edition, you can only access the modules and features available in that edition.
- Vtiger displays the allowed limits of the selected edition alongside your current usage. If any limits are exceeded, you must delete the additional configurations. The downgrade cannot proceed until all excess configurations are removed.
Canceling a Subscription
You can cancel your paid account anytime you need it. Once you delete your account or instance, the data will be deleted. You can export your data before cancelling your Vtiger CRM On-Demand service.
You can cancel your subscription if it is a paid subscription. It is not available for free editions. You can cancel your subscription for the following editions:
- Sales Pilot
- Help Desk Growth
- Marketing Professional
- Vtiger One Enterprise
|
|
Follow these steps to cancel a subscription:
- Log in to your CRM account.
- Click on the User Menu icon.
- Click on the Billing button.
- Go to the Subscription Details tab.
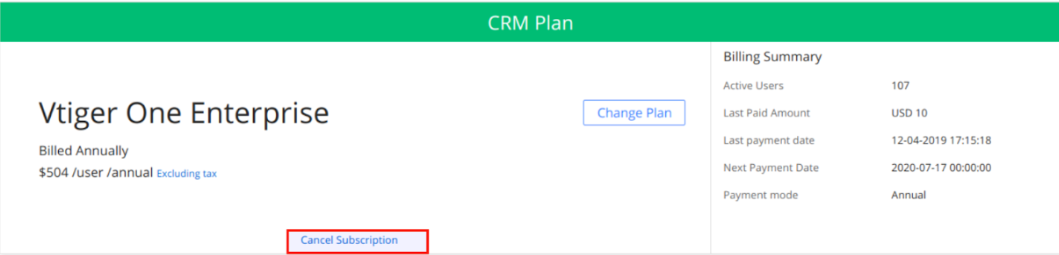
- Click the Cancel Subscription button
- Select the appropriate radio button for cancellation feedback in the Confirm Subscription Cancellation window.
- Enter your feedback.
- Click Send Feedback and Cancel My Subscription to cancel the subscription.
- You can click on Schedule Meeting with CRM Advisor to schedule a meeting via the Appointment page to discuss your queries regarding CRM.
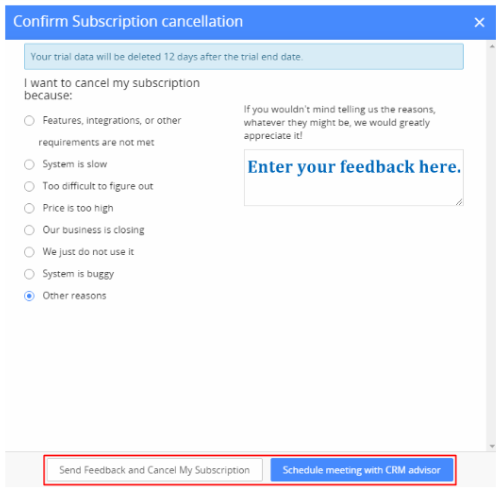
- After submission, you can view your subscription cancellation details.
|
|
Reactivating the Subscription
If you change your mind and want to activate your cancelled or suspended subscription, Vtiger will allow you to do so. You will have the option to reactivate your account within 15 days of your cancellation, or else you will have to do a new sign-up.
Follow these steps to reactivate your account:
- Log in to your CRM account.
- Click on the User Menu icon.
- Click on the Billing button.
- Go to the Subscription Details tab.
- Click the RE-ACTIVATE button on your current plan.
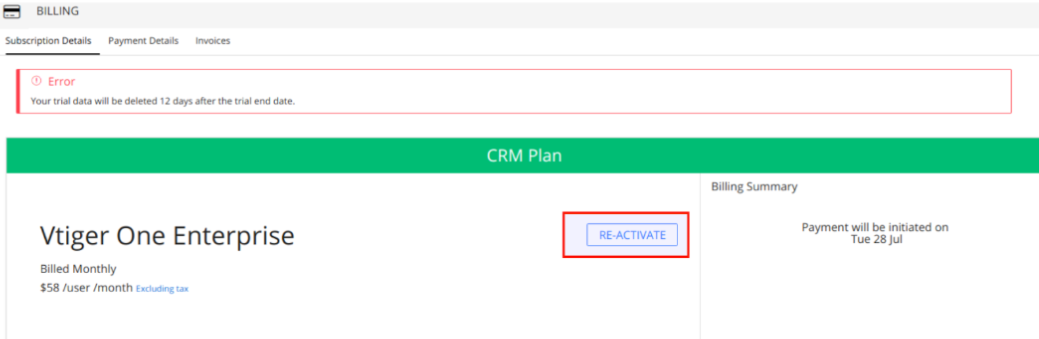
Your account will be reactivated to the plan you previously subscribed to.
Deleting Account or Instance
The data will be deleted when an account or an instance is deleted. In order to prevent the customer from accessing data, Vtiger has the export data option.
- The data will be deleted when the instance is deleted.
- Customers can export the data from Vtiger using the export feature.
- If it is a paid customer, the customer can request for backup SQL file before deleting the account.
Troubleshooting Tips
|
|
|
|
| |
| |
|
| |
|
| |
|
|
| |
| |
|