Articles in this section
Field Sales App
Introduction to Vtiger Field Sales Add-on
Note: The Field Sales article is written for managers (administrators) and sales agents.
What is Field Sales?
Field sales is the direct selling of products or services by sales representatives or agents to customers. Sales agents meet their customers face to face to do the selling and may not always work in an office. Some may not even work during what are considered normal work hours.
Field Sales Software Applications
Customized field sales applications help managers and sales agents perform their tasks effortlessly - either in the office or on the field.
A field sales software application helps managers assign tasks and remotely track sales teams' activities. It helps sales agents log in, perform tasks assigned to them, record visiting statuses, etc.
Vtiger Field Sales Add-on
The Vtiger Field Sales Add-on is built for those in managerial or administrative roles and sales agents.
Using the app, managers can create a plan (called Beat Plan) - outlining and assigning the agents' routes and outlets they have to visit. Managers can also track agents’ activities and updates they make on the app.
Sales agents can use the app to check Beat Plans, assigned outlets, and routes to take, and plan their travel schedule to outlets accordingly. They can also perform assigned tasks, take orders, and create events on the app, like meetings, leaves, and visits.
The Field Sales app is available on both desktop and mobile versions.
Field Sales App - Mobile Version
The app's mobile version is available on a mobile phone or tablet and can be used by sales agents to perform their activities while on the field.
Agents can use the app to:
- Take orders
- Track payment status of past invoices
- Log in to headquarters (head office) and distributor visits
- Create leaves
- Create a joint-work event to work jointly with a team member
- Check in to an outlet
- Perform auditing
- Take surveys
We will learn about special features, line joint work, surveys, and audits in the section below.
Field Sales Dashboard
The Field Sales App (FSA) has a dashboard button allowing you to navigate it from the FSA app on your phone.
This will load the Dashboard widget and display the related information below:
- Admins can view the following:
- The total number of agents, Agents (Users) Logged In Attendance as present, and Agents on leave. (Pivot Report)
- The number of visits were assigned vs. how many visits were completed per agent.
- The number of customers created by each agent. (Pivot Report)
- The number of orders created by agents. (Pivot Report)
- The number of invoices created for each customer.
- The time spent at each store (Organization) with Check-In and Check-Out details.
- Target vs. Achievement by agents.
- Top-selling product for the company by agents.
- Agents can view the following:
- How many visits were assigned vs how many visits were completed
- How many customers were created
- How many orders were created
- How many invoices were created for each customer
- Target vs. Achievement
Note: The above widgets are not provided in the CRM by default. You can create them in the Insights Designer and pin them to the Dashboard.
Features of the Vtiger Field Sales App
The Vtiger Field Sales App includes the following features:
- Beat Plans
- Live Tracking
- Routes
- Insights
Beat Plans
Beat Plans are travel schedules for outlet visits. They are created by managers (or those in admin roles)and assigned to sales agents.
Beat Plans ensure:
- One sales agent’s visit to an outlet does not overlap with the others.
- Outlets in certain areas or locations are fully covered.
- Optimal routes are picked to the outlets.
- Agents know of their schedules ahead of their visits.
In the Beat Plan feature, you have multiple functions, such as:
- Filters - Outlets filtering
- Start location and End location
- Fixed and Flexible Routes
- Shortest Route
- Scheduling
If you create a Beat Plan that Sales Agents use more often, you can use the same one using the Repeat option. The Repeat option in Beat plans allows you to repeat a Beat Plan by changing the dates and retaining all other details relevant to that Beat plan.
While creating a Beat Plan, you must enable recurrence in the Schedule section. If recurrence is not enabled, you can create Beats for only one day.
Check-in Mode
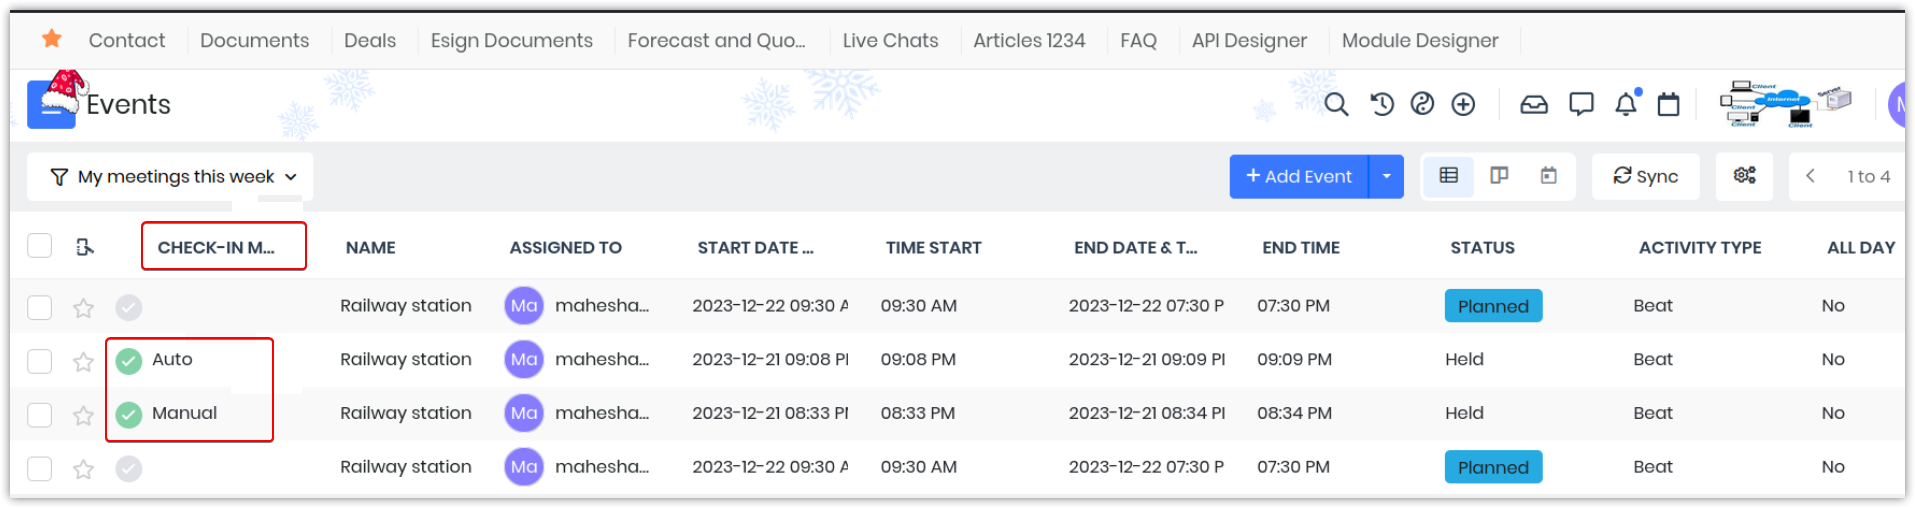
The Check-in mode in the Events module is a field that is updated when:
- A sales agent reaches an outlet (organization) location and checks in manually or,
- A sales agent reaches an outlet (organization) location, and the CRM automatically checks them in.
The Check-in mode field is available:
- In the Events List View, events with the Activity Type as Beat.
- In the Summary View of an Event record for a field sales agent.
Let us see how the Check-in mode works.
- You begin by adding Beat Plans for your agents.
- Events and routes are created automatically.
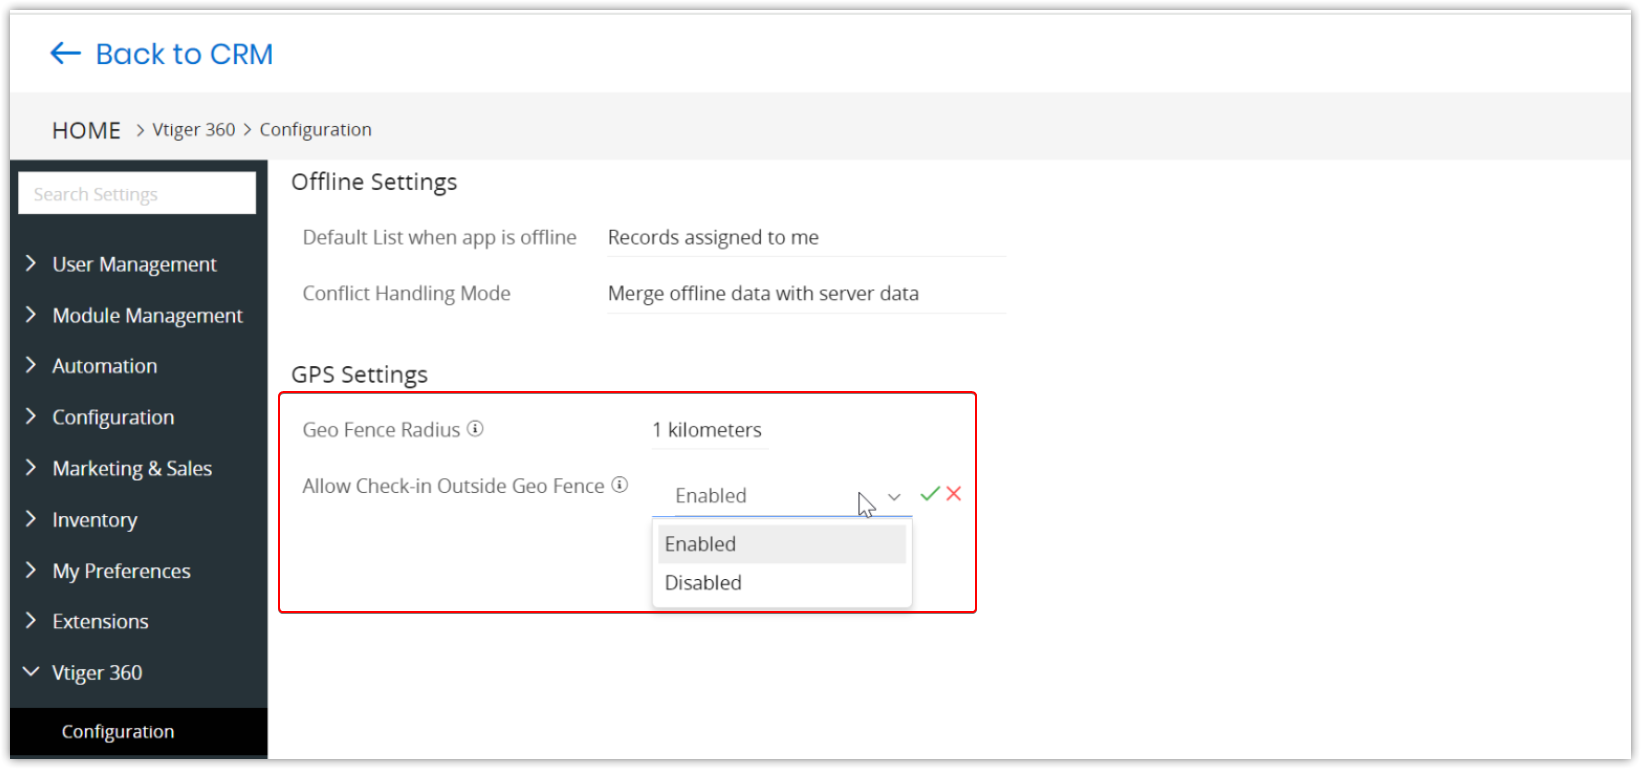
- For the Events created in the Events module, the Activity type will appear as Beat.
- At this stage, you must enable or disable the Allow Check-in Outside Geo-Fence field on the Vtiger 360 > Configuration Settings page.
- When the sales agent reaches a location:
- When the Allow check-in Outside Geo Fence field is enabled, they can check in manually on their FSA mobile app.
- The system checks them in automatically when the Allow check-in Outside Geo Fence field is disabled.
- If the system auto-checks the sales agent, the Check-in mode in the Events module will automatically be updated.
- If the sales agent checks in by themself, then they will have to update the Events record manually.
Live Tracking
The Live Tracking feature relies on a Global Positioning System (GPS) enabled in the field sales mobile app connection. Managers can view the sales agent's location on the map in the web client. Searching for specific agents may be challenging when you have many agents working for you in the field. In such a case, you can use the Search field to look up an agent and track their location.
You now have a search option in the Live Tracking module for Agents. The search will be available if there are more than 5 Agents.
- This will enable you to track your agents in the field in the Live mode.
- The count of users includes the Active, Suspended, and Deleted list of users.
- Note: You can view the tracking details of deleted users (when they were active in the system).
Routes
Routes are the distance between outlets on the map that must be visited. They are created automatically from the Beat Plan and assigned according to the order of the outlets to be visited.
The sales agents can see the distance and duration to travel between one outlet and another. This will help them plan their visit accordingly.
You can see the distance between outlets while creating Beat plans.
There are two types of Routes:
- Fixed - The sales agent will follow the route assigned to him. The planner decides the routes in the Fixed route, and the sales agent must follow the same order. If the sales agent fails to follow the route assigned to them, a warning notification will be sent to the managers.
- Flexible - In the Flexible route, the planner selects only the outlets; the sales agent can select the Beats and plan his visit to the outlet accordingly. The sales agent can modify the route to get the shortest path.
Beat Insights (Reports)
The Beat Insights feature is a reporting feature that lets you generate the following types of analytics:
- Order Analytics - Generates the number of orders an outlet makes, order repetition, products, etc.
- Visit Analytics - Generates numbers on the number of visits made to an outlet by a sales agent and related details.
Special Features of the Vtiger Field Sales App
Apart from the above, the Field Sales app provides you with a few special features.They are:
- Joint work—This feature allows an additional sales agent or a supervisor to join a sales joint on their route and beat.
- Audit - This feature allows you, the sales agent on the field, to do auditing on an outlet. By collecting feedback, live pictures, and/or videos to help marketing teams and Marketing assess the placement of products vis-a-vis competing products.
- Survey - This feature lets you record the feedback from the outlets using Vtiger Surveys.
Feature Availability
|
|
|
|
| |
|
| ||||
|
|
|
|
|
|
Benefits
The following are the benefits of using the Field Sales app:
- Saving time for managers by creating routes automatically.
- Providing insights to managers.
In this article, you will learn about:
- Creating a Beat (in the Organizations module)
- Creating a Beat for an individual
- Creating a Beat Plan
- Using the Vtiger Field Sales app
- Generating Beat Insights
Key Terminology
|
|
|
|
|
|
|
|
|
|
|
|
|
|
|
|
|
|
|
|
|
|
|
|
| Mark Leave |
Field Sales Add-on for Admins and Managers
Note: This section covers the Field Sales App for those in Admin and Manager roles.You can create Beats and assign a sales agent one or more Beat Plans (organization or outlets). Based on the assigned Beats, sales agents use their travel schedules to visit organizations or outlets. Managers or those in admin roles can go to the individual sales agent's My Preferences page to add Beats under the Beat section.
In this section, you will learn how to:
- Create a Beat
- Add a Beat to a sales agent
- Create a Beat Plan
Creating a Beat (Organizations module)
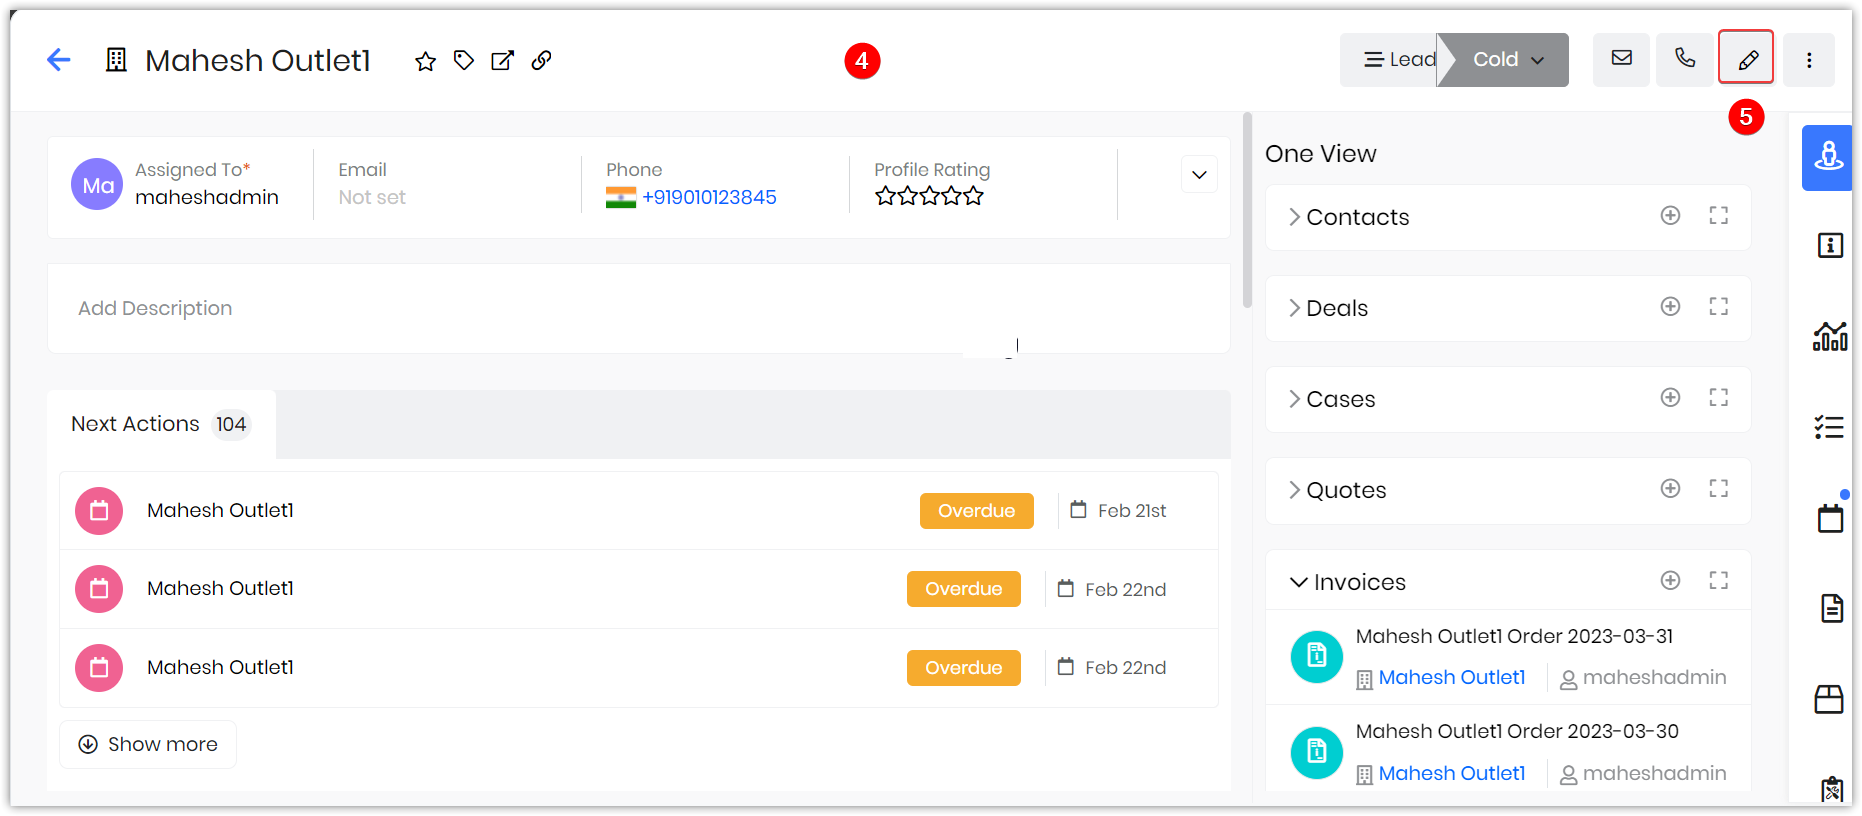
Organization records contain the FS Beat field. The FS Beat field allows you to add a Beat and a Zone (zone or area where an outlet is located) to an Organization record. A Beat is a locality within a city with multiple outlets.
Follow these steps to add a Beat:
- Log in to your CRM account.
- Go to Essentials.
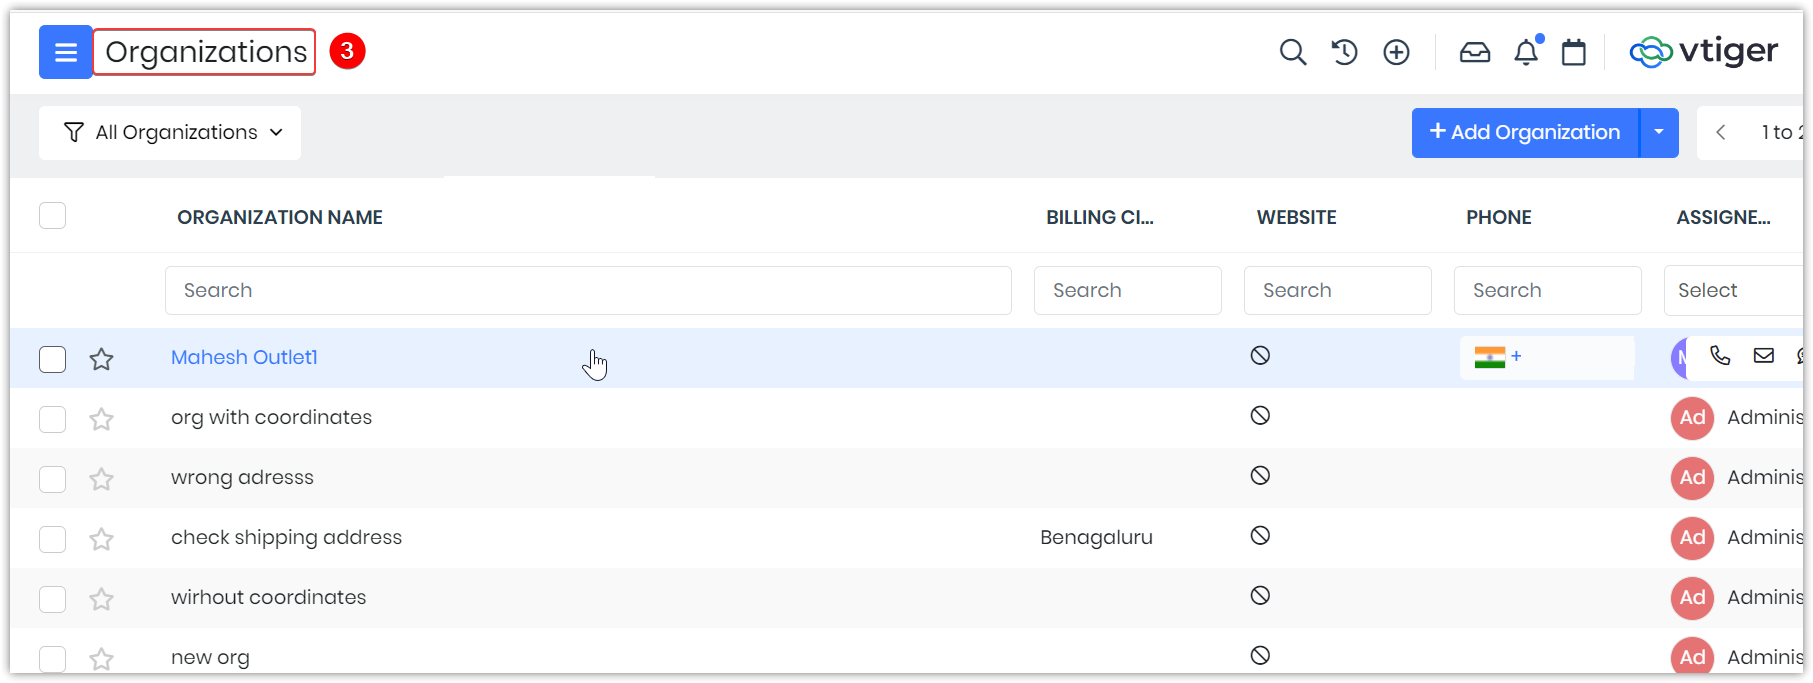
- Select Organizations. The Organizations List View opens.
- Click the required Organization record. The Summary View opens.
- Click the Edit icon.
- Go to the Address Details section.
- Select FS Beat from the drop-down.
- Click Save.
To know about Organizations, click here.
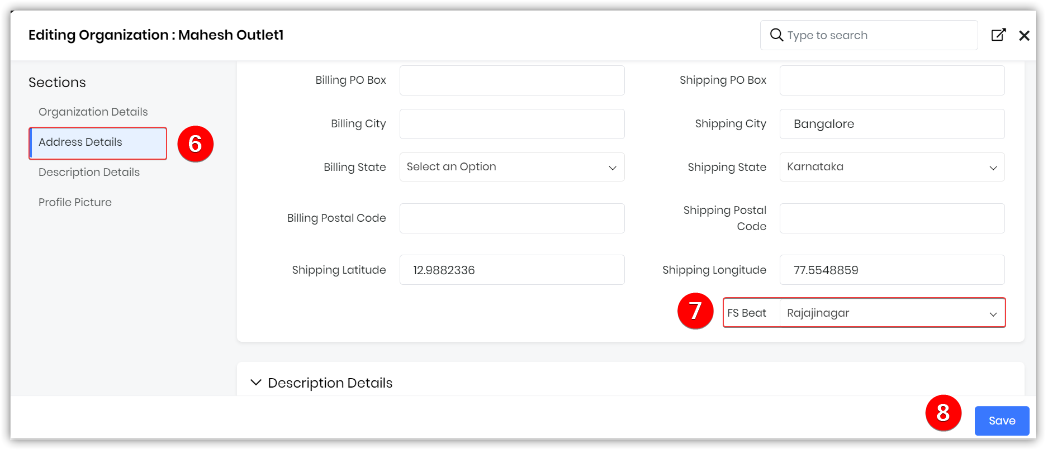
Adding a Beat for a Sales Agent
You can assign one or more Beats to a sales agent.
Follow these steps to add a Beat:
- Log in to your CRM account.
- Click on the User Profile.
- Select My Preferences.

- Go to the User Address section.
- Click the FS Beat Edit icon.
- Select the FS Beat you want to include for a sales agent.
- Click the Green tick to save.
Creating a Beat Plan
A Beat Plan is the travel schedule of sales agents to various outlets. You can create a Beat Plan by selecting the location, date, and time and assigning it to a sales agent. This will help you understand the routes and plan your travel accordingly.
Creating a Beat Plan involves the following steps:
- Step 1: Assigning a Beat Plan to a user (sales agent)
- Step 2: Selecting Outlets
- Step 3: Selecting Actions
- Step 3: Scheduling
Step 1: Assigning a Beat Plan to a user (sales agent)
In this step, you will select a user (sales agent) and assign them a Beat Plan.
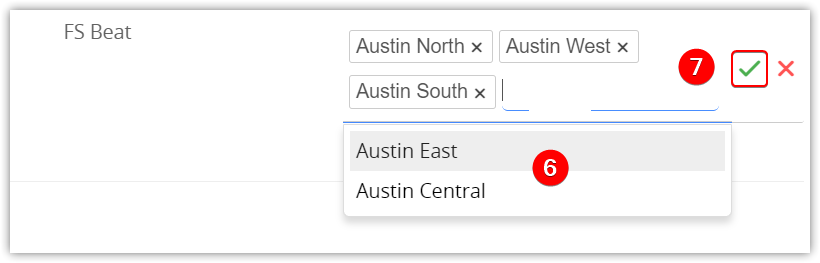
Follow these steps to select a user and add a Beat Plan:
- Log in to your CRM account.
- Go to Tools.
- Select Beat Plan.
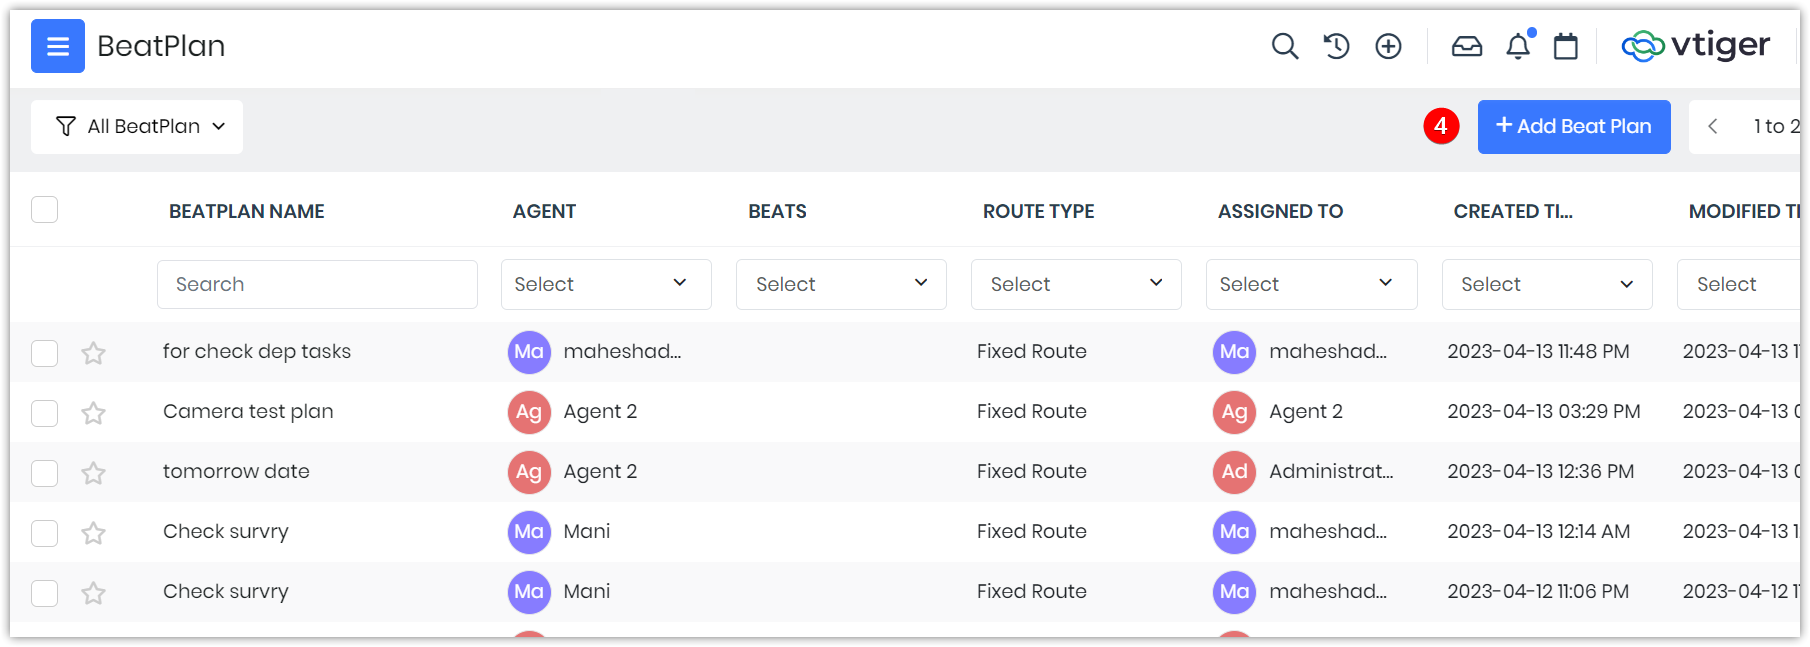
- Click +Add Beat Plan. The Creating Beat Plan window opens.

- Enter or select information for the following:
- Enter the Beat Plan Name under the Select User and Beats section.
- Select the Agent from the drop-down.
- Select the Beats from the drop-down.
- Select the Filters
- Select the Conditions.
- Click Setup.
- You can select multiple Beats for a sales agent.
- The Outlet Beat should also be selected and saved for the sales agents on the My Preferences page. When you select the agent under the Select Outlet section, the outlet can be retrieved for that agent.
Adding Beat on My Preferences page
Follow these steps to add Beats on My Preferences page:
- Log in to the CRM.
- Select the User Profile.
- Select My Preferences.
- Select Configuration.
- Select Global Picklists.
- Enable FS Beat.
- Click More+ to add a Beat.
- Click Save.
Step 2: Organizations
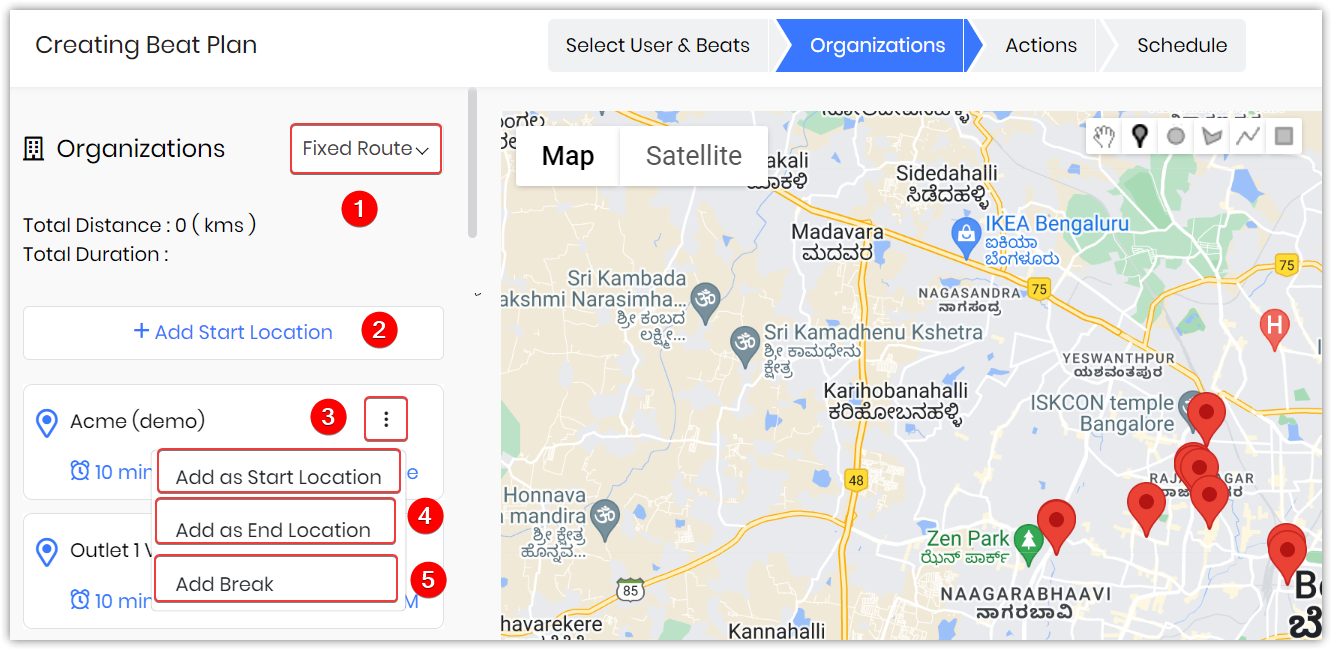
- Select the Route from the drop-down.
- Click +Add Start Location.
- Select Add as Start Location by clicking the More icon on an organization.
- Select Add as End Location by clicking the More icon on an organization.
- Select Add Break.
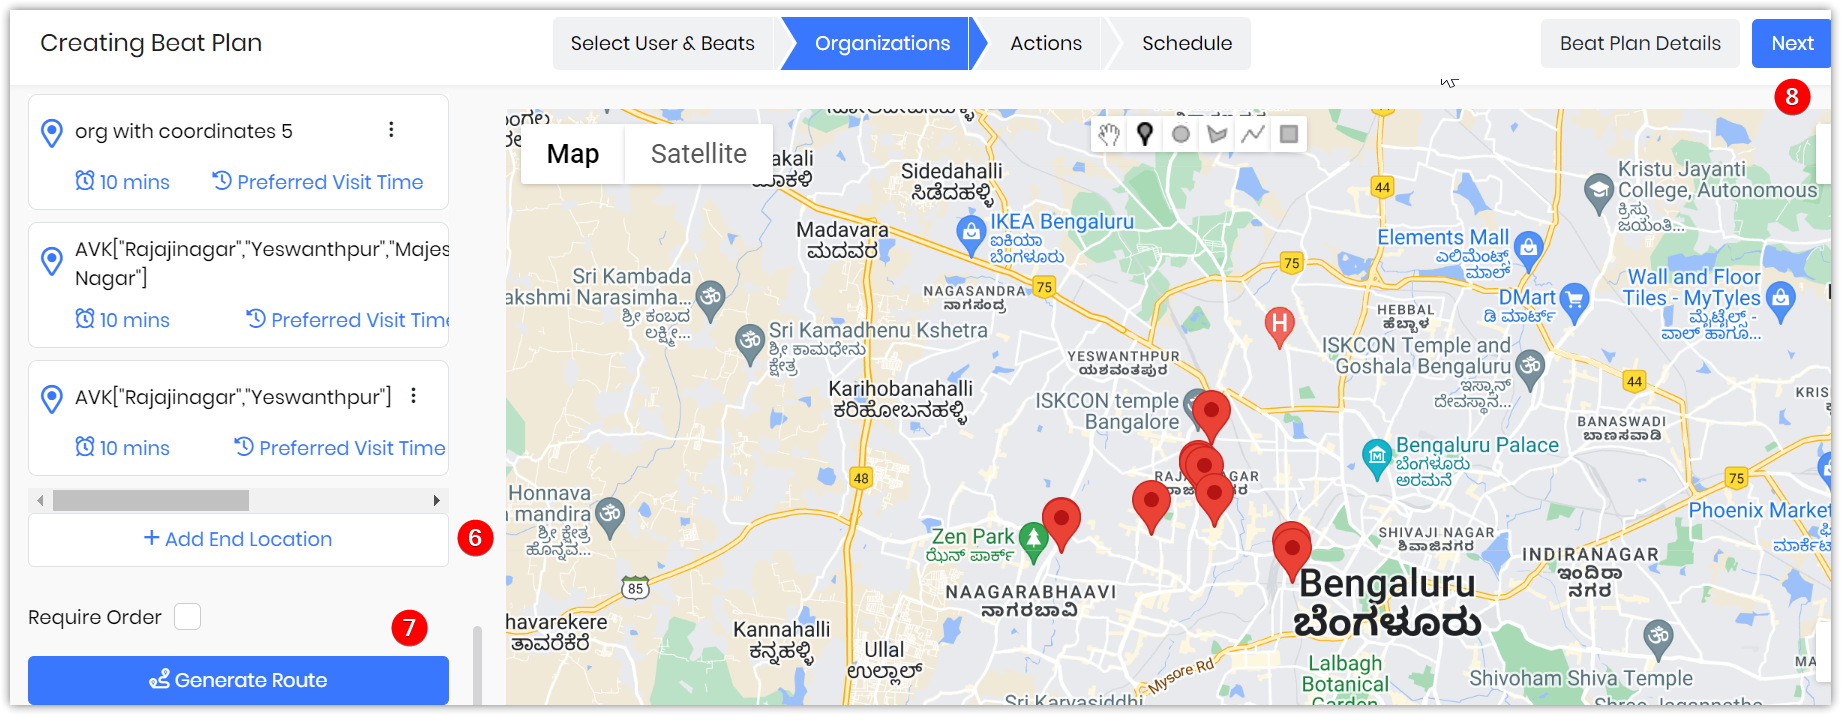
- Select +Add End Location.
- Click Generate Route. The route will be displayed on the map.
- Click Next.
Note:
- You can rearrange the outlets by using the drag-and-drop option.
- You can add the Preferred Visit time for any outlet.
- You can add duration for Breaks for any outlet.
- You can also remove any Outlet.
Step 3: Selecting Actions
This step includes the actions a sales agent needs to perform at the outlet, like taking orders, conducting an audit, and receiving feedback. You can add these actions for a sales agent in the Actions tab.
Once the sales agent logs in, they can see and perform the actions you assigned to them.
You can enable the Mandatory toggle against actions like Take Order, Auditing, and Feedback. If the Mandatory toggle is enabled, the action has to be performed and completed.
You can also enable the Take Signature option if the sales agents must take the outlets' signatures. Once the Take Signature toggle is enabled, the sales agents must take the signature without fail.
Once an order is created, a sales order is created. When you click on the record in the Sales Order module, the signature is captured in the Description Details section of that record.
Note:
- If you are expecting the sales agent to perform an audit, you should have created an audit template in the Quality Audit module of the CRM. To learn more about the Vtiger Quality Audit feature, click here.
- If you expect the sales agent to take feedback, you should have created a survey in the CRM. To learn more about Vtiger Surveys, click here.
Follow these steps to select the Actions for a sales agent:
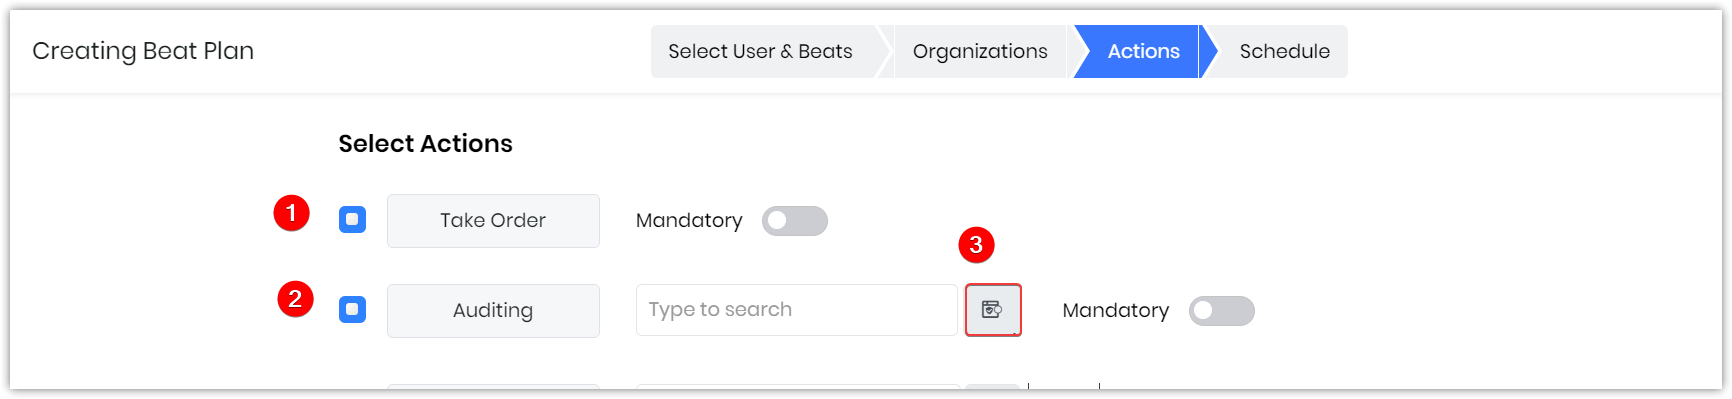
- Enable Take Order.
- Enable Auditing. You can link the Audit Templates by clicking the Audit Template icon.
- Click the Audit Template icon.
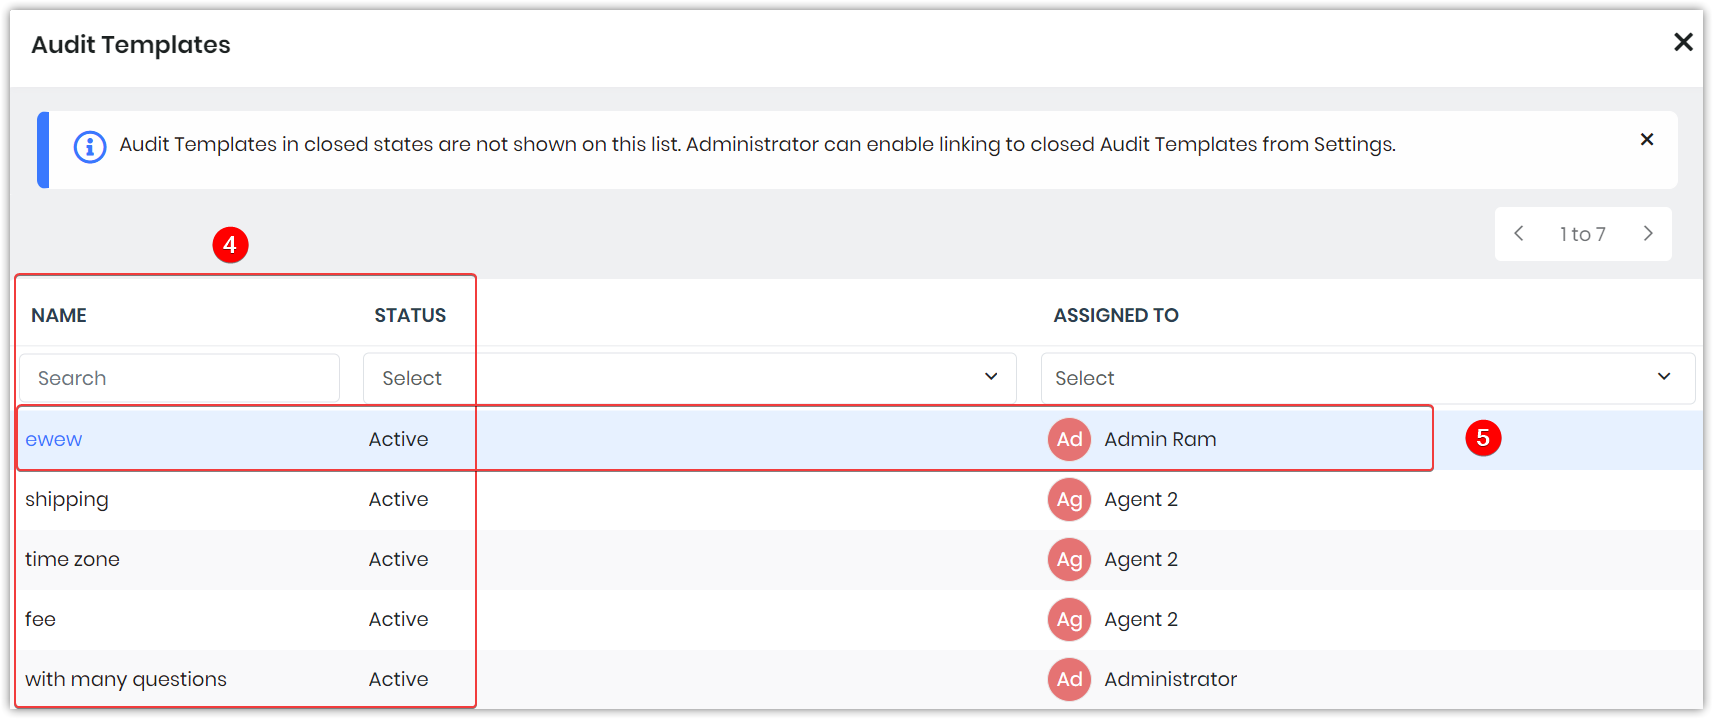
- A List of Active Audit Templates will be displayed.
- Select the Audit Template you want to attach.
- Enable Feedback. You can link Surveys by clicking the Survey icon.
- Click the Survey Icon.
- A List of Active Surveys will be displayed.
- Select the Survey you want to attach.
- Enable the Last 5 Orders if you want to repeat your orders.
- Click Next.
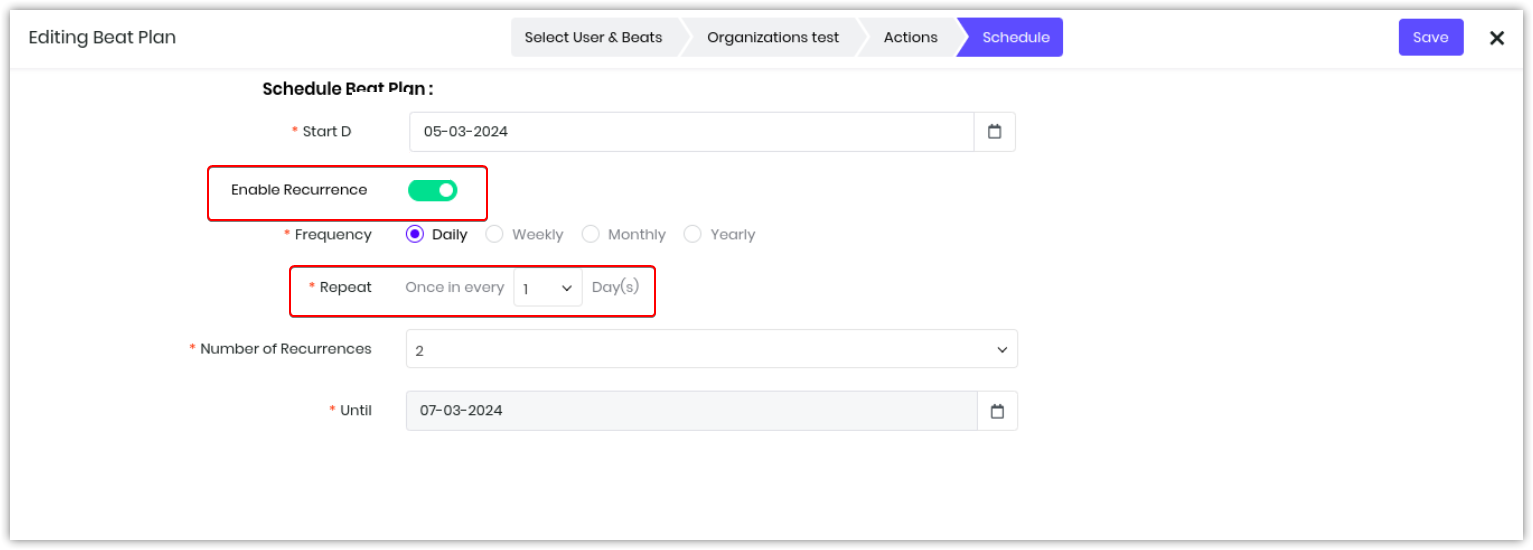
Step 4: Creating a Schedule
Follow these steps to create a Schedule:
- Select the Frequency based on Daily, Weekly, Monthly, and Yearly.
- Select Repeat from the drop-down if you want the Beat plan to be repeated every once in two days or five days.
- Select the Number of Recurrences from the drop-down.
- Select Until.
- Click Save.
You have now successfully created a Beat Plan.
When managers create Beat Plans, the CRM will automatically create the following:
- Routes for each day
- Events for each Outlet to be visited on that day
These will be reflected in the Vtiger Field Sales app
Beat Insights
The Beat Insights feature gives you analytics about an outlet’s performance. You can use a filter to see data on countries, and states and apply a date range between which you can fetch an outlet’s performance data. You can compare data with conditions such as Top Selling Outlets and Least Selling Outlets.
You can generate the following types of analytics from Beat Insights:
- Order Analytics - Gives you the data based on the sales agents' orders.
- Visit Analytics - Gives data based on the sales agents' outlet visits.
Vtiger Field Sales App for Field Sales Agents
The Field Sales app allows the sales agents to log in and take up the Beats assigned to them. The sales agent can look for the routes on the map to visit outlets, take orders at the outlets, and perform various other tasks.As a field sales agent, you can download and open the Field Sales App to:
- View the ongoing tasks, pending tasks, and the current day's route and outlets
- Check in to the visiting outlets
- Take Orders
- Conduct auditing
- Link surveys and feedback to the CRM
Note: When the sales agent enters the Geo-Fence of a particular outlet, he will be auto-checked in.
Using the app, you can also perform the following actions:
- Start a route
- Create events for a leave, visit the head office, or take up a joint meeting
- Take an order by phone call
- Add a new outlet
Actions in the Field Sales App
Starting a route
Once you log in to the app, click Start Route. Under the Today's Journey tab, you will see the Beats assigned to you for the day.
Based on the Beats assigned for the day, you can plan your travel schedule to the outlets.
Follow these steps to start a route:
- Log in to the App.
- Click Start Route.
- Click Today’s Journey.
- The Outlets will be displayed.
- Click Check-In for each Outlet.
- Perform Action
- Take Order - If mandatory, perform the following actions
- Order by Category - Hardware, Software, CRM Applications
- For Example, Click Hardware
- Click Add on a Product.
- Click Place Order.
- Click Close. If an order is placed successfully, you will see a green tick mark beside Take Orders.
- Auditing - If there are any Audit forms, you can link them by clicking the Audit link.
- Feedback - If there are any existing survey forms, you can link them by clicking the Survey form link.
- Last 5 Orders - If there are any previous orders for an outlet, you can click Repeat to place the same order.
- Take Order - If mandatory, perform the following actions
- Click End. A message Are you sure you want to check out from the outlet? will be displayed.
- Click OK.
Your status for the first outlet will be marked as Completed in green. And you can follow the same steps as above for other outlets. Once you have visited all the outlets, click End Route.
Marking Leaves
If the sales agent wants to take leave, he can log in to the app and create a leave of absence event.
Follow these steps to create a Leave Event:
- Log in to the App.
- Enter your (sales agent's) name.
- Select the Start Date and Time by clicking the Calendar icon.
- Select the End Date and Time by clicking the Calendar icon.
- Click Save.
Visiting the head office
When a sales agent visits an outlet, and during his visit, he can pause his visit and also take up other travel.
For example, if a sales agent comes up with an emergency plan to visit the Head Office, they can pause their ongoing visit and keep the manager informed by creating a Head Office Meet event.
Follow these steps to create a Head Office Meet event:
- Log in to the App.
- Enter your name.
- Select the Start Date and Time by clicking the Calendar icon.
- Select the End Date and Time by clicking the Calendar icon.
- Click Save.
Working jointly with team members
A sales agent can join another agent if they visit the same outlet. They can inform the managers by selecting the Joint Working option. You can select the agent who wants to join you by checking their status. You can add their status to the Joint Working event if their status is available.
Follow these steps for Joint Working:
- Log in to the App.
- Click on Joint Working.
- Select the User you want to join from the drop-down.
- Check the User Status.
- Click Add if the status is available.
- Click Save.
Taking orders by phone call
You can take orders by phone using the Order on Call feature. This can happen in a few instances. For example, if you are taking orders from an outlet not listed on a route or cannot visit a particular outlet.You can use the Last 5 orders option if it is a repetitive order.
Follow these steps below for taking an order on call:
- Log in to the App.
- Type the outlet's name in the Search field.
- Select Take Order from the list of outlets displayed.
- Select the Last 5 Orders to repeat the previous Orders from the outlet if required
Adding new outlets
When sales agents are on their beat and discover a new outlet, they can add it to the CRM using the "New Outlet" option.
Follow these steps for creating a new outlet:
- Log in to the App.
- Type the Organization Name.
- Type the Website.
- Type the Phone number.
- Select Assigned To from the drop-down.
- Select Organization Status from the drop-down.
- Select Price Book if you want to link any.
- Select FS Beat from the drop-down.
- The Shipping Latitude will be auto-filled.
- The Shipping Longitude will be auto-filled.
- Click Save.
Cancelling Check-in for an Outlet
You can cancel specific outlet visits while on a route. This feature offers flexibility and enhanced tracking of on-the-ground sales activities.
How to Cancel an Event on a Route
- Once you start a route, a Cancel option is available for each event (store or outlet) in the route.
- Click Cancel if you are unable to attend the event. A pop-up will appear prompting you to select a Cancellation Reason.
- After you submit the reason:
- The event status has been updated to 'Canceled'.
- The selected cancellation reason is stored and visible in the event record.
Reopening a Canceled Event
After canceling, you will also see an option to Reopen and Check-in to the event if needed. This allows flexibility in case you are later able to visit the store.
Handling Partial Store Visits
If you(field sales rep) visit some but not all assigned outlets:
For example, if you visit 4 out of 10 assigned stores and cancel the remaining 6, the route status will automatically update to Partially Completed.
Route Completion without Explicit Cancellations
- And no stores were visited, all event records will be marked as Canceled.
- If at least one store was visited, the route status will be updated to Partially Completed.
Configuration Options
You can configure cancellation features based on your business needs:
- Disable the Cancel option: Navigate to Settings > Picklist Field Values and remove or hide the Cancel option.
- Disable the Reopen Event option: Go to Settings > User Profile and turn off the permission to reopen canceled events.
Limitations
The following are the limitations of the Field Sales app:- The Shipping Address in the Organization record is taken as the Organization's location for distance calculation and checking, while the Mailing Address is ignored.
- On iOS devices, for Live Tracking and Auto Check-in/Check-out to work, the Vtiger Mobile app should run on the FSA's mobile device. Even if the app is closed on Android devices, the mentioned features will continue to work.
References
Quality AuditManaging Organizations
Creating and Sending Surveys