Articles in this section
Configuration - Consents
Introduction
|
|
A customer’s consent is their permission to your company to store and process their data.
The European Union has enforced the law of GDPR, which stresses on the importance of a customer’s privacy and data protection. If your customers reside in the EU, then it is required that you obtain their consent to store their data.
To learn more about GDPR, click here.
|
|
Benefits of the Vtiger Privacy Guard
The Vtiger Privacy Guard comes with the Consents module. By using the module, you will reap the following benefits:
- You will know if you have the consent to store and use a customer’s data.
- You will be able to keep a record of when and from where the consent was granted.
- You will be able to seek consents from select contacts by configuring conditions for each consent. For example, Contacts with Country=France.
Feature Availability
Note: Vtiger Privacy Guard is a paid extension.
|
|
|
|
|
| |
|
| |||||
|
|
|
|
|
|
|
|
|
|
|
|
|
|
|
|
|
|
|
|
|
|
| |||||
|
|
|
|
|
|
|
|
|
|
|
|
|
|
|
|
|
|
|
|
|
Why Does my Business Require Consents
There are two reasons why consents are important for your business:
- To avoid penalties
With increasing concerns about the invasion of privacy, governments around the world have stepped in to enact laws to protect individuals’ rights. For instance,- The European Union has enforced GDPR with stiff penalties for businesses that violate the law.
- The United States enacted the CAN-SPAM act in 2009 with stiff penalties for sending commercial messages that do not follow the stated guidelines.
- To gain trust
You will be able to gain trust from your clients by being transparent about how your business uses their data.
What are the rights of the customers
As per GDPR, a business storing personal information of an individual must offer the following rights to them:
- Right to know what information the business has
- Right to know how the information is being used
- Right to know if the business is tracking their engagement
- Right to ask a business to stop processing their data
- Right to ask a business to erase their data
Prerequisites for Adding a Consent
You must perform the following tasks before you set up a consent.
|
|
- Identify the data for which you need consent
The data for which you need to seek consent varies from one business to another. You must seek consent only for the data that is not required for business operations.
An individual’s email address, phone number, marital status, religion, etc., are considered personal information. However, some of this personal information might be required for operational reasons. For example, if an individual has bought services from your business, then you must retain their name and address on invoices and orders for record-keeping and auditing.
So, classify personal information as essential and non-essential for operational purposes. Also, find out which information is essential only for marketing purposes.
Non-essential personal information needs consent. You must select this information in the Consents to store specific data sections of the Consents page.
- Document the uses of personal data
After identifying the personal data that you will be storing, you must record its use in your business. For example:
- Do you refer customers to partners and share their data with them?
- Do you keep voice recordings of customer phone calls for training purposes?
Such uses of personal data require consent. You must define them in the Custom Consents section of the Consents page.
- Remove duplicate contacts with the same email address
To prevent sending multiple consent requests to the same individual, it is necessary to skip duplicate lead/contact records. Two records are said to be duplicate if they have the same email address.
This task can be arduous if you have thousands of contacts. Fortunately, Vtiger CRM makes it easy by automatically flagging the duplicate contacts by:
- Setting their Status field to Duplicate
- Retaining the last modified contact as the primary one
A CRM administrator is prompted to approve this automated process while enabling the Consents module.
- Choose From Name and From Email to send consent requests
To send consent requests, you must first set up the From Name and the From Email address. Follow these steps to set them up:
- Click your display picture on the top right corner of the screen.
- Click the Settings button.
- Select Email Settings under Configuration.
- Click the Edit icon on the Email Settings page.
- Scroll down to the Double opt-in and Consent Emails section.
- Enter From Name and From Email.
- Click Save.
- Understand the risks of losing data
When a contact denies you permission to store their personal data, you must erase their data from the CRM. The value in the personal fields must be erased when consent is deleted for a field.
Consent Types
You can add three types of consents in Vtiger CRM:
- Data consent - Use this to create a consent to store a contact’s data in personally identifying and encrypted CRM fields. For example, phone number, email address, etc.
- Custom consent - Use this to create a customized consent. For example, permission to send service feedback email monthly, etc.
- Tracking consent - Use this consent to track a customer’s engagement with your company. For example, views on an email, downloads on a shared document, etc.
Creating Personal and Encrypted Fields
Personal and encrypted fields are used to store a contact’s sensitive information such as their personal phone number, bank account details, credit/debit card details, etc.
When you mark a field as Personally Identifying or Encrypted, you can take consent from your contacts to store their data in it.
Follow these steps to create personal fields:
- Log in to your CRM account.
- Click the User Menu on the top right corner of the CRM screen.
- Click Settings.
- Look for the Module Management section.
- Select Module Layouts & Fields.
- Choose Contacts from the Select Module drop-down.
- Click the Detail View Layout tab.
- Click the +Add Custom Field button under any block you want to create it in. For example, under Basic Information, Address Details, etc.
- You can also create a new block:
- Click +Add Block.
- Enter the block name.
- Choose the existing block after which you want to add the new block.
- Click Save.
- Click +Add Custom Field in the newly created block.
- Select the field type. For example, Phone for phone number, Text for name, etc.
- Enter the field name under Label Name.
- Enter a default value for the field (optional).
- Set the field properties:
- Mandatory Field - Entering a value for the field becomes mandatory.
- +Quick Create - The field becomes available under Quick Create.
- Key Field View - The field appears in the Key Fields section of a contact’s Summary View.
- Header View - The field appears in the Header section of a contact’s Summary View.
- Mass Edit - You can perform a mass edit action on the field.
- Personally Identifying - The field can be selected to seek consent from contacts. Data in the field must be erased if a contact does not grant consent.
- Click Save.
Follow these steps to create encrypted fields:
- Log in to your CRM account.
- Click the User Menu on the top right corner of the CRM screen.
- Click Settings.
- Look for the Module Management section.
- Select Module Layouts & Fields.
- Choose Contacts from the Select Module drop-down.
- Click the Detail View Layout tab.
- Click the +Add Custom Field button under any block you want to create it in. For example, under Basic Information, Address Details, etc.
- You can also create a new block and add an encrypted field under it:
- Click +Add Block.
- Enter the block name.
- Choose the existing block after which you want to add the new block.
- Click Save.
- Click +Add Custom Field in the newly created block.
- You can also create a new block and add an encrypted field under it:
- Select the field type. For example, Phone for phone number, Text for name, etc.
- Enter the field name under Label Name.
- Enter a default value for the field (optional).
- Enable the checkbox for Encrypt under Enable/Disable field properties.
- Type ENCRYPT in the textbox provided.
- Click Encrypt.
- Enter the number of characters in the encrypted field that must be visible to CRM users.
- Click Save.
The value in the encrypted field is hidden from CRM users, except the users who have permission to view the value.
|
|
Setting up Consents
The six-step process
Setting up consents is a six-step process. You can set them up if you are an Admin user.
Step 1: Install the Vtiger Privacy Guard from the Extension Store.
- Log in to your CRM account.
- Click the User Menu on the top right corner of the CRM screen.
- Click Settings.
- Look for the Extensions section.
- Select Extension Store. The Vtiger Extension Store opens.
- Look for Vtiger Privacy Guard using the search bar.
- Click Install.
After you have installed the Vtiger Privacy Guard, you can use the Consents module.
Step 2: Enable the Consents module.
- Click the User Menu on the top right corner of the CRM screen.
- Click Settings.
- Look for the Module Management section.
- Select Modules.
- Look for Consents and enable the checkbox.
Step 3: Set up a deduplication of contacts.
- Click the User Menu on the top right corner of the CRM screen.
- Click Settings.
- Look for the Configuration section.
- Select Consents.
- Click the Enable the Preference page checkbox. The Consents Prerequisites window pops up.
- Note: The Preferences page is available in the consent request email that you send to your contacts.
- Enable the checkbox for Mark all except the most recently modified duplicate record as "Duplicate" (a closed state which locks the record, prevents edits, and stops processing).
- When you do this, the Status field in all duplicate records except the record that was most recently modified, is set to Duplicate. Duplicate is a closed state. It locks a record, preventing future modifications on it.
- Enable the checkbox for Stop new records from being created with a duplicate email address.
- When you do this, the CRM will prevent the creation of duplicate records in the future.
- Click Deduplicate & Proceed.
Step 4: Set up From Name and From Email.
This step is automatically skipped if you have already set up From Name and From Email under Email Settings.
- Click the User Menu on the top right corner of the CRM screen.
- Click Settings.
- Look for the Configuration section.
- Select Email Settings.
- Click the Edit icon on the Email Settings page.
- Scroll down to the Double opt-in and Consent Emails section.
- Enter From Name and From Email.
- Click Save.
Step 5: Acknowledge data erasure behavior.
- Go back to the Consents page.
- Click the Next button in the Consents Prerequisites window.
- Click the Enable the Preference page checkbox.
- Enter ‘I UNDERSTAND’ in the text area. By doing this, you acknowledge that if a customer does not grant a data consent (consent value = No), then their data will be erased from the CRM.
- Note: Make sure you do enter extra spaces in the text area.
- Click OK.
Step 6: Configure consents.
- Click the Enable the Preference page checkbox.
- Click the Contacts or Leads tab. This enables you to set up consents for your leads and contacts separately.
- Enter the following information:
- Click Save.
Choosing the audience for a consent
|
|
Here is how to do it:
Each type of consent has a Show To section where you can choose from which contacts you want a specific consent and apply suitable conditions. 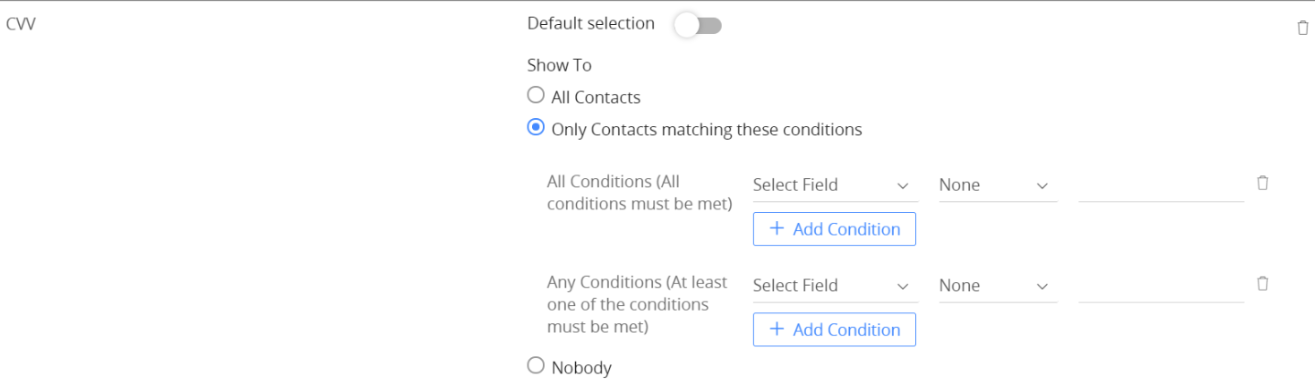
- All Contacts: Consent is visible to any contact who receives the consent request email.
- Only Contacts matching these conditions: Consent is visible only to the filtered list of contacts. For example, contacts whose address is of the EU, contacts who have not opted to your marketing emails, etc.
- Select Only Contacts matching these conditions.
- Click the +Add Condition button.
- Select the field on which you want to apply a condition.
- Nobody: Consent should not be visible to any contact.
Configuring different consents
When you land on Settings > Configuration > Consents after performing the six-step process mentioned above, you will see the following settings on the Consents page.
Consents section introduction

Enter the text that you want to use to introduce your contacts to Consents. Vtiger CRM provides a ready-made introduction paragraph, but you can modify it according to your company’s template.
|
|
Consent to store specific data
Choose the personal/encrypted fields for which you want to obtain consent. Here is an example: 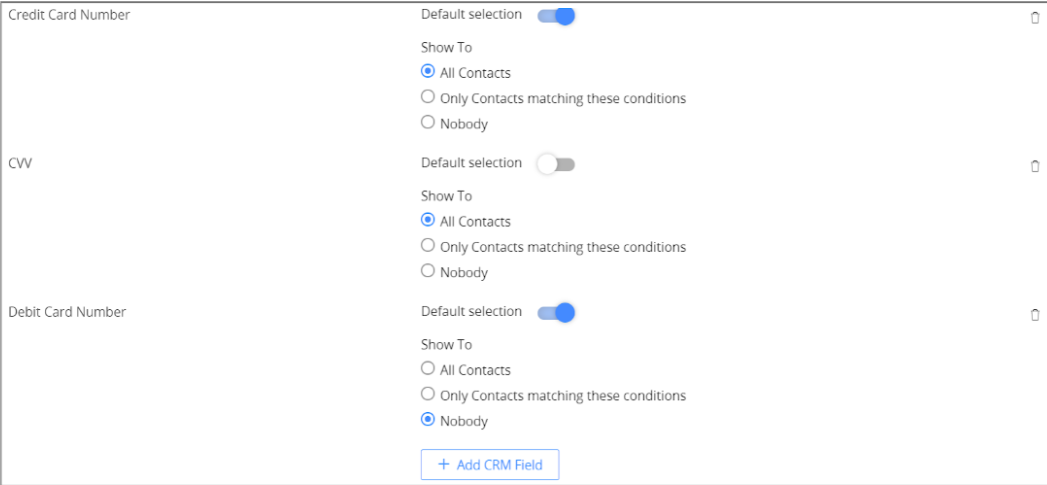
- Personal fields: When you mark a field as Personally Identifying, you can seek your contacts’ consent to store a value in it. If a contact does not grant consent, then the value in the field gets erased.
- Encrypted fields: Values stored in encrypted fields can be hidden from CRM users. Only users with permission can view the encrypted value in the fields.
Custom consents
Add a customized consent by defining its purpose. For example, ‘Allow your contact details (email address and phone number) to be shared with a local partner for follow-up’ can be a custom consent.
- Click the +Add New Custom Consent button.
- Enter the Consent Text. You must define the purpose of the consent here.
- Click Save.
- Choose the default selection for the consent:
- Default selection= Enabled: Enable the toggle button if you do not require the consent but need to provide the right to an individual to revoke it.
- Default selection= Disabled: Disable the toggle button if you require consent.
- Choose the audience for consent.
Consents for tracking purposes
You can track consents for email tracking and document tracking:
- Track my email engagement - This consent allows your contacts to choose whether their opens and replies on an email must be tracked.
- Track my document engagement - This consent allows your contacts to choose whether their downloads and reshares on a shared document must be tracked.
|
|
Other preferences
Your contacts can also choose consents for the following:
- Stop processing request - When a contact opts for this, their CRM record gets locked. This way, you will no longer be able to edit their details.
You can also set up email notifications to be sent to the contacts when their records get locked or unlocked.
- Send lock notification email - If enabled, an email notification is sent to a contact when their record is locked in the CRM. Click the ‘lock notification email’ link to view and edit the email template for lock notification.
- Send unlock notification email - If enabled, an email notification is sent to a contact when their record is unlocked in the CRM. Click the ‘unlock notification email’ link to view and edit the email template for unlock notification.
- Log in to your CRM account.
- Click the Main Menu.
- Go to Essentials.
- Select Contacts.
- Open the contact record that is locked.
- Click the Re-open button.
You can also delete a locked record.
- Data erasure request - Contacts can opt for this if they want their personal data to be erased from the CRM.
When they click this option, a confirmation email is sent to their email address with a confirmation link. The contact must confirm their request by clicking the link in the email.
- Send erasure notification email - When a contact opts for data erasure and you erase the data, a notification email is sent to the contact.
Setting up Consent Notifications
There’s a way to automatically notify a contact when you update the consent configuration or a contact’s details. The notification will contain the revised consents, which the contacts must review.
|
|
Follow these steps to set up consent notifications for contacts:
- Log in to your CRM account.
- Click the User Menu on the top right corner of the CRM screen.
- Click Settings.
- Look for the Configuration section.
- Select Consents.
- Click the Consents Notifications Settings button located below Consents section introduction.
- Select one or both of the options below:
- Automatically notify contacts when they match conditions for a new consent due to a change in their profile (customize email - sent daily at 10AM) or to a change in your privacy policy (customize email - sent Friday at 3PM) - This option, if enabled,
- Automatically notifies contacts at 10 AM daily IF they match a consent condition due to a change in their profile in the last 24 hours.
- Automatically notify contacts on Friday, 3PM IF there was a change(s) in your privacy policy in the last one week.
- Include a link to the preference page in direct emails - Upon selecting this option, the Privacy Preferences link is embedded in the ad-hoc or direct emails that you send your contacts.
- Automatically notify contacts when they match conditions for a new consent due to a change in their profile (customize email - sent daily at 10AM) or to a change in your privacy policy (customize email - sent Friday at 3PM) - This option, if enabled,
- Click +Add preferences page link to add the Privacy Preferences link to the bottom of your email by default.
- Click Save.
Sending a Consent Request
A request for consent is a part of the GDPR law. You can request consent from a contact by sending them the consent request email.
Follow these steps to send a consent request to a contact:
- Log in to your CRM account.
- Click the Main Menu.
- Go to Essentials.
- Select Contacts.
- Click on the contact whose consent you need.
- Click the More icon on the top right corner of the contact record.
- Click the Obtain Consent option.
The consent request email is sent to the contact, where they can review their consent.
|
|
Skip to the next section to learn how your customers can provide their consent to store data.
How Your Customers can Grant Consent
This section is helpful to you if:
- You are a user of Vtiger CRM and want to know how to respond to Vtiger’s consent requests.
- You need help in guiding your customers in granting you consent.
Contacts can review and provide consents from the consent request email that you send them.
- Open the email.
- Click the Review my consents button.
The Consents page in the email will look similar to the one below: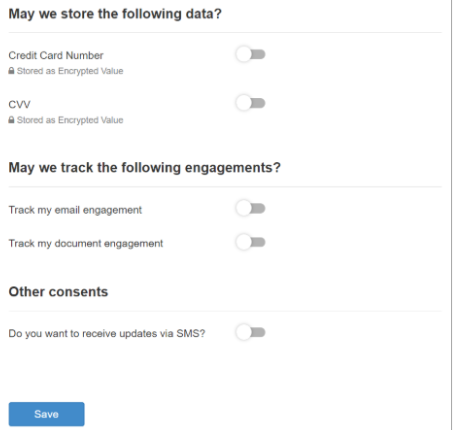
Contacts must enable a toggle button to grant consent or disable it to deny consent. Based on what they choose, the fields in the Consents block in their contact record get updated.
Giving CRM Users the Permission to View Encrypted Values
Permission to view encrypted values can be given to a profile in the CRM. Users belonging to the profile will be able to view encrypted data.
|
|
Follow these steps to provide permission to a profile to view encrypted values:
- Log in to your CRM account.
- Click the User Menu on the top right corner of the CRM screen.
- Click Settings.
- Look for the User Management section.
- Select Profiles.
- Hover on a profile and click the Edit icon.
- Choose an app (Inventory, Sales, etc.) and click the downward arrow on it.
- Choose a module and click the downward arrow on it.
- Scroll down to the Tools section.
- Enable the View encrypted field value checkbox.
- Click Save.
To learn more about Users, click here.
To learn more about Profiles, click here.
Erasing a Contact’s Personal Data
Personal data is the value stored in the Personally Identifying field in a contact record. When a contact requests to erase their personal data, you will see the Erase personal data option on the contact.
Follow these steps to erase the personal data of a contact:
- Log in to your CRM account.
- Click the Main Menu.
- Go to Essentials.
- Select Contacts.
- Open a contact that has personal data.
- Click the More icon on the top right corner of the contact record.
- Click the Erase my data option.
- Click Yes to confirm.
|
|
Consents Block in Contacts
After you install the Vtiger Privacy Guard from the Extension Store and enable the Consents module, the Consents block appears in the Contacts module.
Here is what the default fields in the Consents block mean:
|
|
|
|
|
|
|
|
|
|
|
|
|
|
|
|
|
|
|
|
|
|
|
|
|
|
|
|
|
|
|
|