Articles in this section
Calendar View in Vtiger CRM
Feature Availability
Vtiger Editions: One Growth | One Pilot | One Professional | One Enterprise | One AI
Introduction
Using the Calendar view, you can display scheduled events and tasks for:
- The current date
- A day
- Three days
- A week
- A Month
The Calendar View is available for all CRM modules (with a Date and a Datetime field). It displays different data depending on the module you select. The Calendar View module is an add-on that has to be installed from the Extension store.
Note:
- Records will be fetched based on the current filter and the Date/Datetime field selected.
- You cannot edit records using drag and drop in the Calendar View.
- Only the monthly view is supported.
Features
Calendar View for Events
- Add a comment/sticky note on the event record.
- Open the event record in a new window.
- Mark the event as Held.
- Edit the time, assignee name, status, etc.
Calendar Schedules
You can view your events based on a month, a week, three days, one day, or the current day. To view and select one of these options, click the drop-down beside the Calendar icon when you land on the Events page.
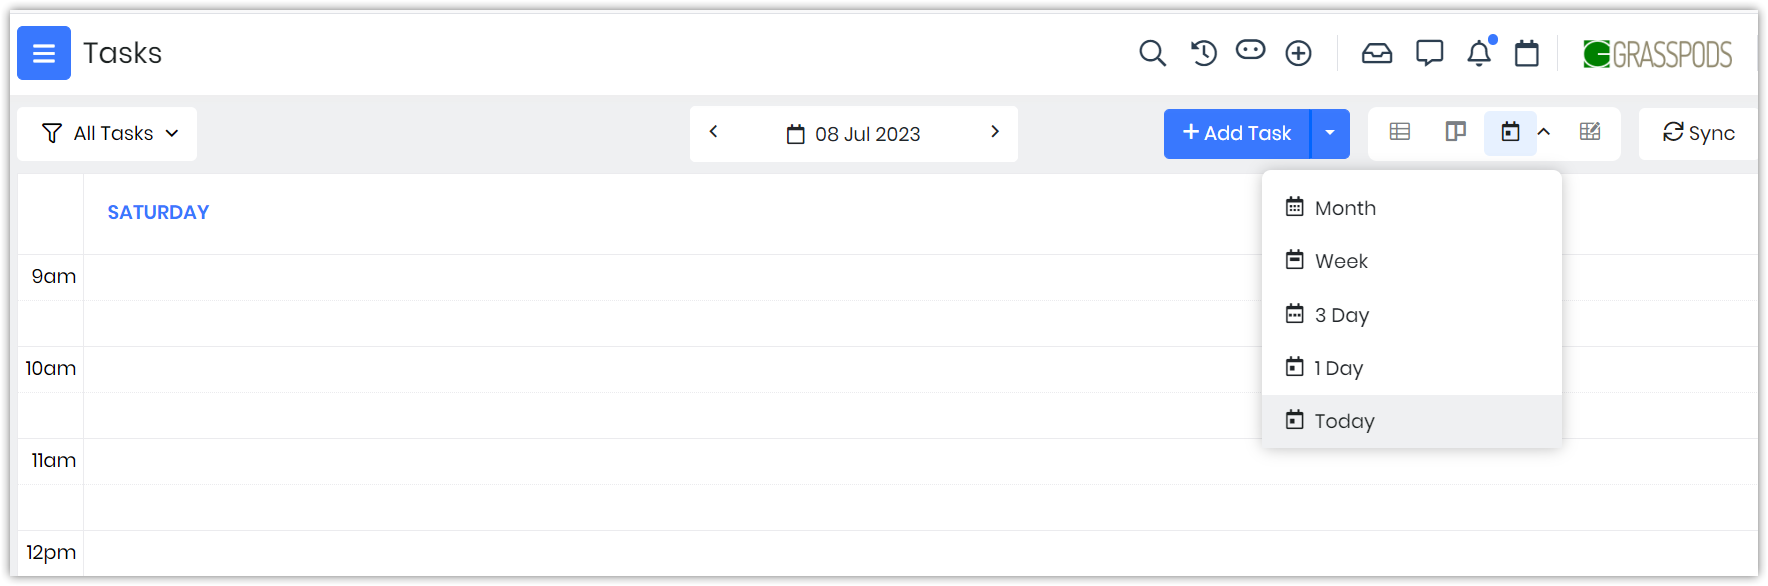
- Month: Displays your schedule for the entire month. Using the left and right arrows displayed on top of the calendar, you can view schedules for the past and future months.
- Week: Displays your schedule for the entire week (from Monday to Sunday). Using the left and right arrows displayed on top of the calendar, you can view schedules for the past and future weeks.
- 3 Day: Displays the schedule for three days, starting from the current day. Using the left and right arrows displayed on the calendar, you can view schedules for the past and future sets of three days.
- 1 Day: Displays the per-day schedule. Using the left and right arrows displayed on top of the calendar, you can view schedules for the past and future.
- Today: Displays your schedule for the day.
Recurring Events
You can create Events that you want to occur multiple times using Recurring events. These can be created Daily, Weekly, Monthly, and yearly. You also have the option to choose the days you want an event to occur by enabling the checkbox against the day you want it to occur.
Benefits
The benefits of using the Calendar View in Vtiger CRM are:
- Create Events: Vtiger CRM's Calendar lets you effectively schedule and manage your activities, appointments, and tasks by creating events.
- Collaborate better with co-workers: Creating events in a Shared Calendar is a great way to collaborate better with your co-workers.
- Shared Calendar: Vtiger CRM allows you to share your calendar with team members, departments, or specific individuals. This feature promotes collaboration and transparency within your organization.
- Automated Reminders and Notifications: The Calendar feature in Vtiger CRM provides automated reminders and notifications for scheduled events.
- Mobile Access and Synchronization: Vtiger CRM's Calendar can be accessed from mobile devices through the Vtiger mobile apps. This ensures that you can view and manage your calendar on the go, enabling you to stay updated and responsive even when you are away from your desk.
- Advanced Filtering and Views: You can customize the calendar display based on your preferences, such as daily, weekly, or monthly views. Filtering options allow you to focus on specific event types, individuals, or departments, providing a clear overview of your scheduled activities.
In this article, you will learn about:
- Creating a Calendar Event
- Displaying the Calendar View
- Creating Recurring Events
- Using the Calendar View in Tasks
- Sharing your Calendar
- Sharing your Calendar with other apps
- Managing Calendar Settings
Key Terminology
| Key Term | Definition |
| Calendar Event | An event on your Calendar to schedule a meeting on a specific date and time. |
| Recurring Event | A recurring event in a calendar refers to an event that repeats regularly, such as daily, weekly, monthly, or yearly. |
Creating a Calendar Event
You can create an event on your calendar for a particular date or schedule a meeting on a specific date and time in two ways:
- Using Quick Create (+) on any of the screens in the CRM
- Using the + Add Event button in the Essentials > Events screen
Using Quick Create (+)
Follow these steps to create an event using +Quick Create:
- Log in to the CRM.
- Click on the +Quick Create icon.
- Click on the Events option. The Add Event window opens.
- Enter or select the following information:
- Start Date & Time
- End Date & Time
- Subject
- Activity Type
- Description
- Participants
- You can invite contacts/users from an Event’s Quick Create window.
- Assigned To
- Status
- Location
- Is Mutual?
- Related To
- Organizations Name
- Click View Full Form. Enter all the necessary information.
- Click Save.
Using the + Add Event button
- Log in to the CRM.
- Go to the main Menu.
- Go to Essentials.
- Click Events.
- Click the + Add Event button on the top right. The Add Event window opens.
- Enter or select the following information:
- Subject
- Start Date & Time
- End Date & Time
- Subject
- Description
- Participants
- You can invite contacts/users from an Event’s Quick Create window.
- Click More fields.
- Assigned To
- Status
- Priority
- Location
- Event Image
- All Day
- Is Mutual?
- Related To
- Organization Name
- Click View Full Form. Enter all the necessary information.
- Click Save.
Displaying the Calendar View
The Calendar View is available for every module in the CRM with the Date and Time fields. Let us learn how to display the Calendar View for the Events and Tasks modules.
Calendar View for Events
In the Calendar View, you can click on an event to view its owner, start time, end time, and status. Also, you can perform the following actions on an event in the Calendar View:
- Add a comment or sticky note on the event record.
- Open the event record in a new window.
- Mark the event as Held.
- Edit the time, assignee name, status, etc.
Follow these steps to display the Calendar View from the Events module:
- Log in to the CRM.
- Click the main Menu.
- Go to Essentials.
- Select Events. The Events page opens. (Usually the List View.)
- Click the Calendar icon in the top right corner of the screen.
Note:
- You can always update your calendar when there is a change in the date or time, an event is scheduled to occur.
- If any upcoming event is marked as held, the start time will be updated with the current time.
Calendar View in Tasks
In the Calendar View, you can click on a task and display the task window.
Follow these steps to display the Calendar View in the Tasks module:
- Log in to the CRM.
- Click the main Menu.
- Go to Essentials.
- Select Tasks. The Tasks page opens. (Usually the List View.)
- Click the Calendar icon in the top right corner of the screen.
The system displays the Calendar View for Tasks. To learn more about Tasks, click here.
Sharing your Calendar
Did you know you can share your Calendar with your co-workers and contacts?
Sharing your Calendar gives you better control over events and the time they are being held as:
- You can view others’ schedules and set up events at the appropriate time
- Others will also be able to see your schedule and set up events involving you
This feature is beneficial when your team is working from different locations or you are setting up events that involve members from multiple teams.
Effects of Sharing Rules on Calendar Events
A calendar can be shared based on Calendar Sharing Rules. Sharing Rules are crucial on the Calendar page, especially for Team Calendars. Anyone in your organization can add your calendar and view your events. This is because the sharing rules default your event visibility to Public.
- If the Sharing Rule is Public, both admin and non-admin users can add all users and groups to their calendars.
- If the Sharing Rule is Private, only the admin can add all users, while the non-admins can add their subordinates and groups to their calendar.
Follow these steps to set up Sharing Rules in Calendar Events:
- Log in to your CRM.
- Click the User Menu in the top right corner of the CRM screen.
- Click Settings.
- Look for the User Management section.
- Click Sharing Rules.
- Select the Events module.
- Click the +Add Custom Rule button.
- Enter or select the following information:
- Contacts of: Whose contact records do you want to share
- Can be accessed by: Who can access the contact records
- With permissions: Which access permissions must be given
- Click Save.
Changing Event Visibility to Private
Syncing your Calendar with Other Apps
Are you using applications like Gmail and Office 365? You can share and update event information by syncing Vtiger CRM Calendar and these apps. Information and notifications from these apps will appear as calendar events in your CRM Calendar module and vice versa.
Follow these steps to sync your calendar events:
- Log in to the CRM.
- Click the main Menu.
- Go to Essentials.
- Select Events. The Events page opens. (Usually the List View.)
- Click the Sync button at the top right. The Sync window opens.
- Select the app you want to sync in the Sync window.
- Click the Sync Log button.
- For example, if you sync your Calendar and Google, the Google-Sync Log window will display the entire list of events for the current date.
Note: You must sign in to your apps before processing the sync.
Editing Sync Settings
You can edit sync settings in the Sync window.
Follow these steps to change sync settings:
- Log in to the CRM.
- Click the main Menu.
- Go to Essentials.
- Select Events. The Events page opens. (Usually the List View.)
- Click the Sync button at the top right. The Sync window opens.
- From the Sync window
- Click the Settings button for the app you want to change the sync settings.
- Change relevant details.
Accessing and Editing Calendar Settings
Follow these steps to go to Calendar Settings and edit your preferences:
- Log in to the CRM.
- Click the User Menu on the top right corner of the screen.
- Click My Preferences.
- Select Calendar Settings. The Calendar Settings window for your profile opens
- Click the Edit icon on the top right to set up your preferences.
Different Settings for Customizing your Calendar
The table below summarizes the different settings available to customize your calendar.
| Field Name | Description |
| Starting Day of the Week | The first day of your week (Monday - Sunday). |
| Day Starts at | The start time of your working hours (12:00 AM - 11:00 PM or 00:00 - 23:00). |
| Date Format | The date format you prefer.
|
| Calendar Hour Format | The calendar format you prefer.
|
| Time Zone | The time zone of your work location. |
| Default Calendar Mode | The default mode must show in the Calendar View.
|
| Default Call Duration (Mins) | The default duration is to be set for events of type Call. The End Date & Time field is set depending on what you choose here.
|
| Other Event Duration (Mins) | The default duration will be set for other events, such as Meetings, Mobile Calls, etc. The End Date & Time field is set depending on what you choose here.
|
| Default Event Status | The default value is to be set in an event’s Status field.
|
| Default Activity Type | The default value to be set in an event’s Activity Type field.
|
| Hide Completed Calendar Events | Events marked as Held are not shown in the Calendar View if this field is enabled. |
| Default Calendar View | The default view of your calendar (in the Events module).
|
| Default Task Duration | The default duration to be set for tasks. You can pick any time in minutes, hours, or days. |