Articles in this section
Access CRM data offline via Vtiger 360
Accessing your Vtiger CRM data via OData feed
Calendar View in Vtiger CRM
Capturing Emotional Journeys
Closed States
Customer Touchpoints
Customizer
Desktop Notification overview
Exporting Data from Vtiger CRM
Vtiger Feature Limits
Glossary
How do I scan a Business Card in Vtiger 360 mobile App
IP Based Restriction
Kanban View in vtiger CRM
Make the leap from Spreadsheets
Merging Duplicates in Summary View
Migration Timeframe and Process
One View: Introduction
Overview of Permission Usecases
Performing Global Search
Rest API Manual
Managing your Vtiger CRM Subscriptions & Billing
Using @mentions
Contact Roles
What are Record-Level Analytics
What are Sticky Notes
Whitelisting Vtiger to Configure Gmail Inbox
What is Quick Create
Details View
Understanding Email Bounces and Error Codes
Summary View in Vtiger CRM
Applicable Taxes for Vtiger Billing
Built-in Phone Dialer in the CRM with Plivo and Twilio
Using Grid Edit in Vtiger CRM
Embedding a Video URL
QR Code in Vtiger CRM
Internal Chat
Course Completion Certificates
Customizing a Course Category
Vtiger SAML application in Microsoft Entra ID
Learn to integrate the Vtiger SAML application in Microsoft Entra ID.
R
Ruba
11 Dec, 2023 - Updated
2 years ago
Installation of Vtiger SAML in Microsoft Entra ID
Follow these steps to install the Vtiger SAML application in Microsoft Entra ID:
- Open your Microsoft Entra ID portal.
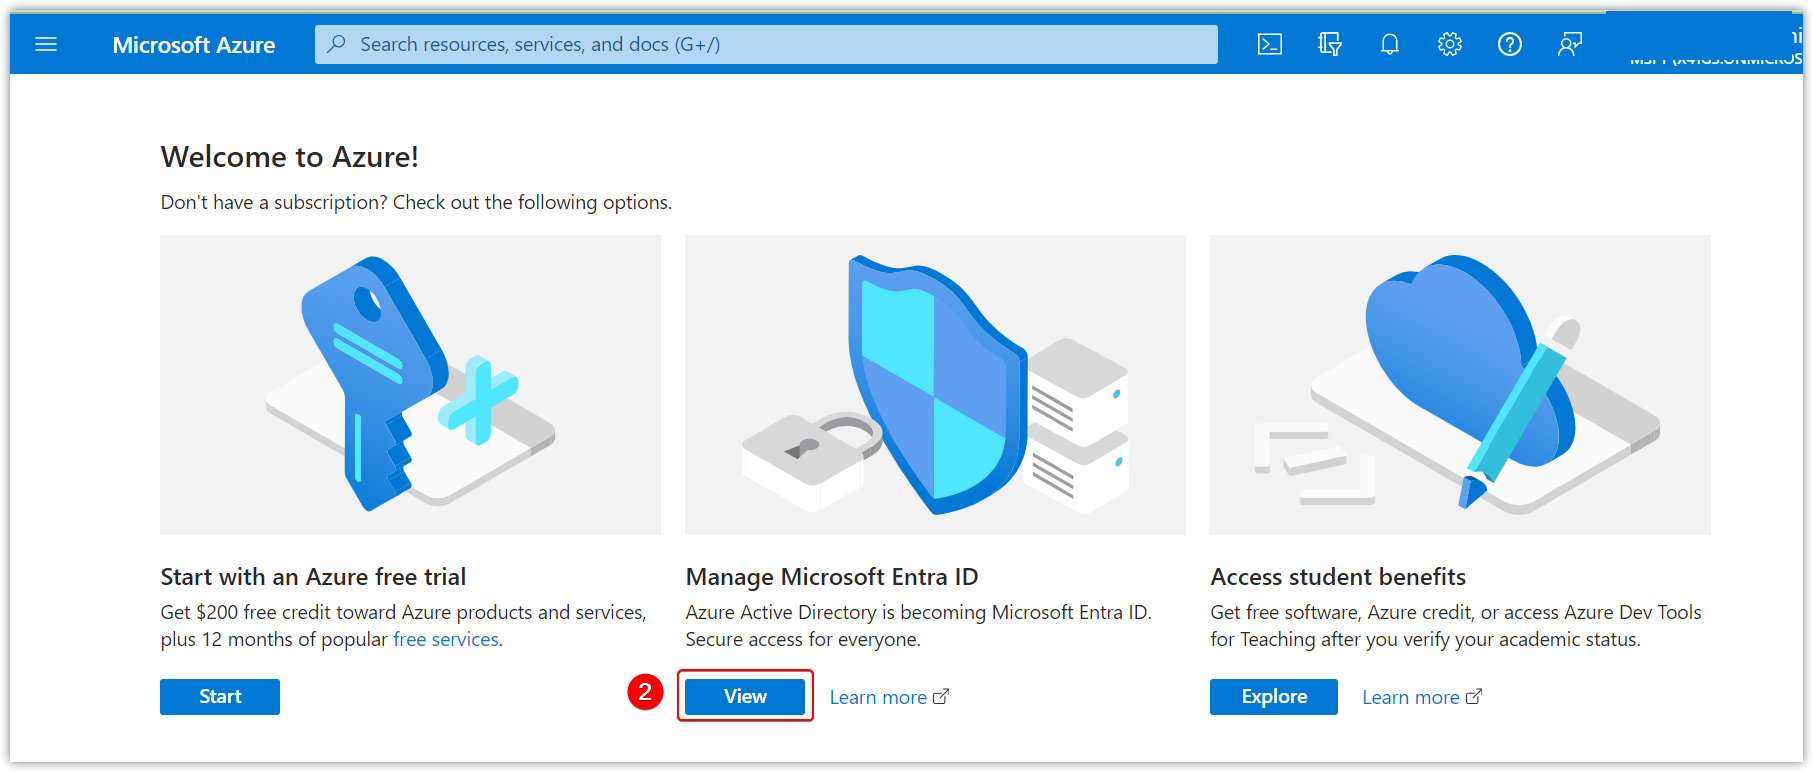
- Click View on Manage Microsoft Entra ID.
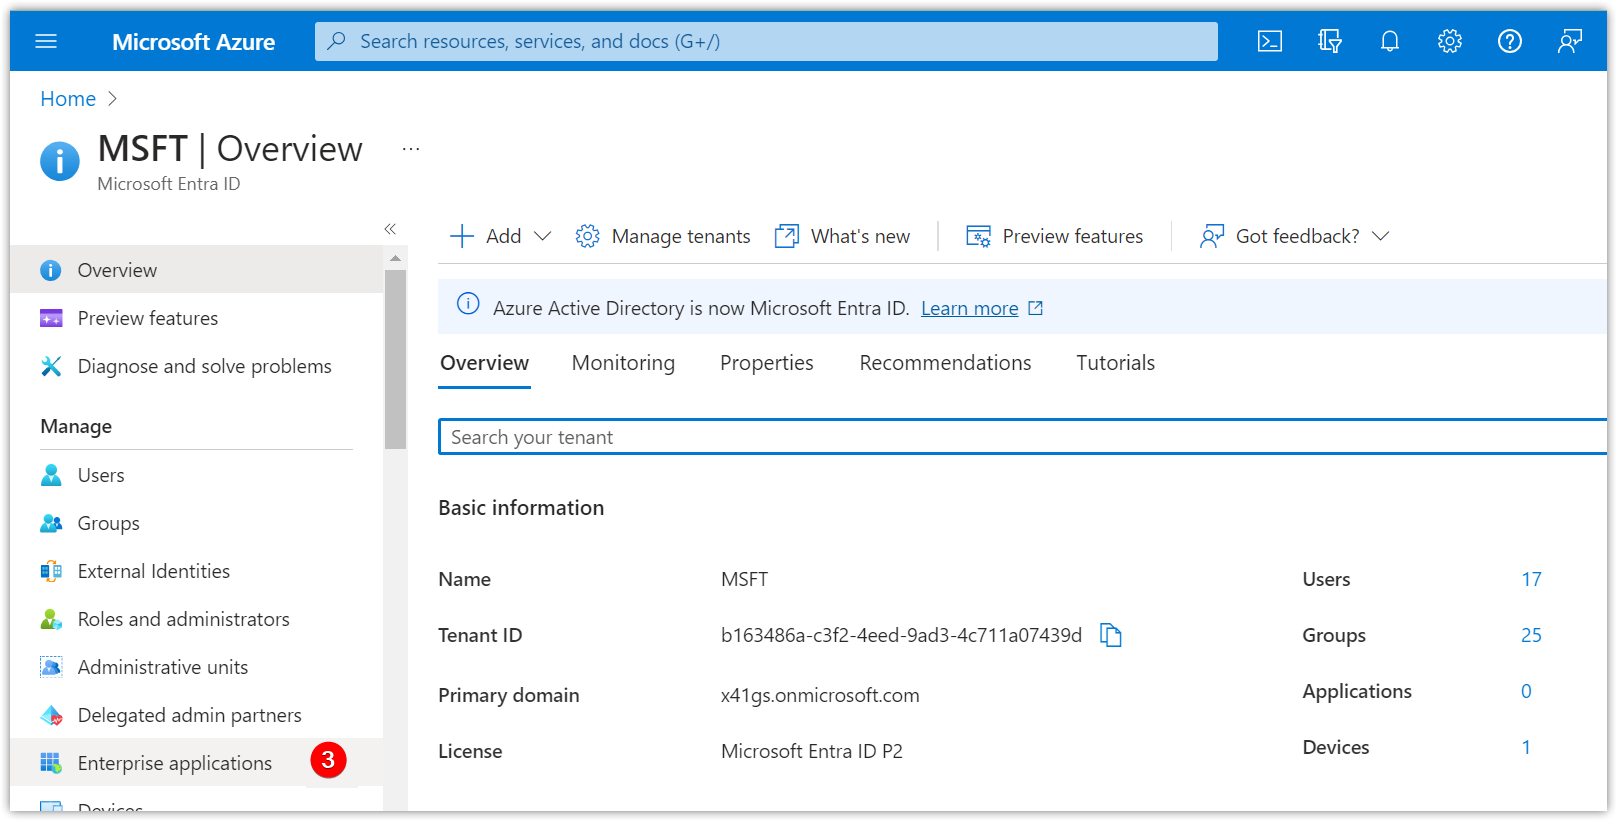
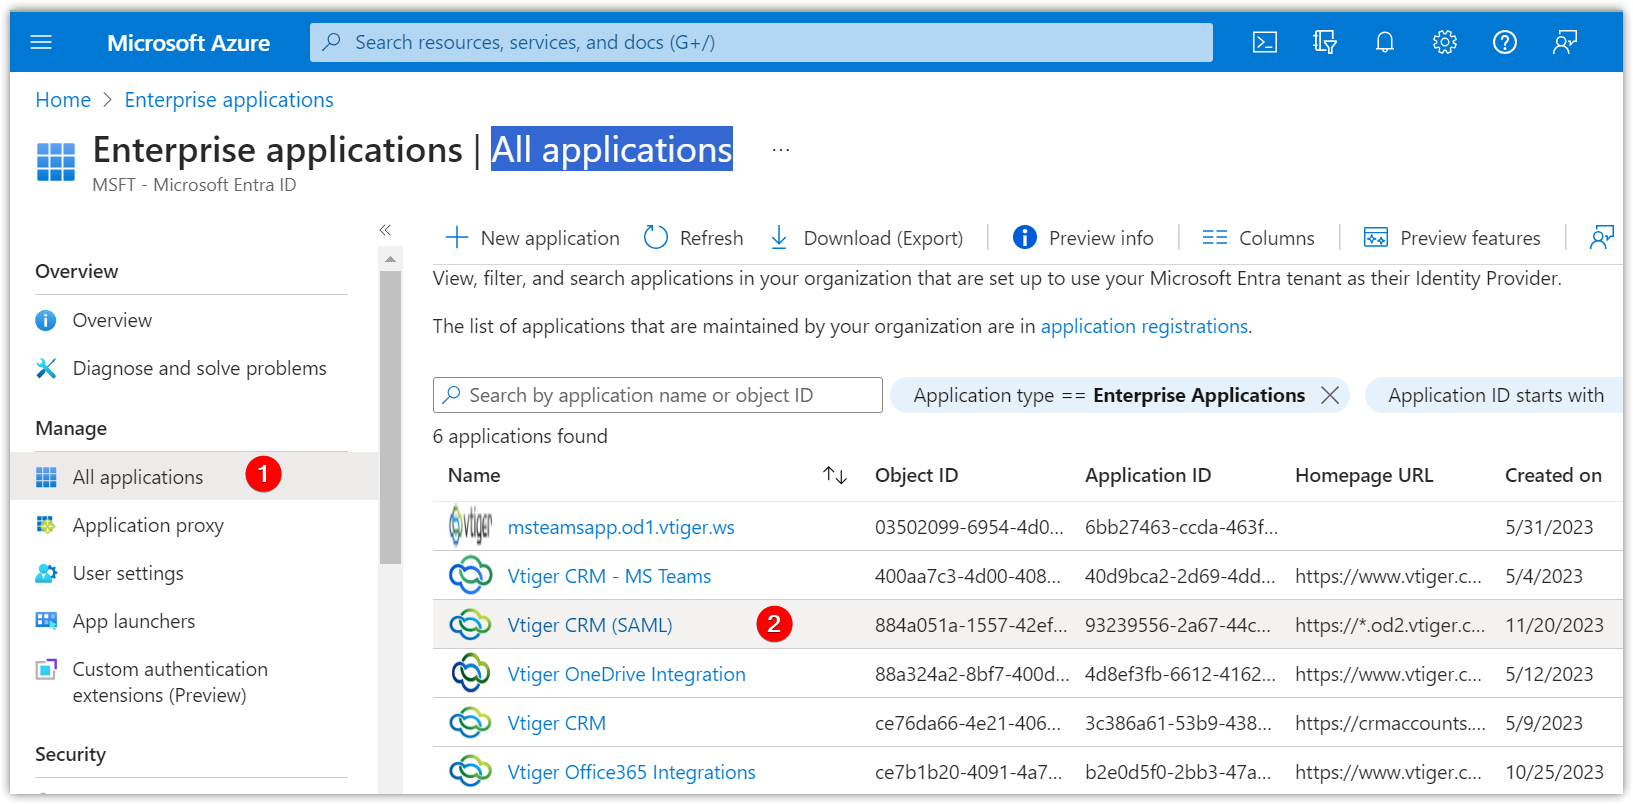
- Click Enterprise Applications under the Manage tab.
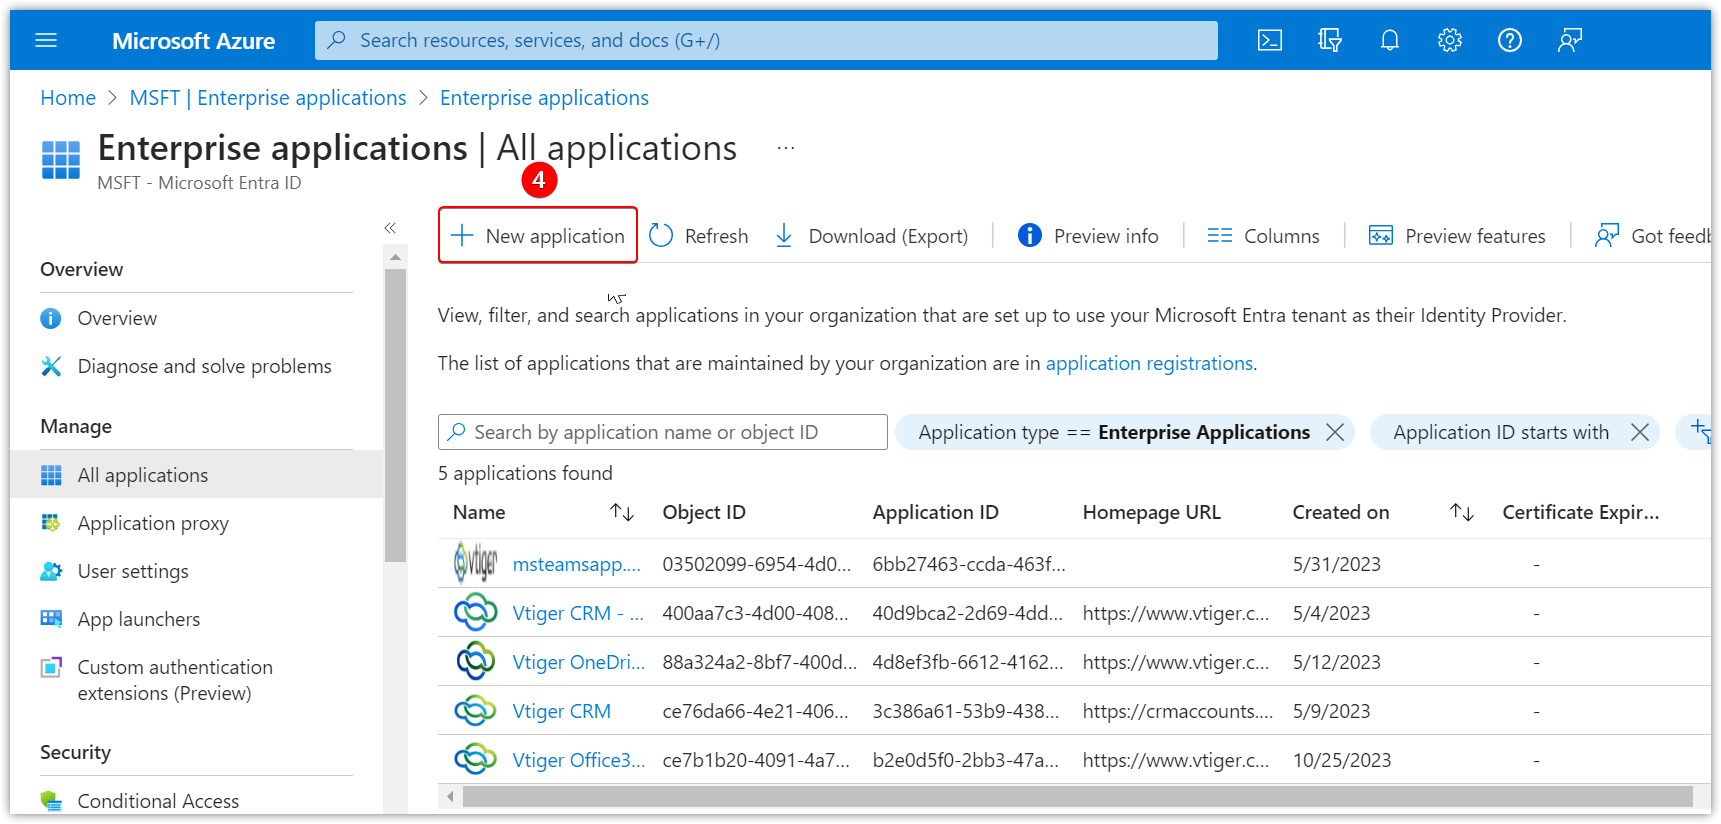
- Click the +New Application button.
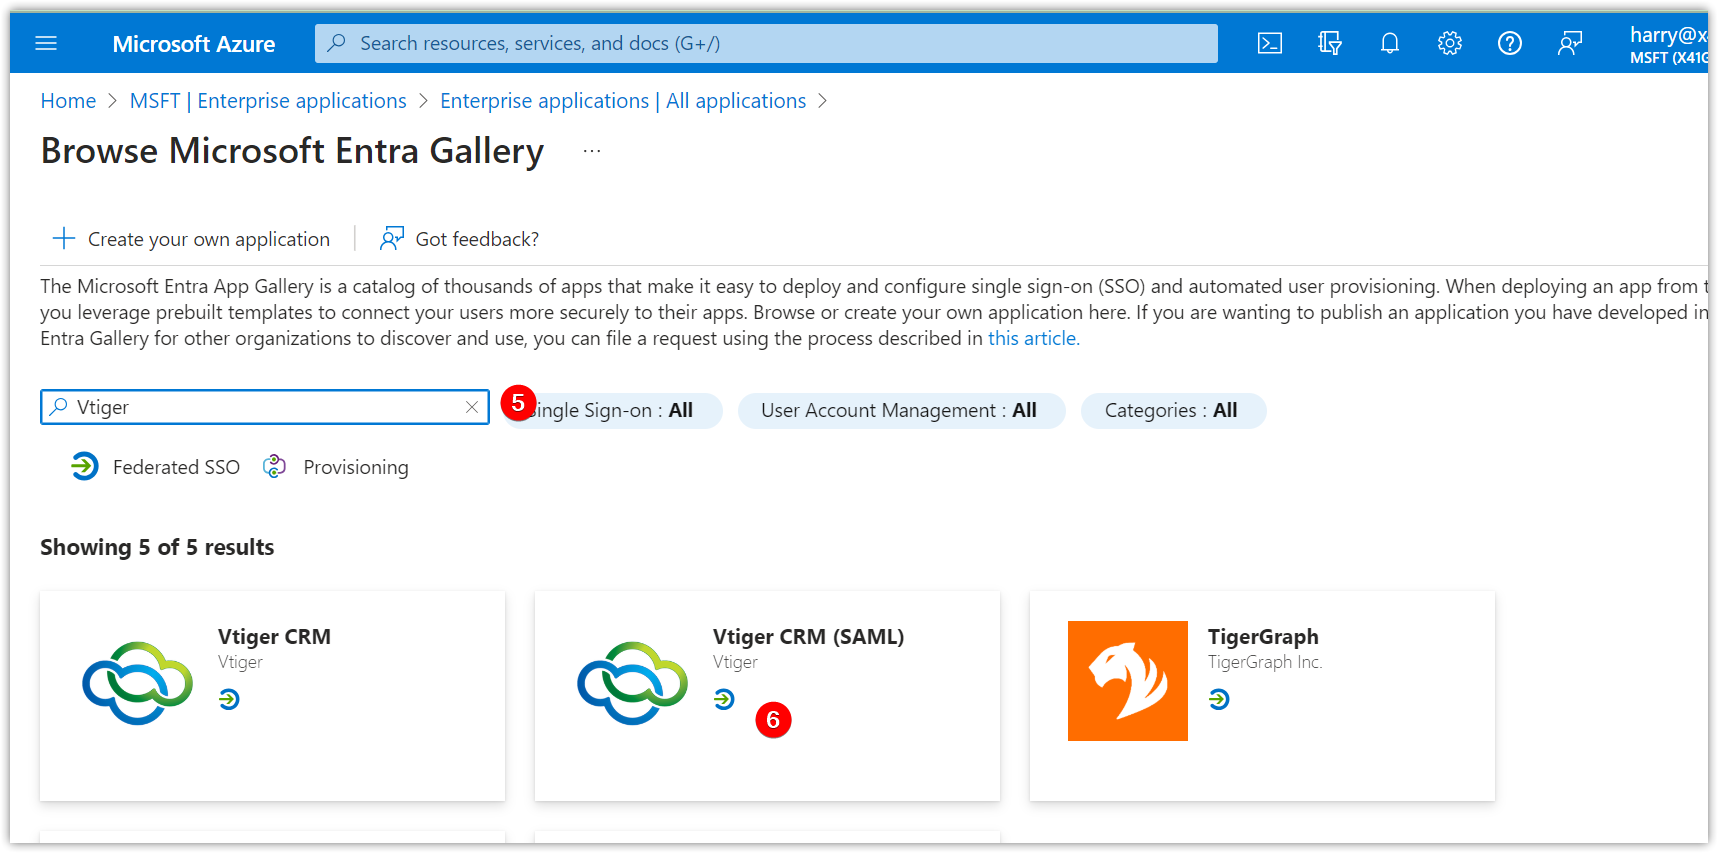
- Search for Vtiger in the Search Applications bar.
- Click on the Vtiger CRM (SAML) app. The Vtiger CRM (SAML) window opens.
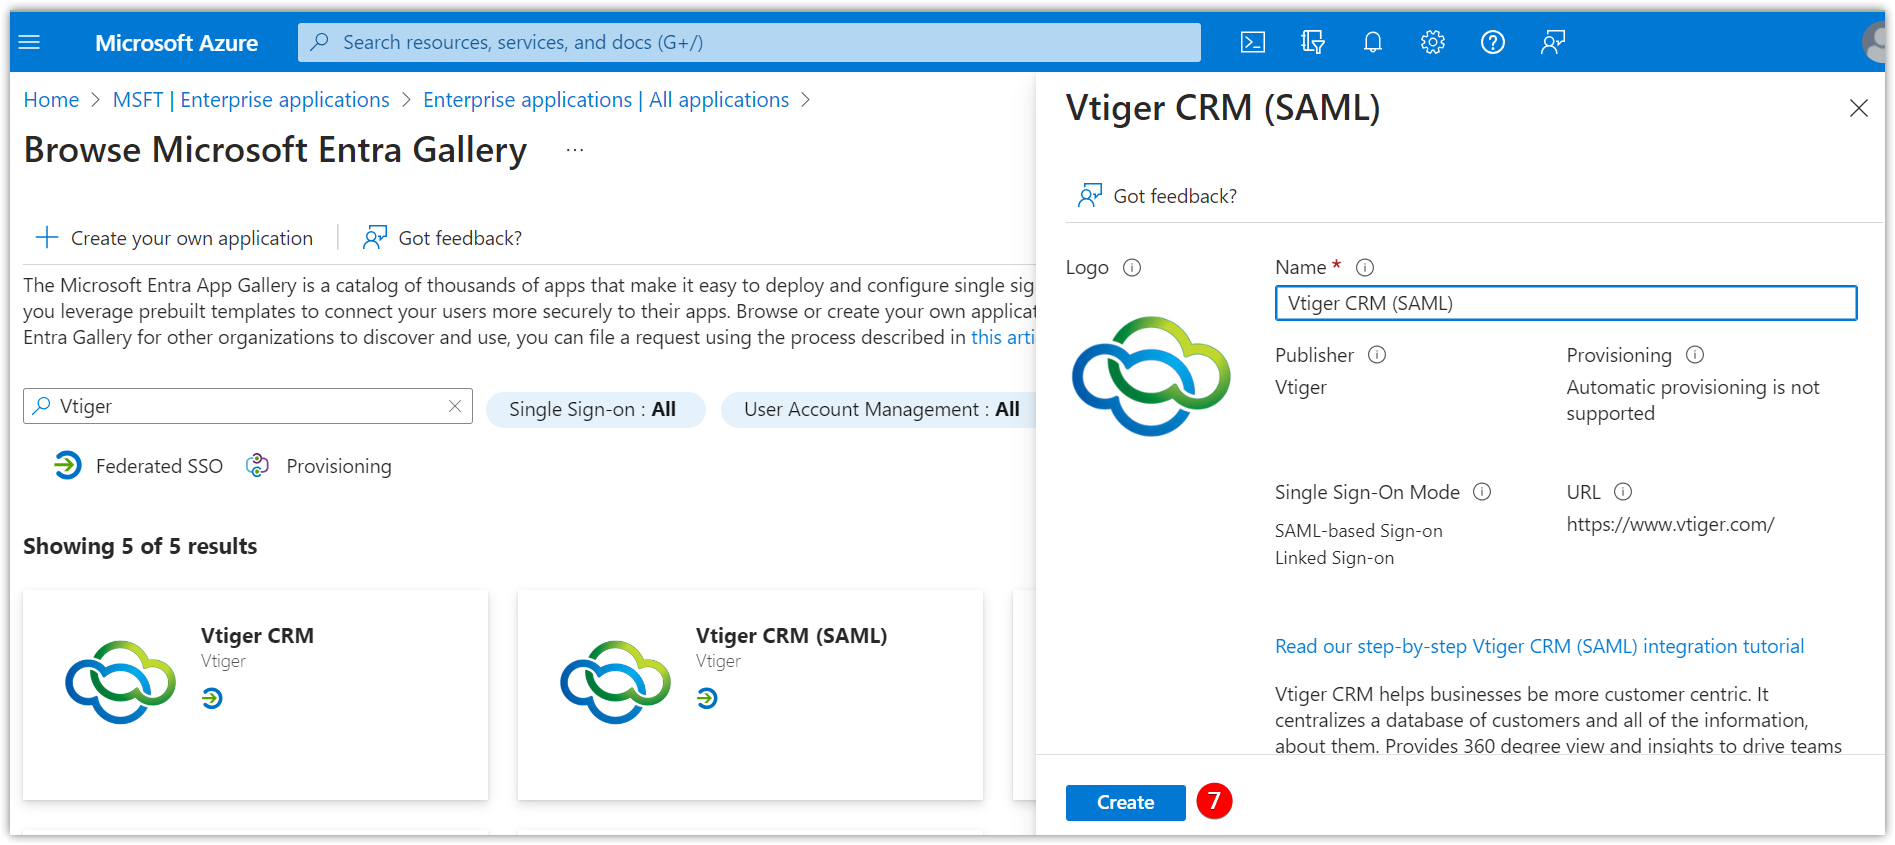
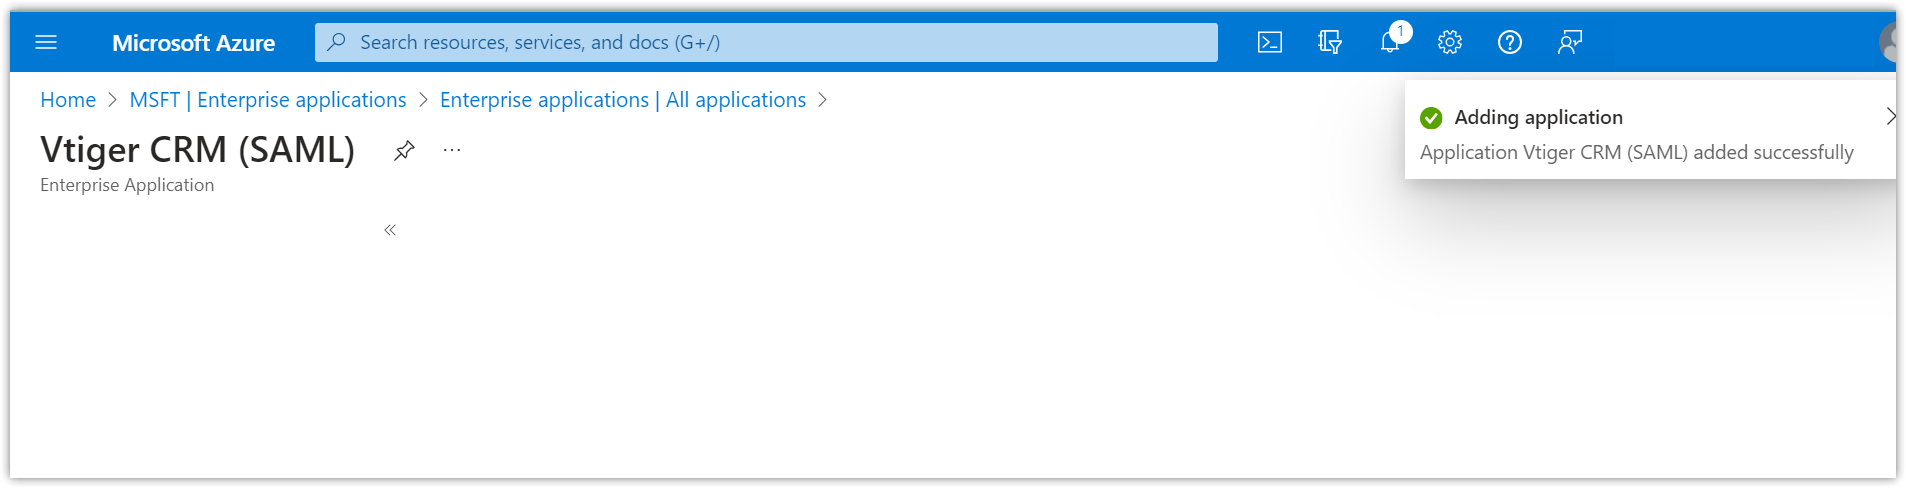
- Click Create. An Application Vtiger CRM SAML added successfully message will be displayed.
Now, go to Vtiger SAML app.
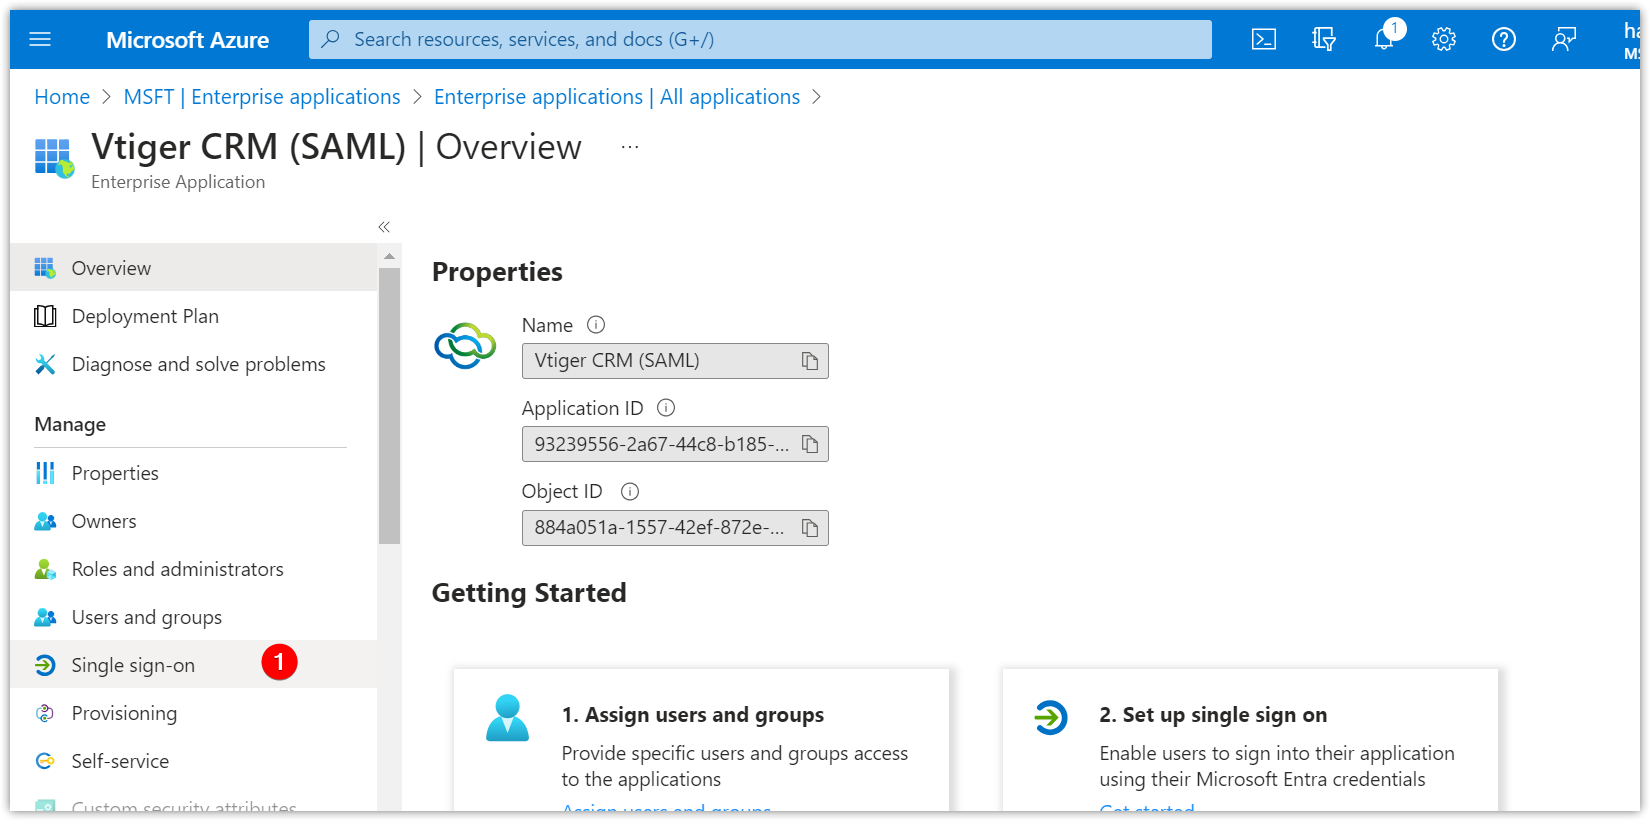
- Click on the Single sign-on option under the Manage tab.
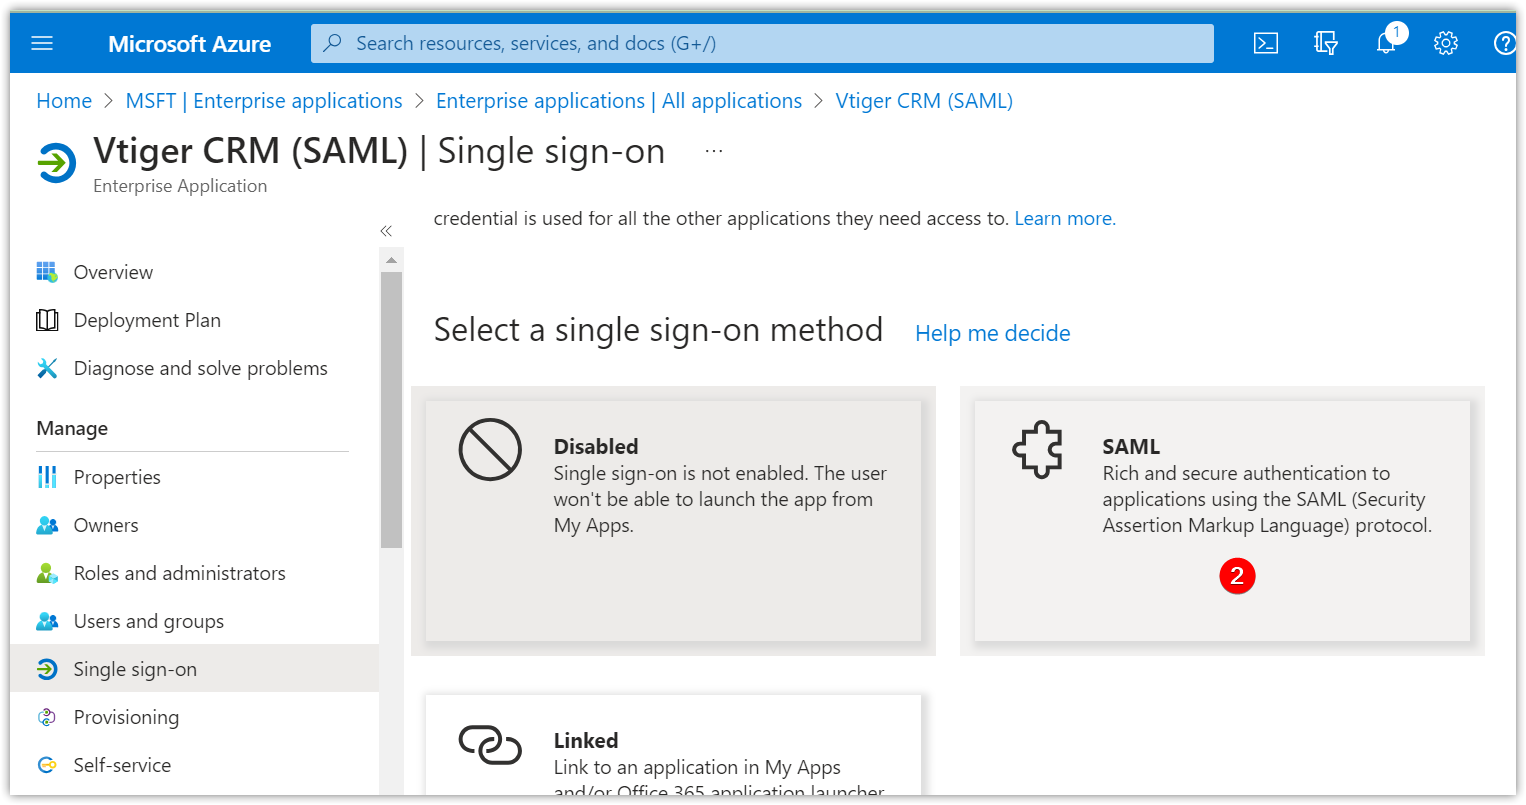
- Select SAML.
Next, set up Single Sign-On with SAML.
- Go to All Applications.
- Select Vtiger CRM (SAML).
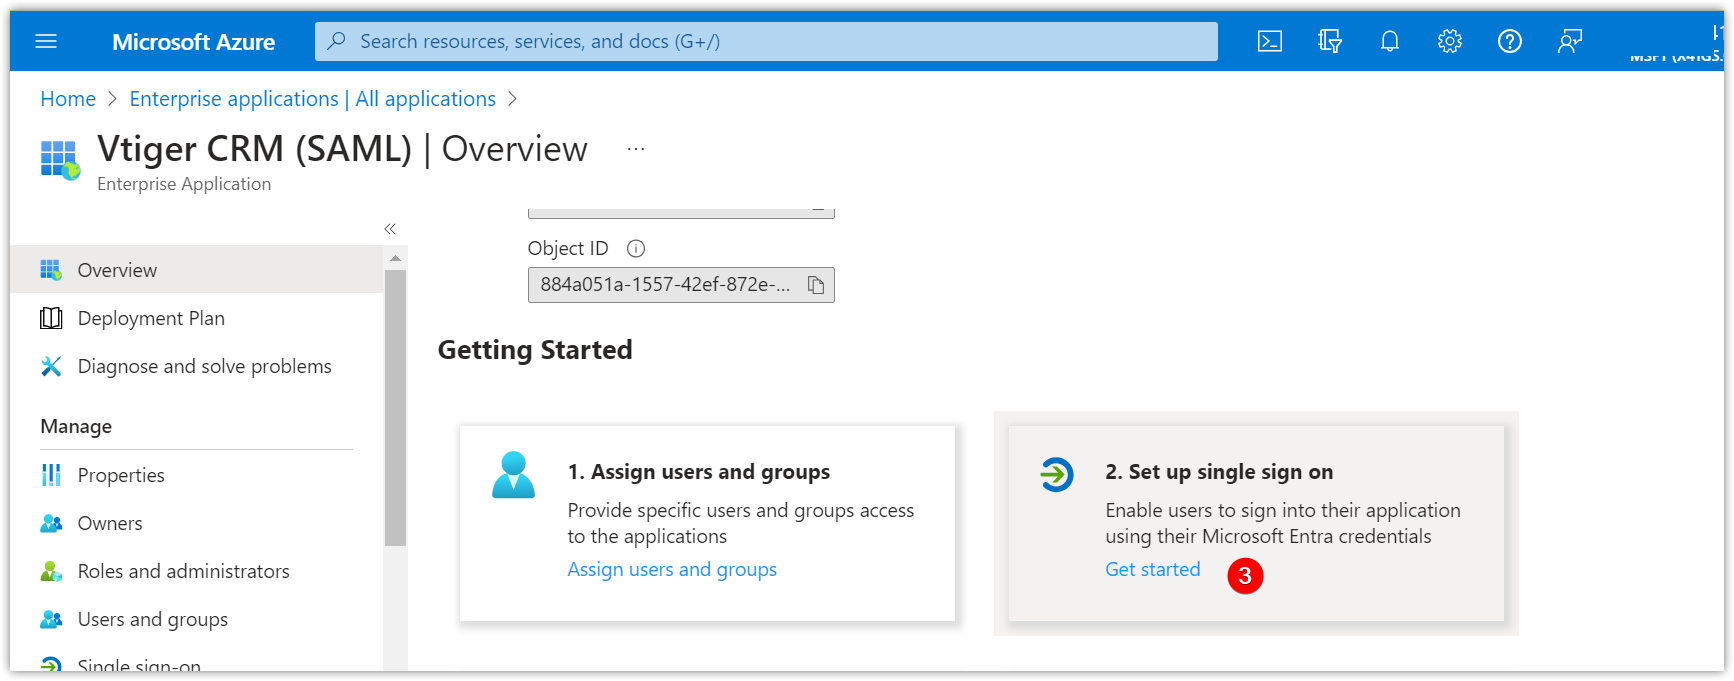
- Click on Get Started on the Set up single sign on tab.
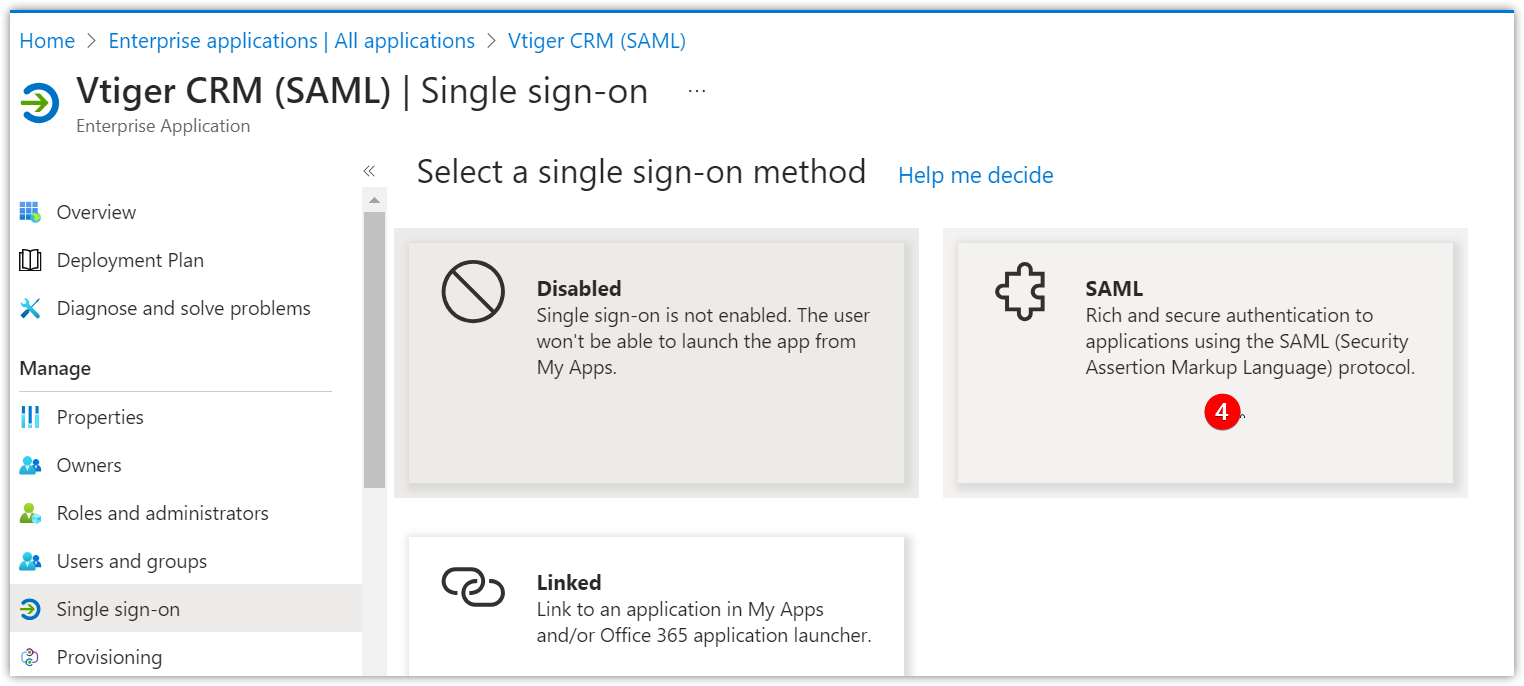
- Click SAML tab.
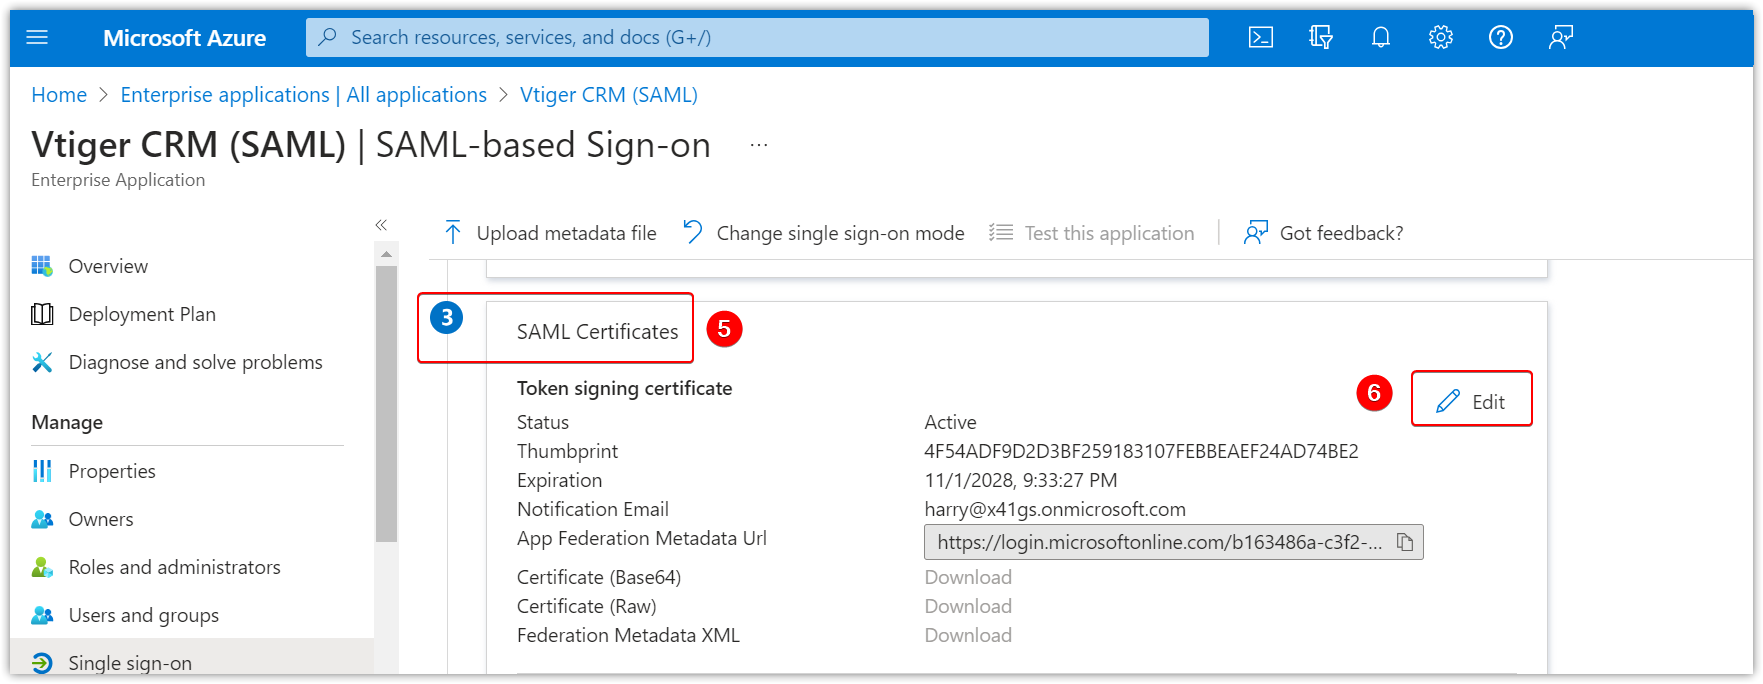
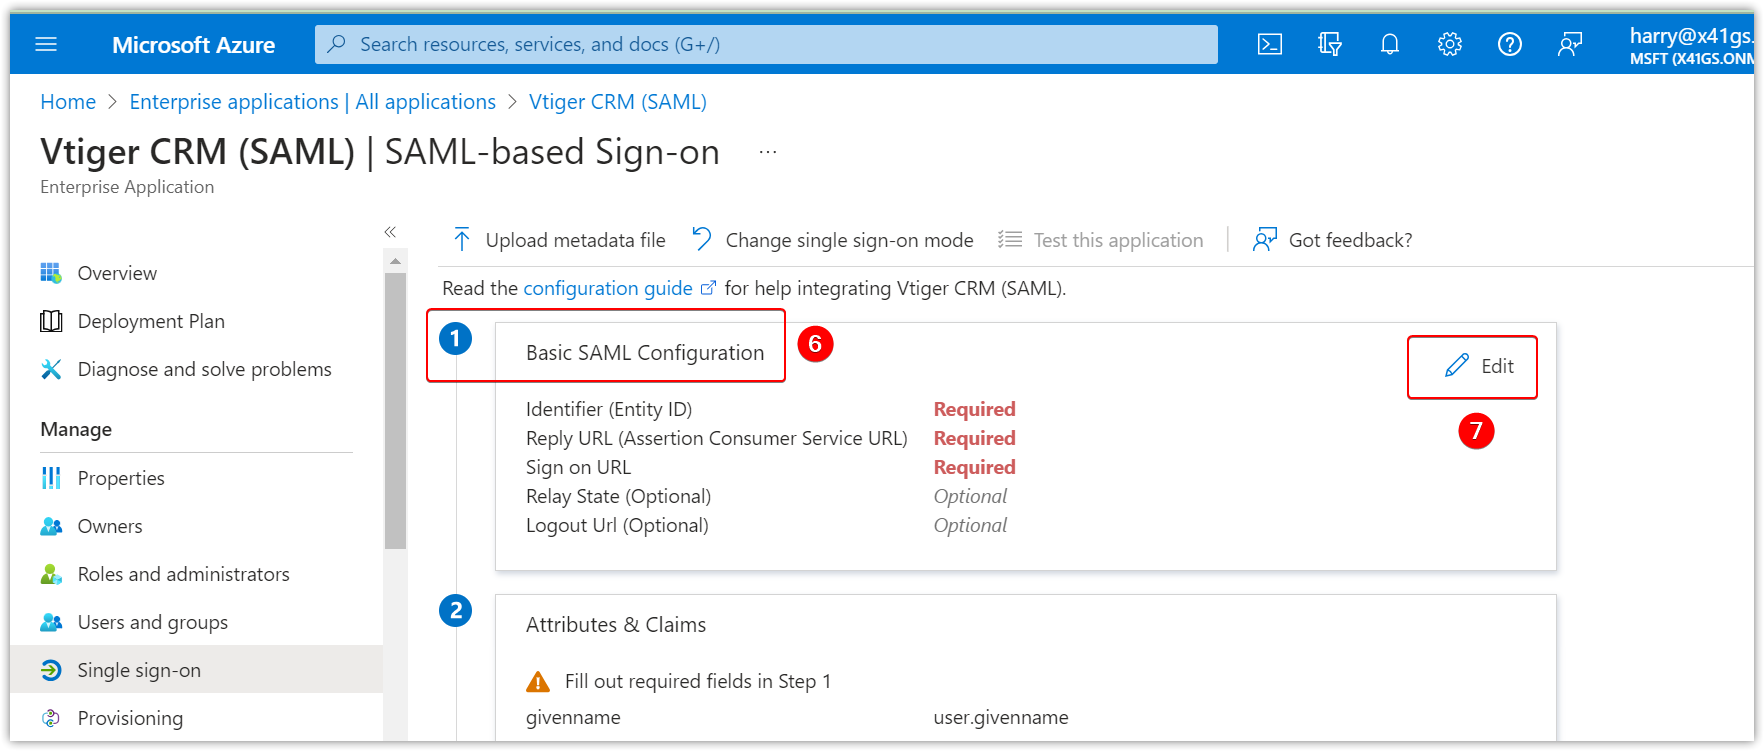
- Go to Step-3 - SAML Certificates.
- Click Edit. A SAML Signing Certificate window opens. A default certificate will be available on installing the Vtiger SAML app which will be in Active status. The user can add a new certificate if needed.
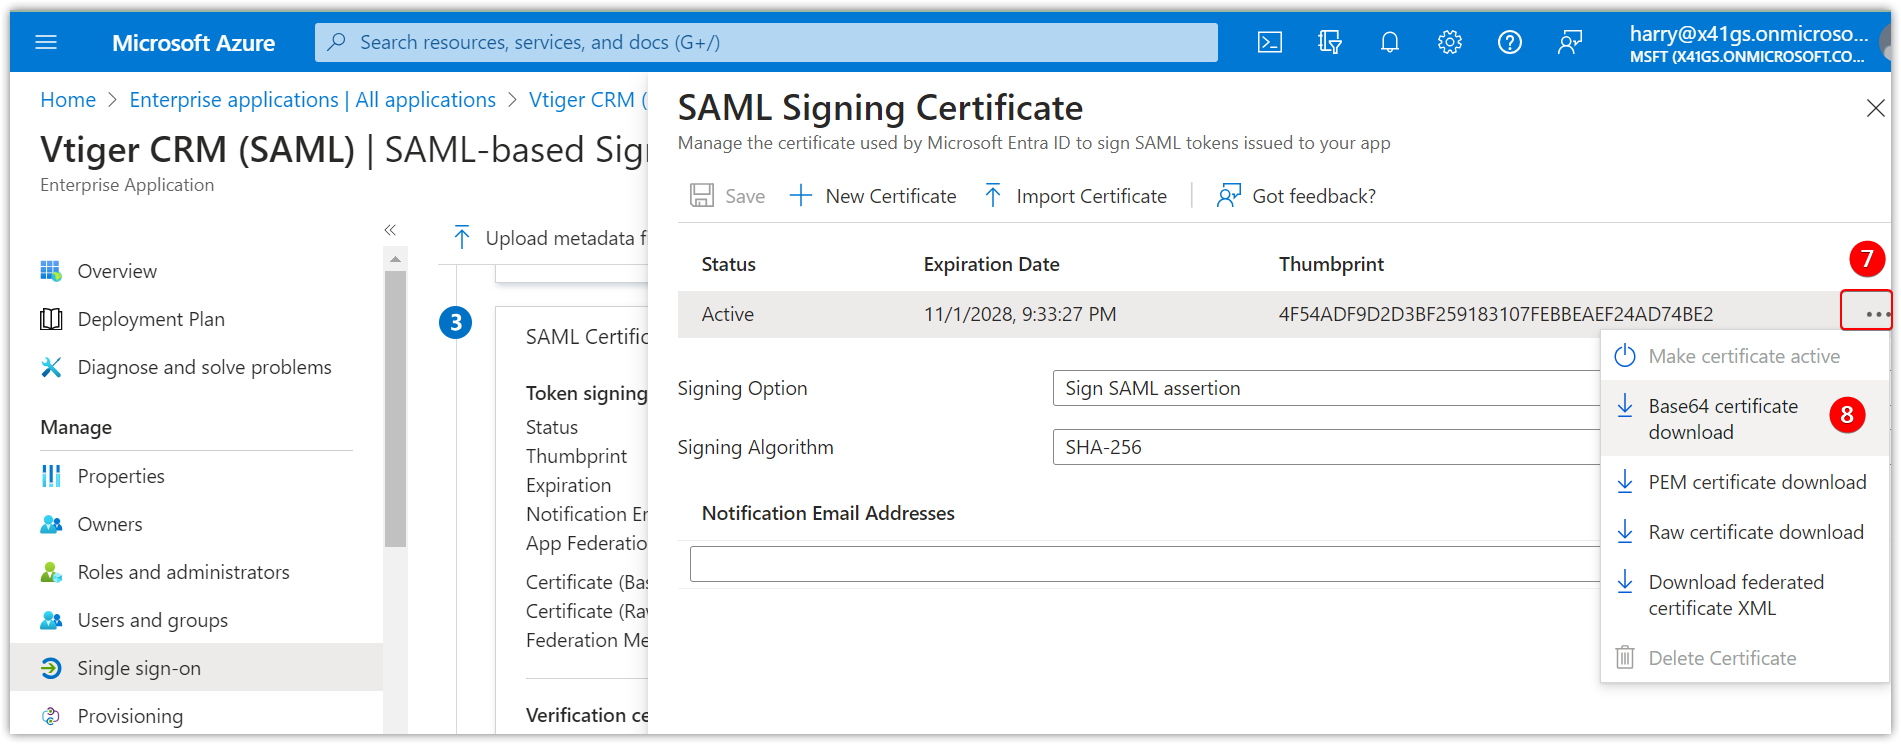
- Click the three dots on the Active certificate.
- Click Base64 certificate download from the drop-down to download and save it on your computer.
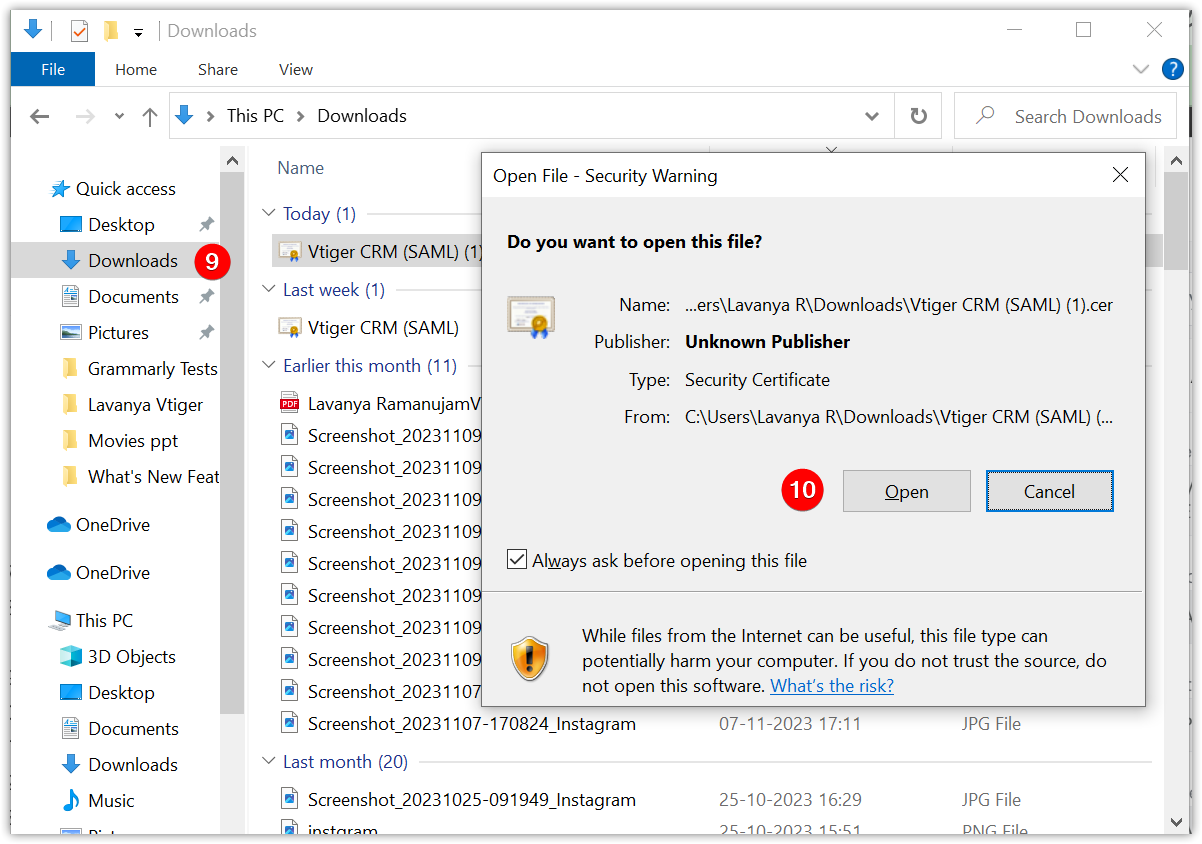
- Go to Downloads. A 'Do you want to open this file?' window opens.
- Click Open. A Certificate window opens.
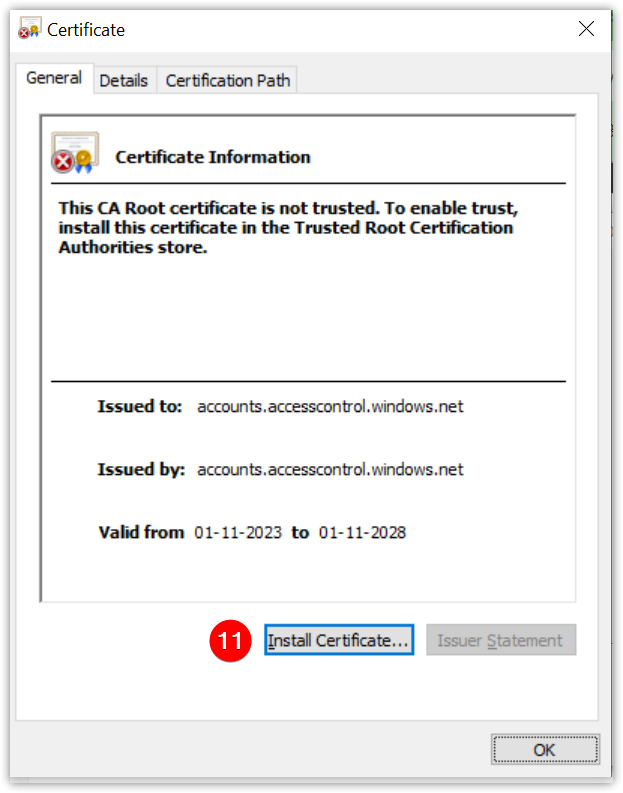
- Click Install Certificate.
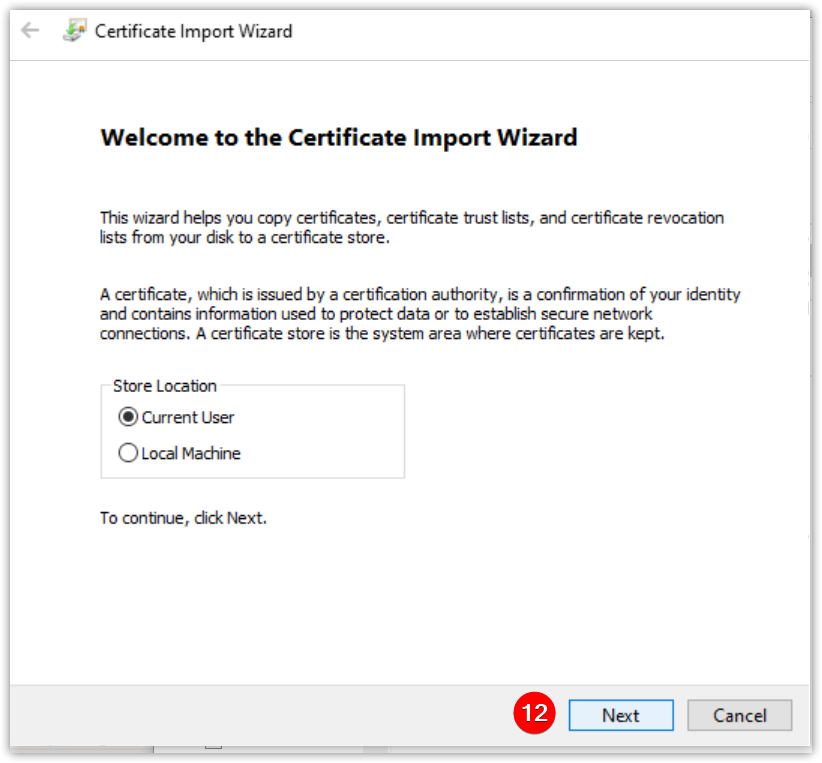
- Click Next.
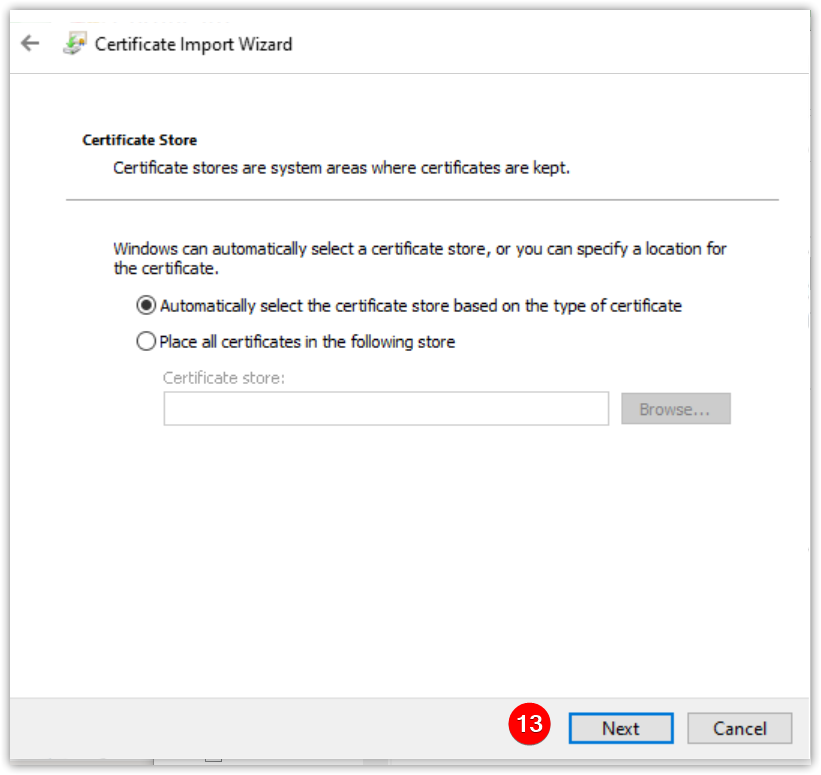
- Click Next.
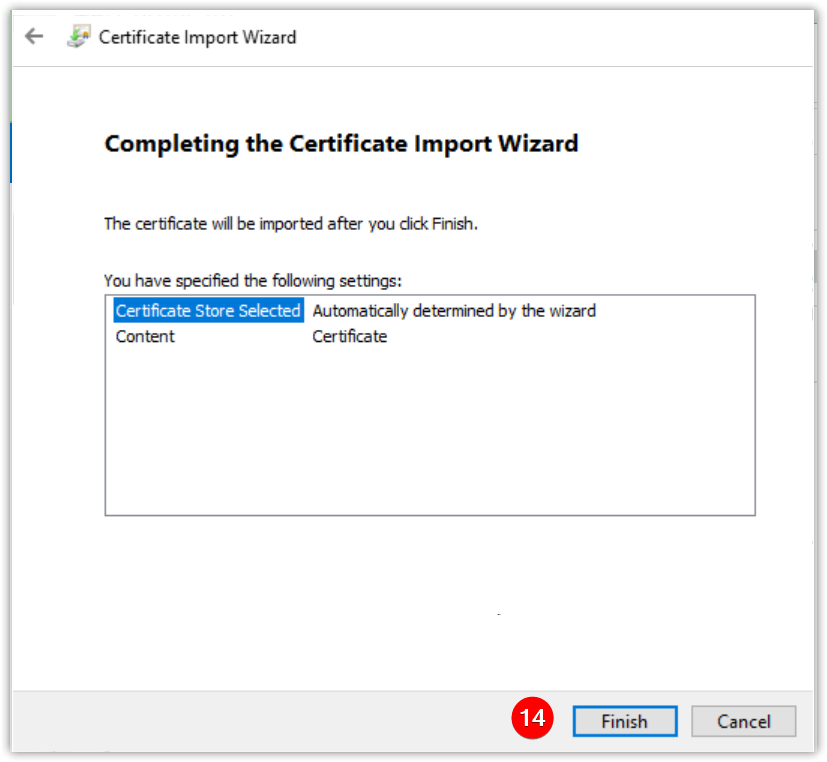
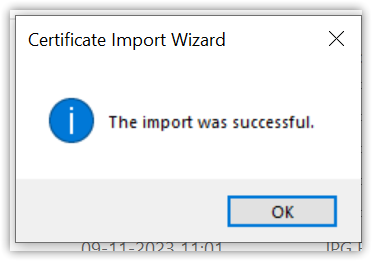
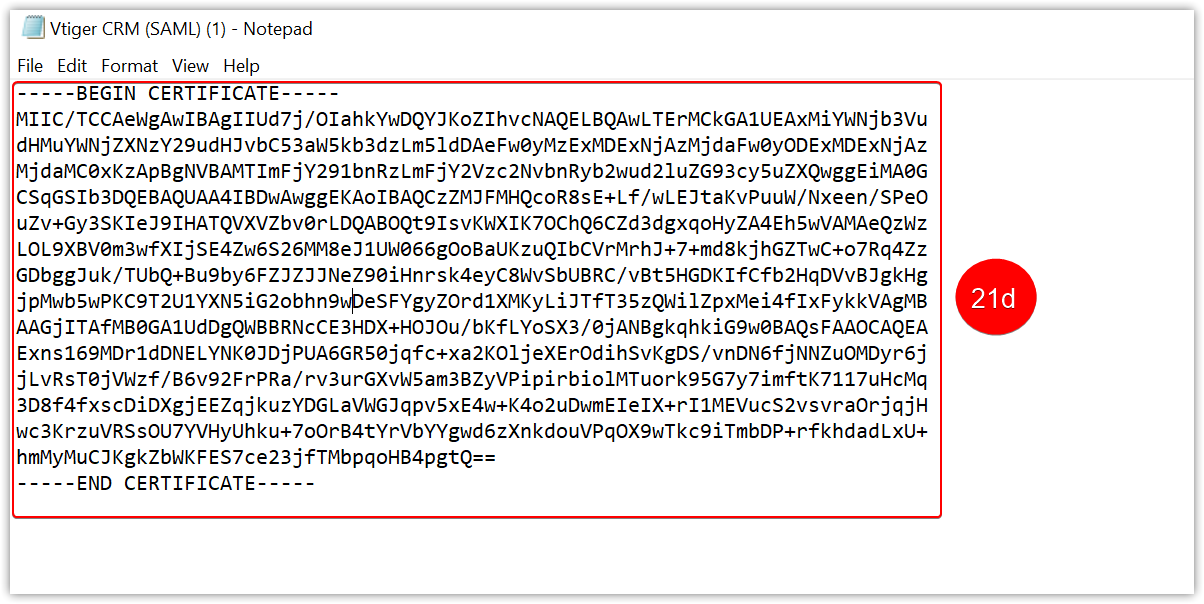
- Click Finish. An Import was successful message will be displayed. Open the downloaded certificate using Notepad or a text editor.
- Log in to the CRM.
- Click Settings.
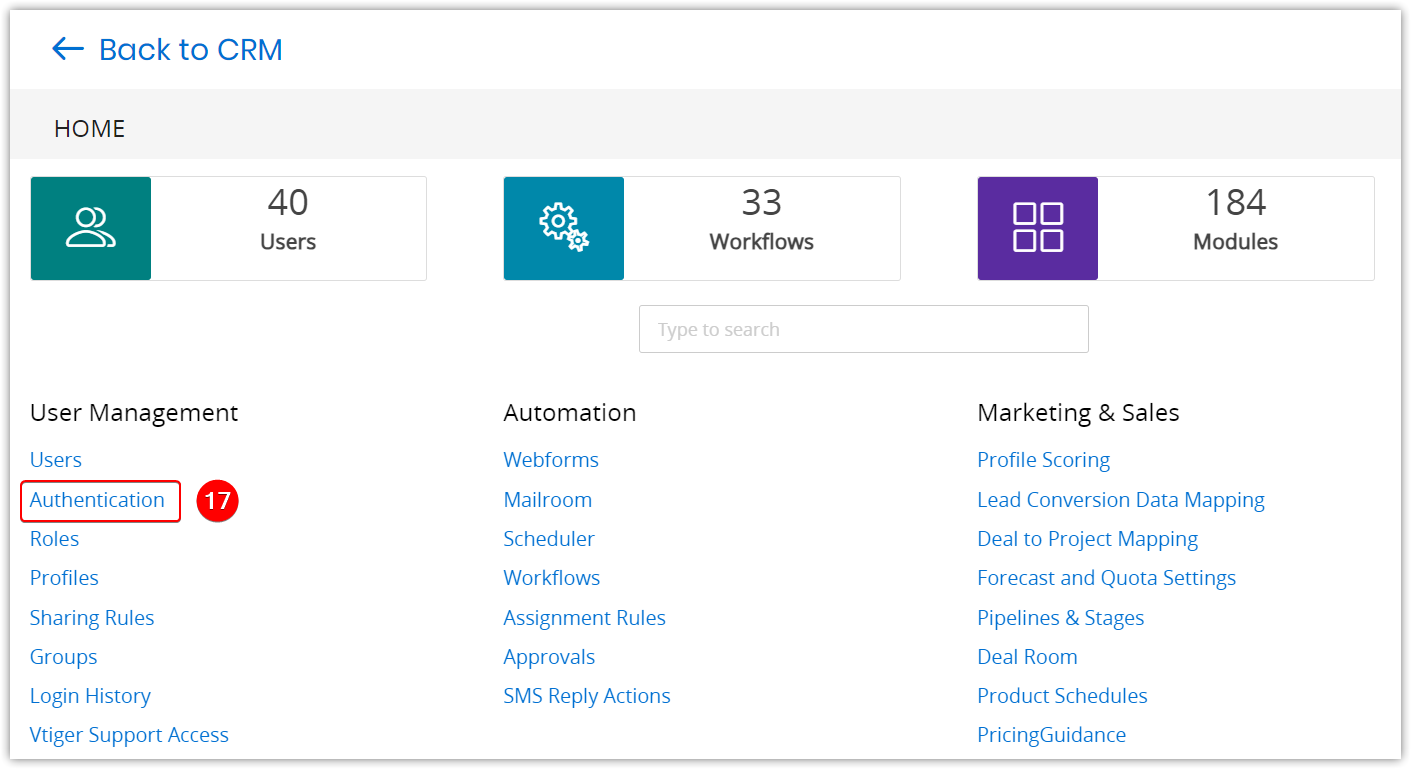
- Click Authentication under User Management. The Authentication settings page opens.
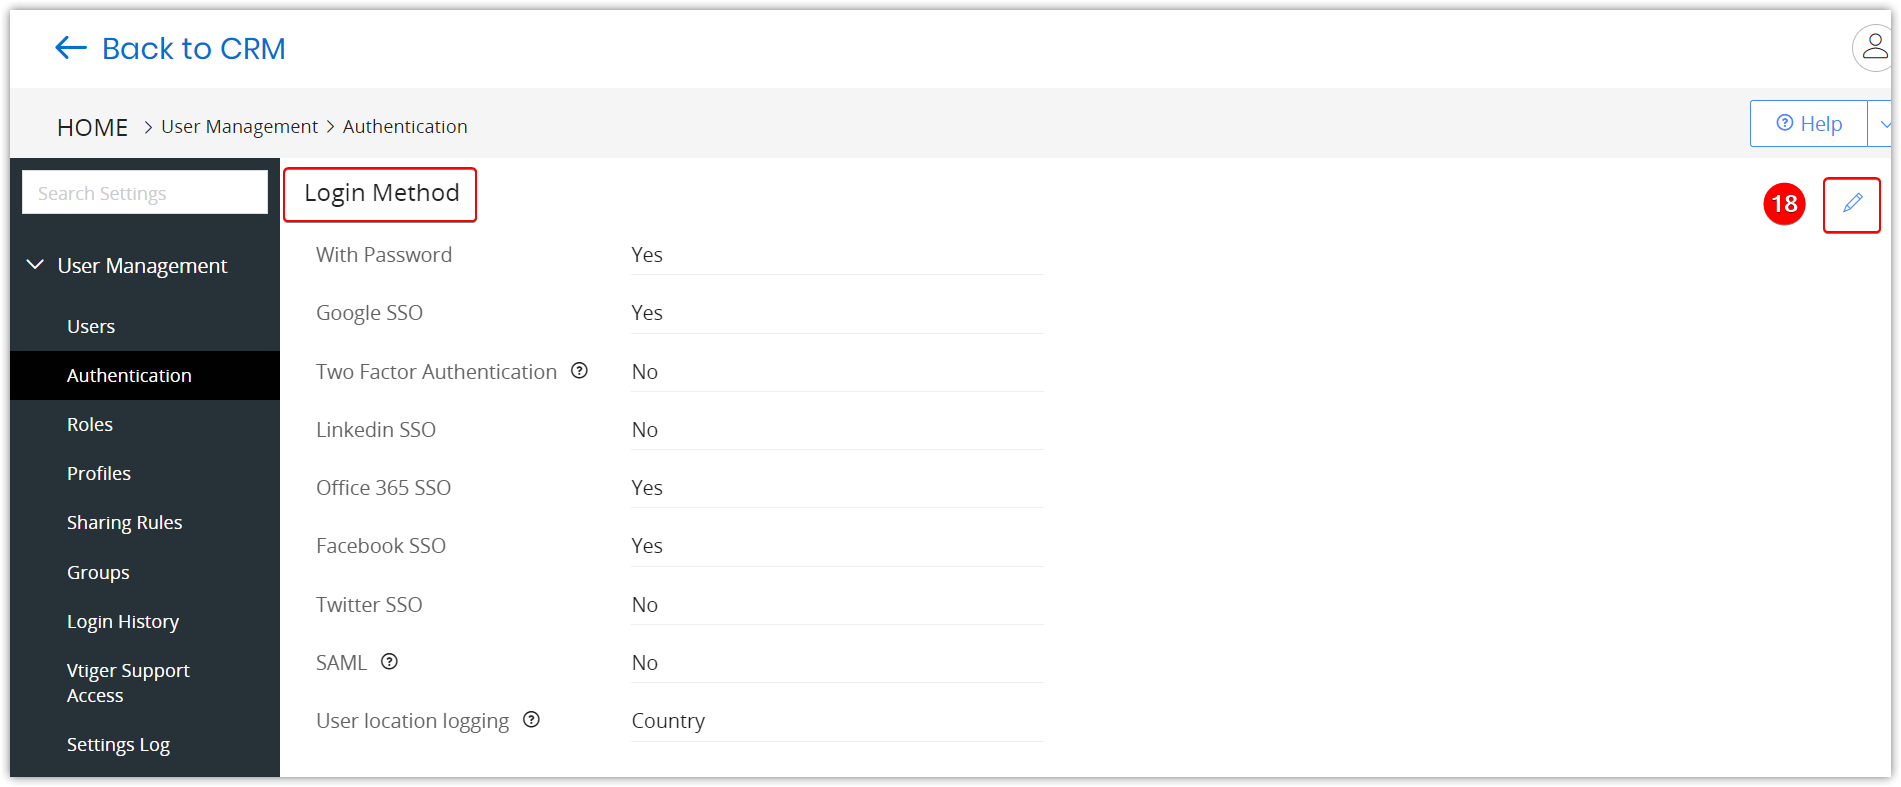
- Click the Edit icon in the Login Method section.
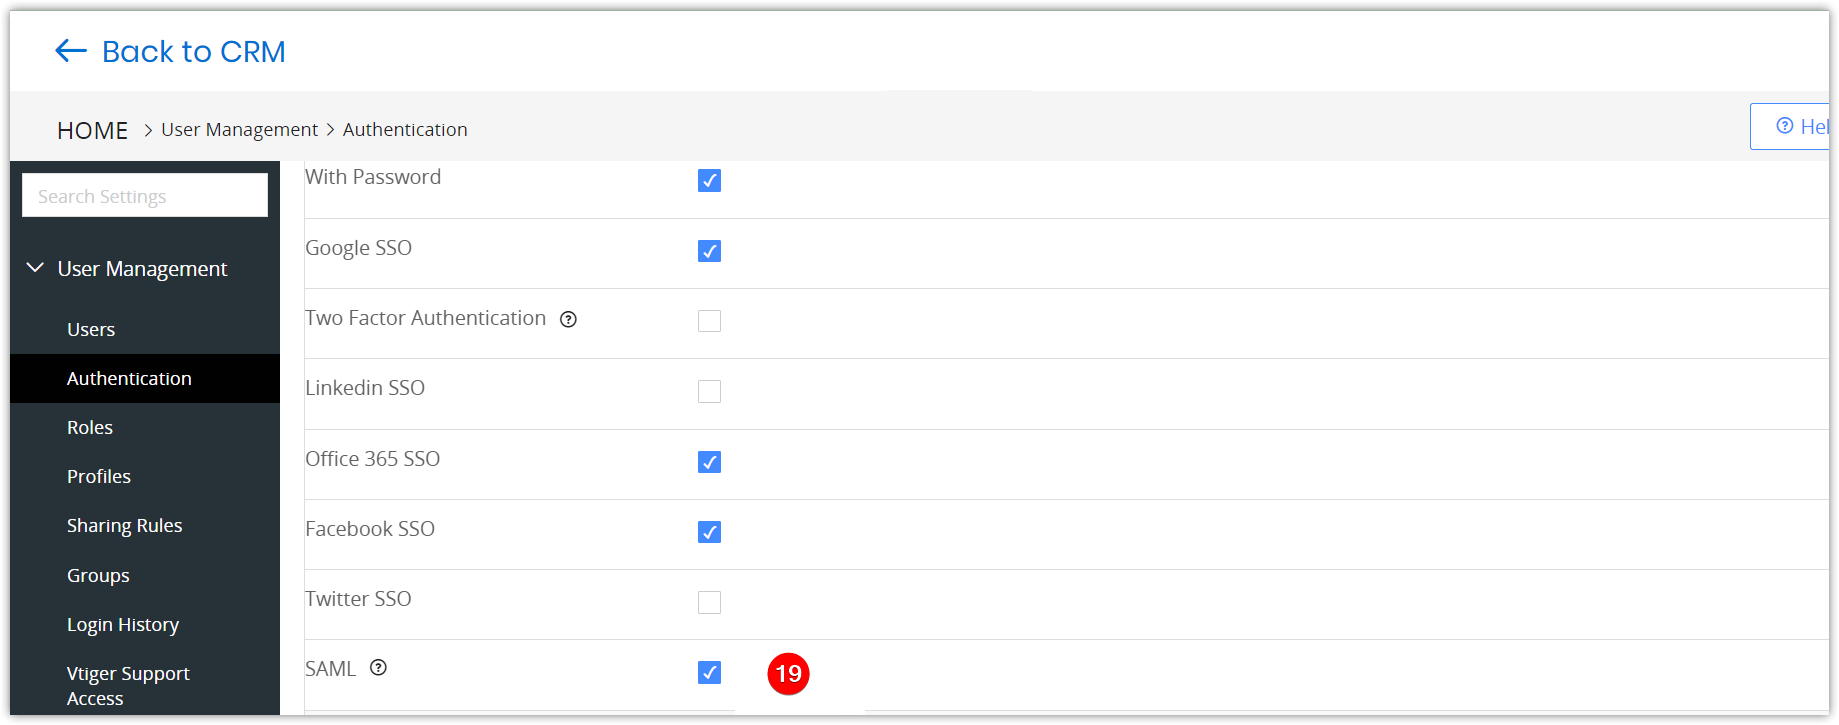
- Enable the SAML checkbox. The SAML details will appear.
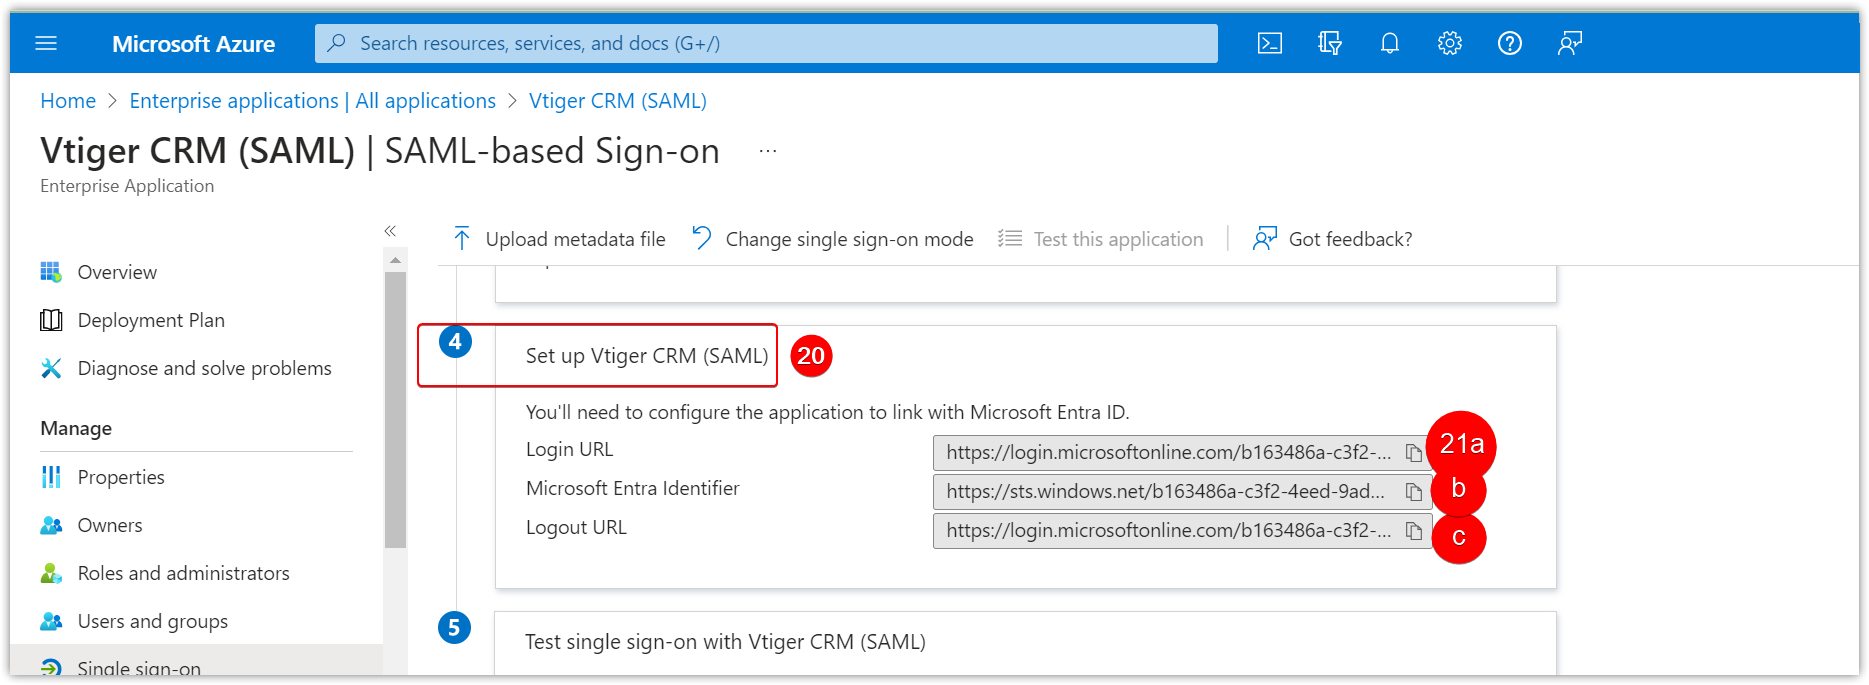
- Go to Step 4 - Set up Vtiger CRM (SAML).
- Copy the following from Entra ID and paste them in Vtiger:
- Log in URL into IDP SSO URL
- Microsoft Entra ID identifier into IDP Entity ID
- Log out URL into IDP SLO URL - You can also give your instance URL.
- Copy the certificate contents and paste it into X.509 Certificate field in Vtiger. (From step 7).
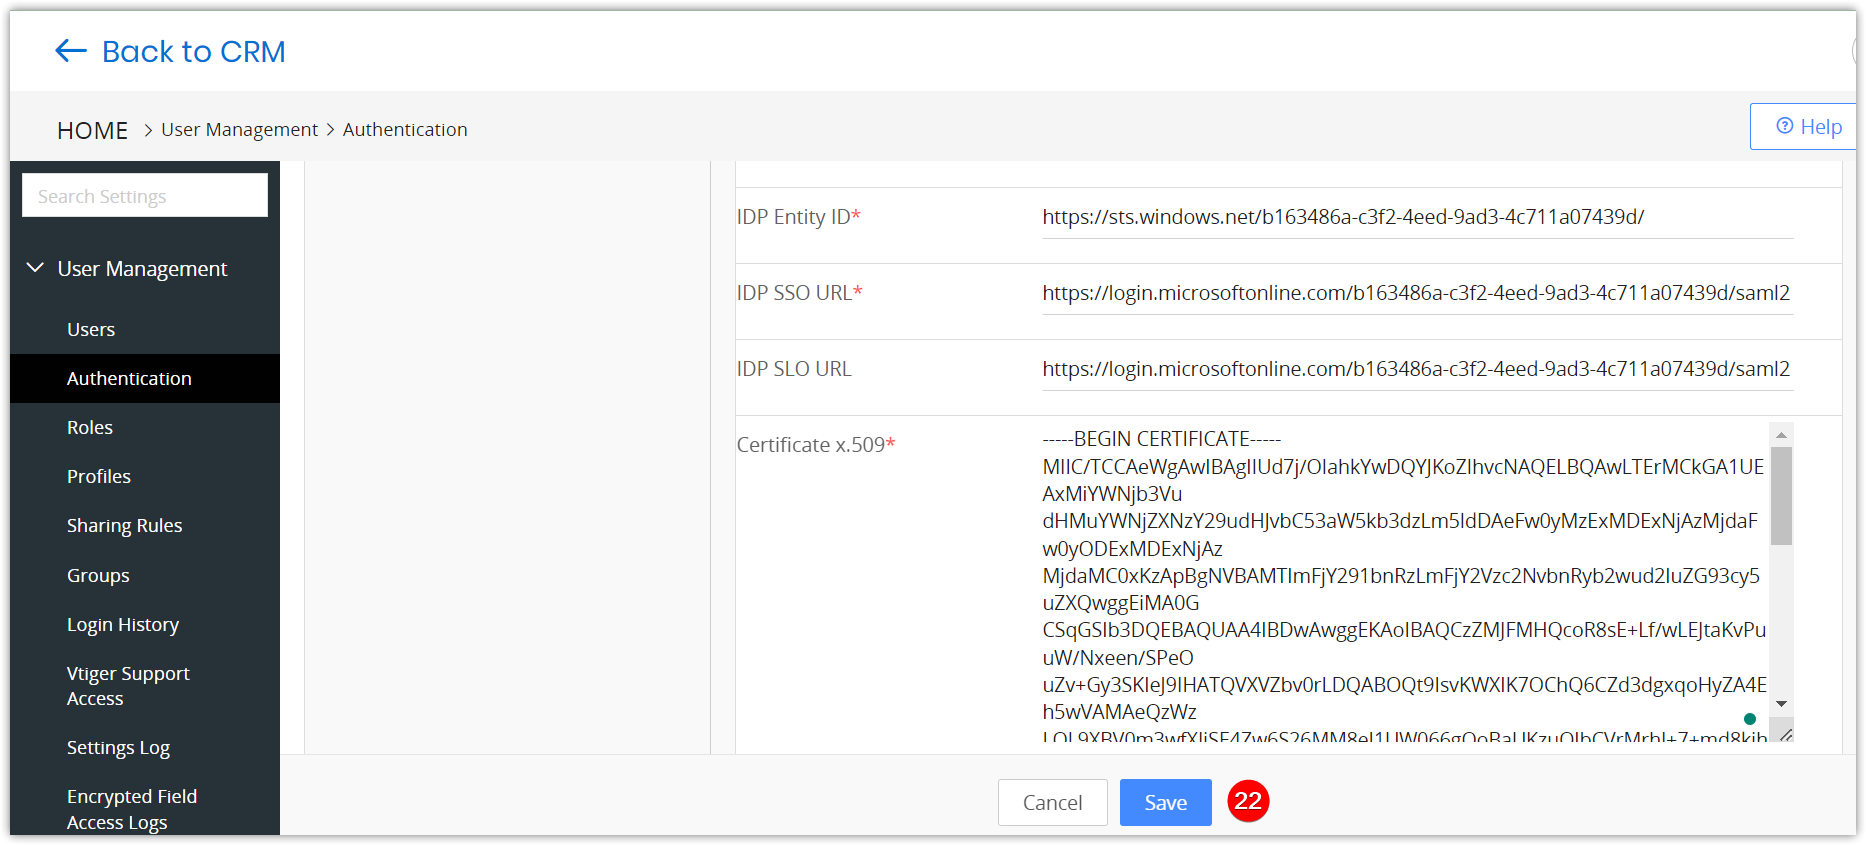
- Click Save in Vtiger.
You can also refer to this article on Microsoft on how to enable SAML with Vtiger.
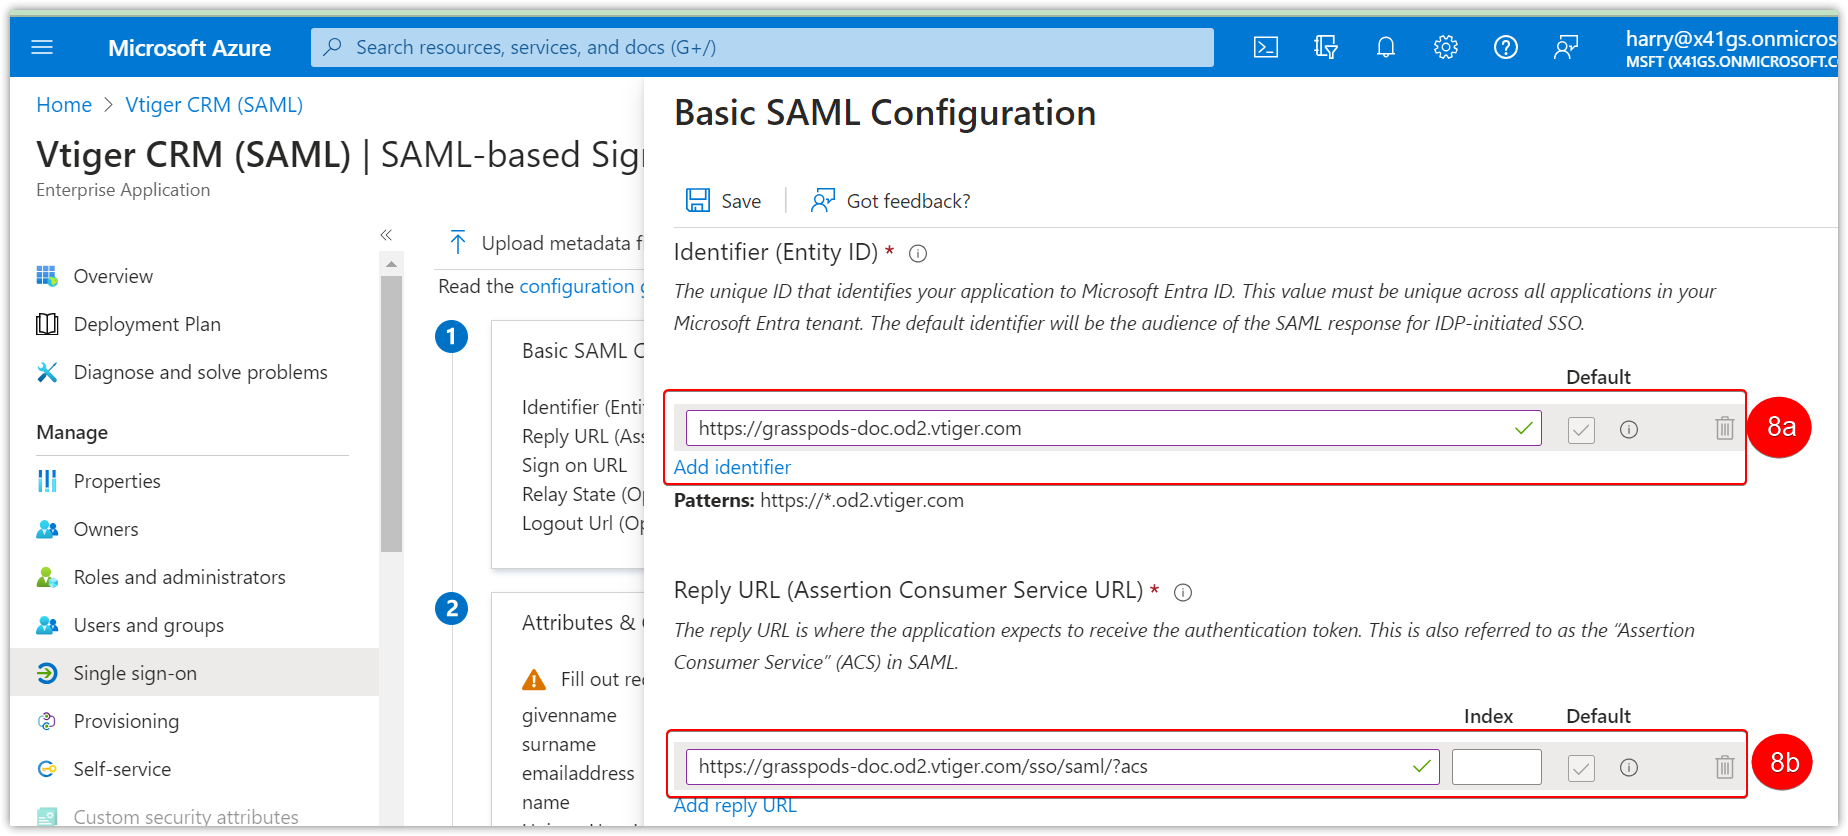
You will get the SP Entity ID and SP ACS URL.
Follow the below steps to configure in the Microsoft Entra ID Portal.
- Log in to the CRM.
- Click the User Profile.
- Click Settings.
- Click Authentication under User Management.
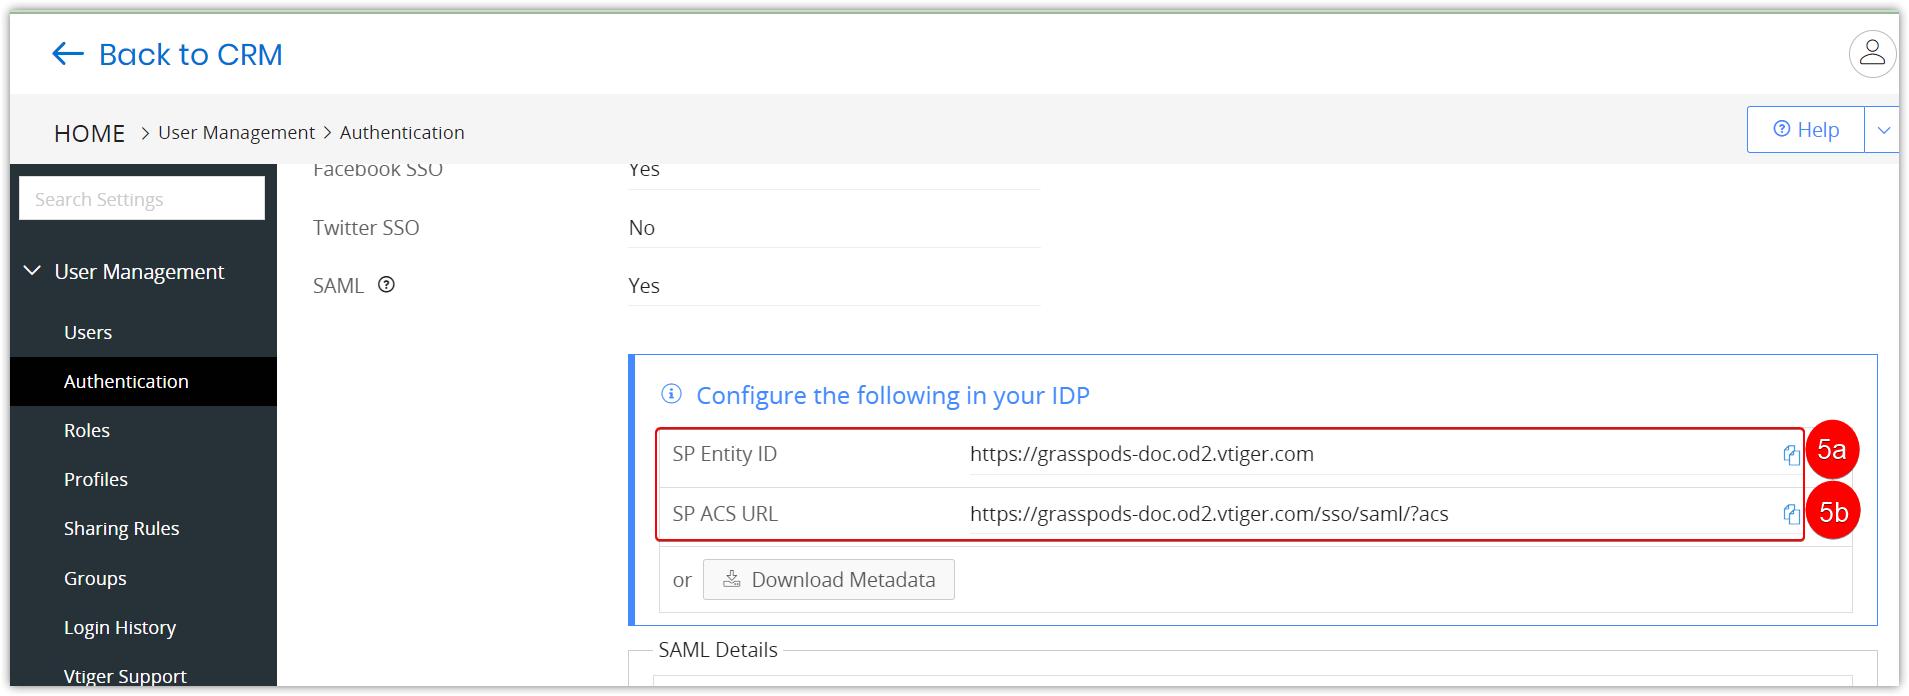
- Copy the following and paste it into the Microsoft Entra ID:
- Copy the SP Entity ID from Vtiger CRM.
- Copy the SP ACS URL from Vtiger CRM.
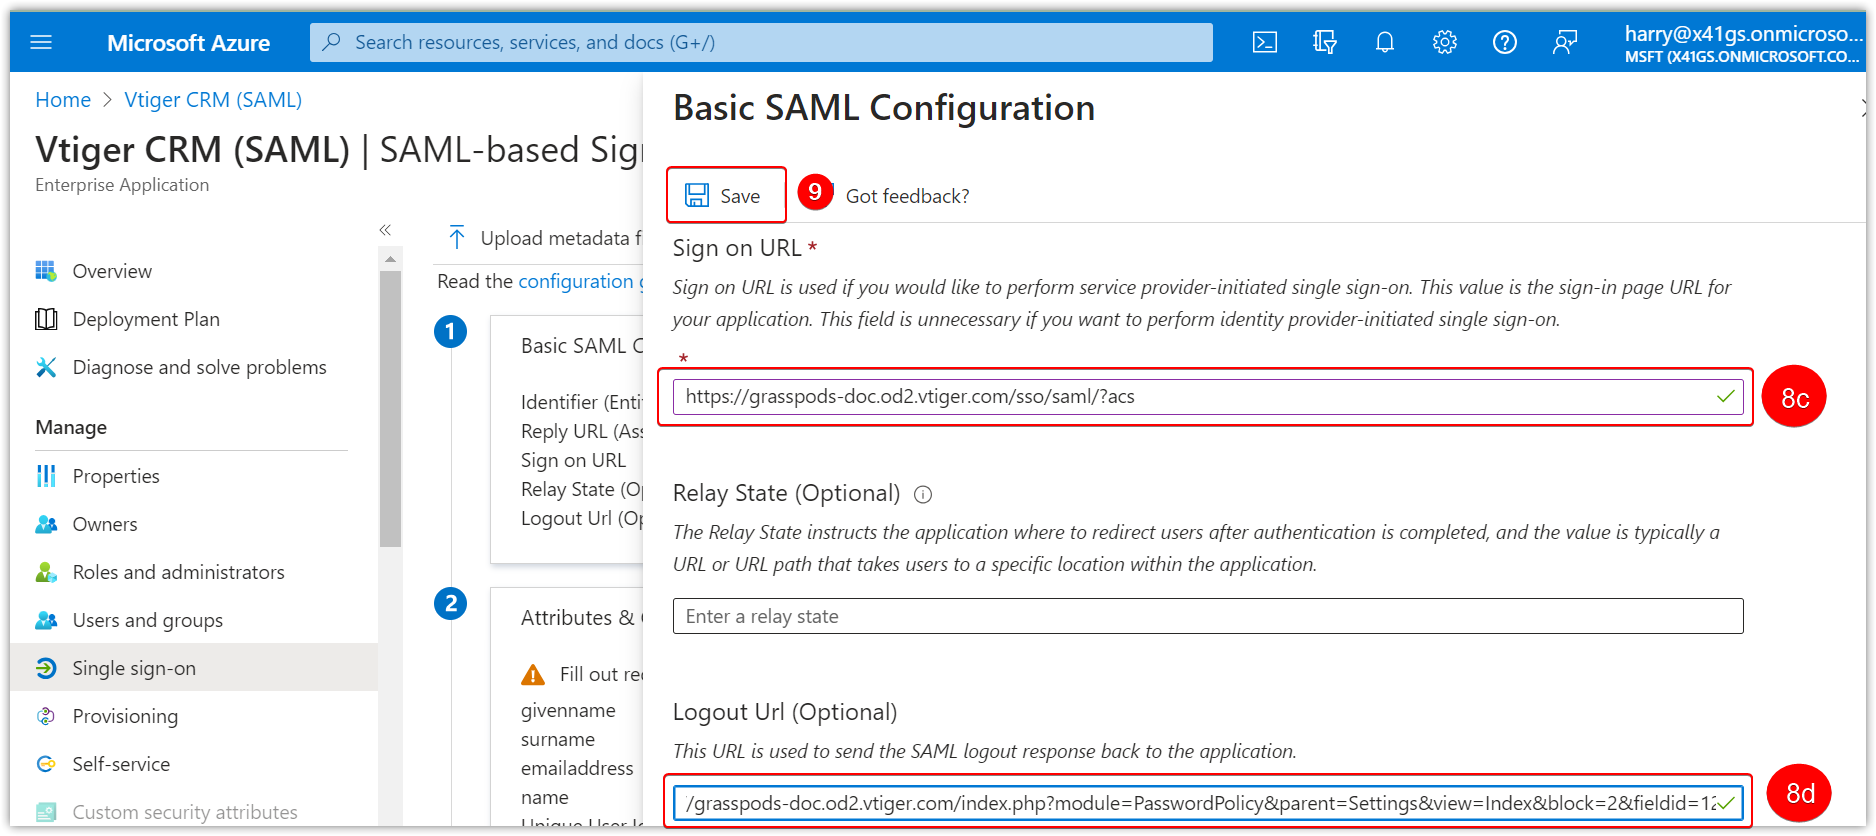
- Copy the Logout URL.
- Go to Step 1 in the Microsoft Entra ID portal.
- Click the Edit icon.
- Paste the above-copied ID in the following Microsoft Entra ID fields:
- Paste the SP Entity ID from Vtiger CRM.
- Paste the SP ACS URL from Vtiger CRM.
- Paste the same SP ACS URL in the Sign-on URL.
- Paste the Logout URL.
- Click Save.
The Sign-on URL will be auto-filled, the same as the acs URL.
Now, the configuration is successful. You can now sign in to Vtiger SAML using Microsoft Entra ID SAML log-in.
Glossary
Now, the configuration is successful. You can now sign in to Vtiger SAML using Microsoft Entra ID SAML log-in.
Glossary
- SP Entity ID - Service Provider Entity ID(Identifier) is the application endpoint needing to do SSO with IDP. In our case, it will be your CRM URL. For example: https://company.od1.vtiger.com
- SP ACS URL - Service Provider Assertion Consumer Service URL is the application's endpoint performing the SSO. Example: https://company.od1.vtiger.com/sso/saml?acs
- We have given an option to download the metadata and upload them into your IDP for the above configurations.
- IDP Entity ID - The Identity provider application endpoint provides the user's identity. For example, OneLogin, Azure, Active Directory, etc.
- IDP SSO URL - This will be the sign-in endpoint of the Identify Provider(IDP).
- IDP SLO URL - This is the signout endpoint of the Identify Provider.
- Certificate x.509 - The IDP will provide this certificate.
- Logout URL - Once the application(CRM) logs out, it will be redirected to this URL.
- AD User Employee Sync - is used to sync AD/Azure users to Vtiger Employees.
|
|