Articles in this section
Summary View in Vtiger CRM
Feature Availability
Vtiger Editions: One Growth | One Pilot | One Professional | One Enterprise | One AI
Introduction to Summary View
Want to see all the details of a record on a single page? Then go to the Summary View of a record.
Summary View for a record displays:
- Key information (depending on the module), and
- The actions performed on that record.
So, how is the Summary View useful to you?
- You won’t be clicking on different tabs to view information scattered in different places.
- And more importantly, you can customize the Summary View to suit your business needs! Just add the required fields or widgets and display the required data.
Displaying the Summary View for a Record
Note: In this example, we will use the Contacts module to discuss the Summary View.
- Log in to the CRM.
- Go to the main Menu.
- Go to Essentials > Contacts. The Contacts page opens. (Usually the List View).
- Hover over and click the record whose details you want to view. The Summary View of the selected record opens
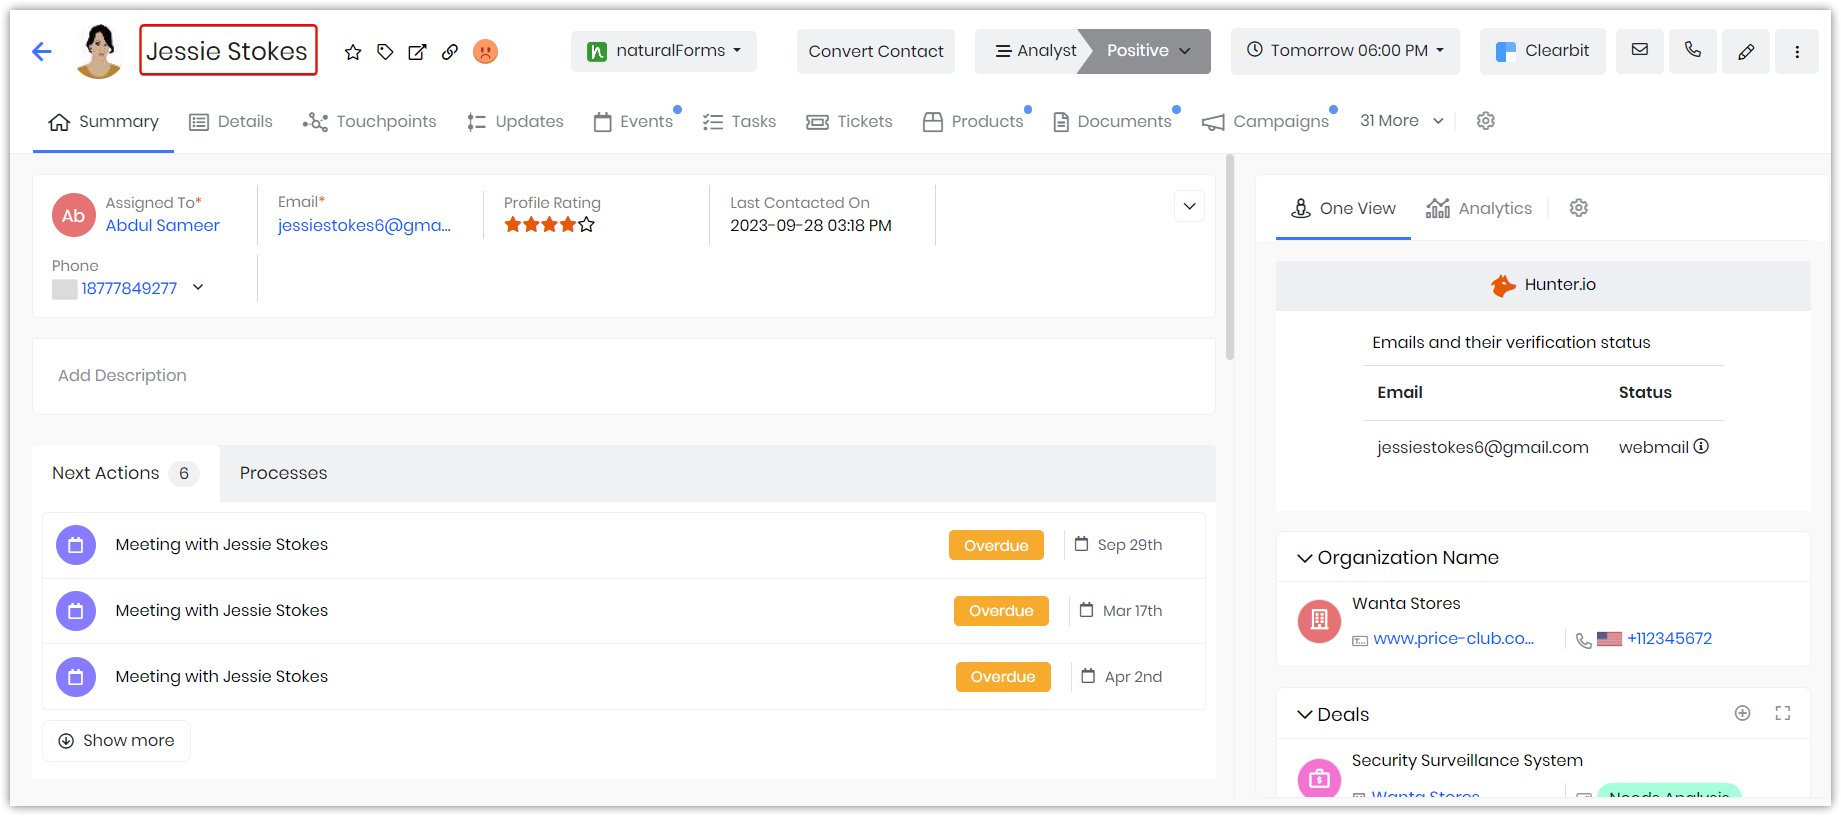
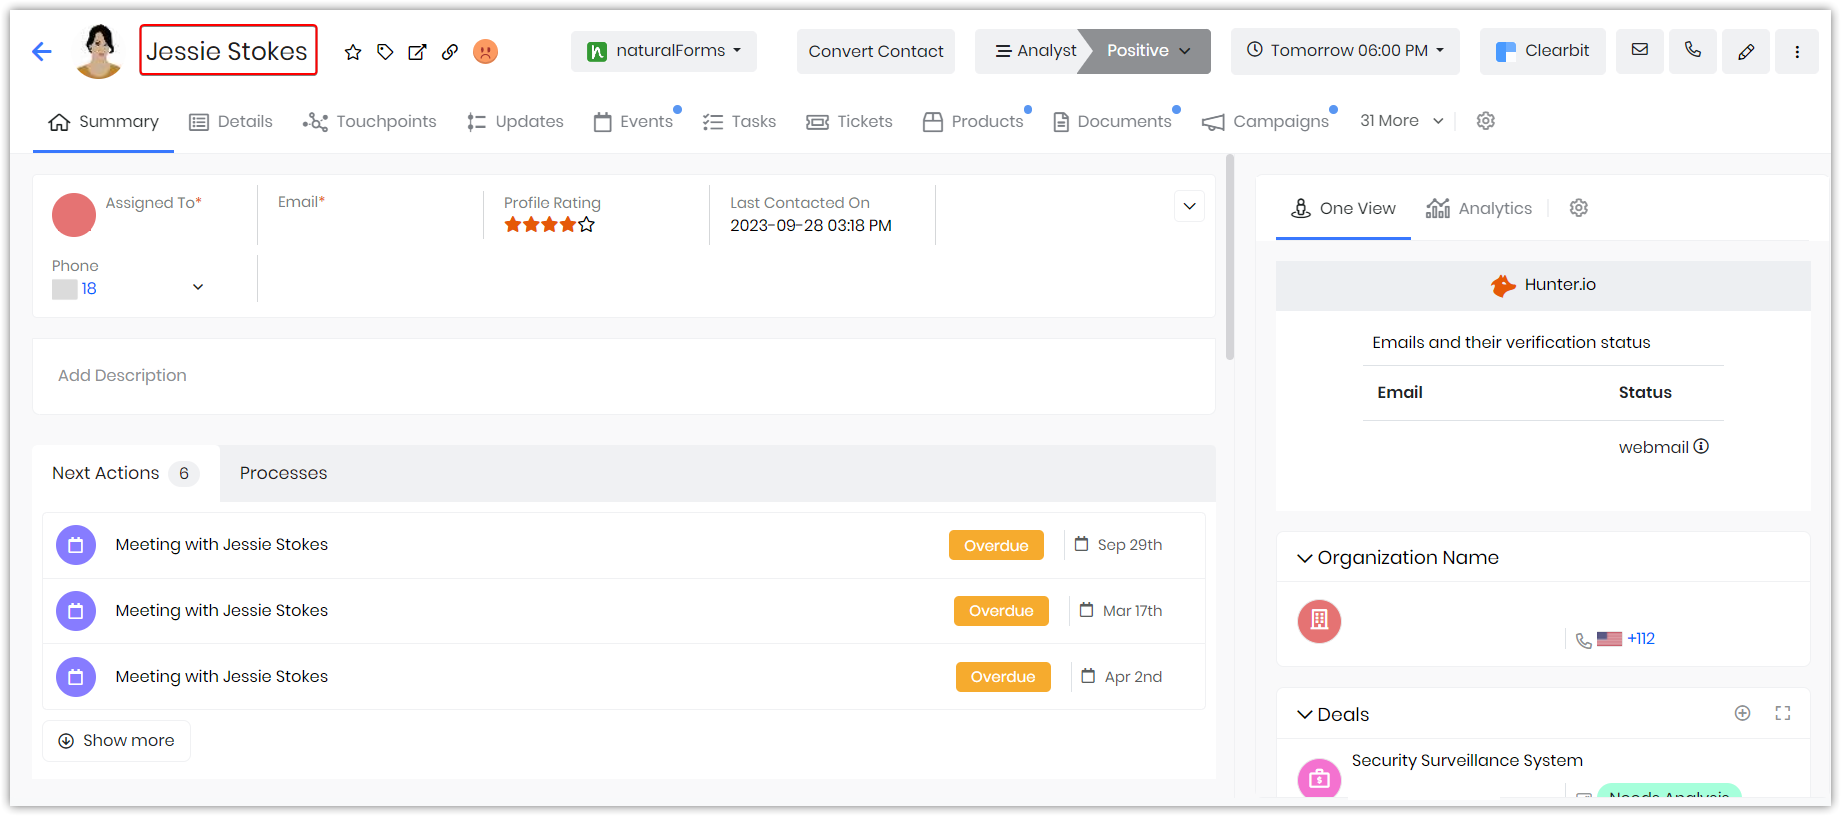
For example, in the above case of a Contact record's Summary View:
- You can edit the contact record, follow or unfollow, add tags, open the record in a new tab, and copy the direct link.
- You can also view the assigned to, Email, Last Contacted on, Email city, and Emailing country.
- You can see the weather details of that particular record.
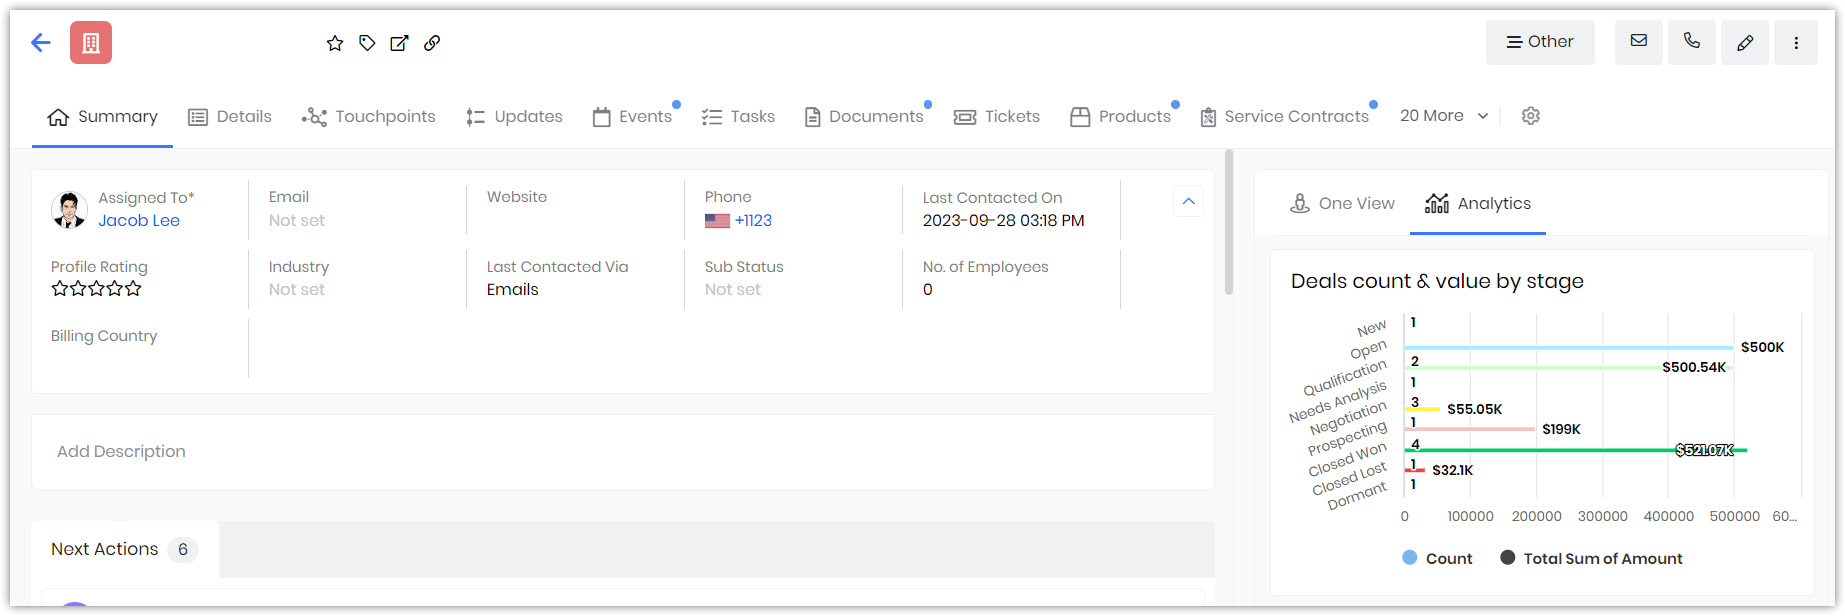
- On the right-hand side of the record, you will view the different widgets.
- You can add a description and processes.
- You can also comment, tag other users, and view the actions that have been taken on this record by other CRM users.
Setting the Summary View as the Default View
If you want to view the Summary View as the default view and would like it to appear first when you log in, make the necessary settings under My Preferences.
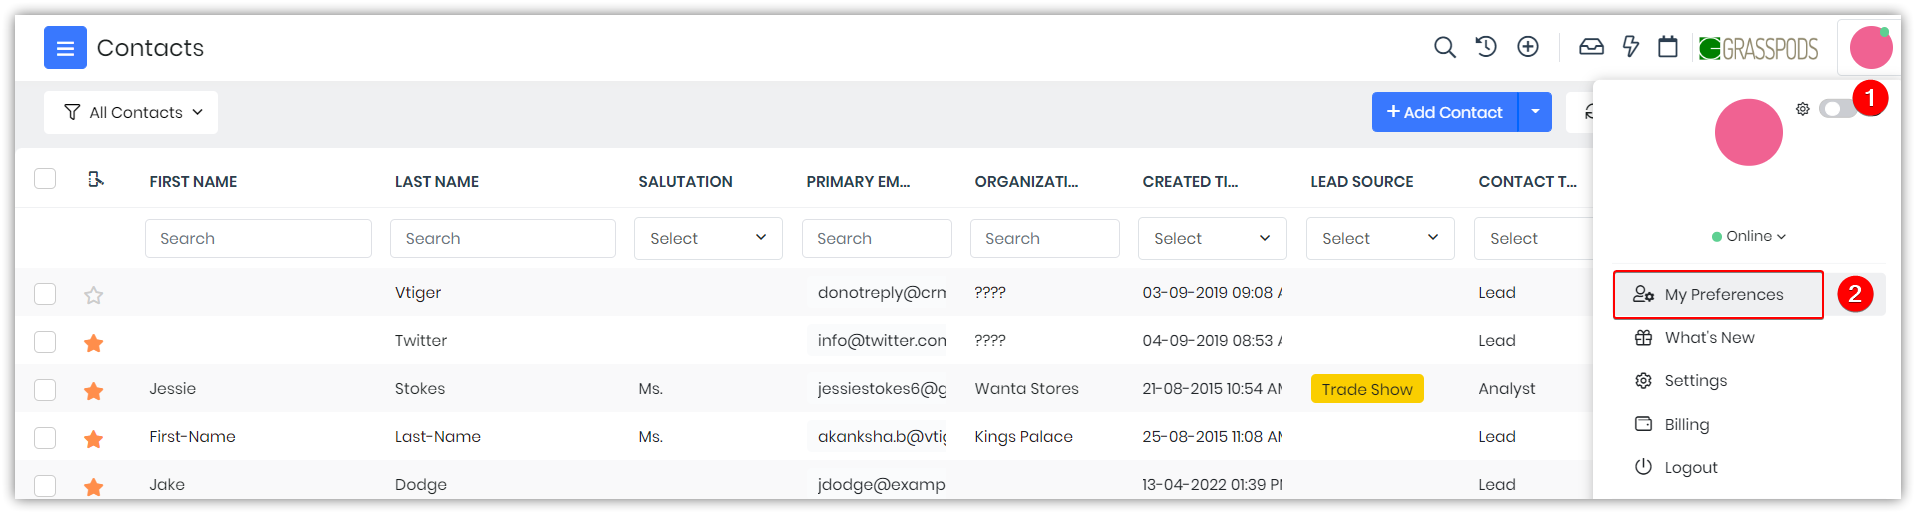
Follow these steps to set the Summary view as your default view:
- Click the User Profile on the top right of the screen.
- Click My Preferences.
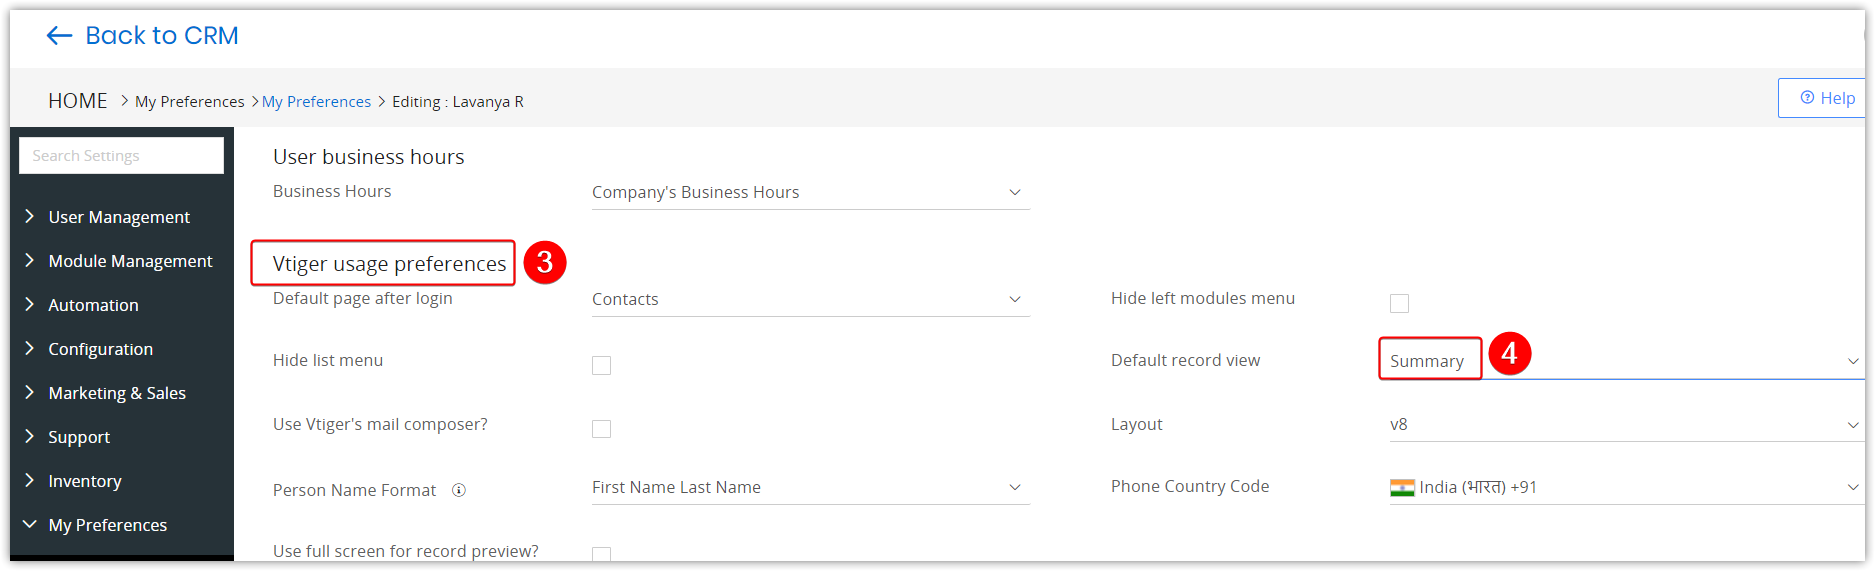
- Scroll down the page to the Vtiger usage preferences section.
- Select Summary View from the Default record view drop-down.
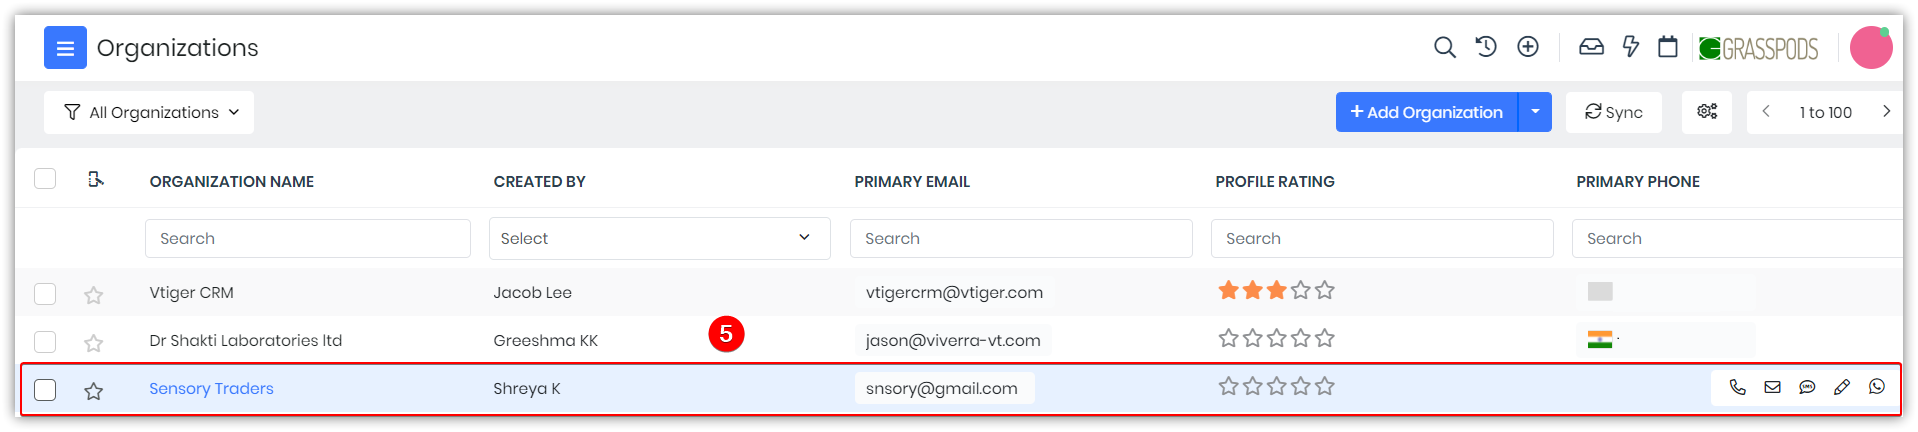
- Select a record to display its Summary View.
- You can now see the Summary View of that particular record.
Actions in the Summary View
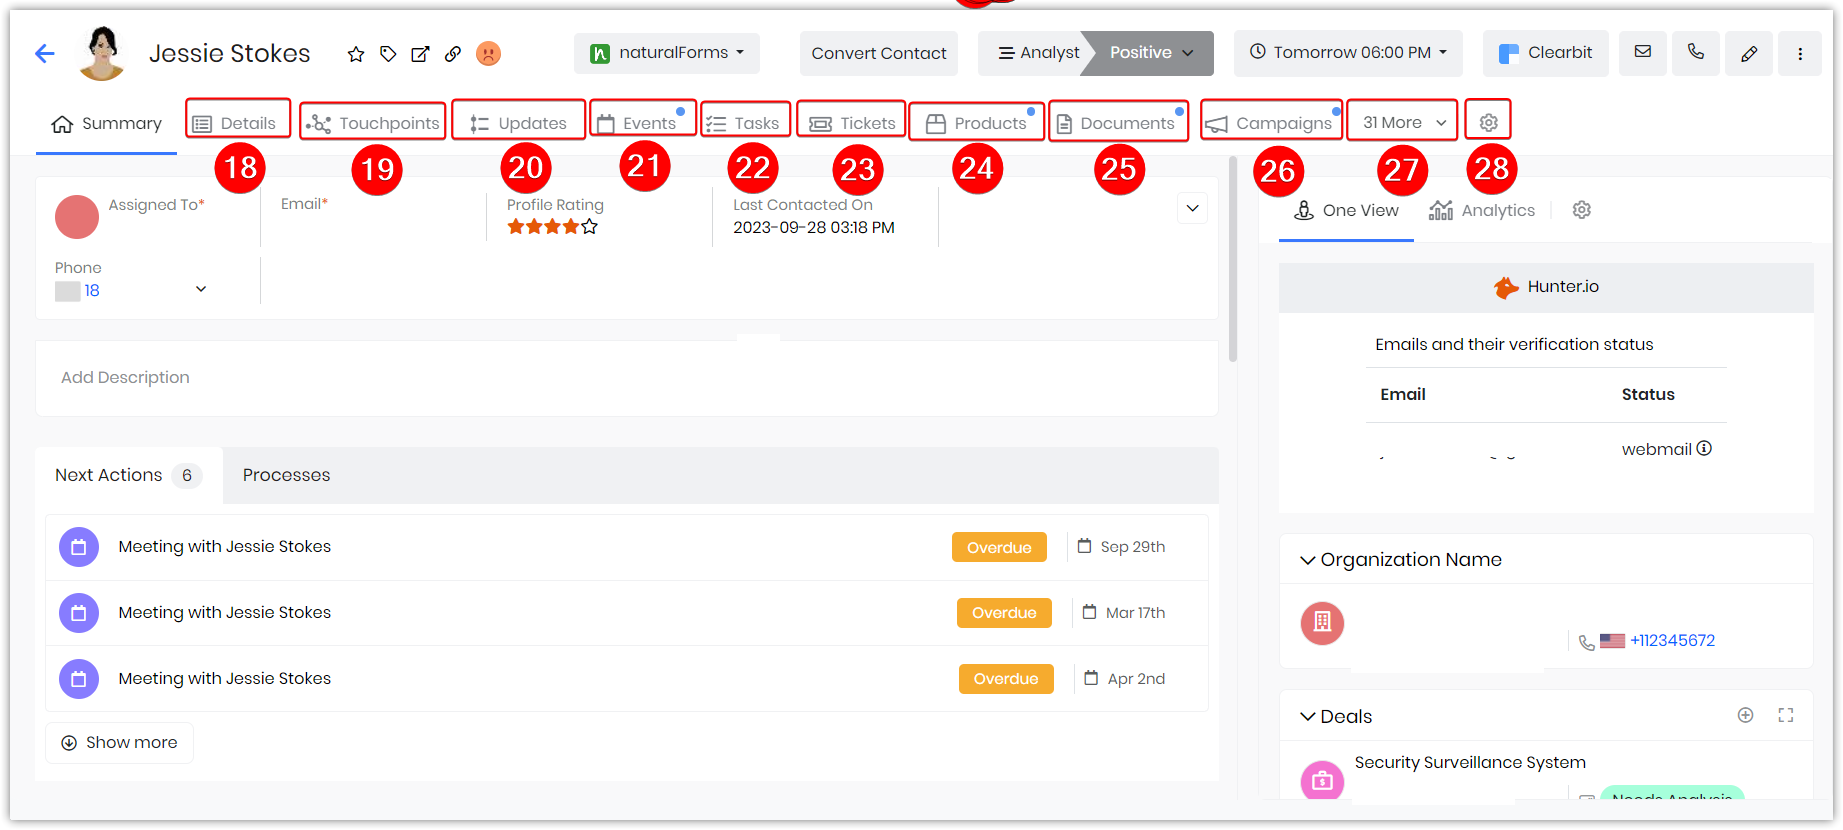
The Summary View displays data in separate sections for easy viewing. The Summary View enables multiple actions to be performed on a single page. You can edit, follow, tag, open in a new tab, and copy the link of that particular record. For ease of understanding, we have used the screenshot of a contact record’s Summary View as an example.
You can perform different actions on a record by clicking different icons in the Summary View.
- Edit: You can edit the first and last name of the contact.
- Follow: You can follow a record to get updates on all the activities performed on that record.
- Tags: You can add tag names to a record to identify the record easily.
- Open New Tab: You can open the record in a new tab.
- Link: You can click on the link icon that copies the URL. You can then paste the URL into a notepad, in your browser, or an email.
- Sentiment emoji: You can see the customer’s sentiment if it is positive, negative, and so on.
- naturalForms - naturalForms is a mobile app that replaces paper forms and collects information electronically that exactly matches your current paperwork. Collect documents, signatures, photos, and sketches. Click here to learn about natualForms.
- Convert Contact - This helps you to choose the contact type and contact status. You can convert the contact type based on the contact status. You can also create a new deal.
- Contact Lifecycle - This gives the lifecycle of a contact where you can choose the contact type from the contact type drop-down. You can also change the status of the contact type based on the stages – Hot, Cold, NLWC, Warm, or duplicate.
- Best Time to Contact - This feature predicts the best time to get in touch with a contact based on touchpoints like email opens, clicks, phone calls, meetings, cases, etc.
- Clearbit - This feature gives you the details of a contact, such as location, company name, title, and time zone. Click here to learn more about Clearbit.
- Email - You can send an email to the Contact by clicking the email icon.
- Call - You can make calls to the Contact.
- Edit - You can edit the Contact information.
- More - You can click the More icon (Vertical three dots) to reach out via SMS and attach any files.

- Contact information: You can edit the following information for a Contact record:
- Assigned to
- Primary Email ID
- Organization Name
- Email Opt-in
- Mailing City
- Mailing Country
- Description: Descriptive text, notes, and contacts for reference can be added here.
- Details -All the basic information of the contact can be viewed and edited here.
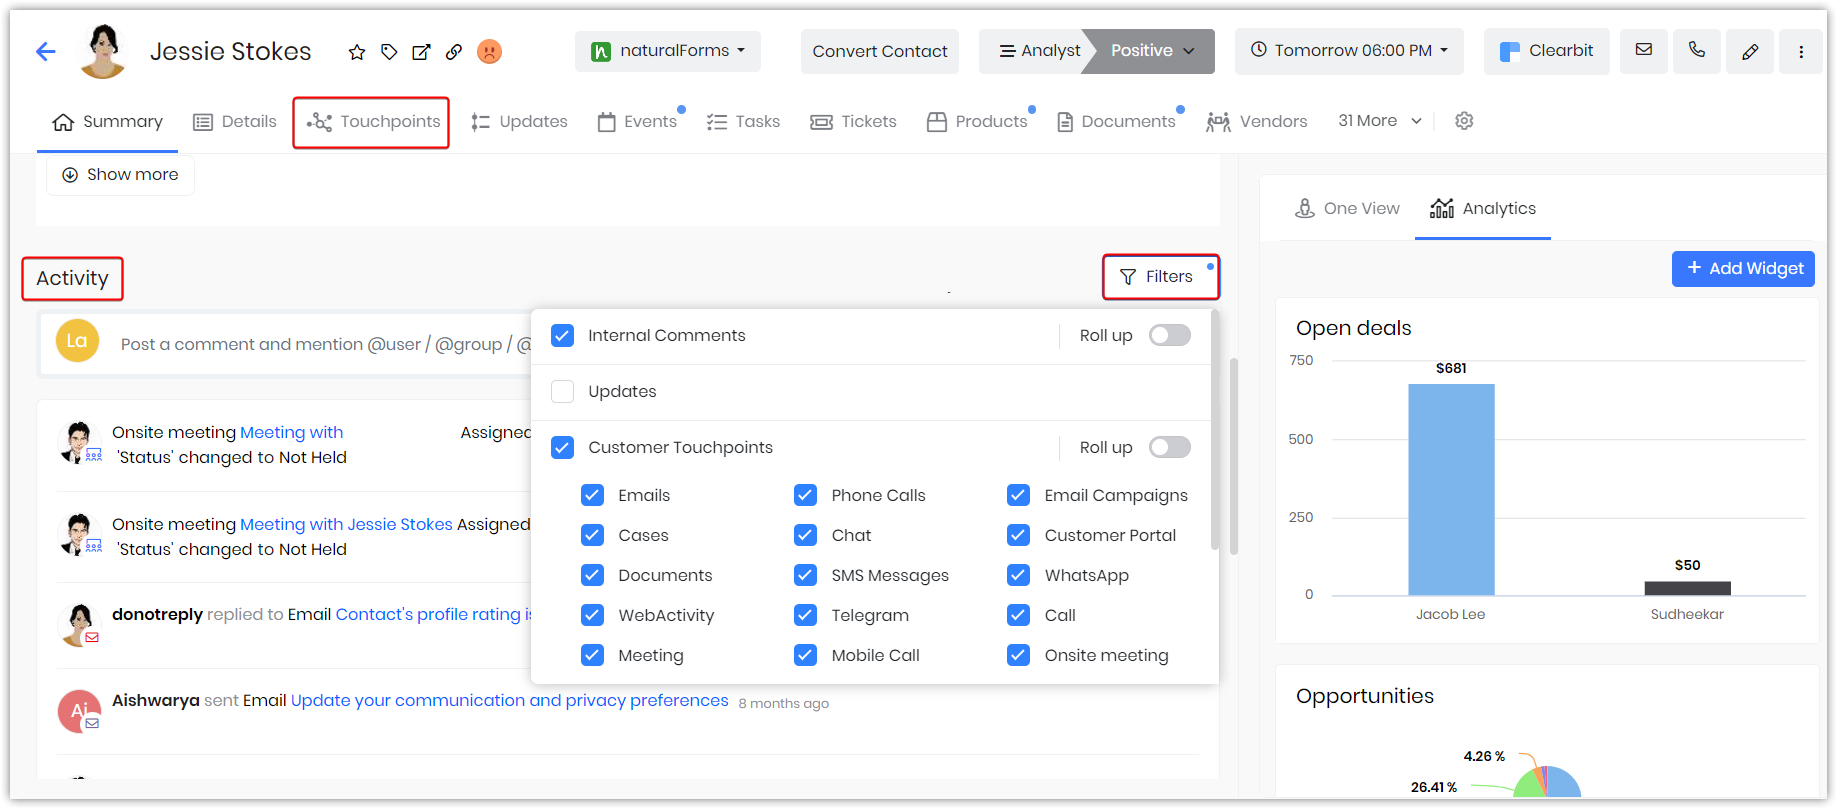
- Touchpoints - You can see the activities on the selected record, such as events, portals, documents, email campaigns, emails, phone calls, webchats, cases, and SMS messages.
- Updates - The Updates option helps you to see the updates made to the record.
- Events - All the events related to the contact are displayed here. You can also add a new event from here by clicking the + button.
- Tasks -All the tasks related to the contact are displayed here. You can also do a new task from here by clicking the + button.
- Tickets - All internal Tickets linked to the record will be displayed.
- Products - All Products linked to the record will be displayed.
- Documents - All Documents linked to the record will be displayed.
- Campaigns - All Campaigns linked to the record will be displayed.
- More - The More option will show other widget options like Sales Return, Purchase Return, Credit Notes, Work Orders, etc.
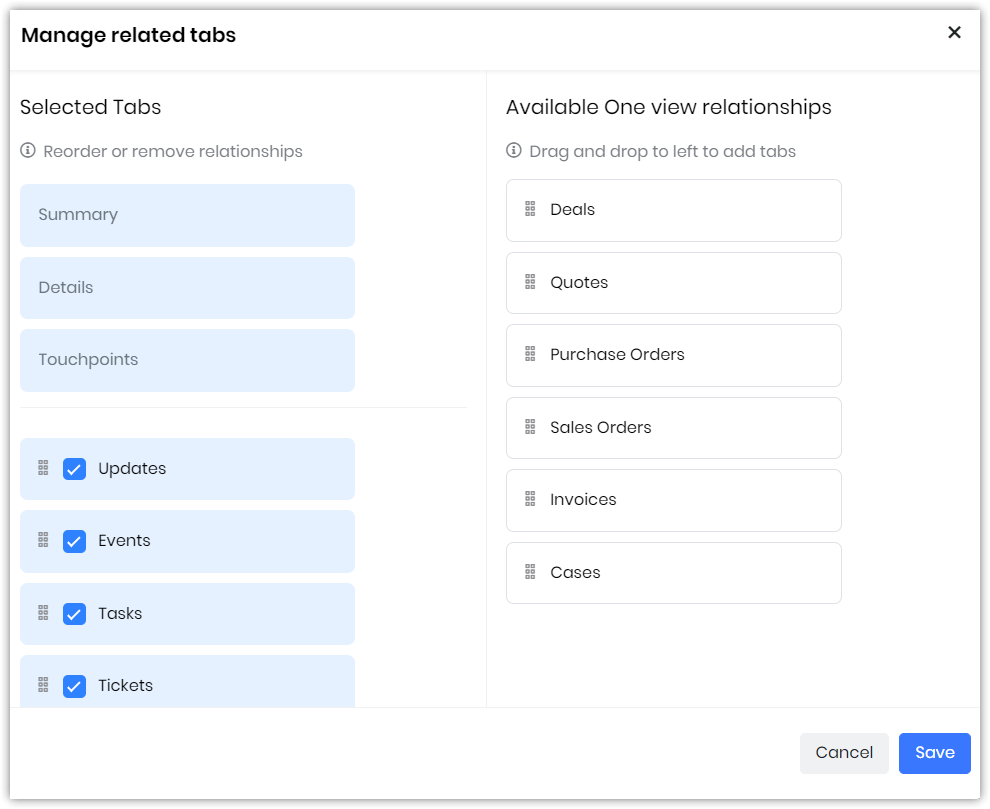
- Manage Related Tabs - You can manage all related tabs here.
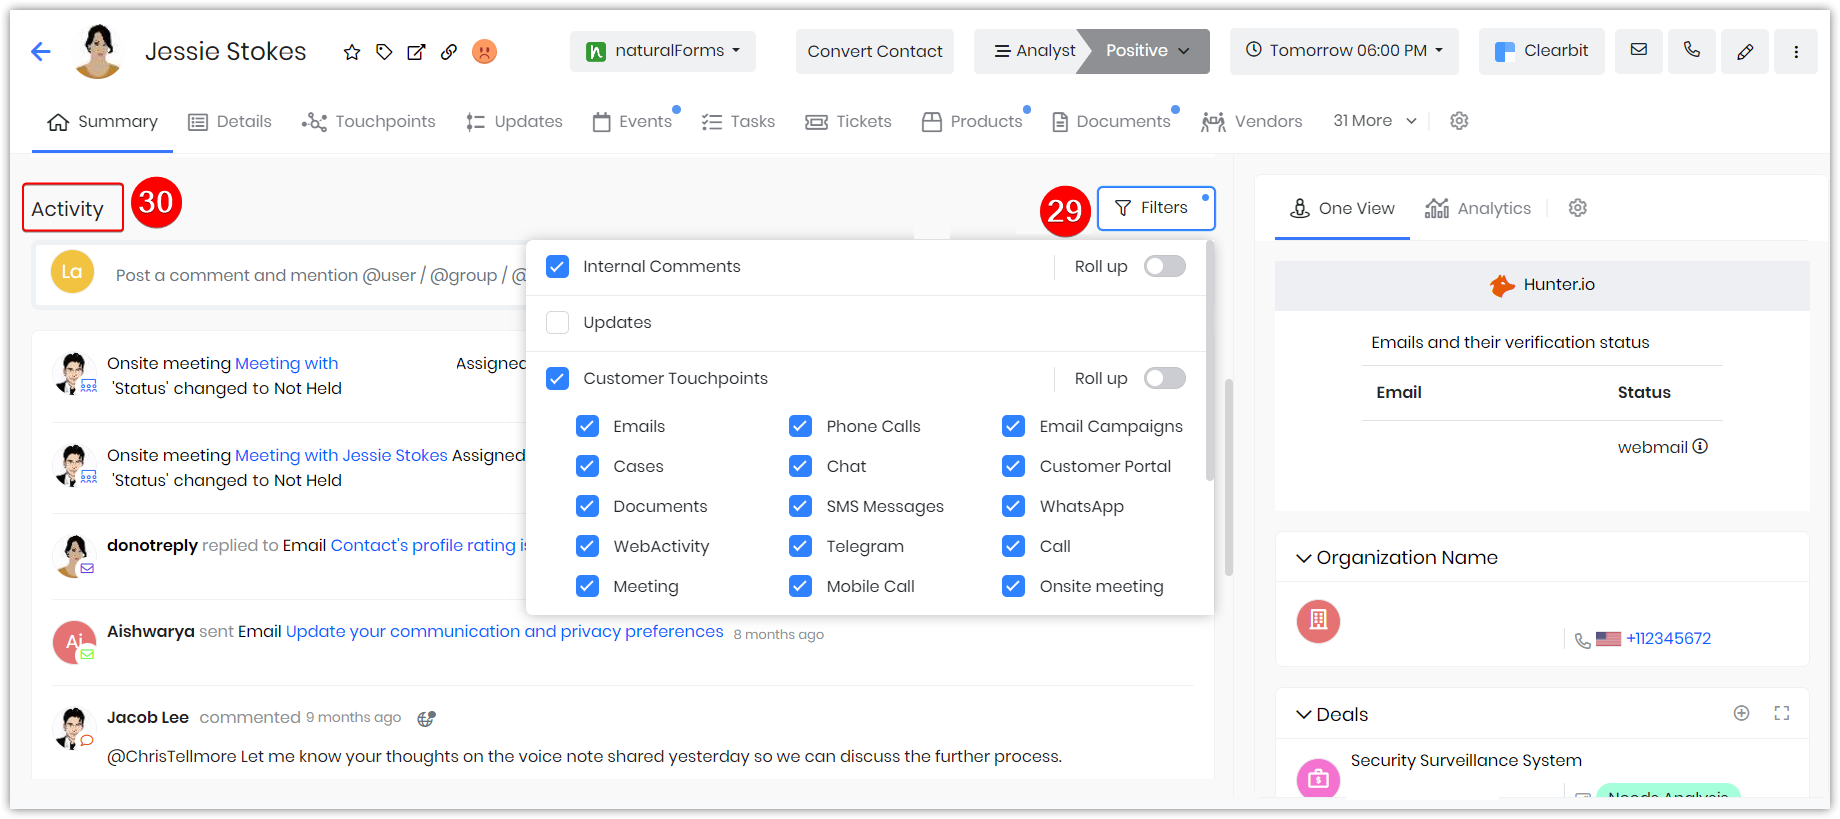
- Filters - You can add filters based on touchpoints, internal comments, or customer touchpoints by checking or unchecking the box. The Updates option under Filters has been moved up the list to help you select the filter easily.
- Activity - You can add comments and mention them to the user, group, and all to notify. You can also attach files and images to a comment.
- Note: Image Restrictions on Image Uploads.
- The maximum size of a file that you can upload is 50 MB.
- If you have included images in an email or added images in the Rich Text Areas (email bodies, Comments, Descriptions, Textboxes) of the below-mentioned modules using the Image icon, the images will be publicly visible/accessible:
- Workflow
- Approvals
- Compose emails
- Cases reply
- Print Templates
- Email Templates
- User Signature
- Email Sequences
- Cases/IT description fields
- Due to security concerns, the images and attachments you have uploaded into the Rich Text Areas (comment/description/text areas) will be visible only inside the CRM from now on.
- Note: Image Restrictions on Image Uploads.
- More icon actions: You can perform different actions on a record by clicking the More icon. (:)
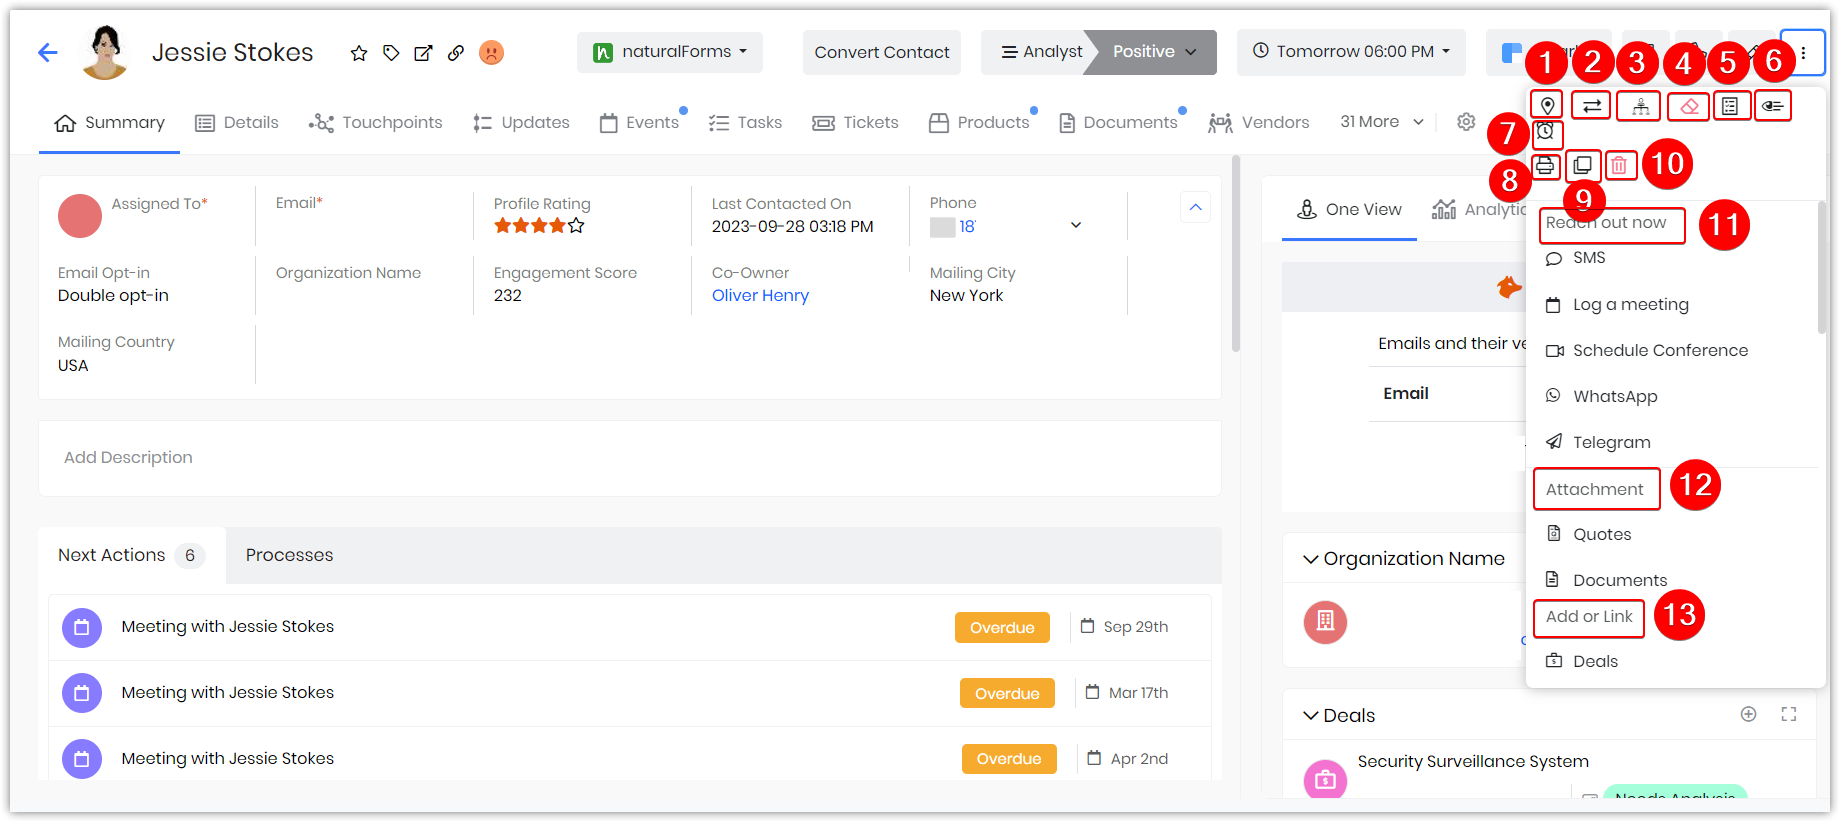
- Show Map: Displays the current location of the contact.
- Transfer Ownership: Transfer ownership of the record.
- Contact Hierarchy: Denotes the contact’s hierarchy in the organization. When you click this icon, the Contact Hierarchy window opens. You can see the details about the contact and updated information, such as the reporting manager.
- Erase Personal Data: Helps you to remove Personal data.
- Obtain Consent: An email will be sent to the Contact to obtain Consent.
- Followers: Displays the list of those who are following the record. Also, click the Add Followers button to add followers to follow a record.
- Create Reminder: You can create a reminder for an upcoming event.
- Print: Using this icon, you can perform the following actions on a document,
- Edit and Export
- Email with PDF
- Save as PDF
- Duplicate: You can duplicate the details available in one record and have them reflected in a new record.
- Delete: You can delete a record by clicking this icon.
- Reach out now - Get in touch with the contact via SMS, meeting, scheduling, conference, or WhatsApp.
- Attachment: Schedule an email, event, or task with the contact.
- Link: - Add or create other modules related to Sales.
- Deleted records are stored in the recycle bin and are deleted permanently after 30 days.
- The Summary View in the Invoices module gives you the Share option. Using this option, you can share the invoice as a link or as an attachment.
Widgets
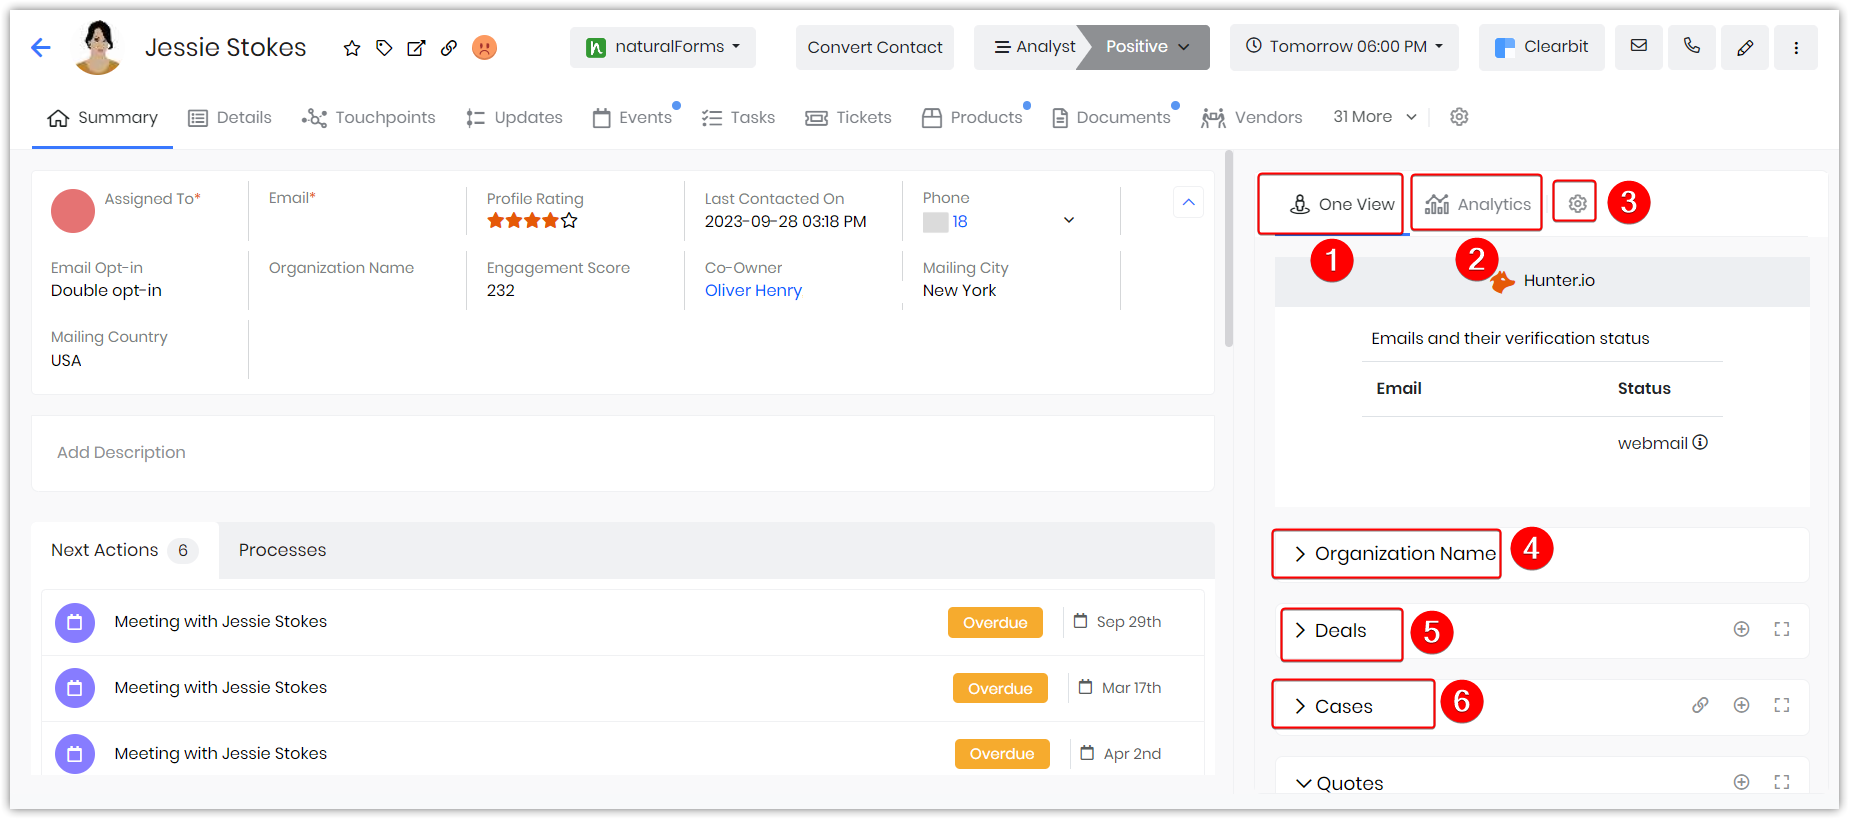
- One View - All the modules related to the contact are displayed here.
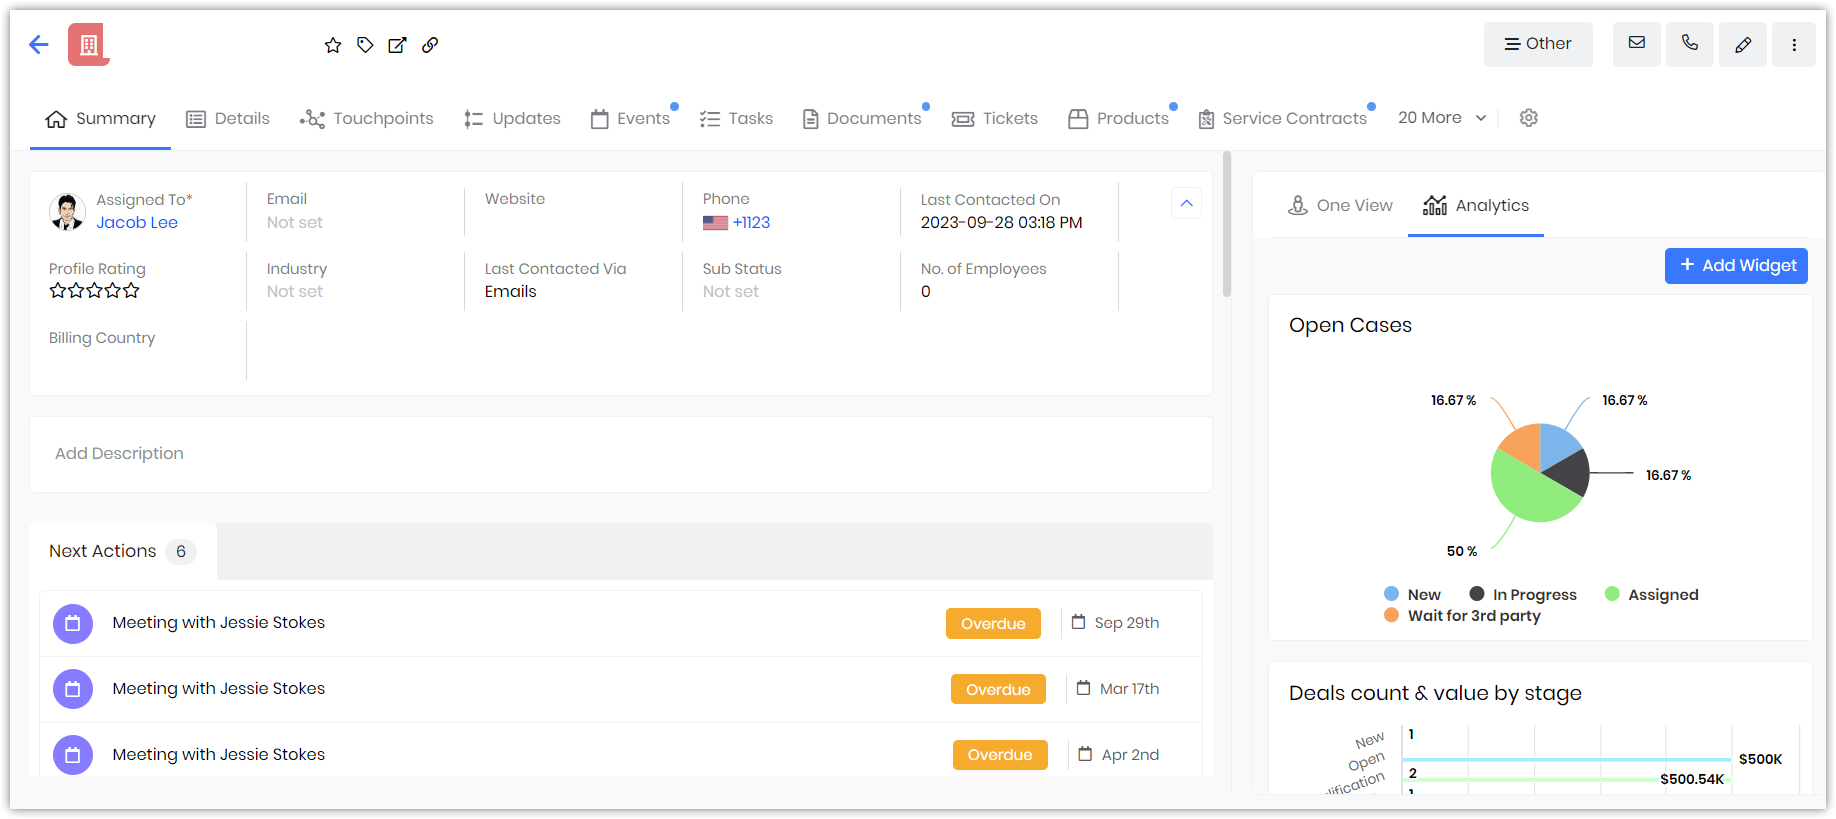
- Analytics -You can view all the metrics related to the contact in the form of charts, mini-lists, etc. You can also create new ones here.
- Settings - You can customize the Contact’s One View by clicking the Settings icon.
- Organization Name - This tab gives you the Organization details specific to the record.
- Deals - This tab gives you the Organization details specific to the record.
- Cases - This tab gives you the Organization details specific to the record.
Customizing the Summary View
Not every business needs to see the same information on their screens. You will want to display information specific to your business model. You can customize the Summary View in two ways by:
- Configuring and displaying the required fields on the screen
- Adding widgets to display required data
Configuring Summary View fields
You can customize the List or Summary Views further by choosing the fields and layout that you want to display. Configuring helps in customizing the screen to display information to suit your business. You can configure the Summary View for a module through Module Management > Module Layouts & Fields.
You will find various fields grouped under the following tabs:
- Detail View Layout
- Relationships
- Duplicate Prevention
- Dependent Fields/Block
- Closed States
And each of the above tabs has blocks of information where you can choose the fields you want to display. In this screen, you can:
- Add a new block of information
- Activate or deactivate a key field
- Add a custom field
- View hidden fields
- Collapse or expand a block of information
Follow these steps to configure the Summary view:
- Click on the display picture icon on the top right of the screen.
- Click on the Settings button.
- Scroll down the page to the Module Management section.
- Click on the Module Layouts & Fields option.
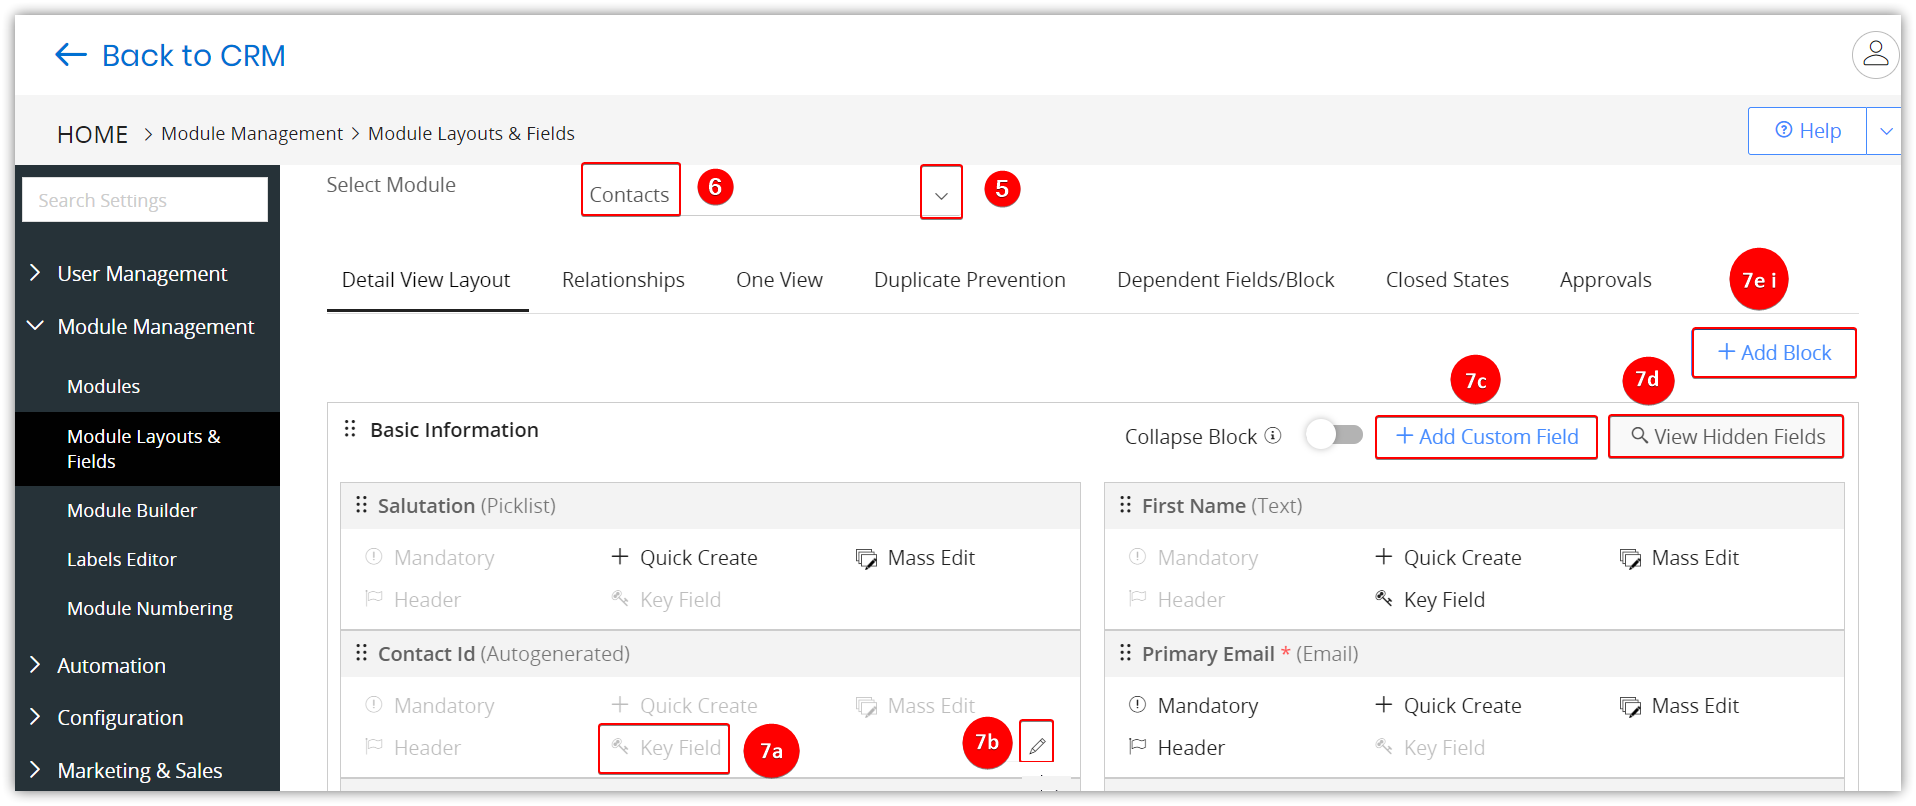
- Select a module from the drop-down.
- Select the tab for which you want to edit information.
- In this section, you can:
- Click on the Key Fields icon to activate or deactivate the fields. If you deactivate a field, it will remain hidden in the Summary View.
- Click on the Edit icon to edit the different fields.
- Click on the +Add Custom Field button to add a custom field.
- Click on the Hidden Fields button to view hidden fields.
- You can add a new field in some of the sections, such as Language, Customer Information, Customer Portal Details, Address Details, etc.
- Click the +Add button to add a new field.
-
-
Customizing the Summary View Using Widgets
Using widgets is a great way to display data related to a module as a list or a chart in the Summary View. As an Admin, you can also decide what information your sales team can view. Consider the following examples.
Noah is a Support Manager and has the privileges of the admin role. He wishes to see the list of open cases on an Organization record. He then creates a widget in the Organization module to view the Open Cases chart. Also, anyone else who has permission to view the Organization and its related Cases will be able to view the chart.
Example 2:
As a Sales Manager, Shanice creates:
- a list widget in a contact record to view the number of pending work orders, and
- a chart widget to get the list of all the Opportunities in the Open state in an Organization record.
Note: Only users with Admin privilege can create a widget in the Summary view.
Widgets and Key Fields in the Summary View
Activities Widget
Represents all activities - upcoming and pending calendar events, comments, touchpoints, and updates.
Key Fields
All key fields in the Summary View will be displayed under the related modules tab.
Note: Key fields: Lists any fields marked as Key fields in the Module Layout editor.
Adding Widgets to the Summary View
Let us create an Open Cases Chart widget in an Organization record. Here are the steps to create a widget:
- Go to an Organization module.
- Select a record from the List View. The Summary View of the record opens.

- Click the Analytics tab.
- Click the +Add widget. The Add Widget window opens.
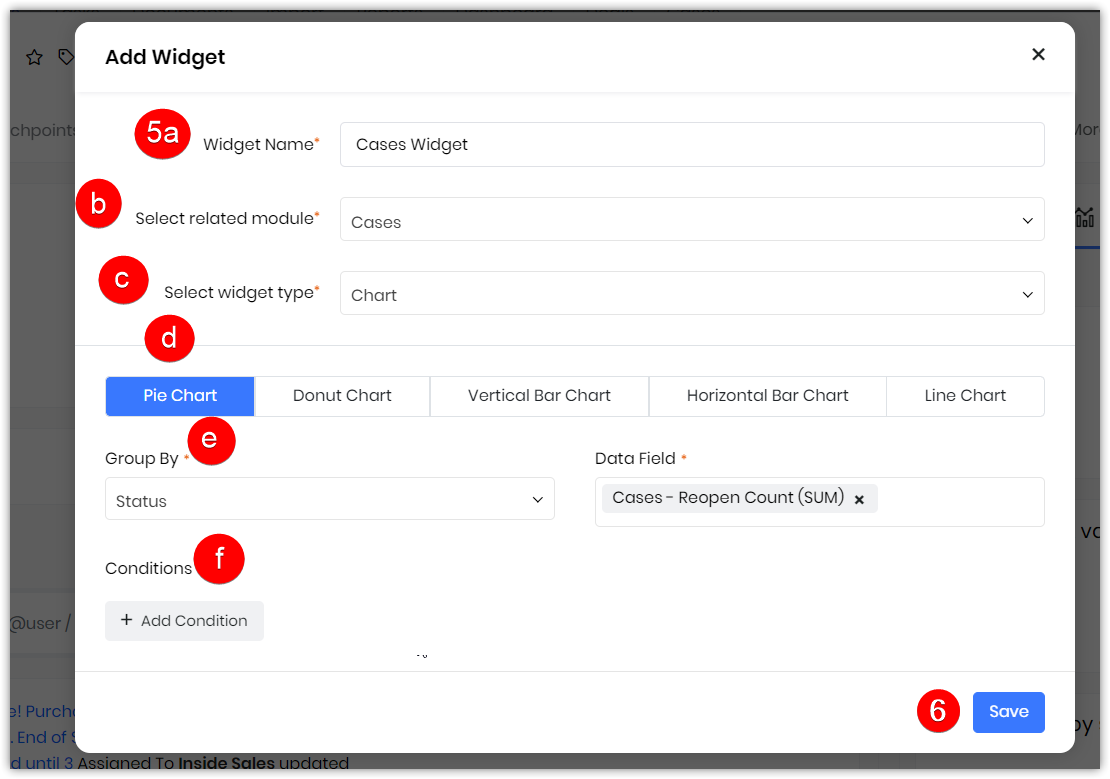
- Enter or select the following information. (For demo purposes, we are using the Cases module as an example.)
- Widget Name - Enter the widget name. For example, Open Cases.
- Select related module -Select the Cases module from the drop-down.
- Select widget type - Select the type of widget, List, or Chart Note: The image below shows a screenshot of Widget Type - Chart.
- Type of Chart: Select the type of chart from the displayed tabs. Available types of charts in the CRM are Pie Chart, Donut Chart, Vertical Bar Chart in the CRM, data fields for the List widget, and Chart type, Group by, and data fields for the Chart widget.
- Group By: Select the group and Data Field from the drop-down.
- Conditions: Enter the conditions; for example, Case status equals Open
- Click Save.
-
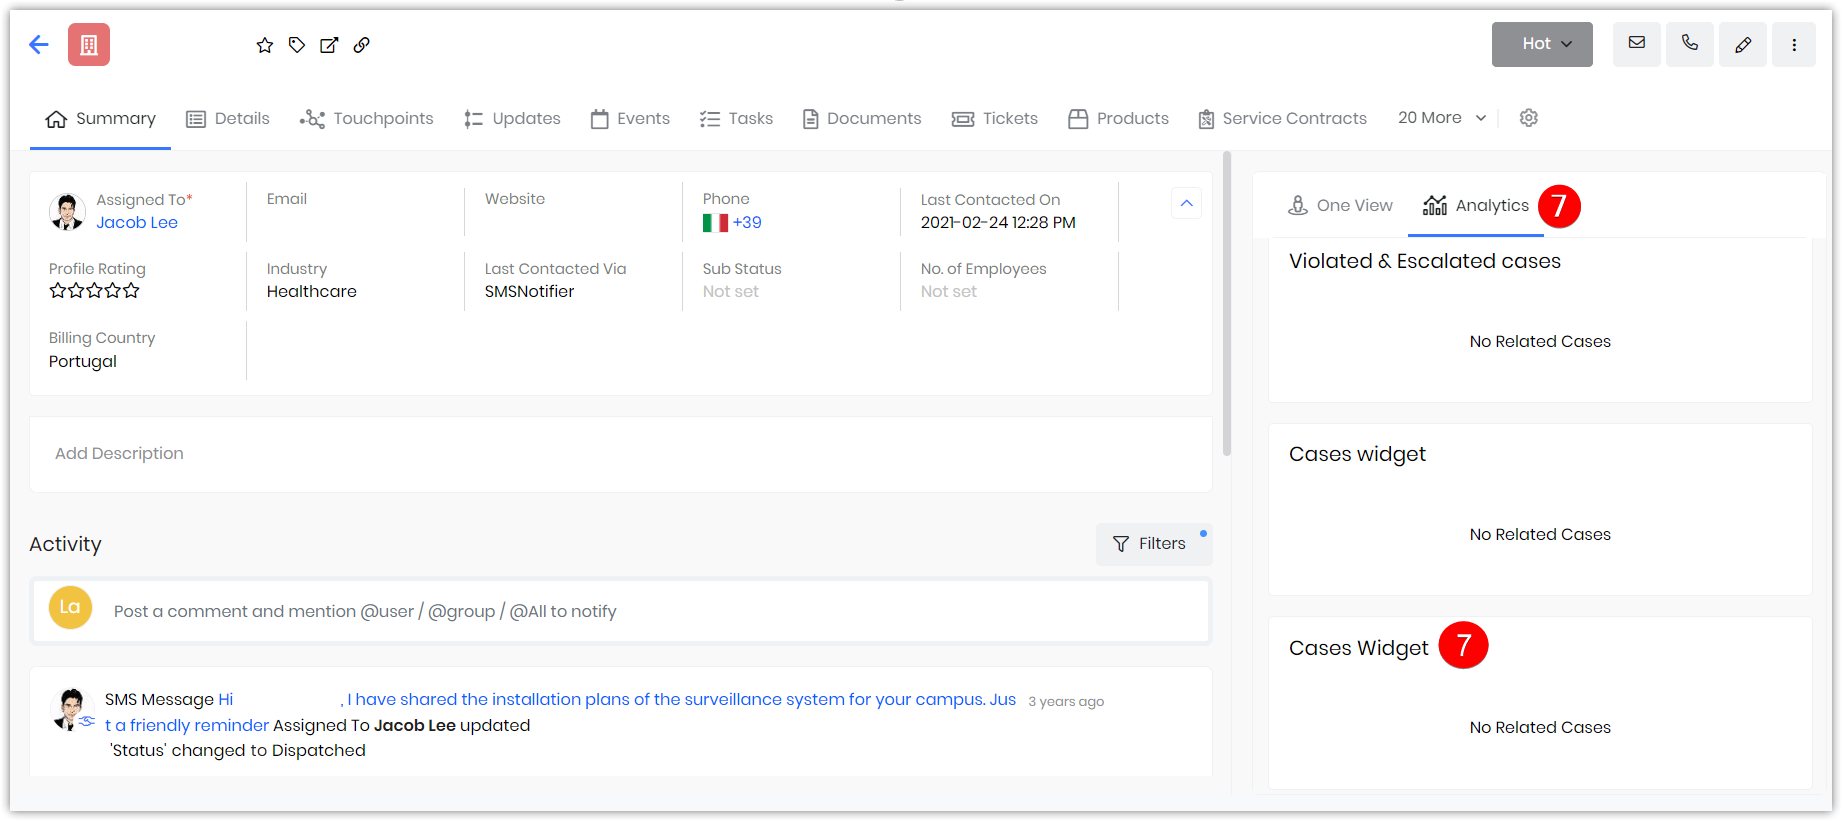
- You can view the widget created at the bottom of the page