Articles in this section
Automate Outgoing Emails in Email Settings
Introduction
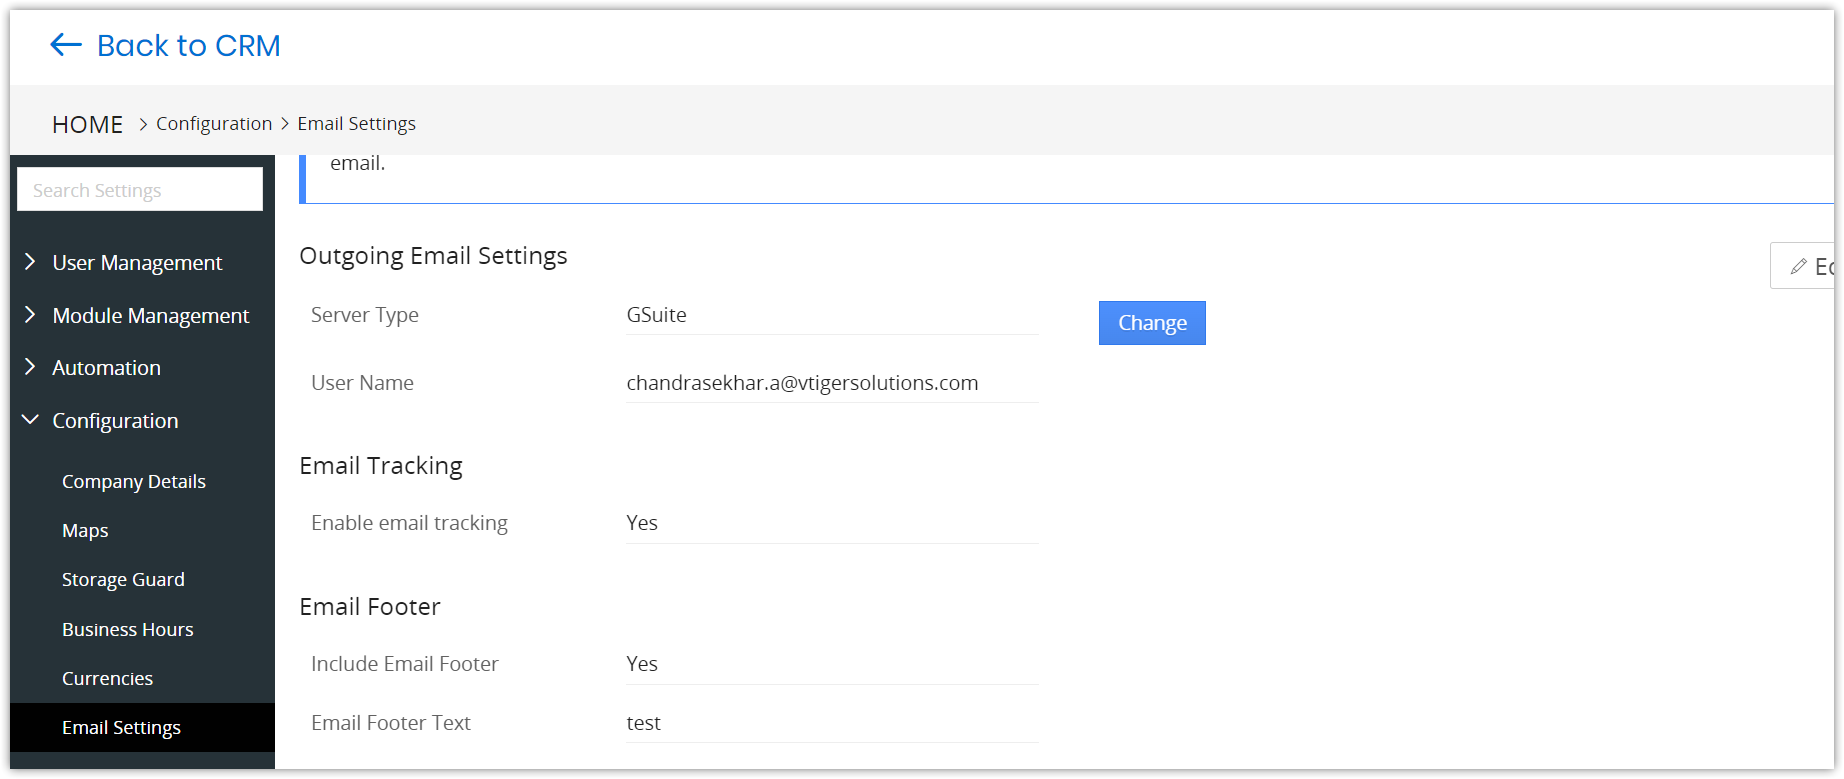
The Outgoing Server routes vtiger CRM to the email server to send emails. Emails sent from Vtiger are forwarded FROM user-defined email addresses but sent through the Vtiger email server. Administrators can change the outgoing email server from Vtiger to the email server.
The Outgoing Server settings, or SMTP servers, are used to route vtiger CRM with the email server to send out emails; more specifically, whether emails are sent with or without first authenticating your user information. Change the mail account for outgoing emails from the Vtiger server to your mail server. The emails you send will be traversing from your server.
Sending Emails through the Vtiger Email Server
Vtiger email server allows user-defined FROM addresses to be used when sending an email. Some email servers, such as Gmail, do not permit overriding FROM addresses.
Note: Vtiger validates that the FROM address belongs to you before allowing you to use it.
In Email Settings, you can add HelpDesk Email IDs from which your Case reply emails are sent. The default limit for HelpDesk Email IDs is based on your edition. You can increase the number of Helpdesk IDs with the Help desk Email ID Booster.
Adding SPF and DKIM records to Authorize domain's Vtiger Email Server
Adding a Vtiger IP address to your domain’s SPF and DKIM records, as outlined below, is crucial to improving email delivery rates.
Verify if the SPF and DKIM record is added

Note! All system emails sent from CRM will be sent via Vtiger mail servers (as and ) to ensure reliable delivery, irrespective of the configured outgoing mail [email protected]>@crmalerts.vtiger.com>. To learn more about authenticating emails with SPF, DKIM, and DMARC, click here.
Mail Server Settings(SMTP)
For Gmail, Yahoo, Hotmail accounts
Follow the steps to configure Gmail Server Settings:
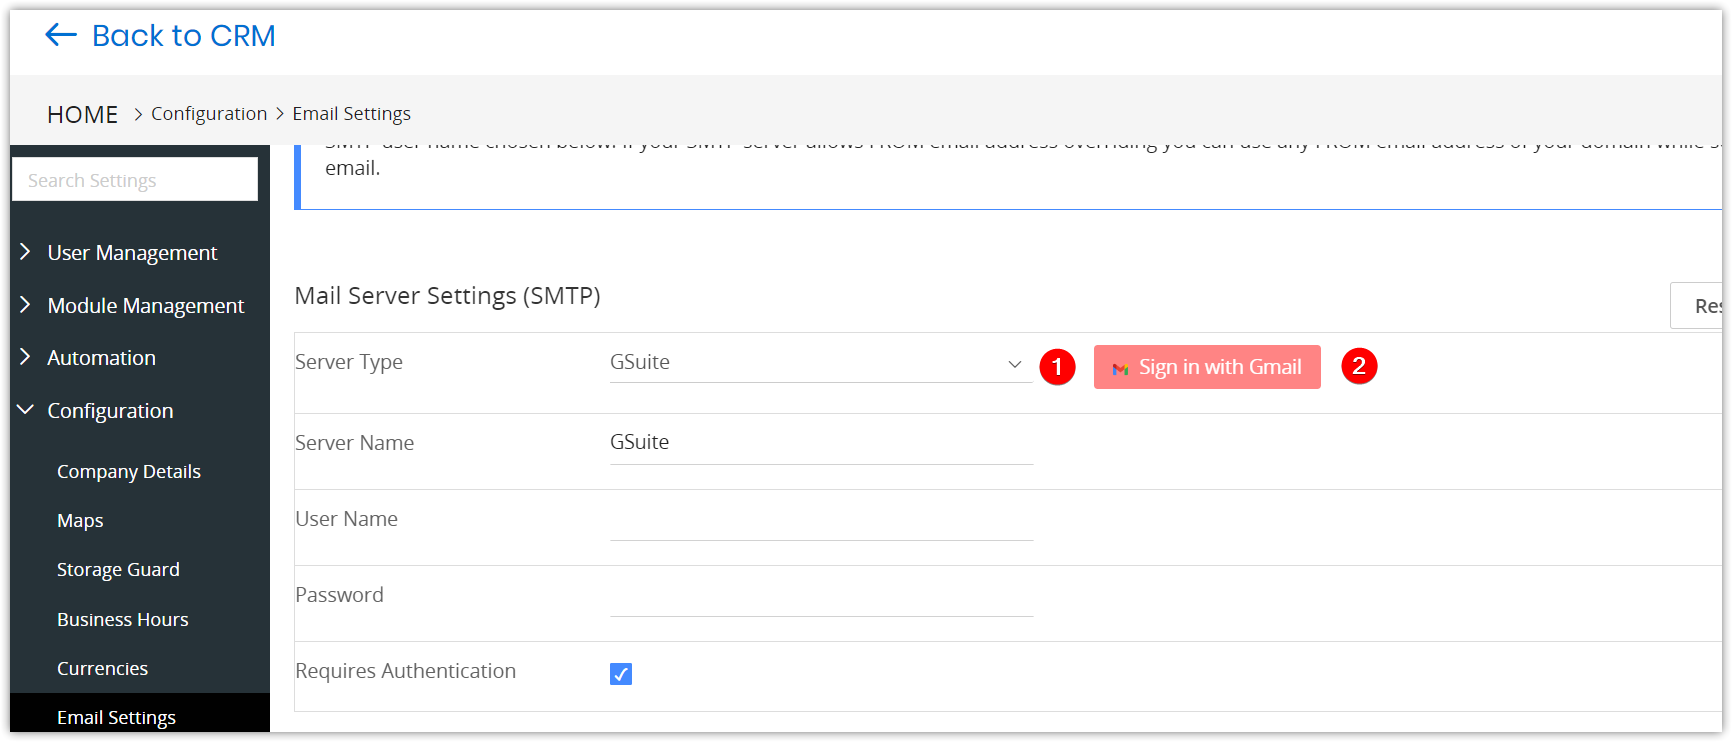
- Select GSuite from the Server Type drop-down.
- Click Sign in with Gmail. The Google account sign-in window opens.
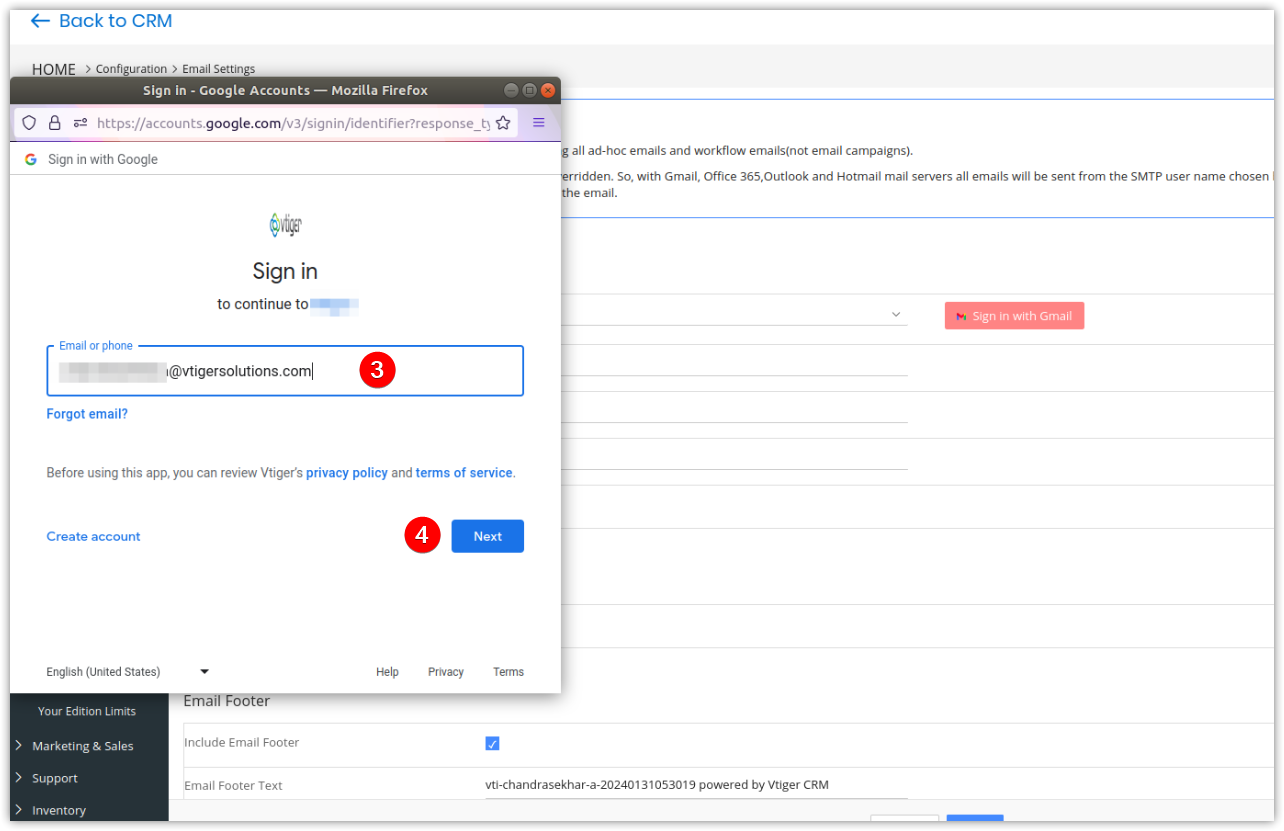
- Enter the Username of your Gmail account.
- Click Next.
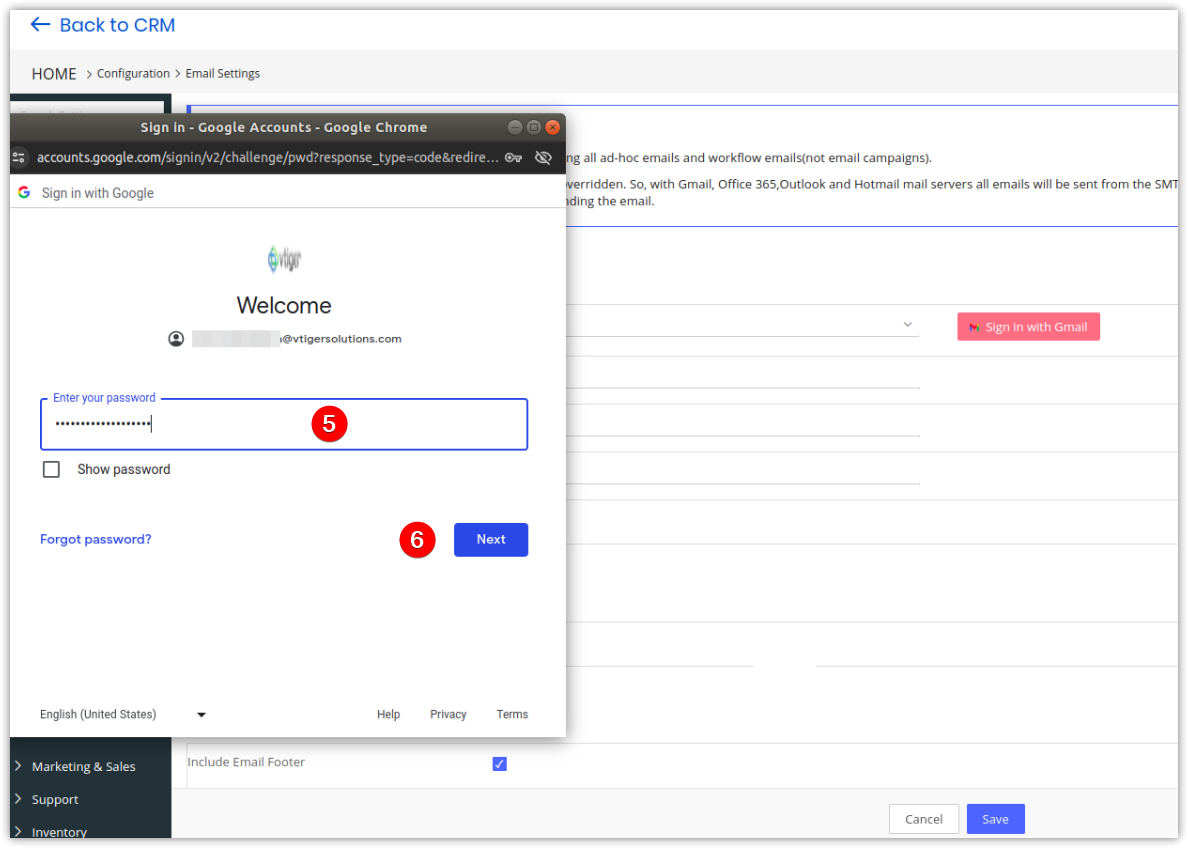
- Enter the Password of your Gmail account.
- Click Next.
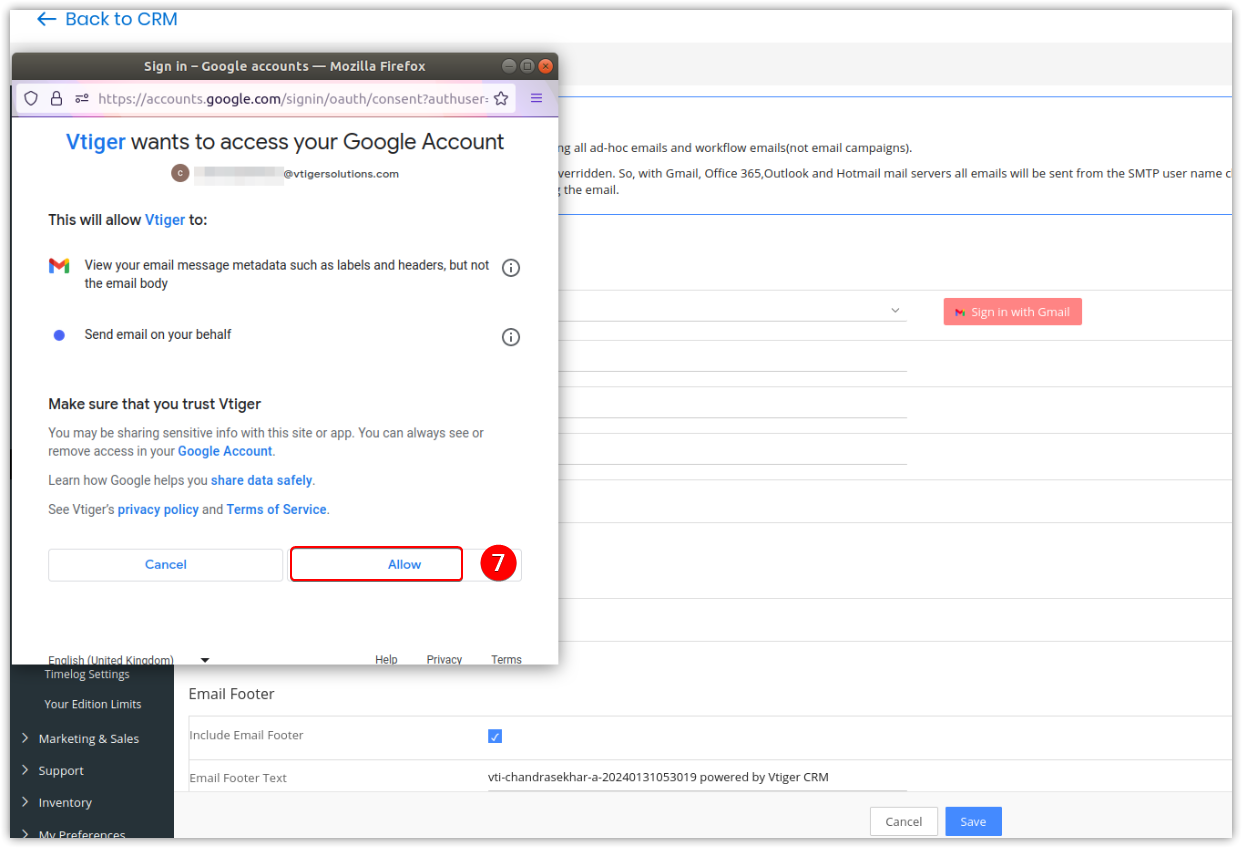
- Click Allow to enable Vtiger to access your Google account.
Your mailbox details will be saved in the Vtiger Outgoing Server settings.
- Your email details are encrypted. Enter the From Email address; this is not mandatory. All the emails will be sent from the email ID you have specified here. For Example, If your outgoing server is Gmail, your Gmail ID will be used to send the mail, i.e., [email protected].
- If the from email is not specified the emails will be sent via the email id of the current login user. To learn more about this, click here. Note: When customers enable 2-factor authentication for gmail account, they need to give app specific password in the password field to sign-in.
Please follow the same steps to set up Yahoo and Hotmail accounts.
Mail Server Settings for Microsoft /Office 365 Accounts
Follow the steps to configure Microsoft Server Settings:
- Select Microsoft from the Server Type drop-down.
- Click Sign in with Microsoft. The Microsoft account sign-in window opens.
- Enter the Password.
- Click Next.
- Enter the Password.
- Click Sign in. A Stay signed-in window opens.
- Click Yes.
For Other accounts
If you are using any other mail account that is not listed in Vtiger, follow the steps below:
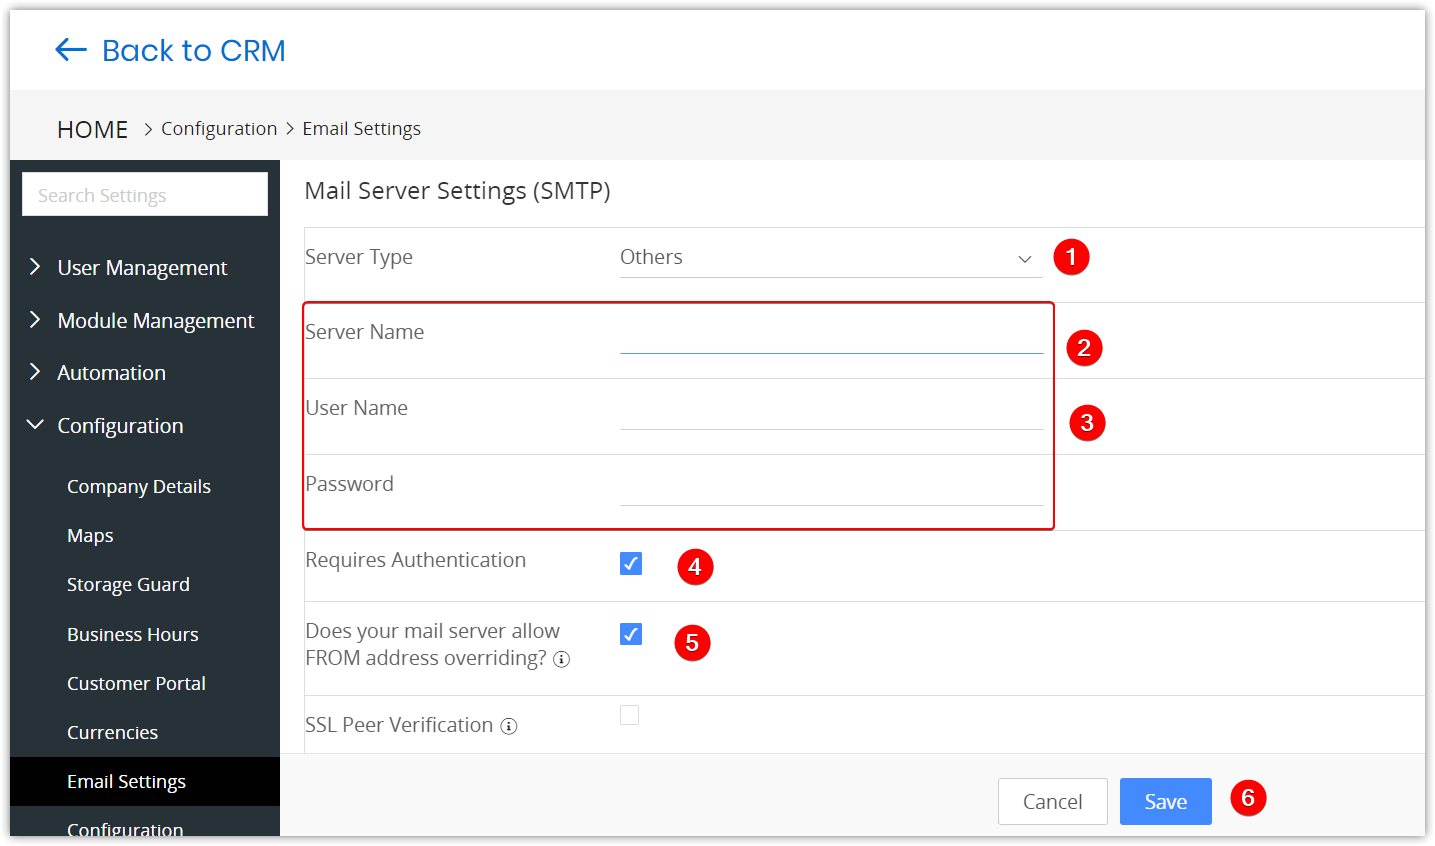
- Select Others in the Server Type drop-down.
- Enter the Server Name, Username, and Password of your account.
- Specify the From Email address. All the emails will be sent from the email ID specified here. For Example, If your outgoing server is Rediffmail, your Gmail ID will be used to send the mail, i.e., [email protected]
- Enable the checkbox to enable authentication before sending an email.
- If your email server allows FROM address overriding, please enable this checkbox. It will allow the user to select the FROM address when sending ad-hoc emails to your customers.
- Click Save.
You can see the list of unverified emails on the Email Settings page.

Email Outgoing
Email Tracking
Manage your Leads and Contacts by eventually tracking their one-to-one email interactions by enabling the Email Tracking check box.
Note: Emails sent from Email Campaigns are always tracked by default and do not depend on these settings.
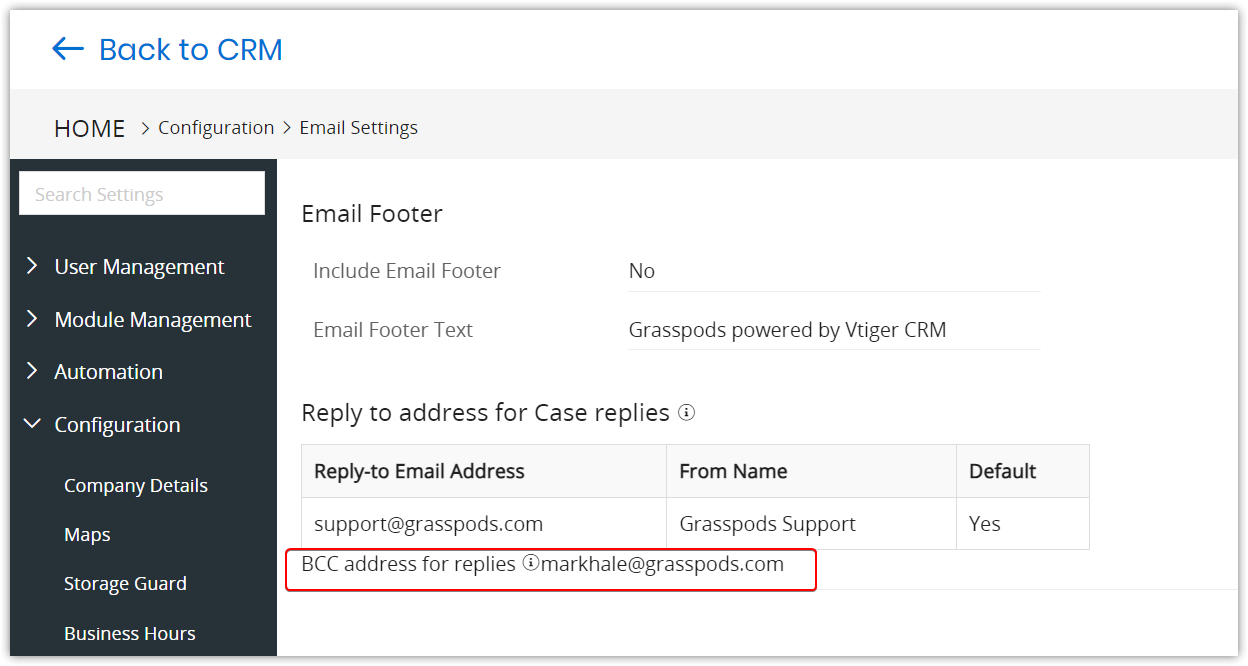
Email Footer
- Include Email Footer: Enable to include the email footer in the body of the email.
- Email Footer Text: Enter the text you want to add to the email footer.
Reply-To Address
Configure your Reply-To emails for Cases and Ad-hoc emails. Choose any one of the three options mentioned below for a Reply-To email:
- User’s Primary Email address - The primary email configured in My Preferences.
- User’s Primary Group Email - The email address of the primary group configured in My Preferences.
- Outgoing email address - The email address configured in Mail Server Settings (SMTP).
- Helpdesk Email/Other - Enter the Reply-To email ID and the name to which the customer will send a reply.
Email Verification
- Email verification is a service that helps you clean up your email list by validating email addresses to improve deliverability.
- In Vtiger, prevent email spoofing and avoid emails landing in the spam folder by verifying all the email addresses added to your instance.
- Verify email addresses added in a username, user’s primary email, and from and reply-to email fields of Email settings.
- An email address used in multiple areas needs one-time verification from any area.
- Admins can send a verification link to the email addresses added in and reply to fields by clicking on the alert icon.

If you own the email address, open the verification email and click the Yes, I own [email protected] button.
Note:
- Every from and reply-to email address added in the CRM needs verification to send emails.
- To send an email, verifying all emails added in the Email settings configuration is a must.
- You can not save the email settings without verifying all email addresses.
- You can also send a verification email to from and reply to addresses from compose email and workflow’s send email windows.
For Case emails
Case replies from your customers will be sent to the address specified in this section, which applies only to emails sent from the Summary view of the Case module.
Note: Set From Name for all outgoing emails to Company Name or Helpdesk Name

For Internal Ticket emails
Internal Tickets replies from your users will be sent to the address specified in this section, which applies only to emails sent from the Summary view of the Internal Tickets module.

Replies by users on Cases and Internal Tickets are cc’d to the email addresses specified in the Email Settings.
For Ad-hoc emails
Customers' replies for ad hoc emails will be sent to the specified address.
Note
- By default, the outgoing server is configured with Vtiger CRM settings. You can manage to send out emails with these settings. However, we recommend you configure the Outgoing Server with your SMTP settings.
- If you prefer to retain the Vtiger server as the Outgoing Server, we urge you to configure your domain’s SPF record to include the Vtiger server as a valid sender for your domain.
- You can click “Reset to Default” in the edit view to populate the default set of values provided by Vtiger CRM.
- If you have changed your password (For example, Gmail password), please update the password in the Outgoing Server.
Font
Set up a company-wide font family and font size for all the emails you send from Vtiger.

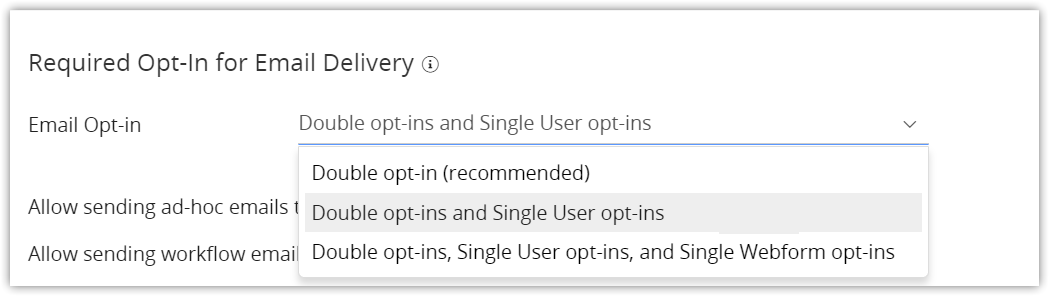
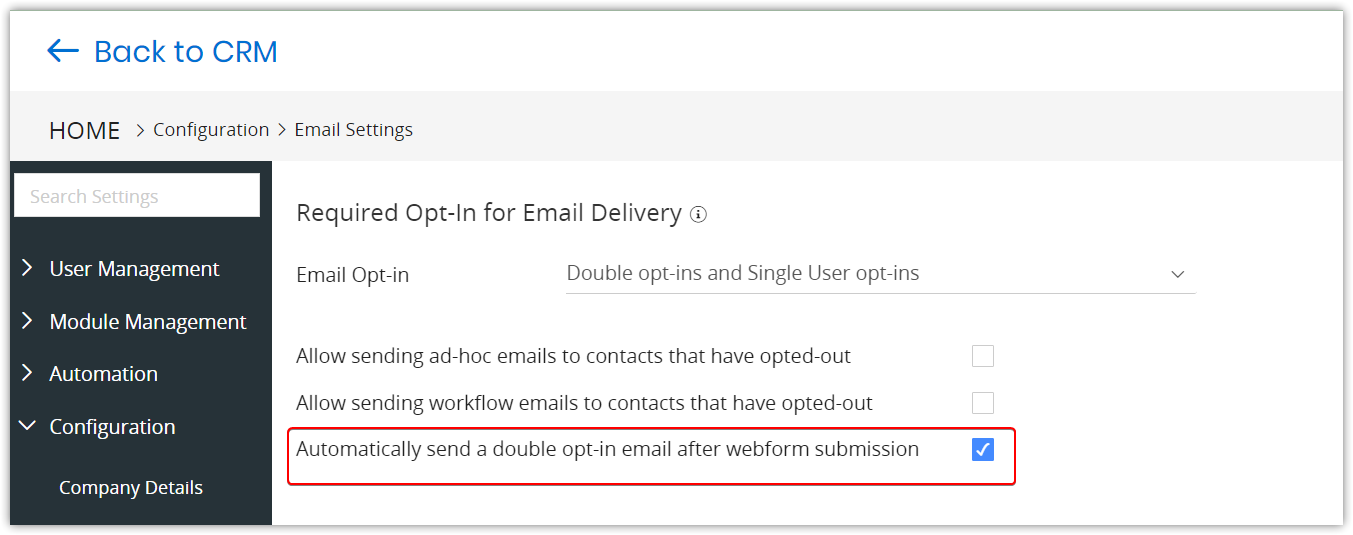
Required Opt-In for Email Delivery
When sending an email campaign, autoresponder, or workflow email to a lead or a contact, Vtiger evaluates if the contact should receive the email based on the value in the contact’s “Email Opt-in” field. This system setting tells Vtiger which values are acceptable for delivering email.
Select the type of opt-ins you would prefer to send out emails. Your options are:
- Double opt-in
- Double opt-in and Single opt-in (user)
- Double opt-in, Single opt-in (user), and Single opt-in (webform).
Double opt-in and consent emails
Consent request emails will go from the Email address you choose, along with the selected FROM name. Provide the FROM Name and FROM email to send the Consent request emails. Learn more about Double Opt-in and Consents

Troubleshooting Tips
Here are some common issues users face when configuring email settings.
- Azure Mail Server Settings Not Updating: When configuring the Azure SMTP server in Vtiger CRM, the mail server settings do not save or update correctly.
- SMTP connect() failed error: The system shows an SMTP connect() failed message after entering SMTP details under Other server type and attempting to save.
To confirm that your email credentials and server settings are correct, test them in Thunderbird. Follow the linked guide to fix the issue.
- Google Authentication issues when using the same email address across multiple instances.
If you are unable to authenticate your email account or notice that schedulers are not running automatically, it may be due to using the same Google email address across multiple WS or .com instances. Google restricts multiple simultaneous authentications for security reasons.
Follow these steps to restore access and allow the same email ID to be used again:
- Open your Google Account Settings.
- Go to Security > Third-party apps with account access.
- Find and select Vtiger from the list.
- Revoke access by removing all Vtiger connections.
- Return to your instance and re-authenticate your Google email account.