Articles in this section
Configuring Picklist Values
Feature Availability
Vtiger Editions: One Pilot | One Growth | One Professional | One Enterprise | One AI
|
|
|
|
|
|
|
|
|
|
|
|
|
|
|
|
|
|
|
|
|
|
|
|
|
|
|
|
Introduction
Picklist Field Values allow administrators to define predefined options that users can select from a drop-down list. Picklist fields help standardize data entry and ensure consistency across records by allowing users to choose only one value from a defined set of options.
For example, Lead Status in the Leads module is a picklist field that guides sales teams through different stages of a lead. Administrators can manage these values using the Picklist Editor, which allows them to add, rename, delete, rearrange, and assign picklist values to specific roles.
Picklist values can also be role-based, meaning users can view and select only the values assigned to their role.
Key Features
The key features of the Picklist Fields are:
- Custom Picklist Value Creation: Add new values to existing picklist fields to reflect your business-specific stages and statuses.
- Role-based Picklist Control: Restrict or allow access to picklist values by user role to support structured workflows.
- Color-coded Picklist Values: Assign colors to picklist values for quick visual recognition and better usability.
- Centralized Picklist Management: Configure and manage picklist values across modules from a single settings page.
- Rearrange and Sort Values: Reorder picklist values using drag-and-drop or automatically sort them alphabetically.
- Edit and Rename Values: Update picklist values without impacting existing records that already use them.
- Delete Obsolete Values: Remove unused or outdated picklist values to keep data clean and relevant.
- Case-specific SLA Configuration: Define SLA timer behavior for custom case statuses in the Cases module.
Benefits
The benefits of Picklist Fields are:
- Improved Data Accuracy: By limiting user input to predefined values, picklist fields reduce errors caused by typos or inconsistent naming conventions.
- Enhanced Workflow Efficiency: Teams can streamline operations by using consistent terminology across modules, making progress tracking and report generation easier.
- Role-Specific Access: Organizations can restrict picklist values to specific roles, ensuring data relevance and security.
- Customizability: Picklist fields can be updated dynamically, allowing businesses to adapt quickly to changing requirements.
- Centralized Management: Admins can centrally manage and update picklist values, reducing the need for extensive user training.
In this article, you will learn about:
- Picklist Fields
- Adding custom Picklist Fields
- Managing Picklist Fields
Key Terminology
|
|
|
|
|
|
|
|
|
|
|
|
|
|
|
|
|
|
|
|
|
|
|
|
|
|
|
Adding a Custom Picklist Field to an existing Picklist
Vtiger CRM lets you create new picklist values in addition to existing ones. After the custom picklist value(s) are created, they will be available for selection in the respective module.
Follow a few simple steps to add new picklist values:
- Log in to the CRM.
- Click the Customize icon in the top right corner of any module.
- Click Picklist Field Values and select Add Value
- Enter Item Value (New Picklist Value)
- Enter Assign to Role value (who can access these values based on Roles)

- Choose a color from the color palette and assign it to a picklist value
- Click Save.
The Picklist name is visible in the All Values tab. Learn how to add a Picklist in a Module - click here.
Working with Picklist Fields
You can perform a wide variety of operations on picklist fields, like adding new values to existing picklist fields, and modifying, deleting, and rearranging existing values of a picklist field. Additionally, you can also assign roles to selected picklist values.
Follow a few simple steps to configure picklist fields:
- Log in to the CRM.
- Click the icon and select Settings
- Click Configuration > Picklist Field Values
- Customize as per your requirements.
Customizing existing Picklist
To customize picklist fields, you’ll need to select the desired [Module] from the Select Module dropdown (for example, Leads, Contacts, etc.) Consequently, the Select Picklist in the [Module] dropdown will display all picklist fields available for that module. This drop-down can be used to select the desired picklist field to perform global actions.

Rearranging picklist values
This feature lets you reorder the picklist values in a picklist field. You can rearrange the values as needed.
Follow a few simple steps to rearrange picklist values:
- Select a module and the desired picklist field
- Click, drag, and drop desired values
You can also sort the picklist values based on alphabetical order.
Editing / Renaming Existing Values
This feature helps you to edit existing picklist values in the selected picklist field.
Follow a few simple steps to rename picklist values:
- Log in to the CRM.
- Select a module and the desired picklist field.
- In the All Values List.
- Click the Edit button.

- Enter New Name.
- Click Save
Note: After entering each picklist value, you have to press the Enter/Return button to show the end of the current value, after which you can either type a new value or click Save.
Deleting Existing Values
This feature helps you to delete existing picklist values in the selected picklist field.
Follow a few simple steps to delete picklist values:
- Log in to the CRM.
- Select a module and the desired picklist field.
- In the All Values List.
- Click Recycle.


- Click Delete.
- Click Save.
Adding a new picklist to the Cases module
You can set the case status and SLA timer behavior for custom case states.

Assigning values to selected Role(s)
The Values assigned to a role option will be shown only if the Role-based Picklist is enabled, either while creating or editing the field in the Module Layouts and Fields.
Follow these steps to assign values to selected roles:
- Log in to the CRM.
- Click User Menu.
- Select Settings. The Settings page opens.
- Go to Configurations > Picklist Field Settings. The Picklist Field Settings page opens.
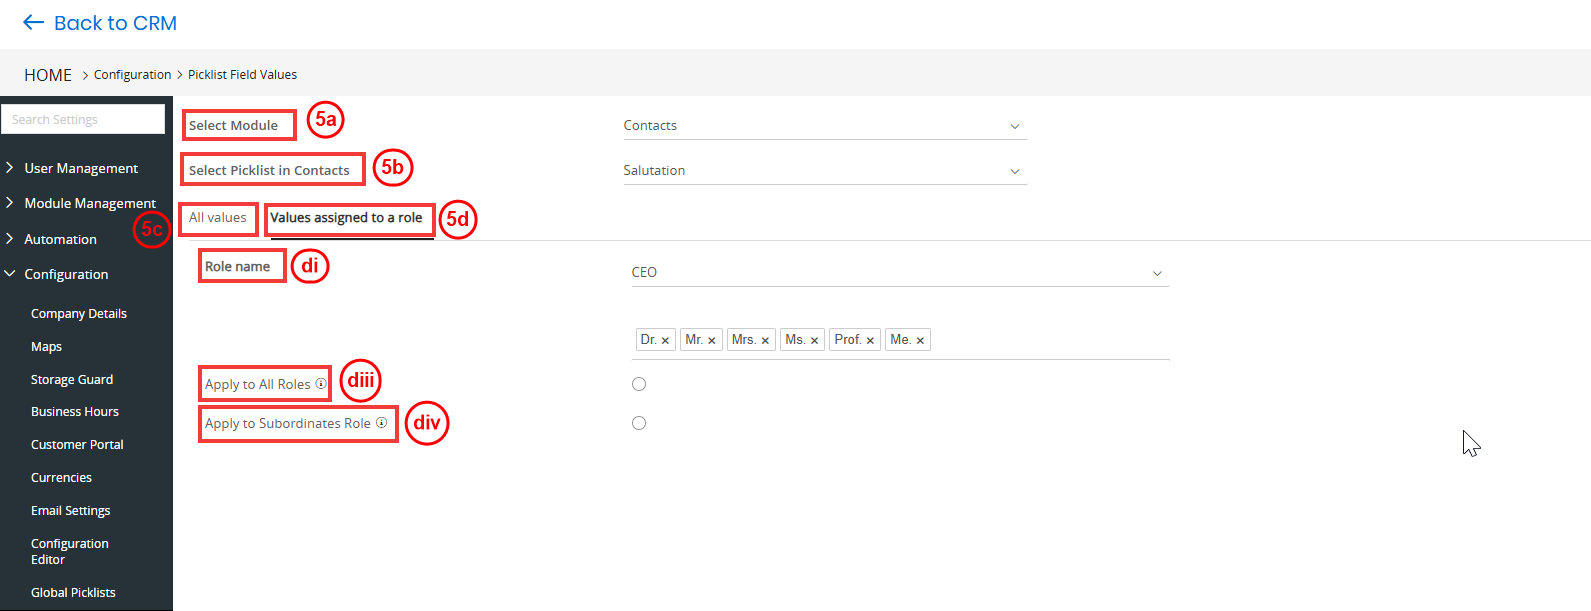
- Enter or select the following details:
- Select Module: Choose the module where the role-based picklist field is enabled(e.g., Leads, Contacts).
- Select Picklist: Choose the specific picklist field for which you want to assign values to roles.
- All Values: Displays all the available picklist values for the selected field
- Values Assigned to a role:
- Role Name: Choose the role to which you want to assign picklist values.
- Picklist Value: Select the value(s) from the list that should be available to the chosen role.
- Apply to All Roles: Enable if you want the selected picklist value to be available for all roles.
- Apply to Subordinate Role: Enable this to apply the value not only to the selected role but also to all subordinate roles under it.
- Click Save.
Note:
- The new item value is added to the Role. Only the users with the assigned can access and use the picklist values.
- New picklist values updated via web services are restricted.