Articles in this section
Workflows in Vtiger CRM
Feature Availability
Vtiger Editions: One Pilot | One Growth | One Professional | One Enterprise | One AI
Introduction
Every sales and customer-support team has repetitive tasks that need to happen at exactly the right time. A new lead comes in, and someone needs to send an email. A deal moves to a new stage, and the sales representative needs a follow-up task. A customer subscription changes, and the corresponding date needs to be recorded. An invoice is accepted, and the next step needs to be triggered.
When these activities are handled manually, even a well-organized team can miss steps, delay follow-ups, or enter information inconsistently. This is where Vtiger Workflows can help.
Workflows automate business processes by executing predefined actions when specific events or conditions occur. Instead of relying on users to remember every follow-up, update, notification, or task, you can configure Vtiger to perform these actions automatically.
For example, you can configure a workflow to:
- Send an email when a lead is created.
- Create a task when a deal reaches a particular stage.
- Update a field when a condition is met.
- Send an alert or reminder based on a date.
- Create or update a record when specific criteria are satisfied.
The result is a more consistent process with less manual intervention.
Types of Workflows
Vtiger offers two types of workflows to help automate and streamline your business processes: Standard Workflows and Multi-path Workflows.
Standard Workflows
These workflows follow a single linear path and execute actions based on predefined conditions. They are ideal for straightforward automation needs.
Four Components of Standard Workflows
To create a standard workflow, you must specify the following:
- The module on which the workflow is executed.
- The trigger that will cause the workflow to execute.
- Conditions based on which the workflow will execute its actions.
- Actions that the workflow will perform when the conditions are met.
Multi-path Workflows
Multi-path workflows enable you to create multiple actions on a single field, known as the Anchor Field. Unlike in Standard workflows, you need not create a separate workflow to execute an action for each field's value. For example,
- If you want to send an email to a sales rep when Invoice status = Accepted, and create a task when Invoice status = Rejected, you must create separate Standard workflows.
- However, by creating a multi-path workflow, you can include different actions for different statuses of an invoice in the same workflow. Hence, the name multi-path.
Four Components of Multi-Path Workflows
Similar to Standard workflows, Multi-path workflows also have four components.
- The module on which the workflow is executed.
- The trigger that will cause the workflow to execute.
- Conditions based on which the workflow will execute its actions.
- Actions that the workflow will perform when the conditions are met.
Benefits of using Workflows
The benefits of using Workflows in Vtiger CRM are:
- Automation of Repetitive Tasks: Save time by automating routine actions like sending emails, assigning records, or updating fields.
- Improved Efficiency: Workflows speed up business processes by reducing manual intervention and delays.
- Consistency and Accuracy: Ensure every process is executed the same way, every time, reducing human errors.
- Faster Response Time: Trigger immediate follow-ups or alerts based on defined conditions to improve customer responsiveness.
Use Case for Automatic Lead Follow-Up
ABC Technologies wants to ensure that every new Lead is followed up by the assigned Sales Representative in a timely manner. Whenever a new Lead is created in Vtiger, a follow-up task should be automatically created and assigned to the Lead Owner.
John Keyes, a Sales Representative, is responsible for following up with new Leads. Using Workflows, the CRM Administrator creates a workflow that:
- Starts when John or another Sales Representative creates a new Lead.
- Checks whether the Lead Status is New.
- If the condition is met, a follow-up task is automatically created for the Lead Owner.
- If the Lead Status is not New, no follow-up task is created.
- The workflow creates the following task:
- Task Subject: Follow up with the new Lead.
- Assigned To: Lead Owner.
- Due Date: The next business day.
- Priority: High.
- Once the task is created:
- John receives the follow-up task in Vtiger.
- John contacts the Lead and updates the Lead record with the outcome.
- John can continue moving the Lead through the normal sales process.
By automating this follow-up process, ABC Technologies ensures that every new Lead receives timely attention without requiring Sales Representatives to manually create follow-up tasks. This helps reduce missed opportunities, improves response time, and ensures a consistent Lead management process.
In this article, you will learn about:
- Accessing Workflow settings
- Creating a Workflow
- Editing a Workflow
- Enabling a Workflow
- Disabling a Workflow
- Deleting a Workflow
Accessing Workflow Settings
Follow these steps to access Workflow settings:
- Log in to the CRM.
- Click User Menu.
- Select Settings. The Settings page opens.
- Go to Automations.
- Click Workflows. The Workflows page opens.
The Workflows page displays the workflows available for your organization. From this page, you can create, edit, enable, disable, or delete workflows as needed.
Creating a Workflow
Vtiger allows you to create Workflows to automate actions based on specific triggers and conditions. You can create a workflow based on your business needs in the following ways:
- Standard Workflow
- Multi-path Workflow
- Workflows will not be triggered for imported records based on their existing values. However, they will be triggered when the records are updated and meet the workflow criteria.
- Scheduled workflows will be triggered for imported records that meet the scheduled workflow criteria.
Creating a Standard Workflow
A Standard Workflow follows a single path and executes predefined actions when its trigger and conditions are satisfied. It is suitable for simple automation requirements where the same set of actions should be performed whenever the defined criteria are met.
Components of a Standard Workflow
A Standard Workflow consists of the following components:
- Module: The module on which the workflow is executed.
- Trigger: The event that causes the workflow to execute.
- Conditions: The criteria that determine whether the workflow should execute its actions.
- Actions: The actions that Vtiger performs when the workflow conditions are satisfied.
For example, you can create a Standard Workflow for the Leads module that triggers when a Lead is created, checks whether the Lead Status is New, and creates a follow-up task for the Lead Owner.
Follow these steps to create a Standard Workflow:
- Log in to the CRM.
- Click the User Menu in the top-right corner.
- Click Settings. The Settings page opens.
- Go to the Automation section.
- Select Workflows. The Workflows page opens.
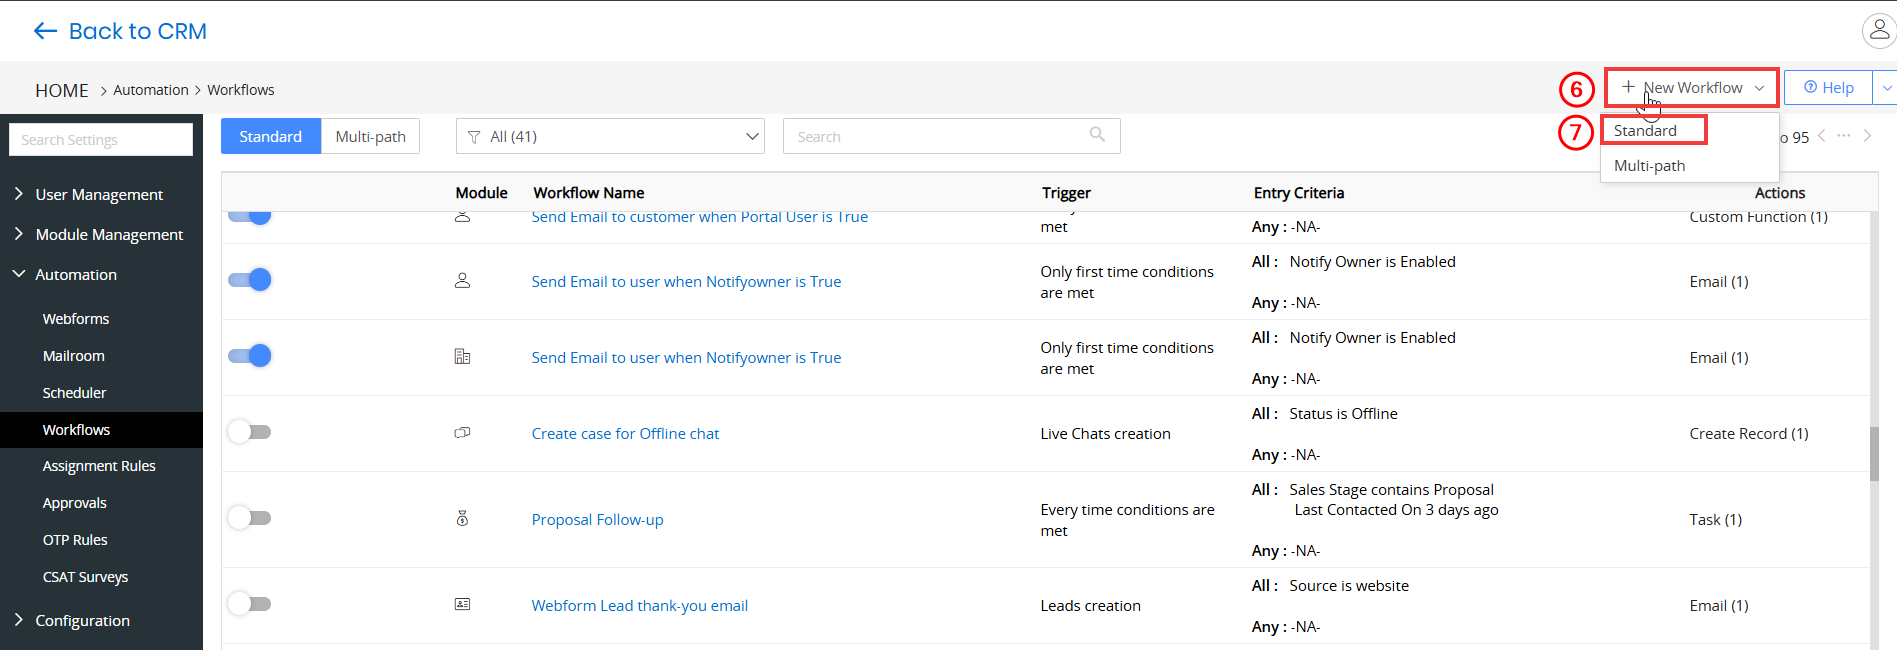
- Click + New Workflow.
- Select Standard. The New Standard Workflow page opens.
- Enter or select the following information:
- Basic Information:
- Workflow Name: Specify the name of the workflow.
- Target Module: Specify the module on which the workflow must execute, such as Deals, Contacts, Products, etc.
- Status: Specify the workflow status as Active or Inactive. The workflow does not execute when the status is set to Inactive
- Description: Provide a brief description of what the workflow is used for, the actions it performs, etc.
- Workflow Trigger:
- Trigger Workflow On:
- Record creation: Choose this option if you want the workflow to trigger when a record is created in the Target Module (mentioned in the previous section).
- Record updation (includes creation): Choose this option if you want the workflow to trigger when a record is updated or created in the Target Module (mentioned in the previous section).
- Only first-time conditions are met: Triggers the workflow if the specified conditions are true. Once executed, the workflow will not trigger on the same record again. However, it will trigger on other records in the selected module.
- Every time conditions met: Triggers the workflow on a record every time the specified conditions are true.
- Time Interval: Choose this option if you want the workflow to trigger at a frequent time interval.
- Entry Criteria
- All Conditions: Select this option when all the specified conditions must be satisfied for the workflow to execute.
- Any Conditions: Select this option when at least one of the specified conditions must be satisfied for the workflow to execute.
- Actions
- Send Mail: Send an email notification to specified recipients.
- Invoke Custom Function: Execute a custom function to perform a specific operation.
- Create Task: Create a task and assign it to the required user or role.
- Create Event: Create an event based on the workflow requirements.
- Update Fields: Automatically update one or more fields in the record.
- Create Record: Create a new record in a supported module.
- SMS Task: Create or send an SMS-based task or notification.
- Mobile Push Notification: Send a push notification to a user's mobile device.
- Webhook: Send workflow data to an external application or service through a webhook.
- WhatsApp: Send a WhatsApp message based on the workflow configuration.
- Telegram: Send a Telegram message based on the workflow configuration.
- Server Script: Execute a server-side script to perform a customized operation.
- Send OTP: Send a one-time password based on the configured workflow action.
- Click Save.
- Trigger Workflow On:
- Basic Information:
After creating the workflow, you can enable it to allow Vtiger to execute it automatically whenever the configured trigger and conditions are satisfied.
Creating a Multi-path Workflow
A Multi-path Workflow allows you to define different actions based on the values of a single field, known as the Anchor Field. It is useful when different values of the same field require different actions.
For example, suppose you want to automate actions based on the status of an Invoice:
- If Invoice Status = Accepted, send an email to the Sales Representative.
- If Invoice Status = Rejected, create a follow-up task.
- If Invoice Status = Pending, send a reminder notification.
Instead of creating separate Standard Workflows for each Invoice status, you can configure these different actions within a single Multi-path Workflow.
Components of a Multi-path Workflow
A Multi-path Workflow consists of the following components:
- Module: The module on which the workflow is executed.
- Trigger: The event that causes the workflow to execute.
- Conditions: The criteria used to determine the appropriate workflow path.
- Actions: The actions that Vtiger performs for each path.
The key component that distinguishes a Multi-path Workflow is the Anchor Field, whose different values determine which path and actions are executed.
Follow these steps to Create a Multi-path Workflow:
- Log in to the CRM.
- Click the User Menu in the top-right corner.
- Click Settings. The Settings page opens.
- Go to the Automation section.
- Select Workflows. The Workflows page opens.
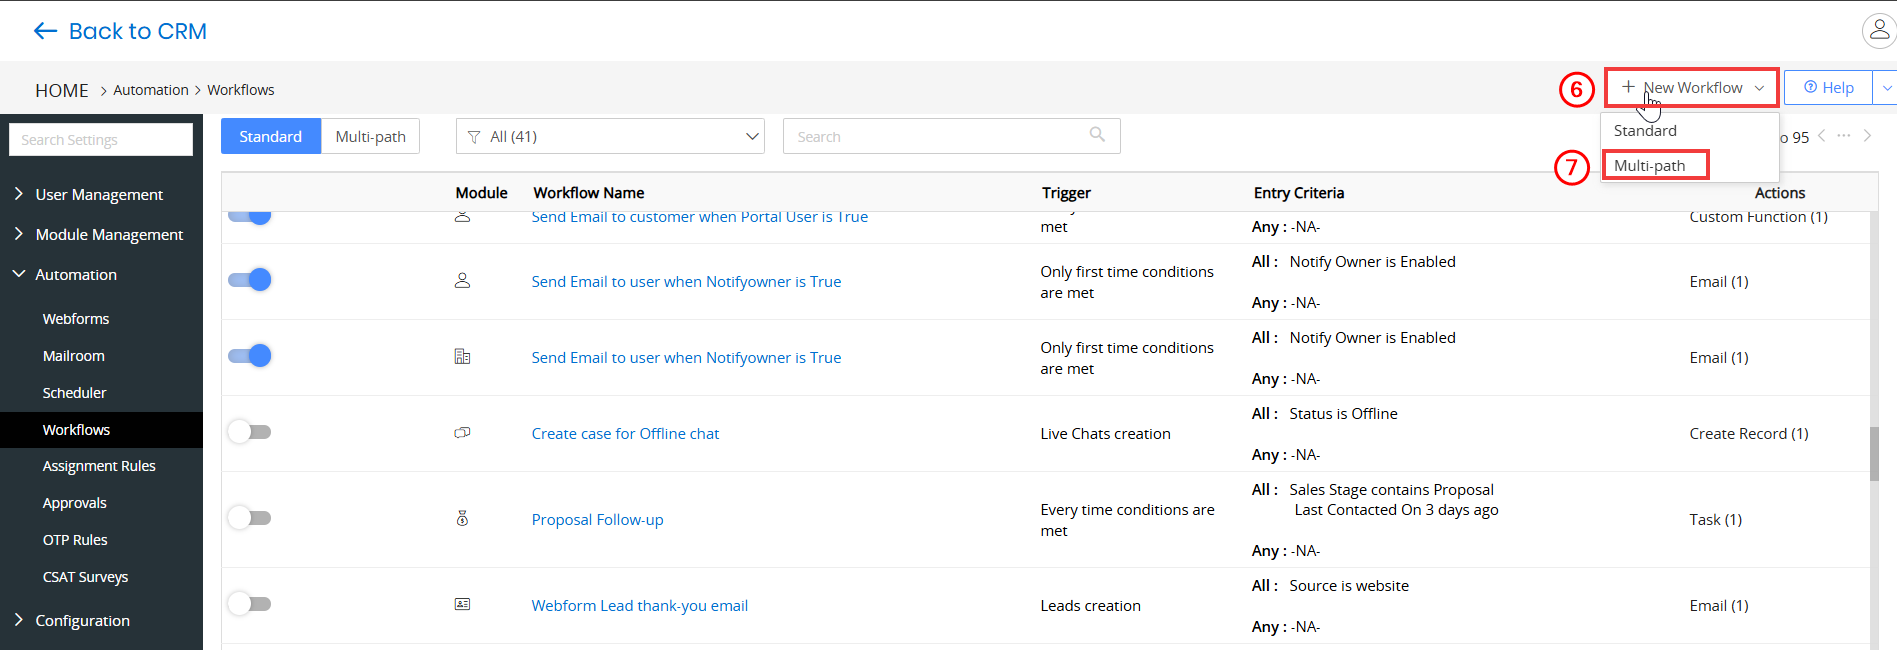
- Click + New Workflow.
- Select Multi-path Workflow. The Multi-path Workflow page opens.
- Enter or select the following information:
- Basic Information:
- Workflow Name: Specify the name of the workflow.
- Target Module: Specify the module on which the workflow must execute, such as Deals, Contacts, Products, etc.
- Status: Specify the workflow status as Active or Inactive. The workflow does not execute when the status is set to Inactive
- Description: Provide a brief description of what the workflow is used for, the actions it performs, etc.
- Workflow Trigger:
- Trigger Workflow On:
- Record creation: Choose this option if you want the workflow to trigger when a record is created in the Target Module (mentioned in the previous section).
- Record updation (includes creation): Choose this option if you want the workflow to trigger when a record is updated or created in the Target Module (mentioned in the previous section).
- Only first-time conditions are met: Triggers the workflow if the specified conditions are true. Once executed, the workflow will not trigger on the same record again. However, it will trigger on other records in the selected module.
- Every time conditions met: Triggers the workflow on a record every time the specified conditions are true.
- Time Interval: Choose this option if you want the workflow to trigger at a frequent time interval.
- Entry Criteria
- All Conditions: Select this option when all the specified conditions must be satisfied for the workflow to execute.
- Any Conditions: Select this option when at least one of the specified conditions must be satisfied for the workflow to execute.
- Actions
- Anchor Field: Select the field whose values determine the different paths of the workflow.
- Rules: Define the rules or conditions for each value or path of the Anchor Field.
- Actions
- Send Mail: Send an email notification to specified recipients.
- Invoke Custom Function: Execute a custom function to perform a specific operation.
- Create Task: Create a task and assign it to the required user or role.
- Create Event: Create an event based on the workflow requirements.
- Update Fields: Automatically update one or more fields in the record.
- Create Record: Create a new record in a supported module.
- SMS Task: Create or send an SMS-based task or notification.
- Mobile Push Notification: Send a push notification to a user's mobile device.
- Webhook: Send workflow data to an external application or service through a webhook.
- WhatsApp: Send a WhatsApp message based on the workflow configuration.
- Telegram: Send a Telegram message based on the workflow configuration.
- Server Script: Execute a server-side script to perform a customized operation.
- Send OTP: Send a one-time password based on the configured workflow action.
- Click Save to save the Multi-path Workflow.
- Anchor Field: Select the field whose values determine the different paths of the workflow.
- Trigger Workflow On:
- Click Save.
- Basic Information:
Once the Multi-path Workflow is created and enabled, Vtiger evaluates the Anchor Field and determines the applicable path based on the configured rules. It then executes the actions associated with that path.
Editing a Workflow
You can edit an existing workflow when you need to change its trigger, conditions, or actions.
Note: You can not edit the Target Module field.
Follow these steps to edit a workflow:
- Log in to the CRM.
- Click the User Menu in the top-right corner.
- Click Settings. The Settings page opens.
- Go to the Automation section.
- Select Workflows. The Workflows page opens.
- Locate the workflow you want to modify.
- Click and open the Workflow.
- Update the required workflow settings.
- Click Save.
The updated configuration is used the next time the workflow executes.
Enabling a Workflow
A workflow must be enabled before Vtiger can execute it automatically.
Follow these steps to enable a Workflow:
- Log in to the CRM.
- Click the User Menu in t he top-right corner.
- Click Settings. The Settings page opens.
- Go to the Automation section.
- Select Workflows. The Workflows page opens.
- Locate the workflow you want to enable.
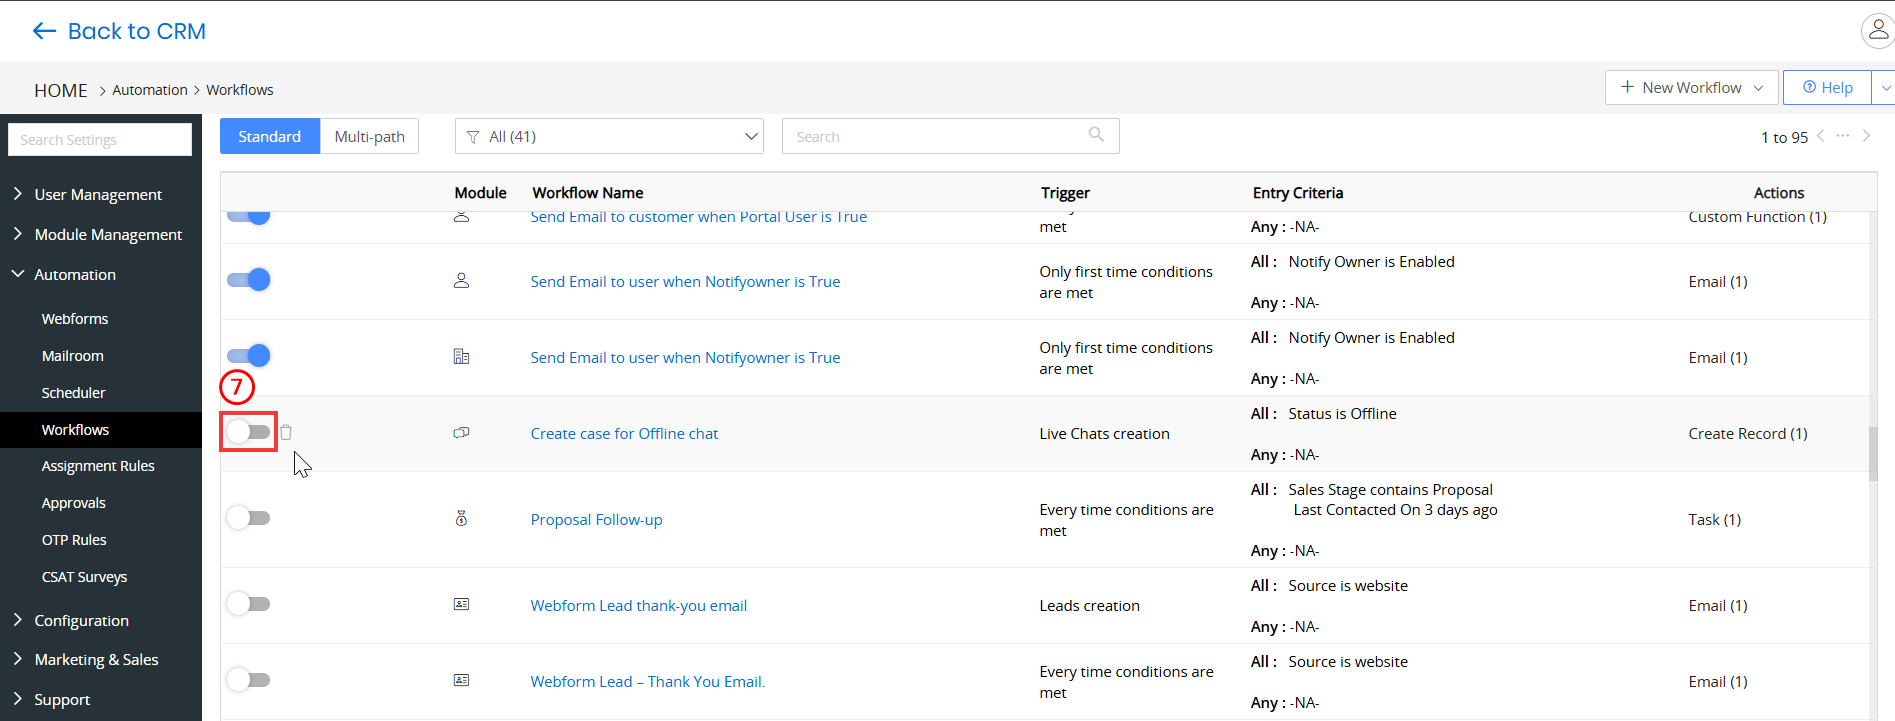
- Click the toggle to enable the Workflow.
Once enabled, the workflow executes when its configured trigger and conditions are satisfied.
Disabling a Workflow
You can temporarily disable a workflow when you do not want it to execute but may need to use it again later.
Follow these steps to disable a Workflow:
- Log in to the CRM.
- Click the User Menu in t he top-right corner.
- Click Settings. The Settings page opens.
- Go to the Automation section.
- Select Workflows. The Workflows page opens.
- Locate the workflow you want to enable.
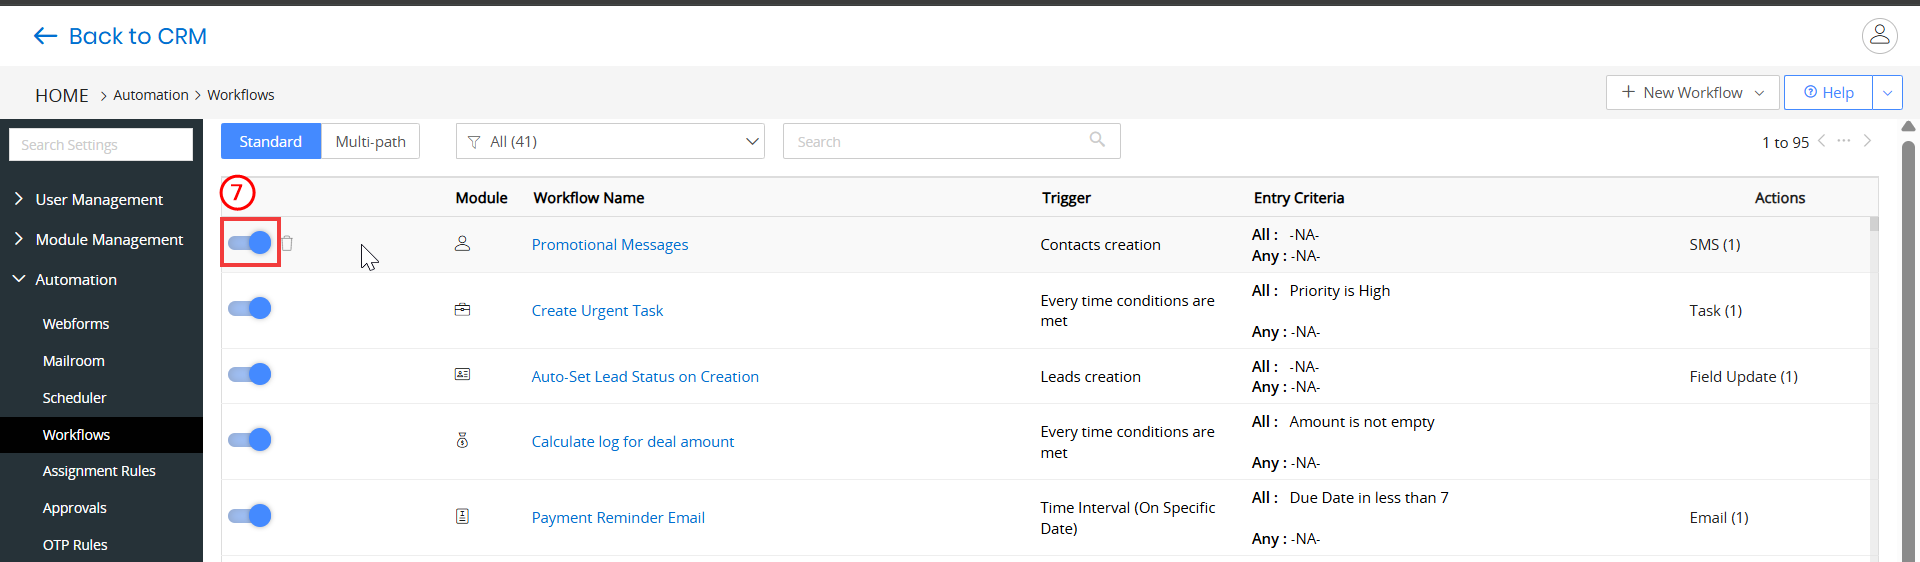
- Click the toggle to disable the workflow.
When disabled, the workflow remains available in Vtiger but does not execute until it is enabled again.
Note: Once disabled, the workflow record moves to the bottom.
Deleting a Workflow
If a workflow is no longer required, you can delete it from the Workflows page.
Follow these steps to delete a Workflow:
- Log in to the CRM.
- Click the User Menu in t he top-right corner.
- Click Settings. The Settings page opens.
- Go to the Automation section.
- Select Workflows. The Workflows page opens.
- Hover over the workflow you want to delete.
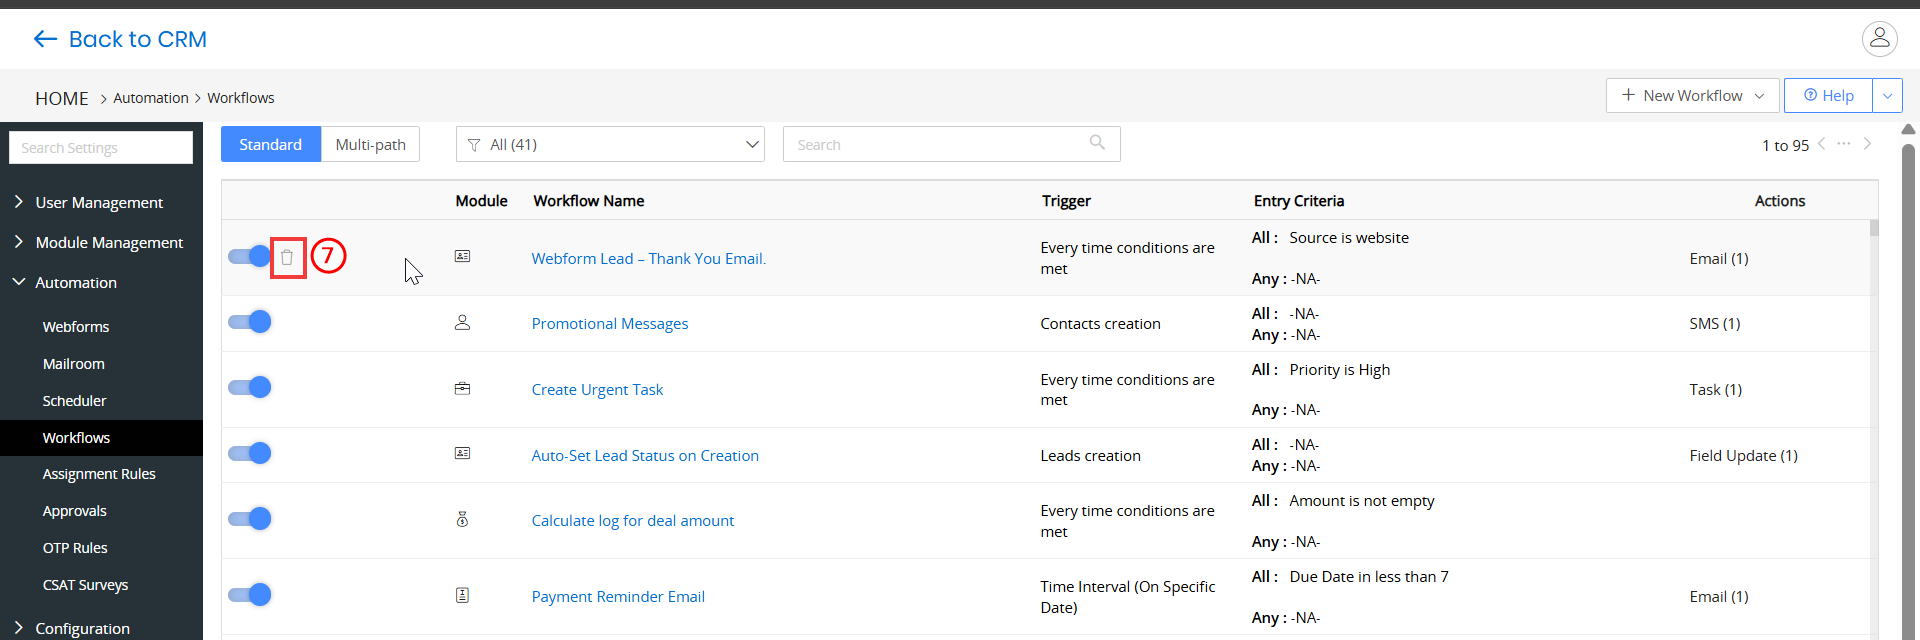
- Click Delete. A confirmation window opens.
- Click Yes.
Once deleted, the workflow is no longer available for execution.
Limitations
- No Cross-Module Condition Checks: Workflows typically apply to a single module and can't evaluate conditions across multiple related modules directly.
- Limited Field Update Logic: You can only update fields with static values, basic math, or field-to-field mapping—complex logic or conditional formulas are not supported natively.
- Lack of Looping or Recursion: Workflows can’t loop through records or trigger themselves repeatedly. This limits use cases like scheduled follow-ups over a period of time.
- Not Ideal for Bulk Data Changes: Workflows are not optimized for mass updates—running on many records at once may slow down performance or hit execution limits.
- User Permissions May Block Actions: Workflow actions may fail if the assigned user doesn’t have permission to perform those actions on the record.
Troubleshooting Tips
The following are the common issues faced while working with workflows:- Workflow Is Not Triggering: Trigger condition (e.g., "On Create" or "On Update") may not be set correctly.
- Check the workflow trigger type and ensure it matches the intended action.
- Also verify that the entry conditions are met when the record is created or updated.
- Workflow Conditions Not Matching: Incorrect field values, wrong operator, or missing data.
- Double-check the entry criteria and ensure that the field values being tested actually exist and are correctly formatted in the record.
- Actions (like email or task creation) Are Not Executed: Required fields may be empty, or the user may not have permission to perform the action.
- Verify all required fields are filled and that the user assigned in the action has the necessary access permissions.
- Also, confirm the action configuration is complete.
- Workflow Emails Not Sending: Missing email address or errors in the email template.
- Make sure the email field in the record is populated.
- Check for placeholder variables in the template that may not have matching field values in the record.