Articles in this section
Google Lead Form Extensions Integration
Introduction
A lead form is a web form that helps capture data about leads (your potential customers). This data can include names, addresses, email IDs, etc.
Google Lead Form Extensions are Google’s forms that capture user data when users search for your products or services on Google.
Customers can fill out these forms on Google Search, YouTube, and other Gmail platforms. Google Lead forms provide a wider customer reach and help collect voluminous data.
Integrating Google Lead Form Extensions with Vtiger CRM
When you integrate Google Lead Form Extensions with Vtiger CRM, you can:
- Send out Google Lead Forms from ads.google.com
- Collect and import lead data into the CRM
This integration helps you generate leads to enhance your businesses by propelling more conversions. Extensive questionnaires in the forms can conveniently help you understand your customers and their product priorities.
|
|
Enabling Duplicate Prevention
When using Google Ads Lead forms, keeping your Leads and Contacts records up-to-date is important.
Enabling the Duplicate Prevention checkbox helps ensure that if a customer or contact with an existing record in your CRM fills out a Google Ads Lead form, the CRM will update their existing record instead of creating a new one. This helps keep your CRM organized and avoids creating duplicate entries.
|
|
Benefits of Google Lead Form Extensions Integration
Google Lead Forms
- Are pre-filled, making it easier for users to collect a wide range of customer details.
- Help users promptly contact new leads as they sign up.
- Are easy to customize to fit a business’s marketing goal as they are based on customer search patterns on Google.
Note:
- Admin users should have a business account with Google Ads - ads.google.com
- The subscribed business account with Google Ads should be an Active one.
Feature Availability
|
|
|
|
| |
|
| ||||
|
|
|
|
|
|
Key Terminology
| Google Ads | Google Ads is a Google product owned by Google providing advertising platforms to businesses to publicize and market their services or products. They place ads in the results of search engines like Google Search, YouTube, Gmail, etc. |
| Contact/Lead Generation | Is the process of identifying potential customers for your business’s products or services by adapting efficient and productive strategies via online or offline resources and eventually converting them to buyers. |
| Google Lead Form Extensions | Google Lead Form Extensions help you immediately capture user information when they search for your company, products, or services on Google. Ads that use this extension allow prospects to enter their contact information directly in the ad’s popup form. |
| Webhook Url | Webhooks are automated messages sent from websites/apps when some activity happens. They have a message or payload and are sent to a unique URL, essentially the website/app's phone number or address. |
| Google Key | These are primarily Security keys that offer two-way Verification to help you keep hackers out of your Google Account and save you from the risk of targeted online attacks. |
In this article, you will learn about:
- Installing the Google Leads extensions
- Google Lead Form Extensions integration with Vtiger CRM
- Retrieving the Webhook URL and Google Key
- Field Mapping to Integrate Google Lead Forms with Vtiger CRM
- Ways of verifying Contacts or Leads added to Vtiger CRM
- Disabling the Google Leads feature
Installing the Google Leads extension
The Google Leads extension is not available by default in the CRM, and you will have to install it from the Extension Store.
Follow these steps to install the Google Leads feature:
- Log into your CRM account.
- Click the Main Menu.
- Click Add-ons on the bottom left corner of the screen.
- Look for the Google Leads extension.
- Click Install.
Once the Google Leads extension is installed, the Google Leads feature will appear under Extensions in Settings.
Integrating Google Lead Form with Vtiger CRM
Let us now learn how to integrate Google Lead Forms with Vtiger CRM.
This process involves the following steps:
- Step 1: Setting up the Google Lead Form
- Step 2: Creating your Lead Form
- Step 3: Retrieving Webhook URL and Google Key
- Step 4: Field Mapping to integrate Google Leads forms and import data to Vtiger CRM
Note: This process requires navigating between two Google Ads - ads.google.com and Vtiger CRM.
Step 1: Setting up the Google Lead Form
Follow the below steps to set up the Google Lead Form Extension in Vtiger CRM:
- Log in to your Google Ads account.
- In the Overview menu on the left, click Ads & extensions.
- Click Extensions.
- Click the + button
- Select Lead form extension.
- Click the checkbox for the Campaigns of your choice.
- Click Done.
The Google Lead Form screen will open, where you can create your Lead Form.
Step 2: Creating your lead form
The Google Lead form contains the following sections:
- The Add Lead form extension section is where you can select the required Campaigns.
- The Create Your Lead form section is the Google Lead Form, whose details you will have to fill in.
- They include the headline, business name, and description details to be entered.
- The Questions section includes the contact information, work information, qualifying questions, and background image details to be chosen.
- The Create form submission message section includes the headline, Description, Call-to-action, and Call-to-action URL.
- The Select a Call to Action for your ad section includes the Call-to-action and Call-to-action details that you have to enter.
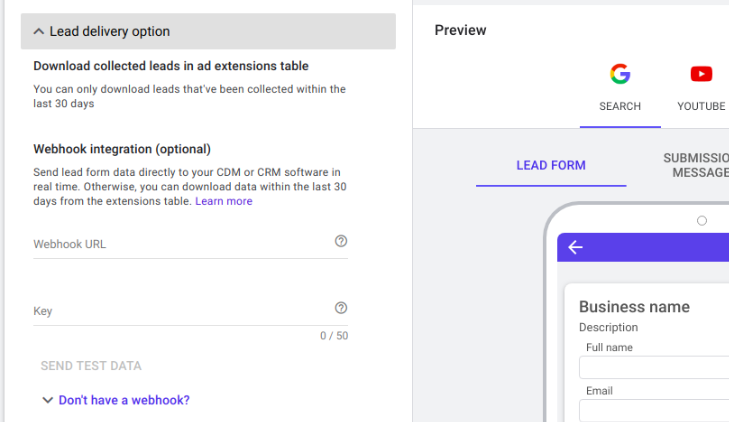
- The Lead delivery options section is the significant section that includes the Webhook URL and Key details to be entered.
- The Lead form type section is to be read and understood.
- Also, a Preview section displays a preview of the Google Lead Form, Submission message, and the AD for Google Search, YouTube, and Gmail platforms.
The details you enter in these sections reflect questions in the Google Lead Forms of the customers.
Create your lead form section
In the Create Your Lead form section, enter the relevant details as shown below.


Step 3: Retrieving the Webhook URL and Key from the Vtiger CRM Google Leads page.

The pivotal and mandatory details of the Create Your Lead form are the Webhook URL and Key. You can retrieve the Webhook URL and Key from the Google Leads page in Vtiger CRM.
This process includes the following steps:
- Step 3a: Retrieve the Webhook URL and Google Key
- Step 3b: Paste the Webhook URL and Google Key
Note: To retrieve them, you must navigate to the Vtiger CRM Google Leads page.
Step 3a: Retrieving the Webhook URL and Google Key
Follow these steps to retrieve the Webhook URL and Google Key:
- Log into your CRM account.
- Click the User Menu on the top right corner of the screen.
- Click Settings.
- Look for Extensions.
- Click Google Leads. The Google Leads page opens.

- Click +Add Record. The Google Leads page opens.

- Enter or select the following information:
- Name: Add a suitable name.
- Select module for mapping: Select the Contacts or Lead module.
- Click Save & Proceed. The system displays the Google Leads screen.
- Note: In Vtiger CRM, the Google Leads feature is mapped only to the Contacts and Leads module

- Copy the Webhook URL and Google Key using the copy icon beside them.
- After you copy the Webhook URL and Google Key are copied, the system displays a success message notification for each of them.
- Once you copy the key, go back to Google Ads - ads.google.com for the next step.
Step 3b: Pasting the Webhook URL and Google Key in the Create Lead Form page
- Paste the Webhook URL in the Webhook URL section and the Google Key in the Key section of the Create Lead Form page
- Once you enter the Webhook URL and Key, the SEND TEST DATA option is enabled.
- Click SEND TEST DATA. The system displays a Test Data Sent success message.
- Click Save.
Step 4: Field Mapping to integrate Google Leads forms and import data to Vtiger CRM
Note: To integrate Google Lead Forms successfully with Vtiger CRM, you must map Google Label and Google Columns to the respective CRM fields.
To map fields, you must return to the Vtiger CRM Google Leads Page, where you retrieved the webhook URL and Google Key.
Follow the steps below steps to map fields and complete the Google Leads Form Extensions Integration:

- Click Load Google form fields from TEST DATA to display a pop-up window with the field mapping data.

- Look for the required Google Label and Google Column.
- In the CRM Field, select a suitable field from the dropdown.
- Click Save. The system displays a success message if the mapping is successful.
- Click Save. The system opens the Google Leads log screen.

- Click the icon beside Actions to display the fields that have been mapped.

- The screen above displays the details of the mapped fields.
- Click X to close the pop-up window. You will go back to the previous screen.

- Hovering the mouse to the right of the icon gives you the Edit and Delete options, which will help you make changes or delete the fields that have been mapped as shown above.
- Clicking the View Sync Log button displays the sync log with record-sync details.

- Clicking on the number of records created will show the records created successfully in Vtiger.

- Clicking on the Record Name will take you to the customer's contact or lead record in the Contacts or Leads module, where you can retrieve the details of the particular contact or lead.

The above is one way of verifying whether a new record was created. Other ways are mentioned below.
Verifying if Contacts or Leads were successfully added to Vtiger CRM via Google Lead Forms

- From the Contacts or Leads List View
- Type Google Leads in the Search > Source field to display contacts or leads created by Google Lead Forms.

- From the Summary View of a Contact or Lead record
- Go to the Summary View of a contact or lead record of a customer.
- Click the Details tab to see the Source field as Google Leads.
Disabling the Google Leads Feature
Admin users can disable the Google Leads feature by disabling the Google Leads extension.
Follow these steps to disable the Google Leads feature:
- Log in to your CRM account.
- Click the User Menu on the top right corner of the screen.
- Click Settings.
- Look for Module Management.
- Click Modules.
- Uncheck the Google Leads extension.