Articles in this section
Instamojo Integration with Vtiger CRM
Introduction
Instamojo is a fintech company that serves as a payment gateway. It allows you to accept online payments through various methods, including credit or debit cards, net banking, UPI (Unified Payments Interface), and digital wallets.
Instamojo allows you to generate payment links, making it easy to share them through various channels, such as emails, social media, and messaging, so customers can make payments.
Vtiger supports integration with the Instamojo payment gateway.
With this integration, you can:
- Receive Payments: You have the Send Link option in the Payments module. When you click on a record, the Summary View of that record opens. A list of available payment gateways will appear from which you can select the gateway and send the link.
- Send Payments: You have the Pay Now option in the Payments module. When you click on a record, the Summary View of that record opens. A list of available payment gateways will appear from which you can select the gateway and add your credit or debit card details to make the payment.
What is required for the Integration?
- An active Instamojo account.
- Payments module in the CRM.
How does the integration work?
You must install the Payments module to configure and use Instamojo as a payment gateway. You must obtain a Client ID and Client Secret from the Instamojo platform. You must then paste it into the Vtiger Payments Settings page.
Note: The Instamojo Gateway supports payments for only INR currencies.
Feature Availability
|
|
|
|
| |
|
| ||||
|
|
|
|
|
|
Benefits of Instamojo Integration with Vtiger CRM
The following are the benefits of Instamojo integration with Vtiger CRM:
- Seamless Transactions: The integration allows for a smooth and integrated payment process within the CRM platform. It enables you to accept payments through Instamojo without switching between different systems.
- Automatic Record Keeping: The integration automatically records Payments and transactions made through Instamojo. It links them to customer profiles within Vtiger CRM, providing a consolidated view of customer interactions.
- Automated Follow-ups: The integration allows automated follow-ups or notifications based on payment activities. It helps sales and support teams stay informed and engaged with customers.
- Secure Transactions: The integration maintains secure payment processing, ensuring that financial transactions are secured.
In this article, you will learn about,
- Installing the Payments module
- Configuring Instamojo
- Creating Payment record
- Tracking Payments
Installing Payments
To use the Instamojo payment gateway, you must install the Payments module from the Extension Store.
Note: The Payments module is available by default.
Follow these steps to install the module:
- Log in to the CRM.
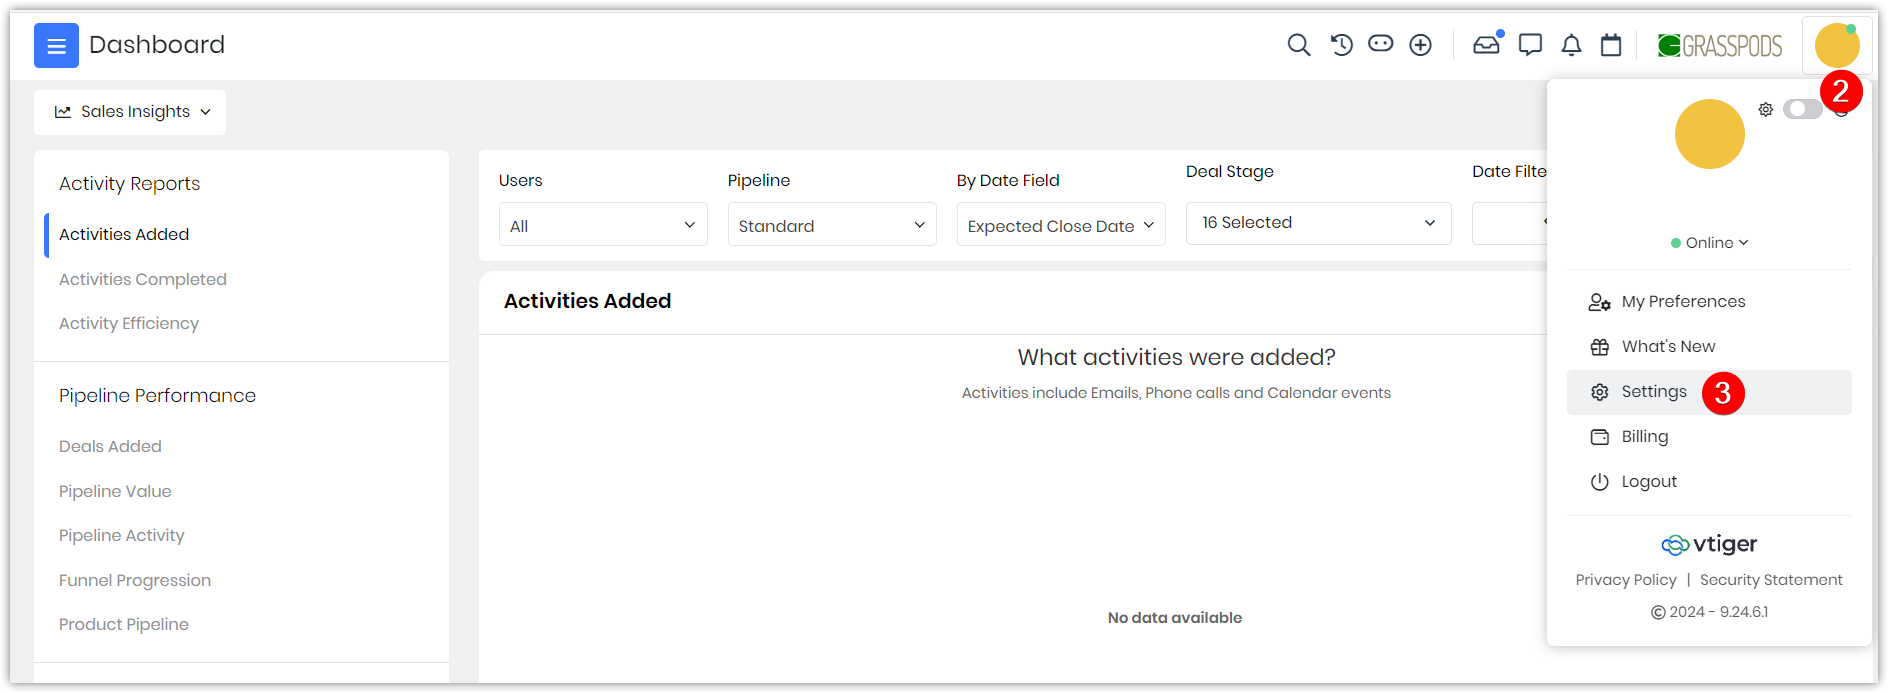
- Click the User profile on the right-hand top corner of the screen.
- Select Settings.
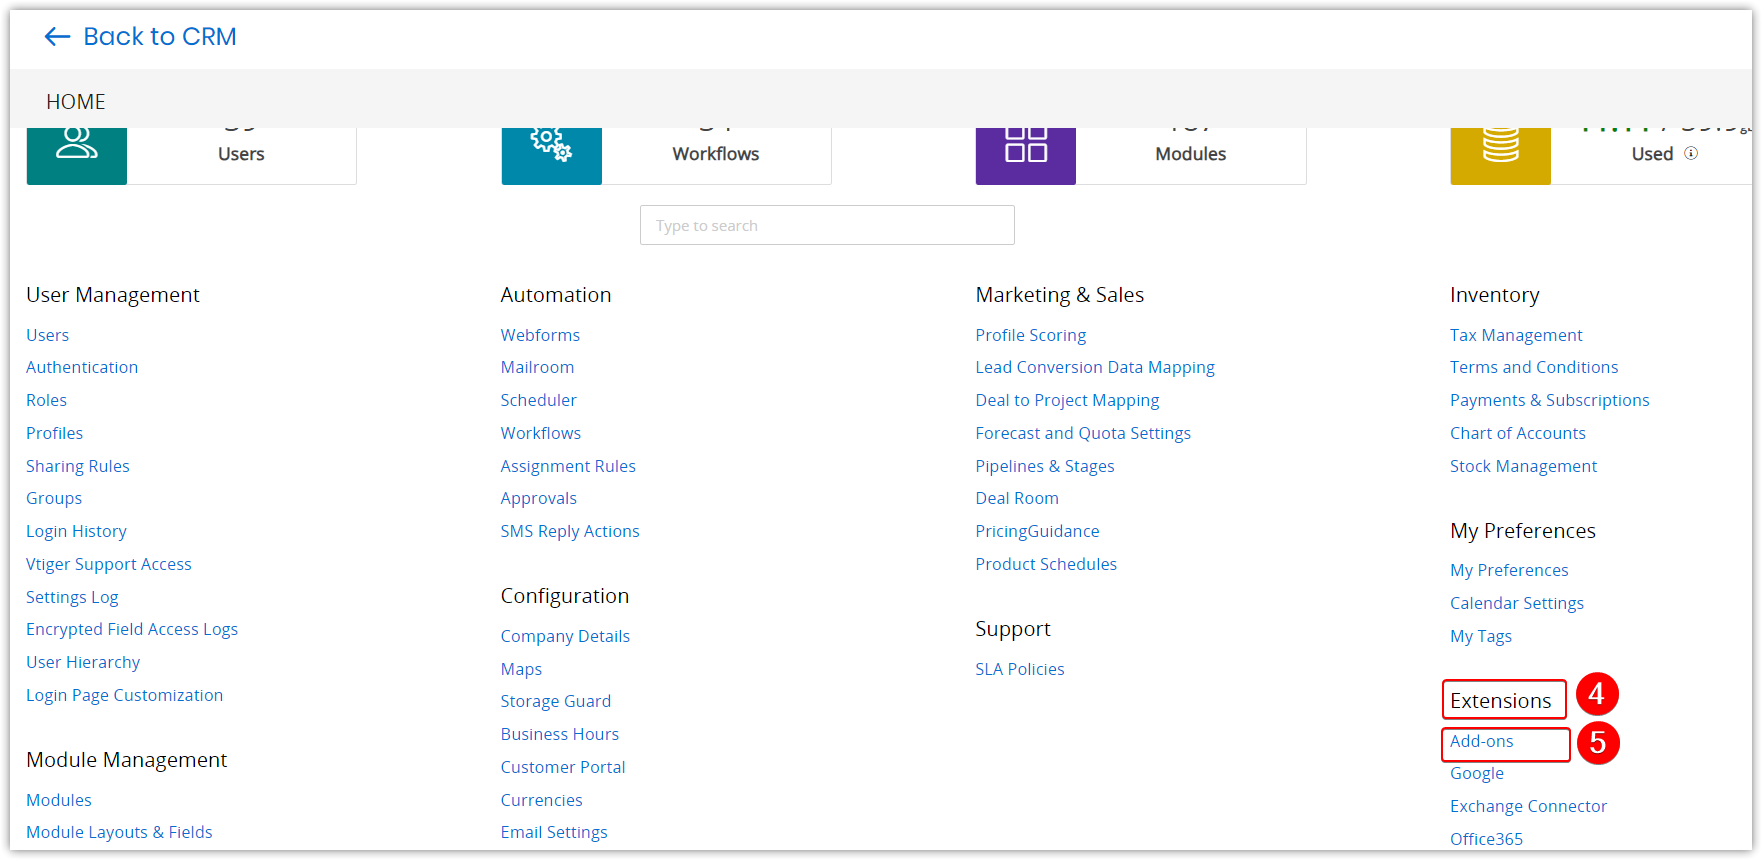
- Go to Extensions.
- Click Add-ons.
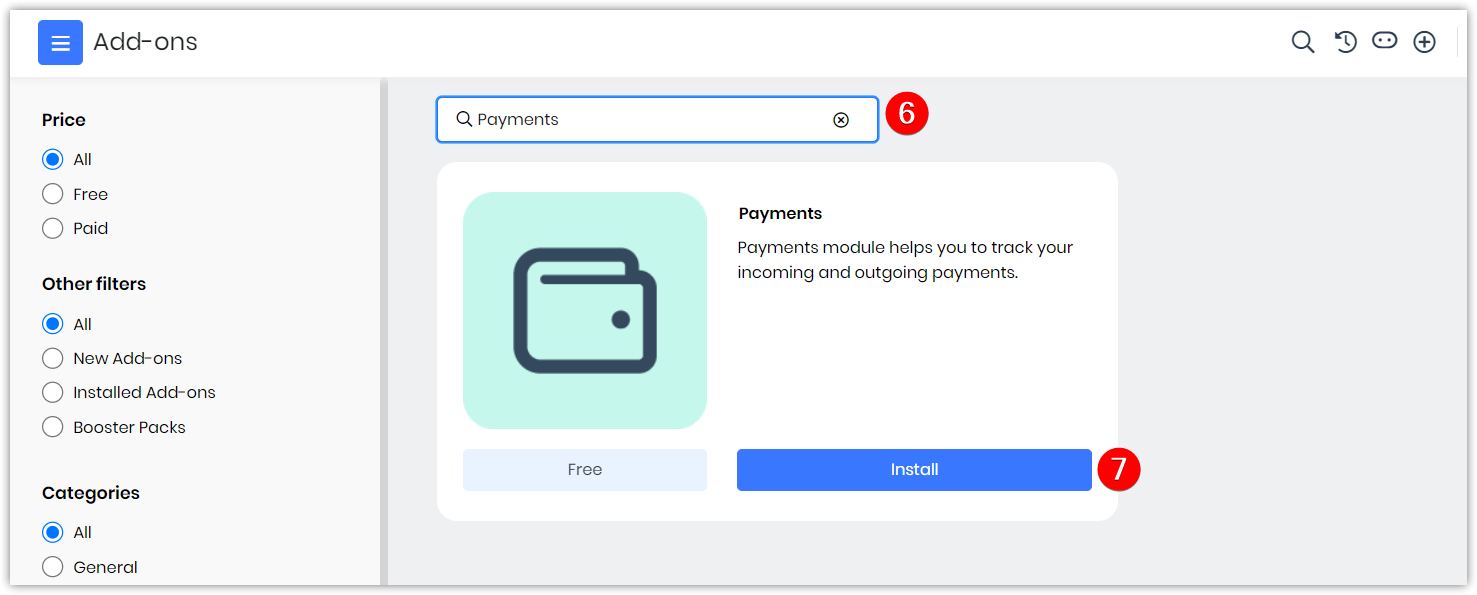
- Locate Payments.
- Click Install. Are you sure you want to install this Add-on? message window appears.
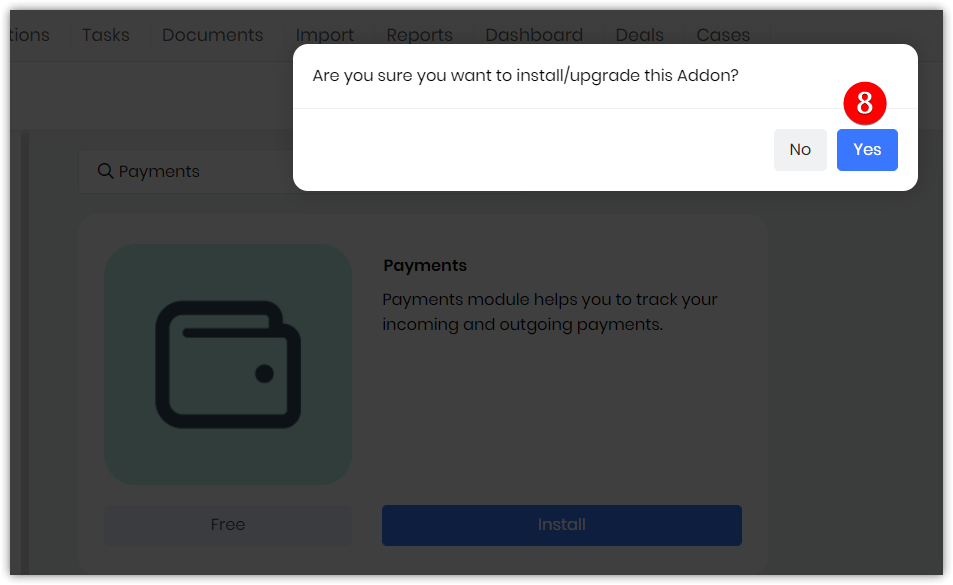
- Click Yes.
A success message is displayed once it is installed.
The Payments module will be available under Main Menu > Inventory > Order Fulfillment > Payments.
Configuring Instamojo with Vtiger CRM
Integrating Instamojo with Vtiger CRM requires the following
Step 1: Retrieving the Client ID and Client Secret from the Instamojo platform
Step 2: Configuring the Client ID and Client Secret with Vtiger CRM
Note: You must move back and forth between Instamojo and Vtiger screens
Step 1: Retrieving the Client ID and Client Secret from the Instamojo platform
You must log in to the Instamojo platform to retrieve the Client ID and Client Secret.
- Log in to Instamojo. You will land on the Instamojo Dashboard.
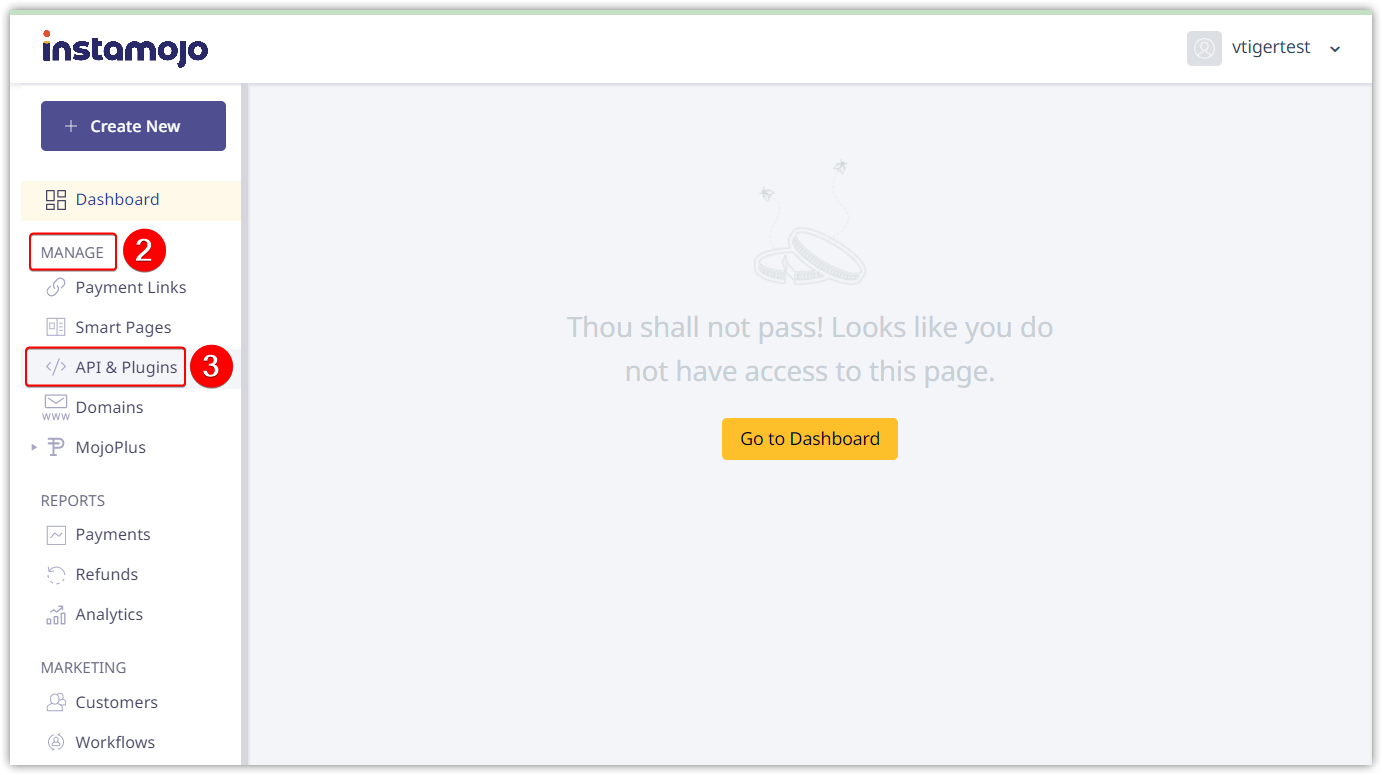
- Click Manage.
- Select API and Plugins.
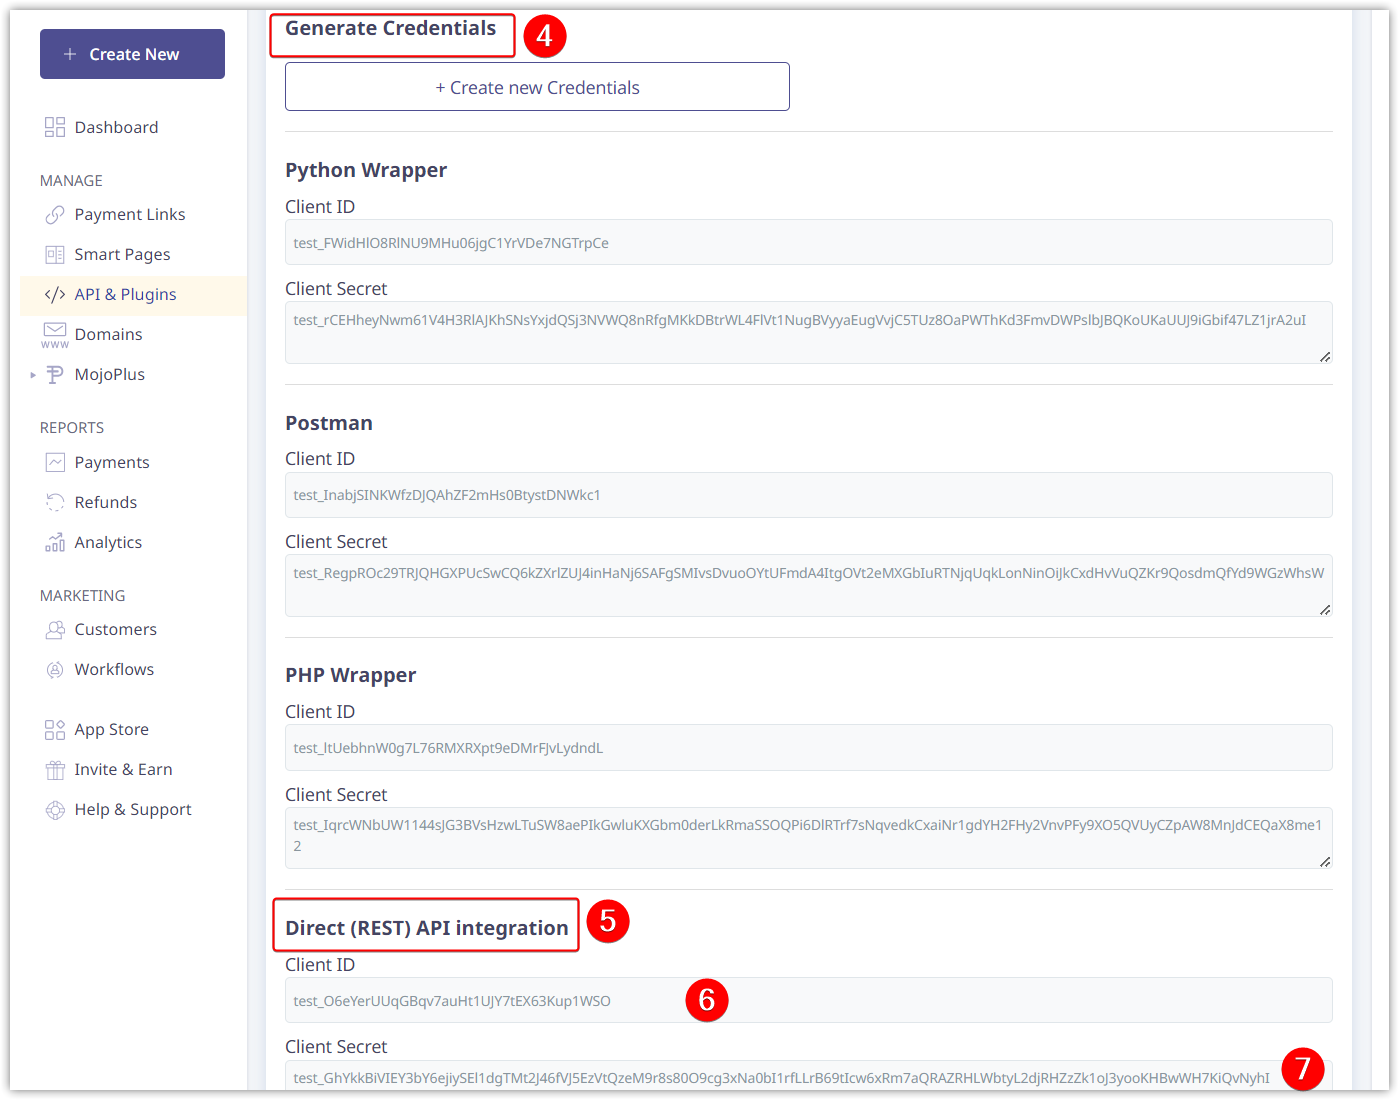
- Click Generate Credentials.
- Go to Direct (REST) API Integration.
- Copy the Client ID and paste it to the Notepad.
- Copy the Client Secret and paste it to the Notepad.
Note: This can be done by admins only.
Step 2: Configuring the Client ID and Client Secret in Vtiger CRM
Follow these steps to configure Client ID and Client Secret:
- Log in to the CRM.
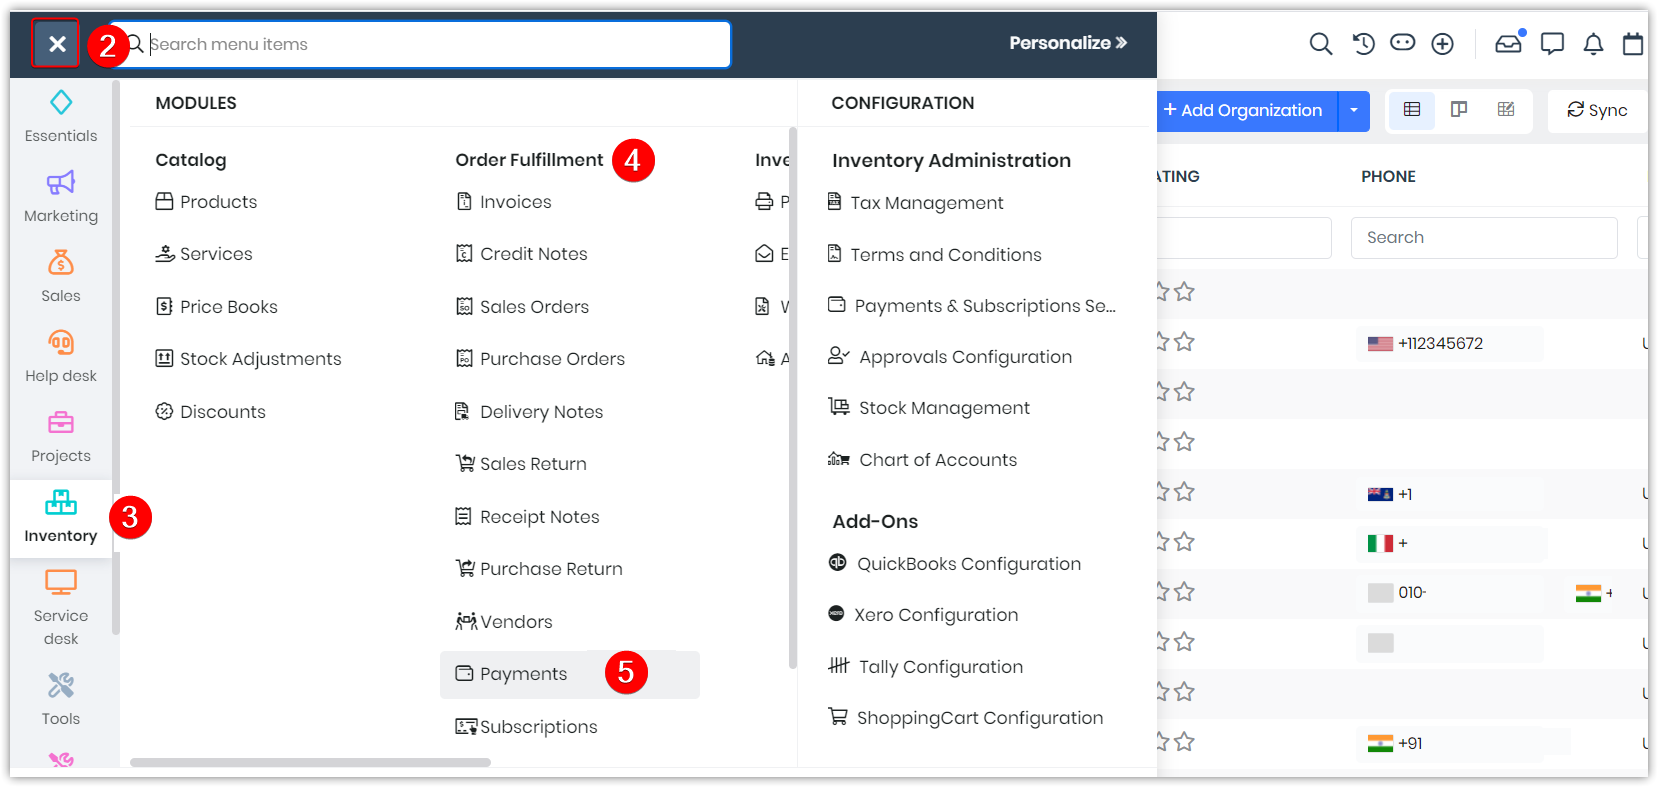
- Click the Main Menu.
- Go to Inventory.
- Go to Order Fulfillment.
- Select Payments. The Payment module opens.
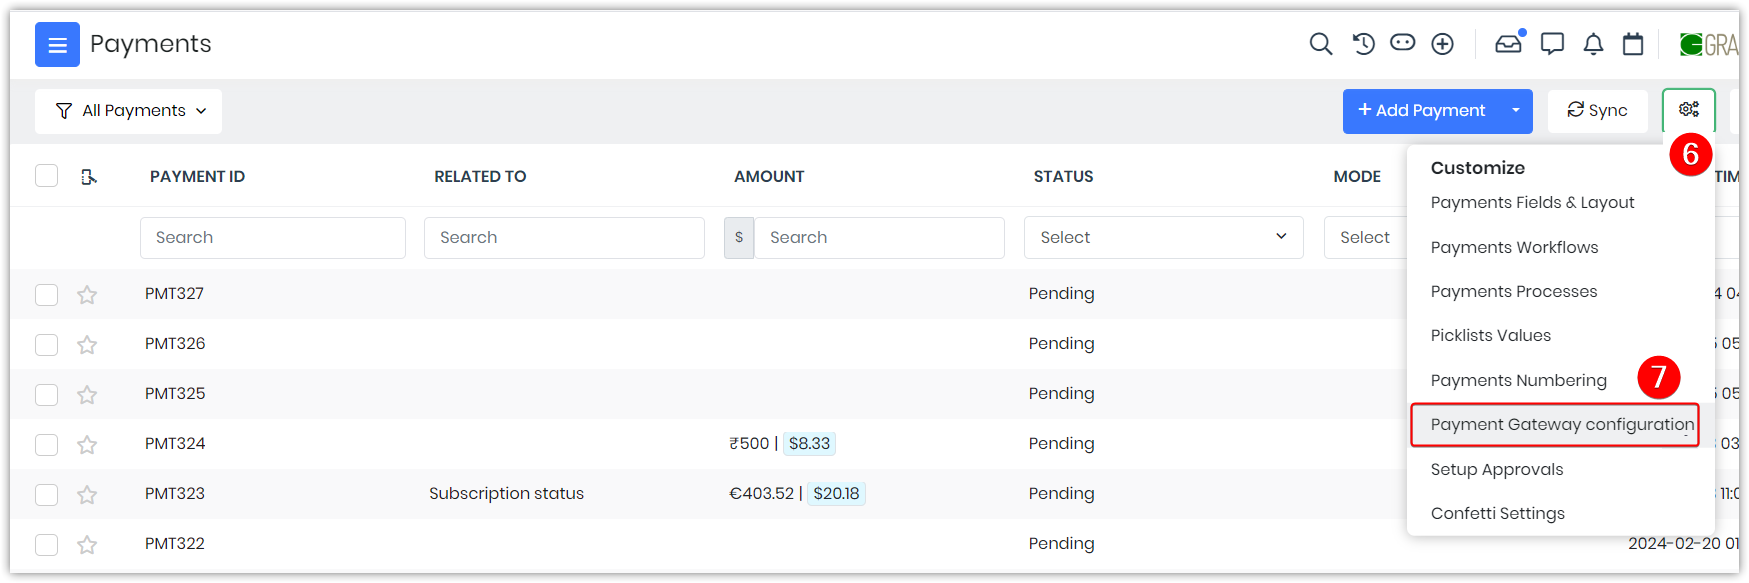
- Click Settings.
- Click Payment Gateway Configuration. The Payment Gateway Settings page opens.
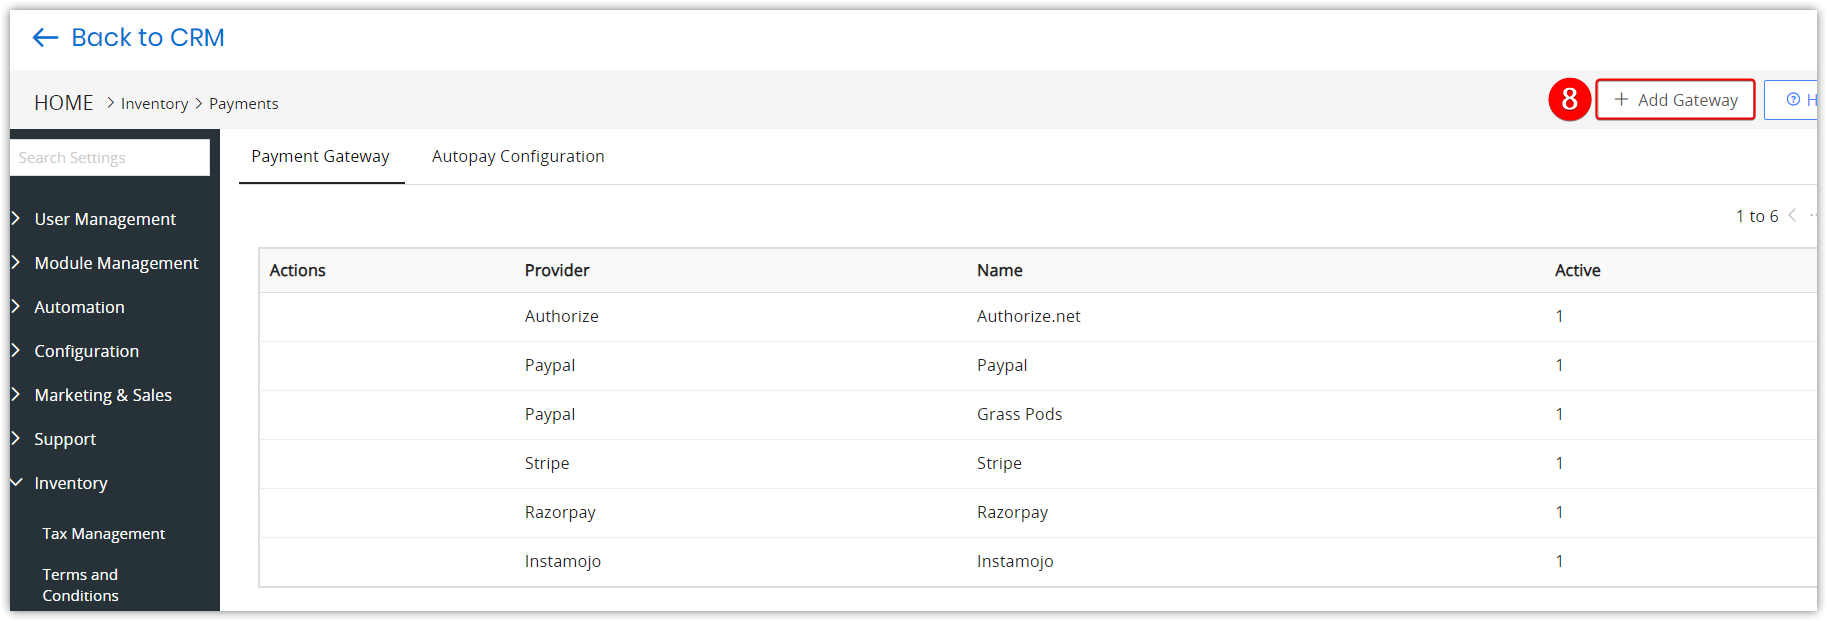
- Click +Add Gateway. The Add Configuration window opens.
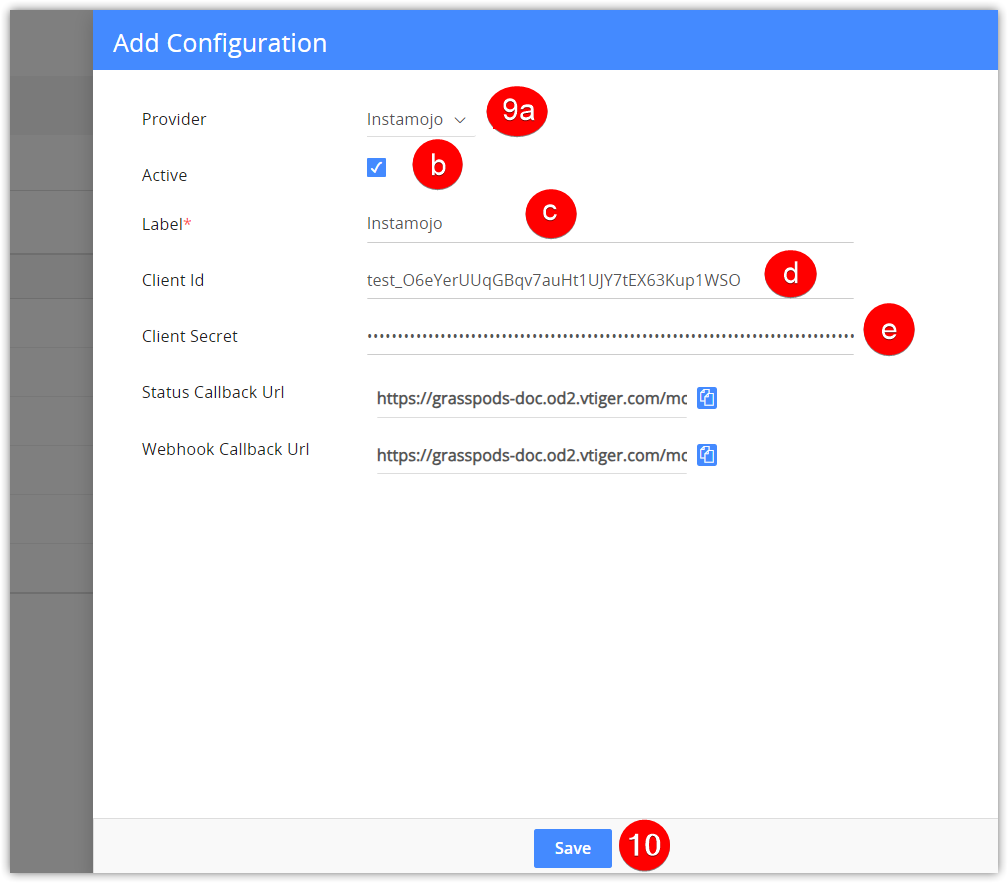
- Enter or select the following information:
- Provider: Select Instamojo.
- Active: To enable or disable your merchant account.
- Label: Enter the desired label for the gateway.
- Client ID: Paste the copied Client ID from the Instamojo platform.
- Client Secret: Paste the copied Client Secret from the Instamojo platform.
- Click Save.
Creating a Payment Record
Listed below are how you can create a payment.
From Payment's List View
To create a new payment, use the +Add Payment button, which is located at the top right corner of the Payments’ List View.
Follow the steps below to create a payment:
- Log in to the CRM.
- Click the Main Menu.
- Go to the Inventory tab.
- Select the Payments module.
- Click +Add Payment. By default, all payment records are related to Invoices. To change the module, click the arrow next to Invoices to select from the drop-down.
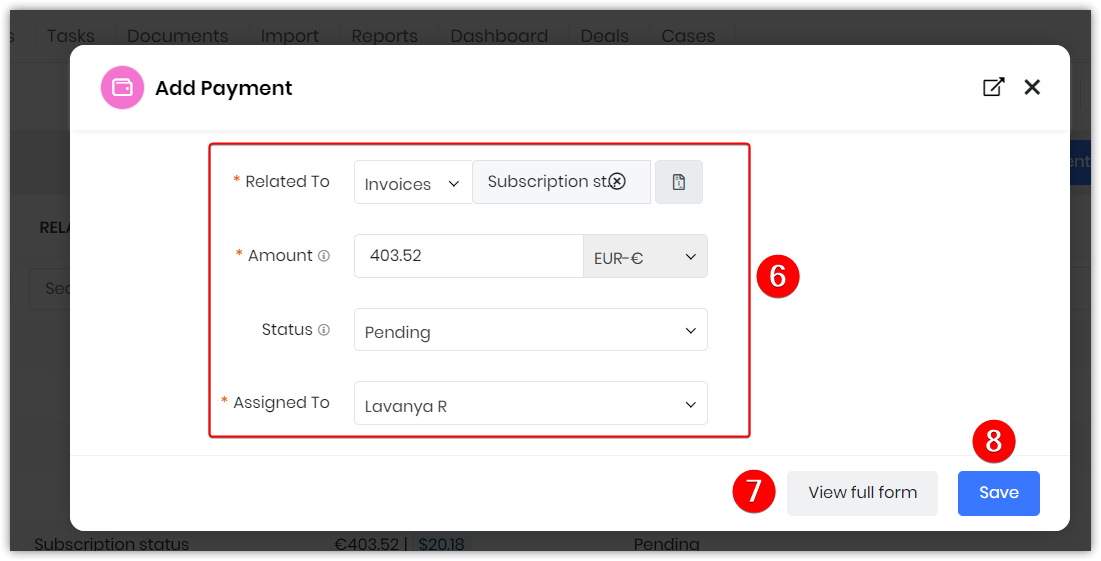
- Fill in all the necessary details.
- Click View full form to add more details.
- Click Save.
From Invoices
You can create a payment through an invoice with the More icon.
Follow these steps to add a payment from the More icon in Invoices
- Click the Main Menu.
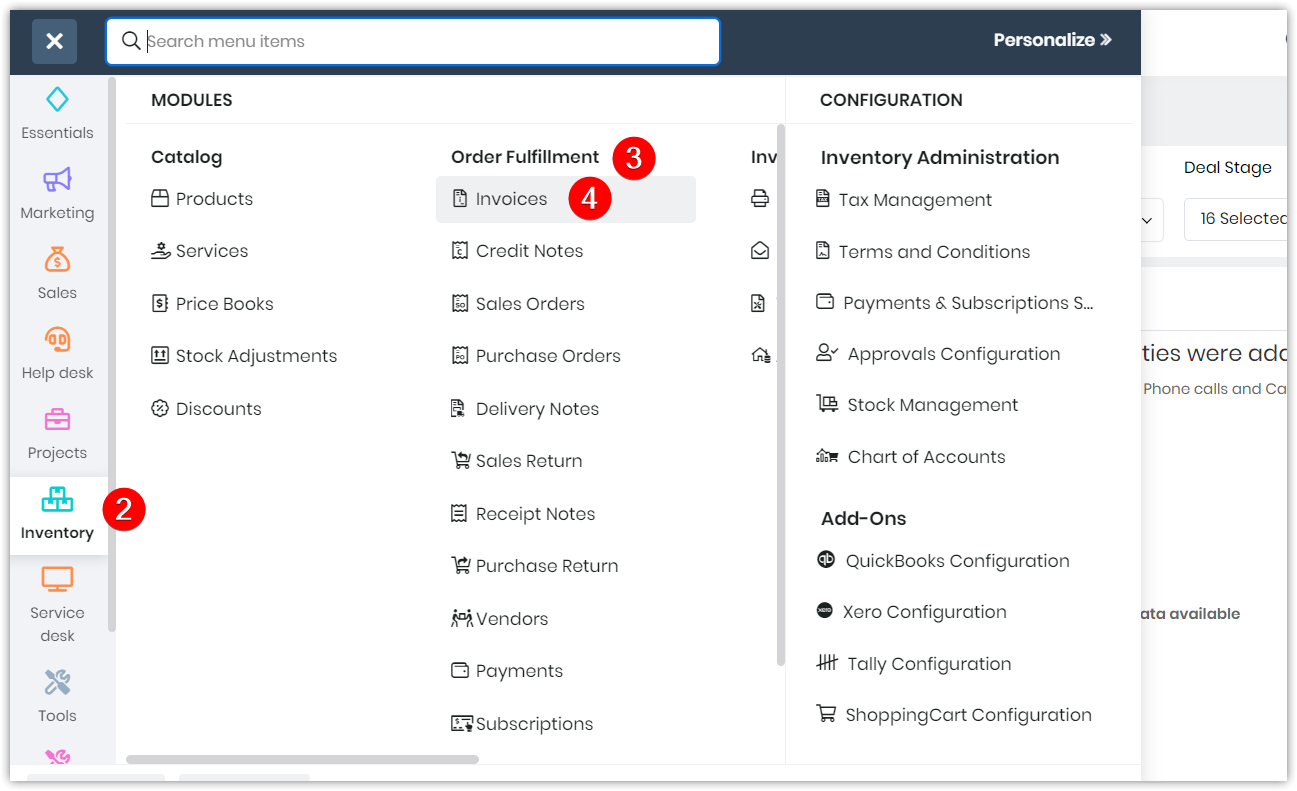
- Go to the Inventory tab.
- Go to Order Fulfillment.
- Select Invoices. The Invoices module opens.
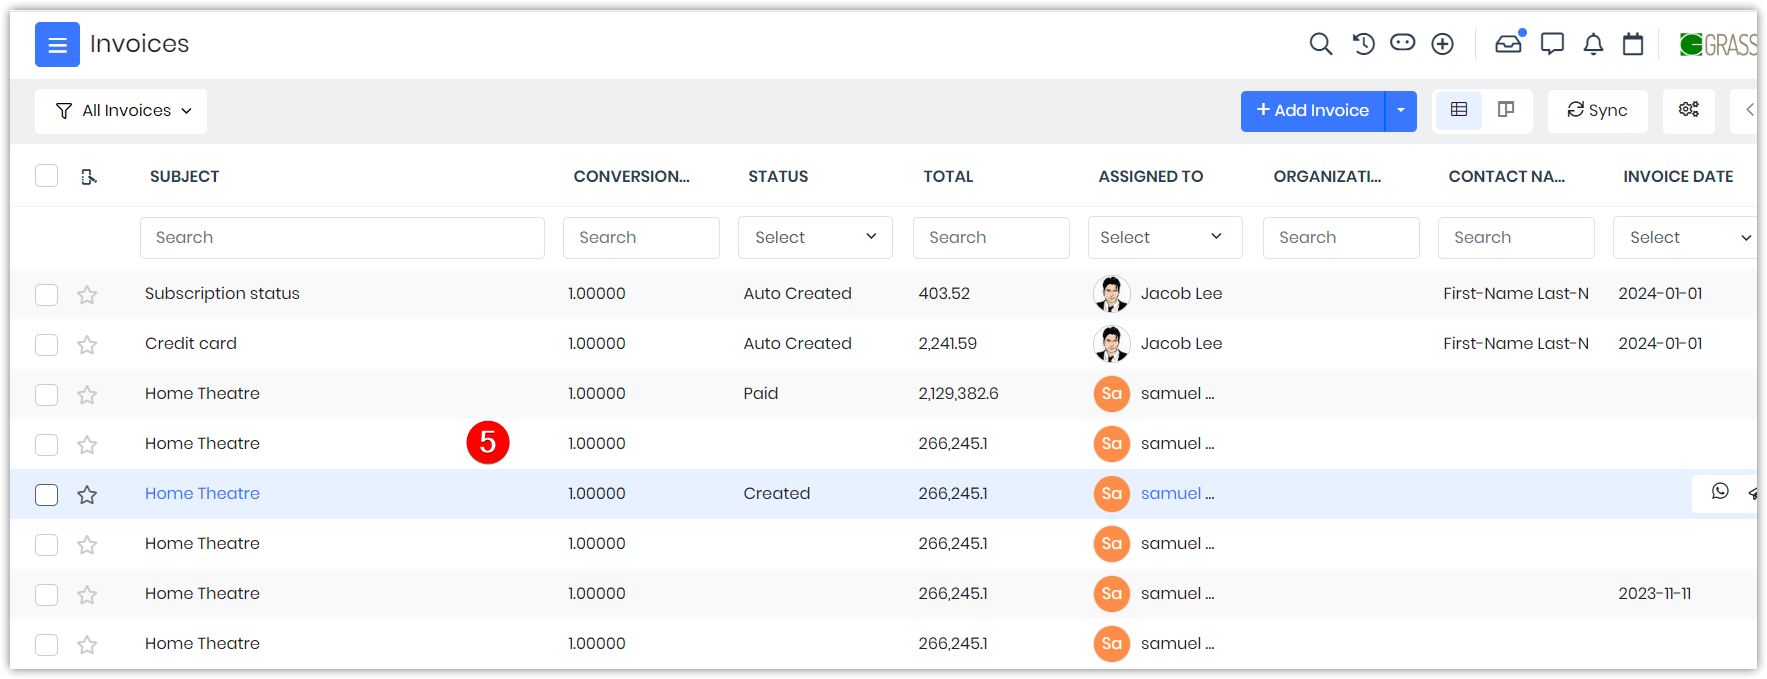
- Click an Invoice from the List View. The Summary View of the invoice record opens.
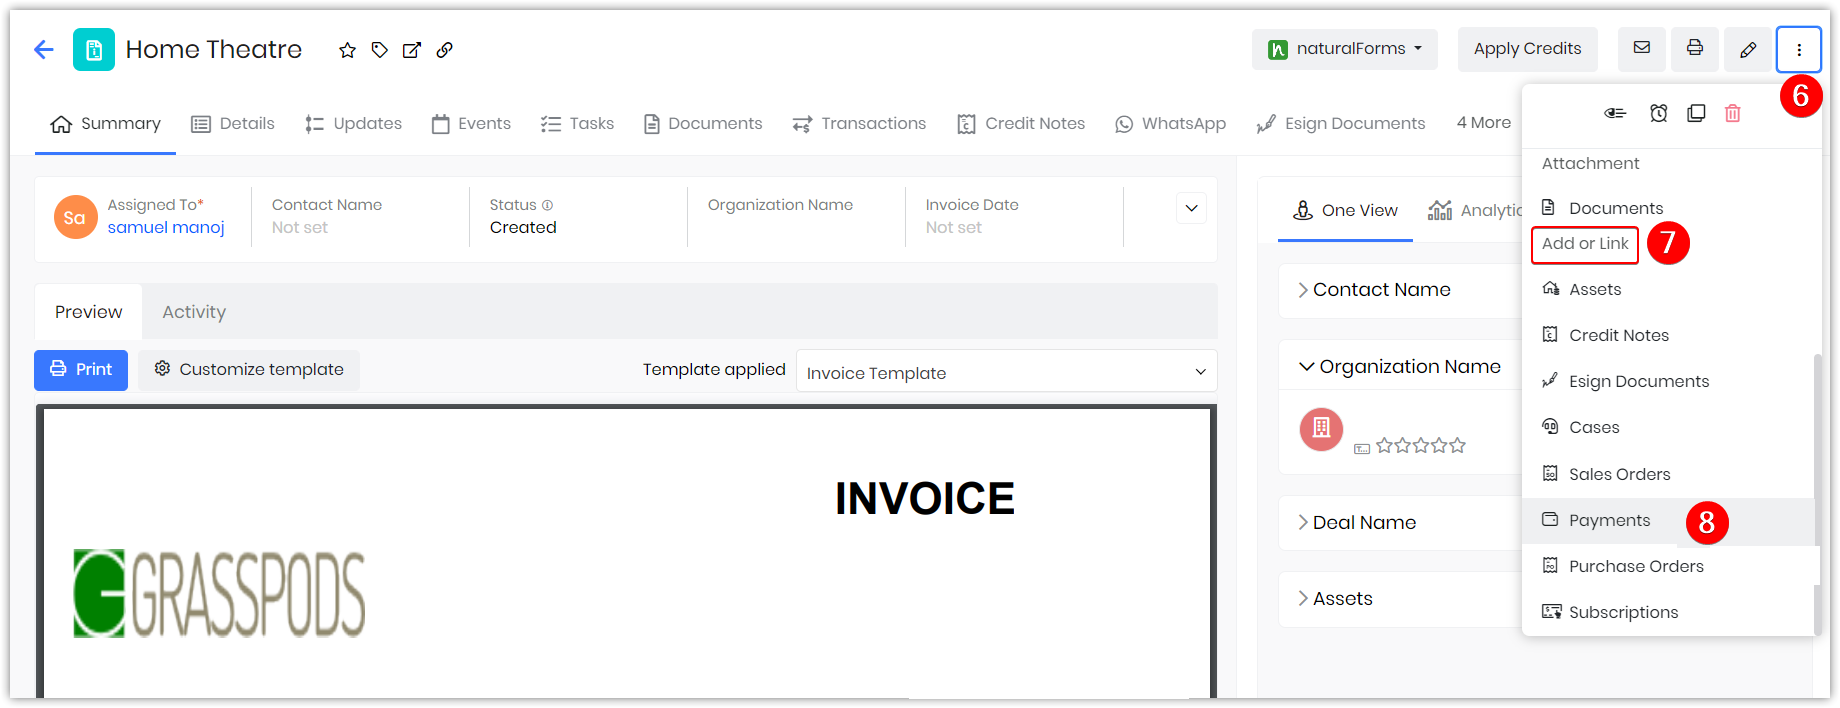
- Click the More icon on the top right corner of the screen.
- Go to the Add or Link section.
- Click Payments.
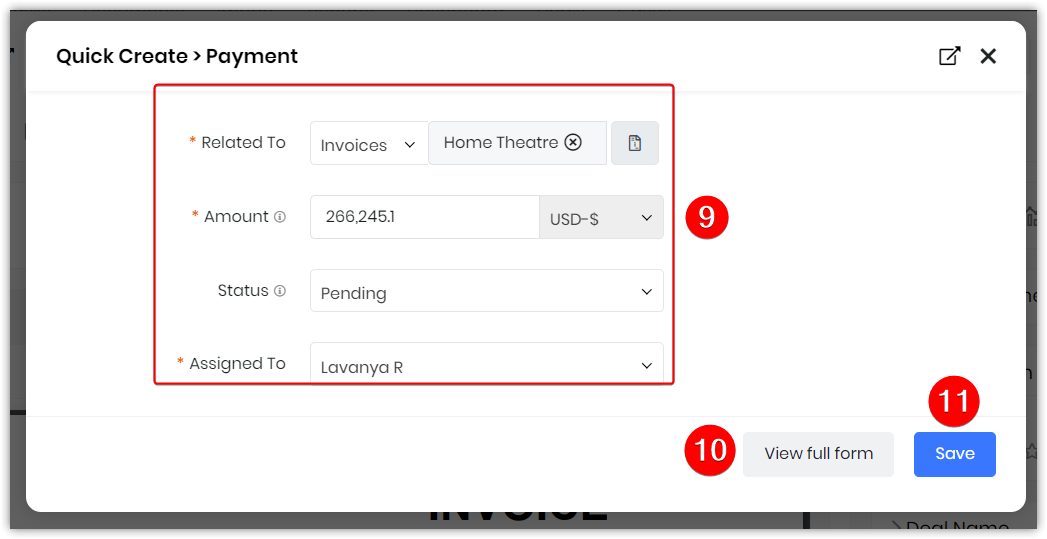
- Enter all the details.
- Click View full form to add more details.
- Click Save.
This newly created payment will now be linked to the invoice.
Click here to learn more about Payments
References
Managing Payments
Managing your Vtiger Subscriptions and Billing
Configure Authorize.Net to Process Payments
Configure Paypal to process your payments
Razorpay Integration
Stripe Integration in Vtiger