Articles in this section
WhatsApp Integration with WATI
Feature Availability
Vtiger Editions: One Professional | One Enterprise | One AI
Introduction
WATI is a customer engagement platform that enables businesses to communicate with customers via WhatsApp through a centralized interface.
Using WATI APIs and integrations, businesses can automate messaging workflows, trigger event-based notifications, and streamline communication processes.
It supports customer support, marketing, and sales use cases by enabling timely and scalable interactions.
WATI Integration with Vtiger CRM
To Integrate WATI with Vtiger CRM, you must have an active WhatsApp account with a Facebook Business page.
WhatsApp Integration with WATI for Vtiger CRM helps you send and receive WhatsApp messages directly from the CRM screens. Once WATI is integrated with the Vtiger WhatsApp module, you can carry out WhatsApp conversations via Vtiger CRM or mobile phone.
To learn more about the WhatsApp feature in Vtiger CRM, click here.
To integrate WATI and use it with Vtiger CRM WhatsApp, you must:
- Have an active Facebook business page with WATI.
- Install the WATI Add-on in Vtiger CRM.
Benefits of WATI Integration with Vtiger CRM
The following are the benefits of integrating your WATI account with Vtiger and WhatsApp:
- Enhanced Communication: You can directly integrate WATI, which offers various channels like WhatsApp and SMS, into Vtiger CRM for your communication.
- Centralized Data: You can integrate a seamless data flow between WATI and Vtiger, ensuring communication history, customer interactions, and messages are stored within the CRM platform.
- Easy Communication: You can easily access communication logs and customer interactions through Vtiger's integration.
- Time-saving: You can save time by eliminating the need to switch between different applications for communication and CRM purposes.
In this article, you will learn about:
- Installing the WATI Add-on
- Integrating WhatsApp with WATI
- Adding Webhooks
- Using WATI to send WhatsApp messages
Key Terminology
|
|
|
|
|
|
|
|
|
|
|
|
|
|
|
|
|
|
|
|
|
Integrating WhatsApp and WATI with Vtiger CRM
You must have a WATI as well as a WhatsApp business account to integrate WATI and WhatsApp with Vtiger CRM.
You must first install the WATI Add-on in Vtiger CRM to begin the integration process. You will be moving back and forth between WATI, WhatsApp, and Vtiger.
To integrate and use WhatsApp and WATI with Vtiger CRM, you must follow the below steps:
- Step 1: Installing the WATI Add-on in Vtiger CRM
- Step 2: Configuring WATI on WhatsApp
- Step 3: Adding Webhooks in the WATI platform
Step 1: Installing the WATI Add-on in Vtiger CRM
Follow these steps to install the WATI Add-on:
- Log in to the CRM.

- Click User Profile on the top right corner of the screen.
- Click Settings.
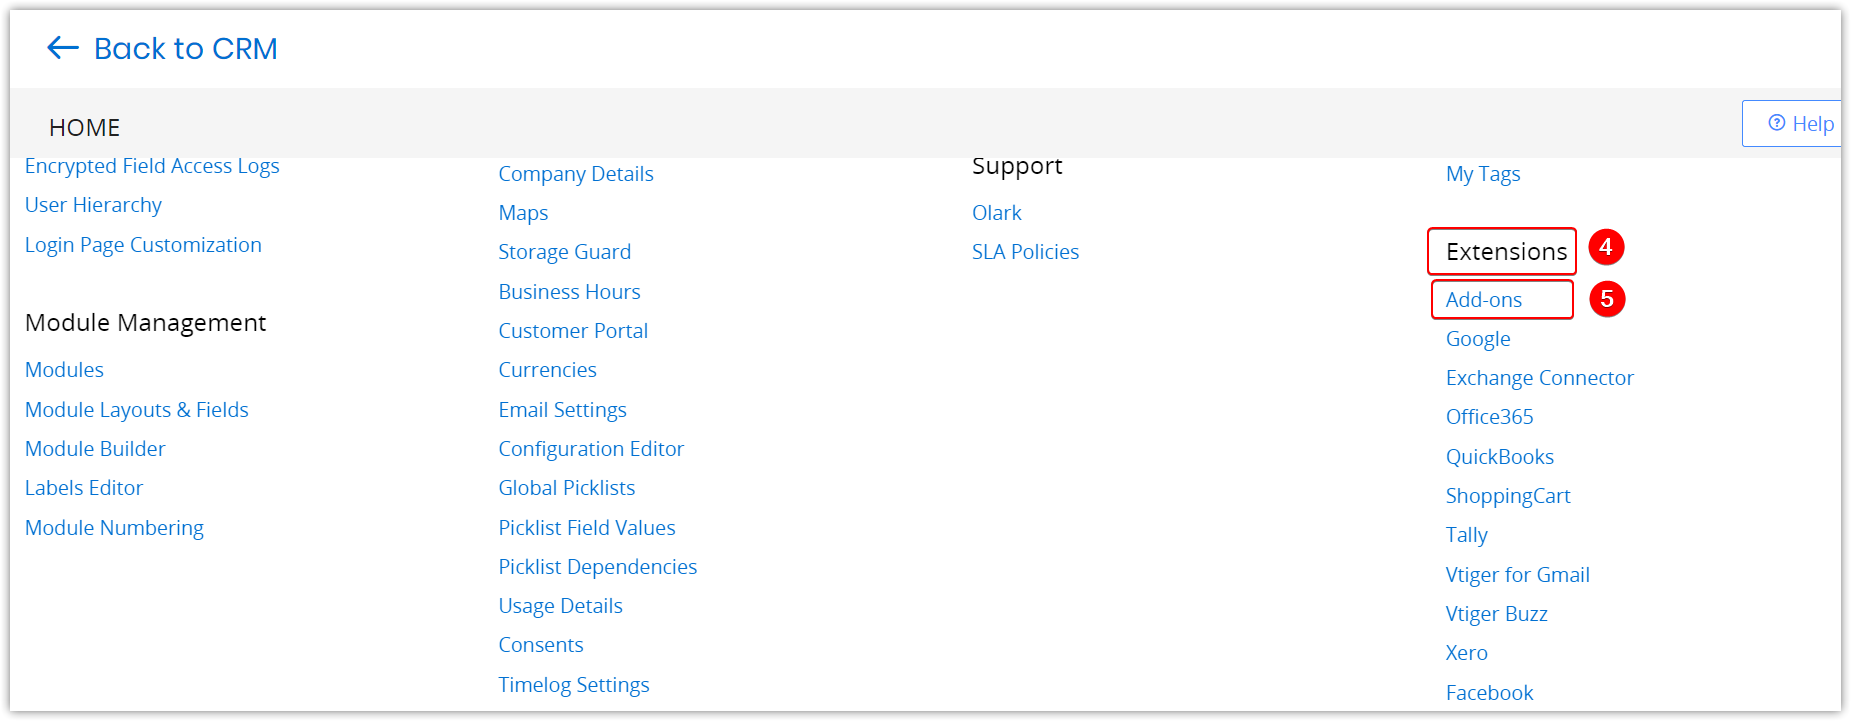
- Go to Extensions.
- Click Add-ons. The Add-on page opens.
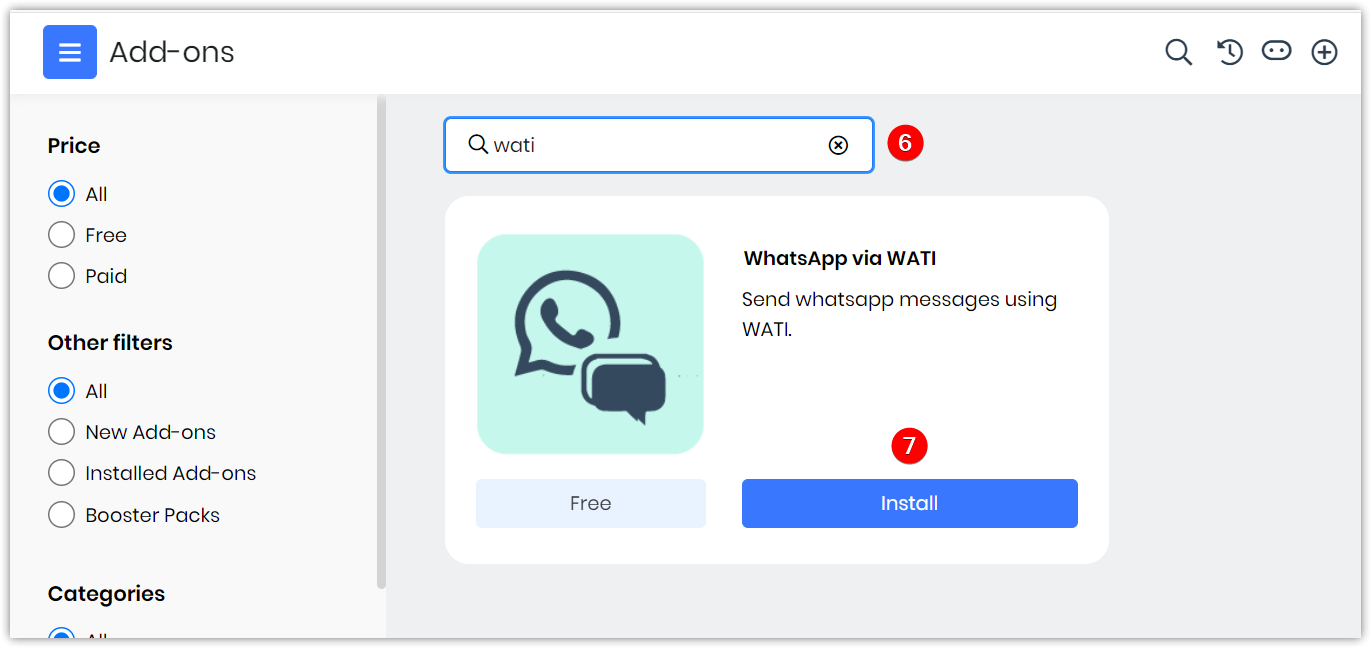
- Type WATI in the search bar. The Whatsapp via WATI add-on appears.
- Click Install. Are you sure you want to install/upgrade this add-on? a message pops up.
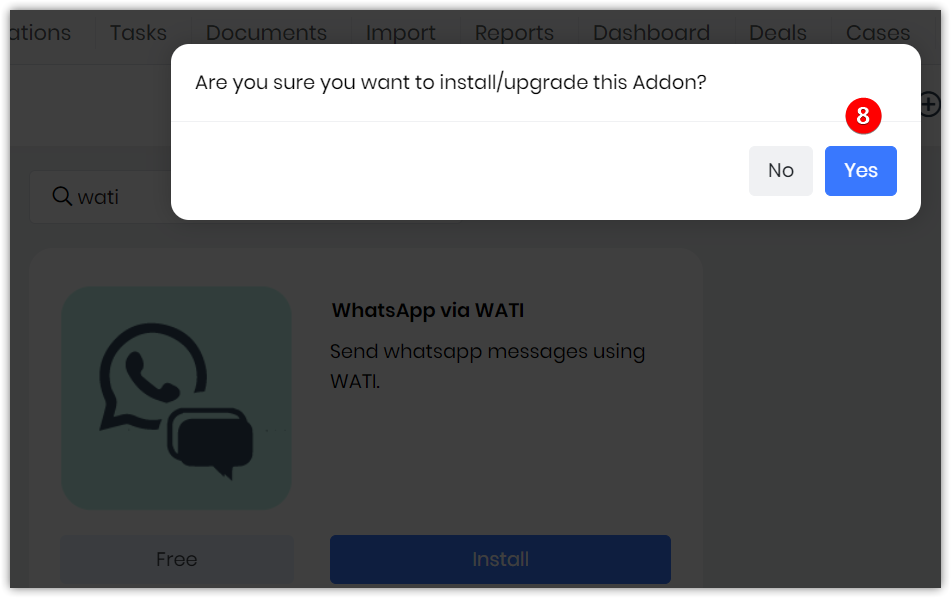
- Click Yes to confirm the installation.
A success message is displayed once it is installed. Once installed, you can find WATI under the Provider configuration in the WhatsApp module. You can then configure it in the WhatsApp module.
Step 2: Configuring WATI in the WhatsApp module
Let us see how to configure WATI in Vtiger CRM.
Note: These steps require you to navigate back and forth between the Vtiger CRM screen and the WATI platform.
Follow these steps to configure WATI in Vtiger’s WhatsApp module:
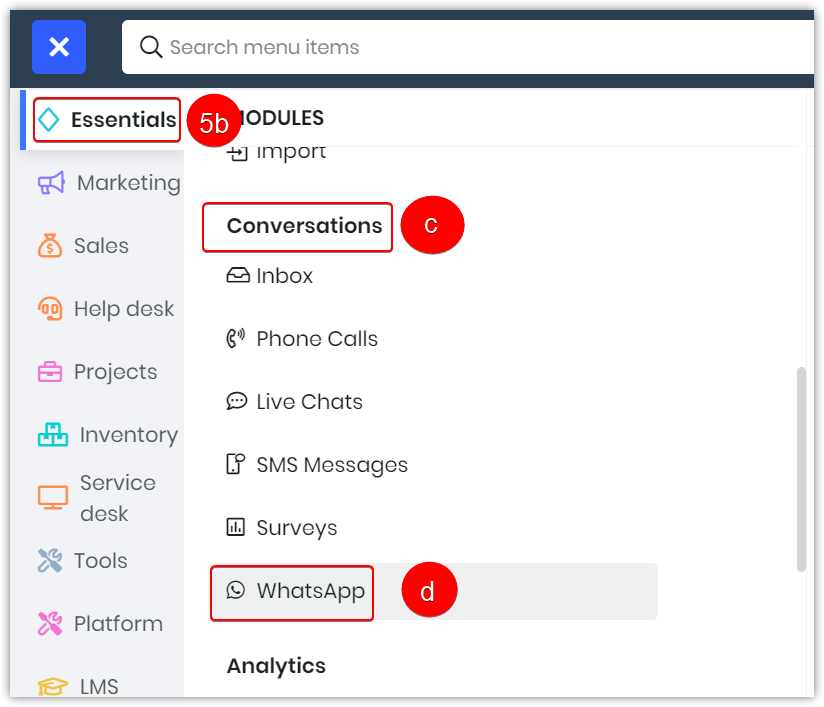
- Log in to the CRM.
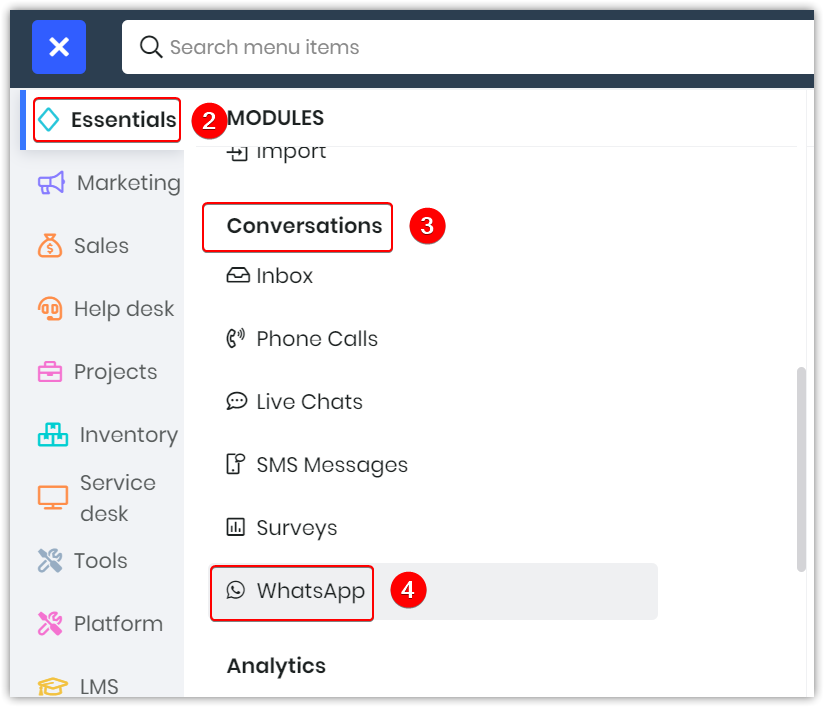
- Go to Essentials.
- Go to Conversations.
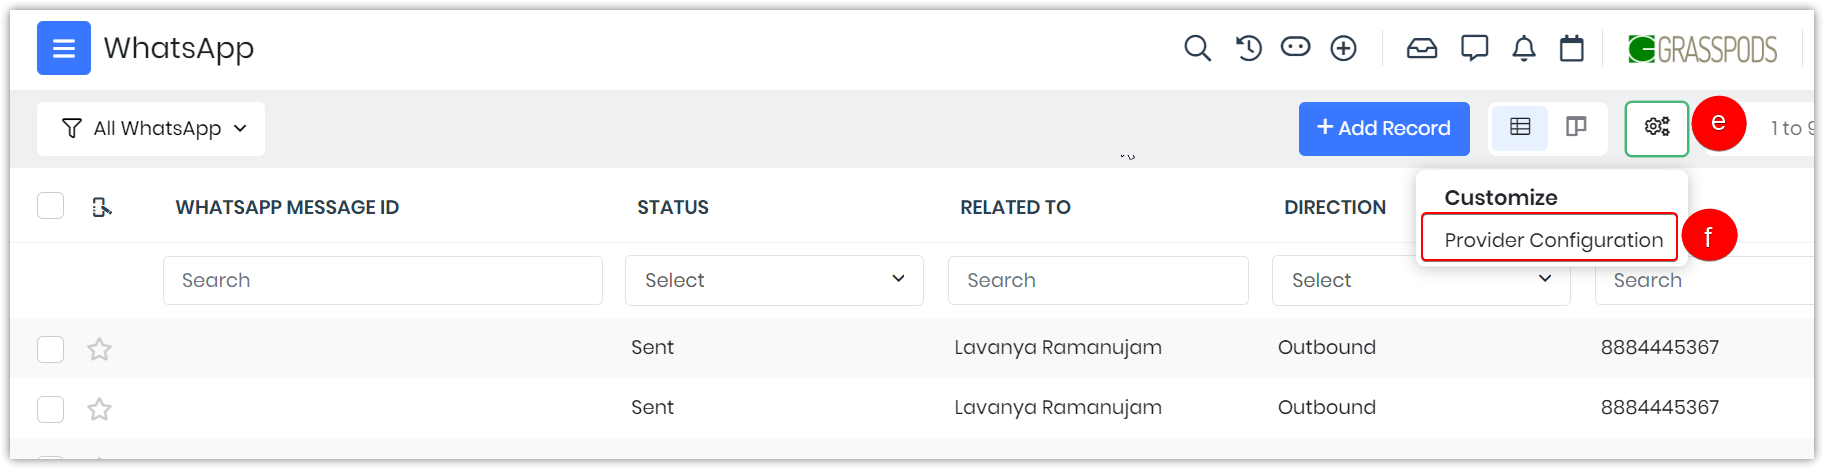
- Select WhatsApp. The WhatsApp module opens.
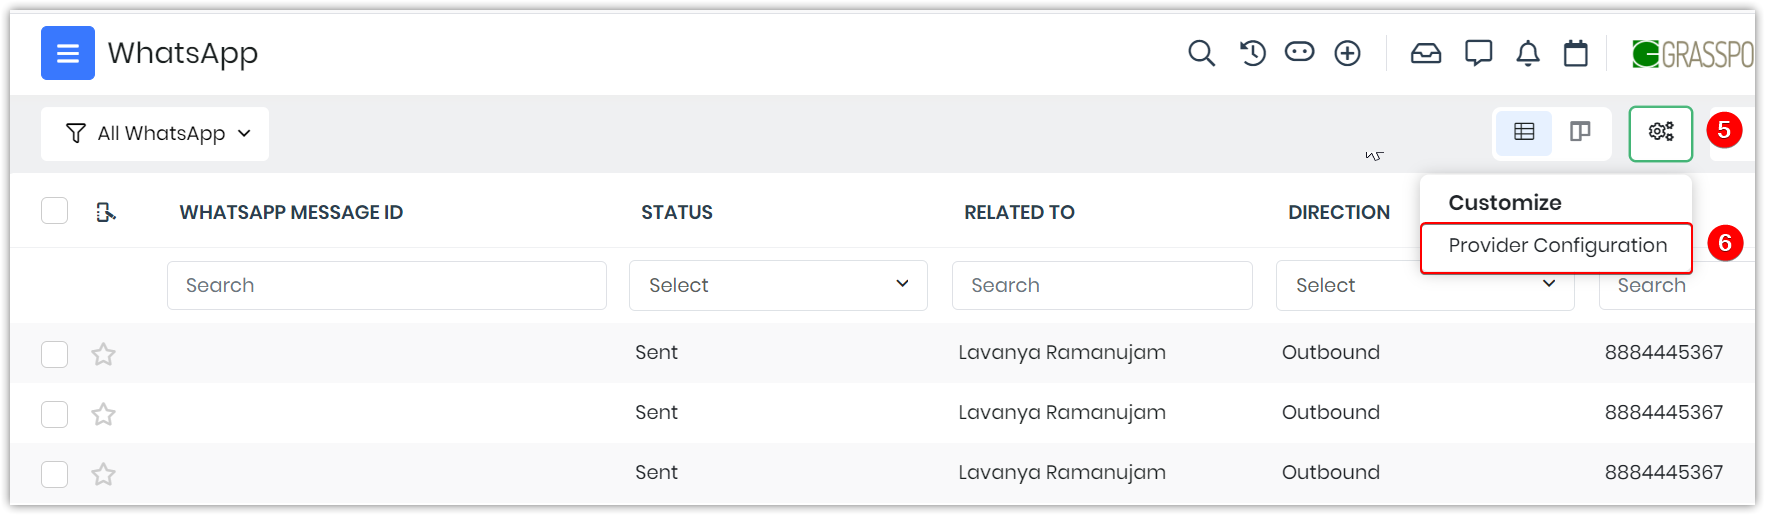
- Click Settings.
- Select Provider Configuration from the drop-down.
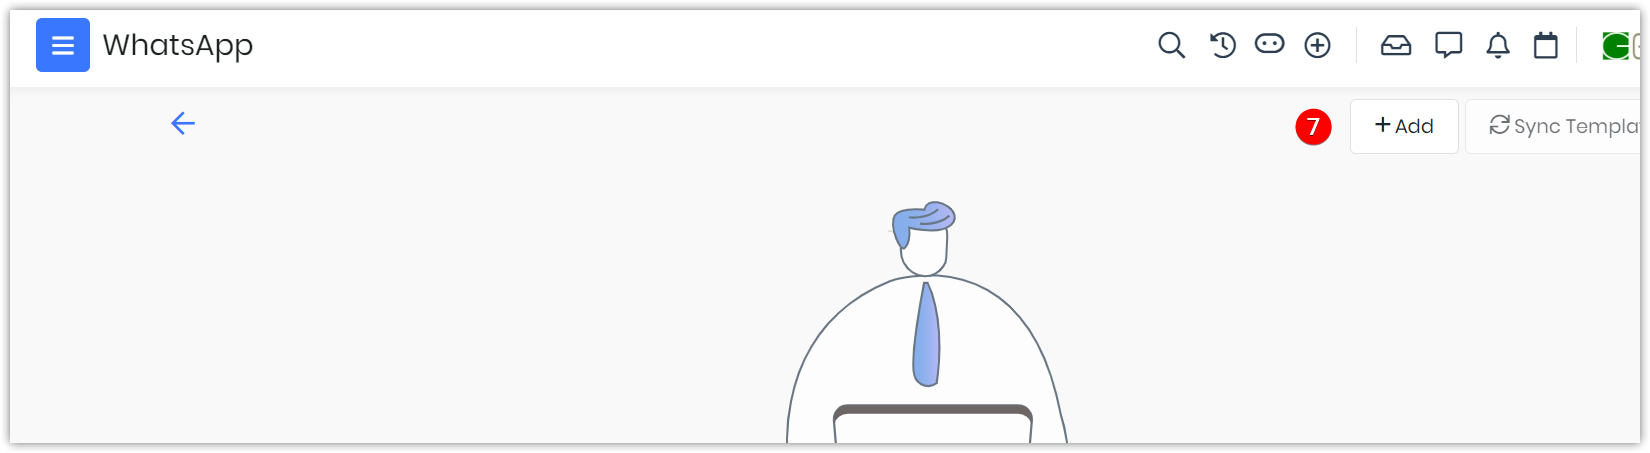
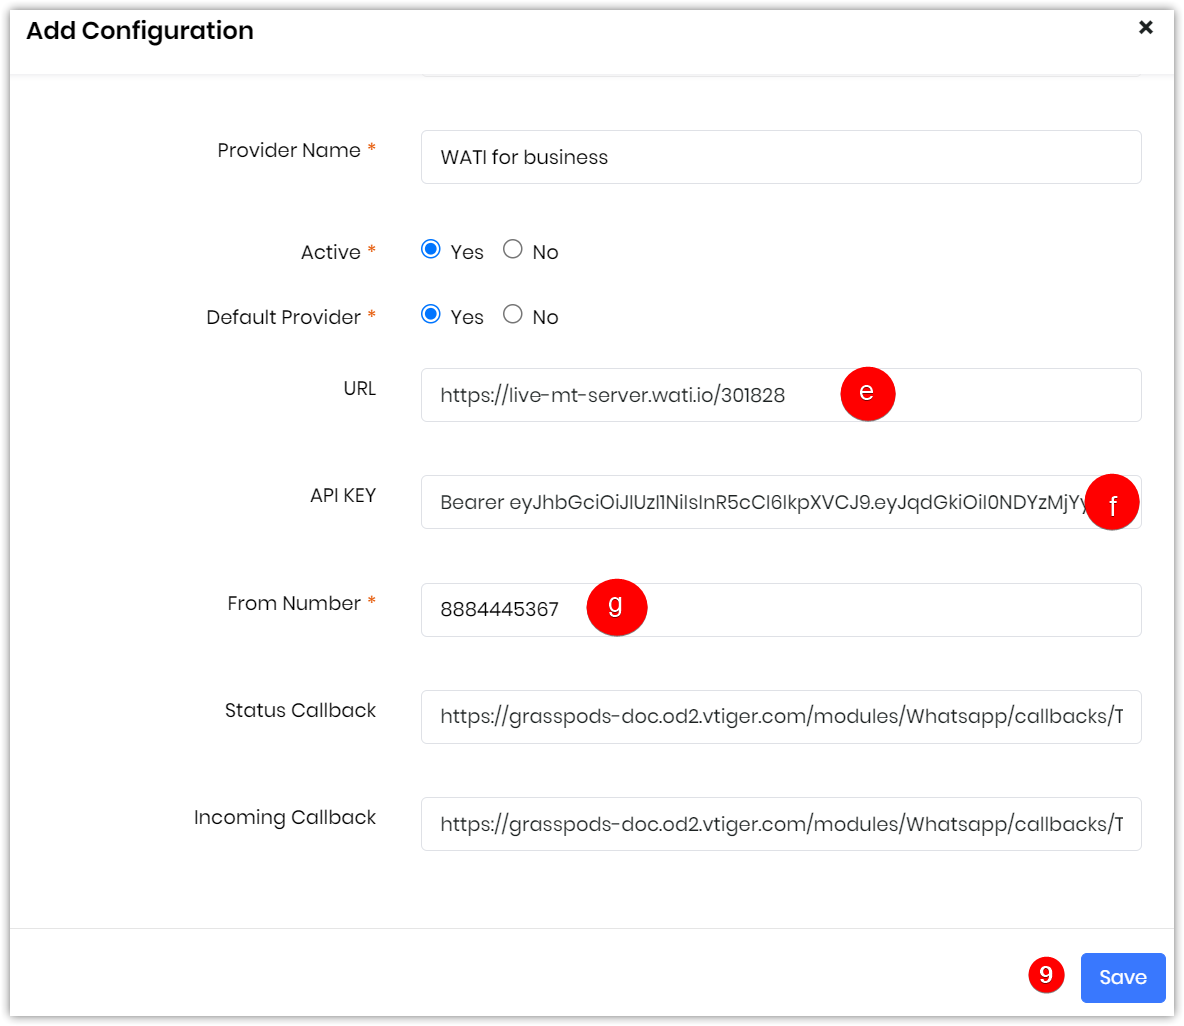
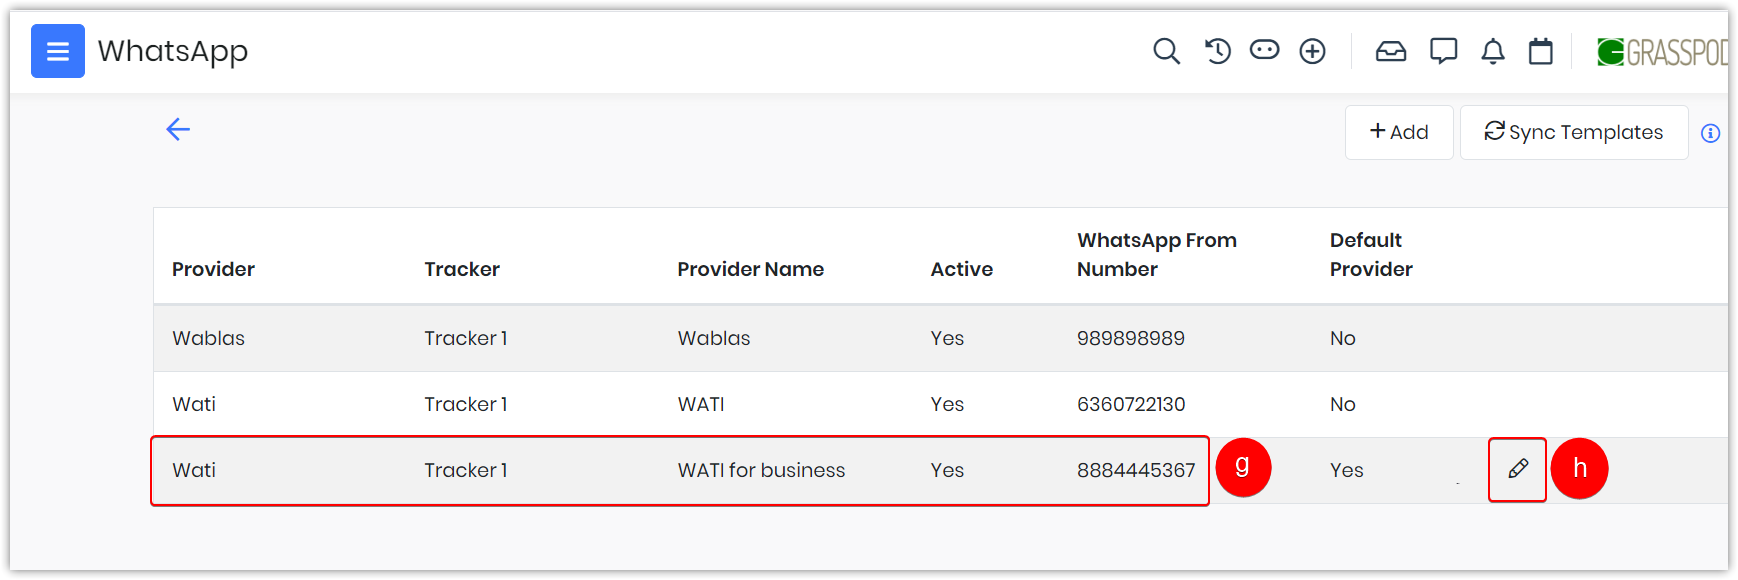
- Click +Add. The Add Configuration window opens.
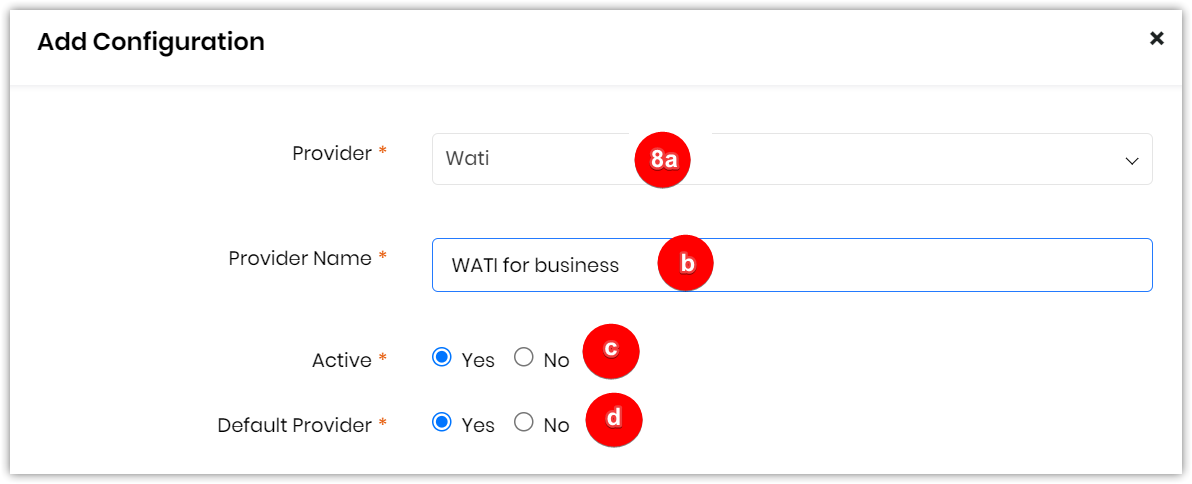
- Enter or select the following information:
- Provider: Select WATI from the drop-dowProvider: Select WATI from the drop-down.
- Provider Name: Type the Provider name. For example, WATI for testing or WATI for Business.
- Active: Enable Yes or No.
- Default Provider: Enable Yes or No.
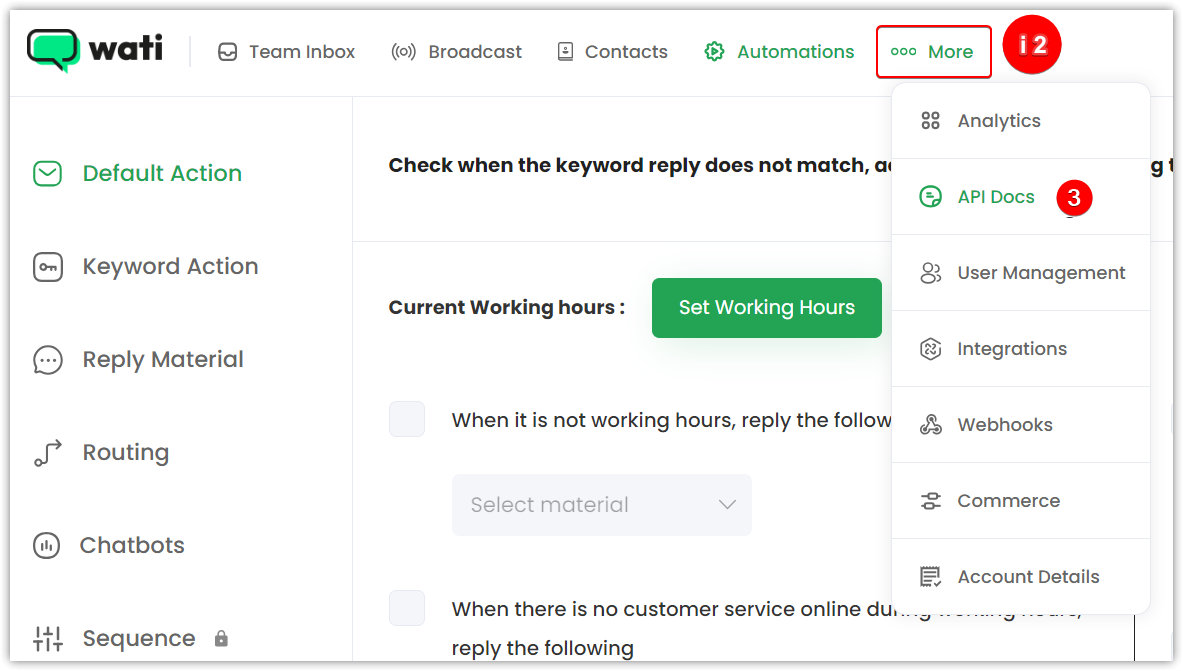
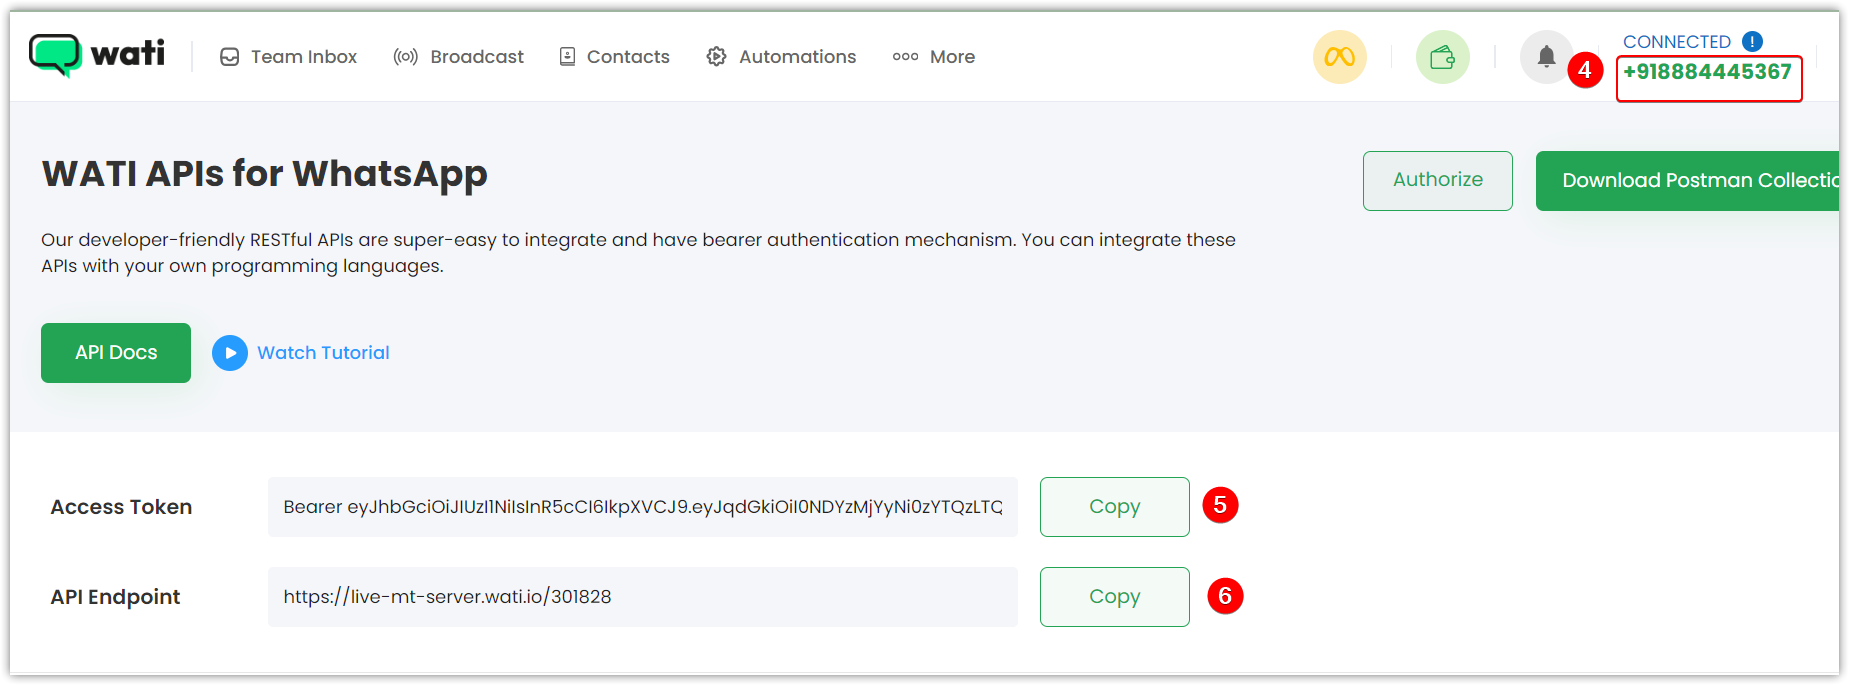
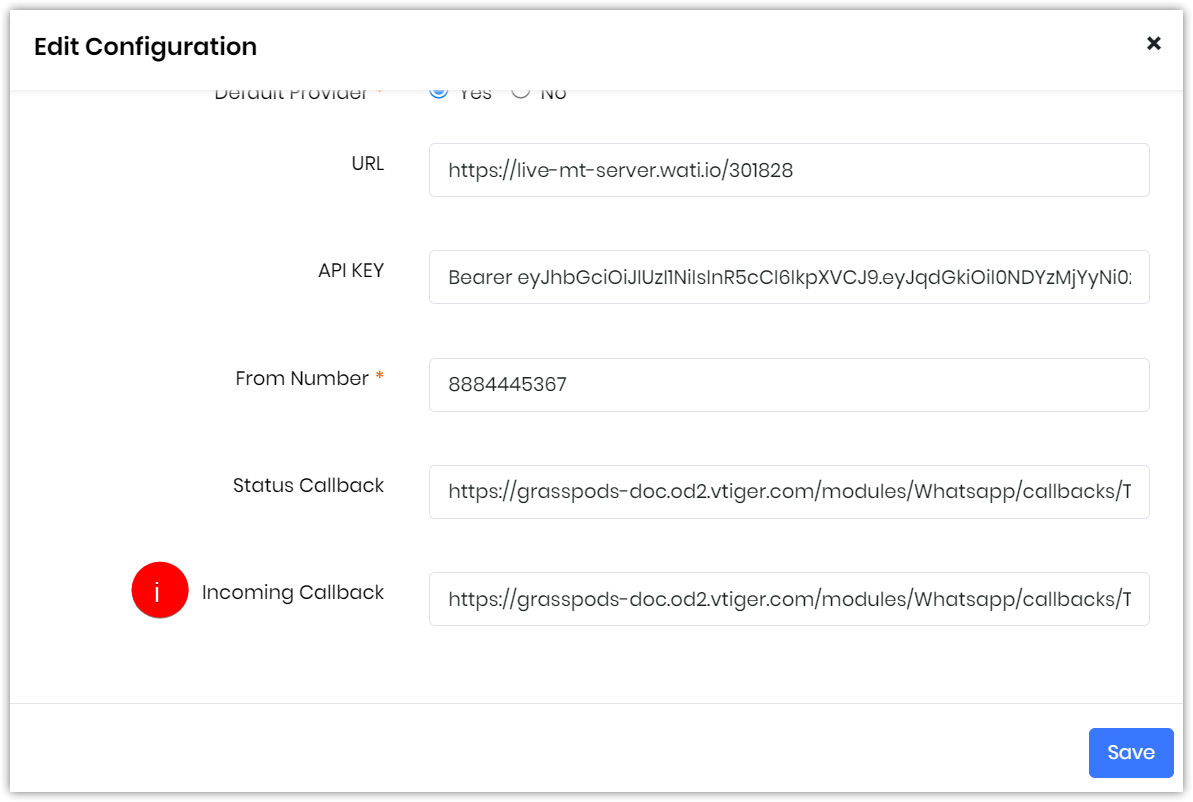
- Follow these steps to get the following from the WATI platform:
- Log in to the WATI platform.
- Click More.
- Click API Docs from the drop-down. A WATI API for WhatsApp window opens.
- Copy the number from the right corner of the WATI screen.
- Copy the API Endpoint.
- Copy the Access Token.
f. API Key: Paste the Access Token you copied from the WATI platform.
g. From Number: Paste the number you copied from the WATI platform.
- Click Save.
Step 3: Adding Webhooks in the WATI platform
You must add two webhooks for the incoming callbacks and status callbacks. To add Webhooks, you must go to the WATI platform and follow the below steps.
Webhooks for Incoming Callbacks
Adding Webhooks for Incoming Callbacks will allow you to receive incoming messages. This is possible only if you copy the incoming callback URL from Vtiger CRM and paste it into the WATI platform.
Note: You need to move back and forth between Vtiger and WATI platforms to copy and paste the Incoming Callback URL.
Follow these steps to add Webhooks for incoming messages:
- Log in to WATI.
- Click More.
- Click Webhooks from the drop-down.
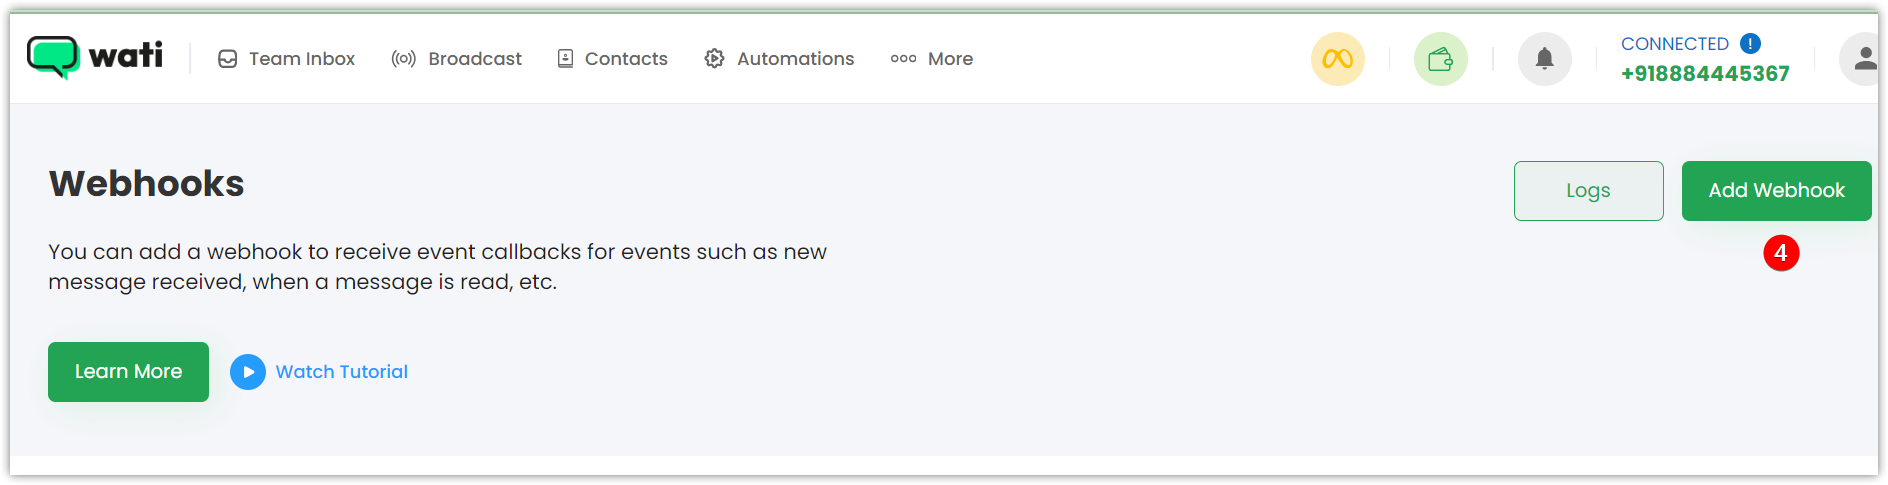
- Click Add Webhook. The Add Webhook window opens. The URL field will be blank if you are adding a URL for the first time.
- Follow these steps to copy the Incoming Callback URL from Vtiger CRM:
- Log in to the CRM.
- Go to Essentials.
- Go to Conversations.
- Select WhatsApp. The WhatsApp module opens.
- Click Settings.
- Select Provider Configuration from the drop-down. A list of providers will appear.
- Hover over to WATI from the list.
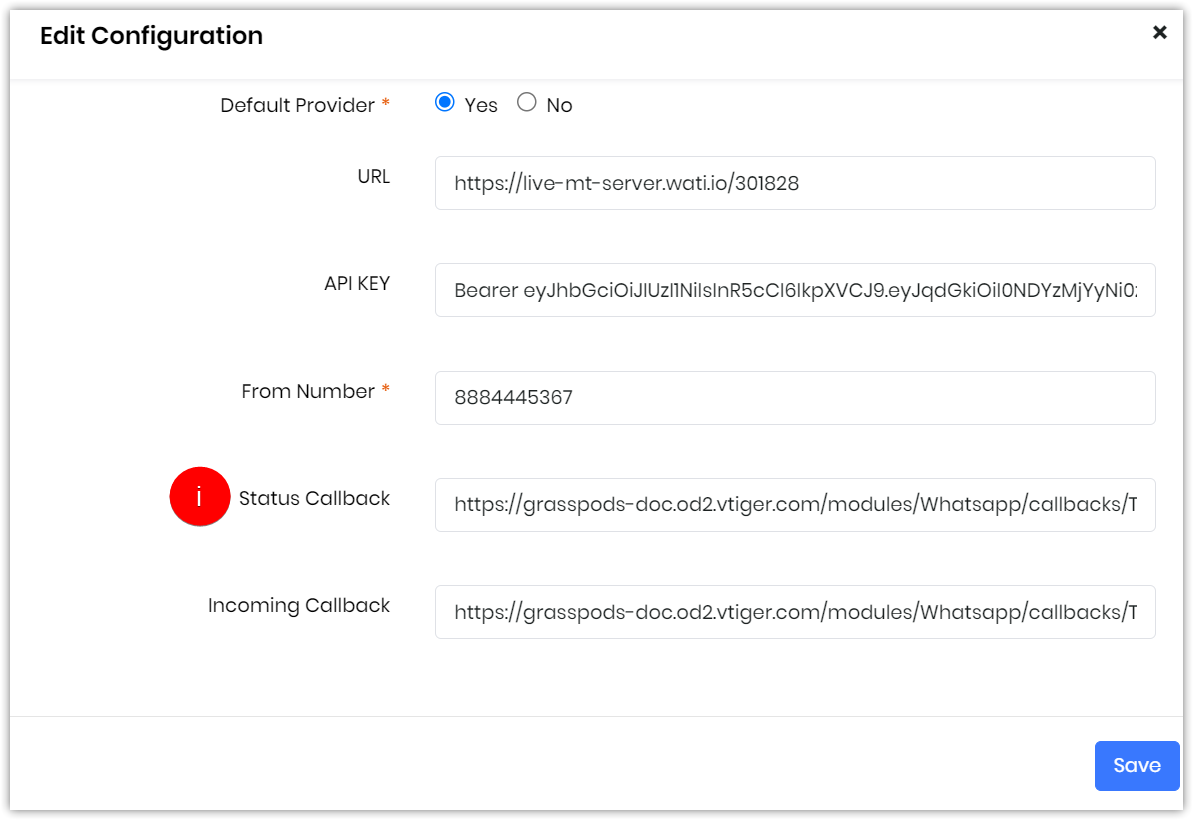
- Click the Edit icon. The Edit configuration window opens.
- Copy the Incoming Callback URL.
- Go back to the WATI platform.
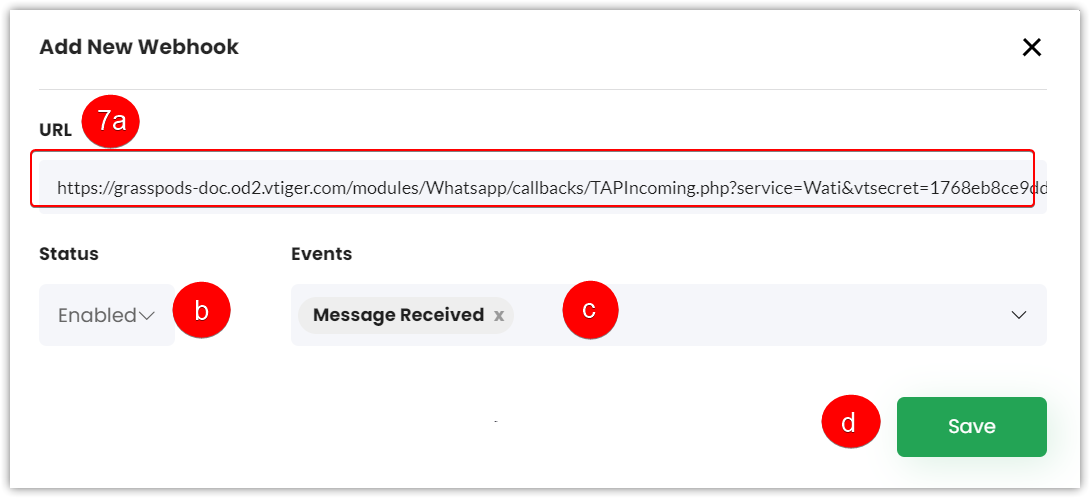
- Enter or select the following information in WATI
- URL: Paste the Incoming Callback URL from Vtiger CRM.
- Status: Select Enabled from the drop-down.
- Event: Select Message Received from the drop-down.
- Click Save.
Note: The above Webhook is added only for receiving messages.
Webhooks for Status Callback
Adding Webhooks for the Status Callback will give you a notification if a message sent is delivered or read.
Follow these steps to add Webhooks in the WATI platform for Status Callback:
- Log in to the WATI.
- Click More.
- Click Webhooks from the drop-down.
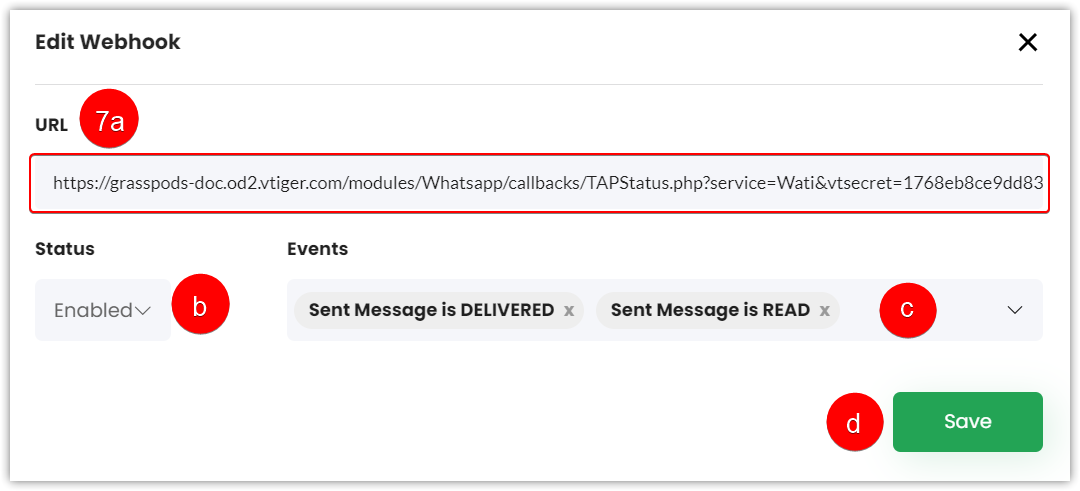
- Click Add Webhook. An Add Webhook window opens.
- Follow these steps to get the Status Callback URL from Vtiger CRM
- Log in to the CRM.
- Go to Essentials.
- Go to Conversations.
- Select WhatsApp. The WhatsApp module opens.
- Click Settings.
- Select Provider Configuration from the drop-down. A list of providers will appear.
- Hover over to WATI.
- Click the Edit icon. An Edit configuration window opens.
- Copy the Status Callback URL.
- Go back to the WATI Platform.
- Enter or select the following information
- URL: Paste the Status Callback URL from Vtiger CRM.
- Status: Select Enabled from the drop-down.
- Event: Select Sent Message Delivered and Sent Message is READ from the drop-down.
- Click Save.
Note: The above Webhook is added for message delivery notifications.
Creating Templates in WATI
WATI integration with Vtiger allows you to sync templates from WATI to Vtiger. You can create message templates in the WATI platform and sync them to Vtiger once they are approved by WATI.
Follow these steps to create a new template in WATI:
- Log in to the WATI.
- Click Broadcast.
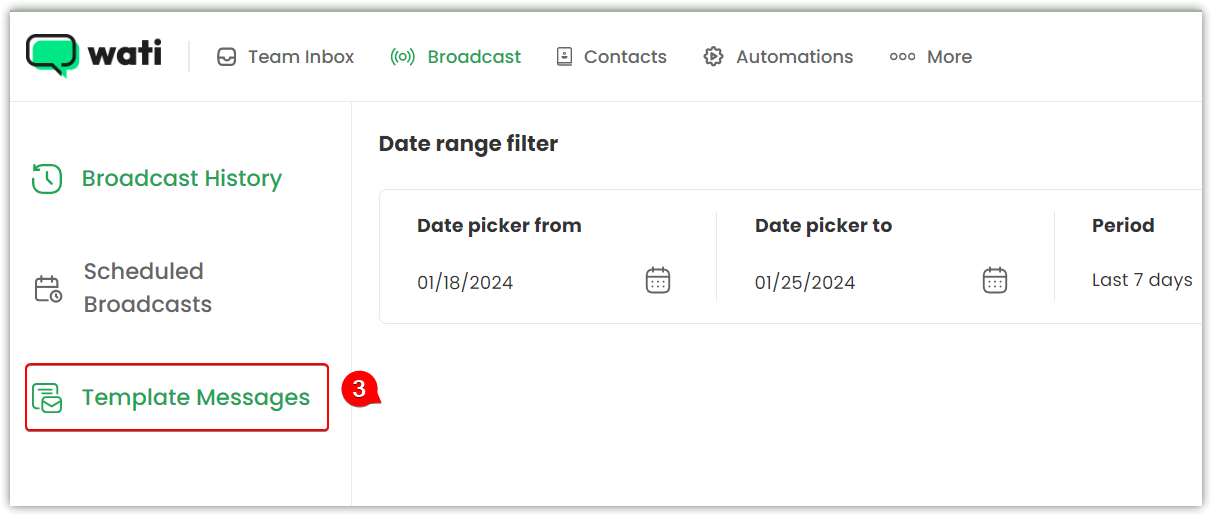
- Go to the Template Messages section.
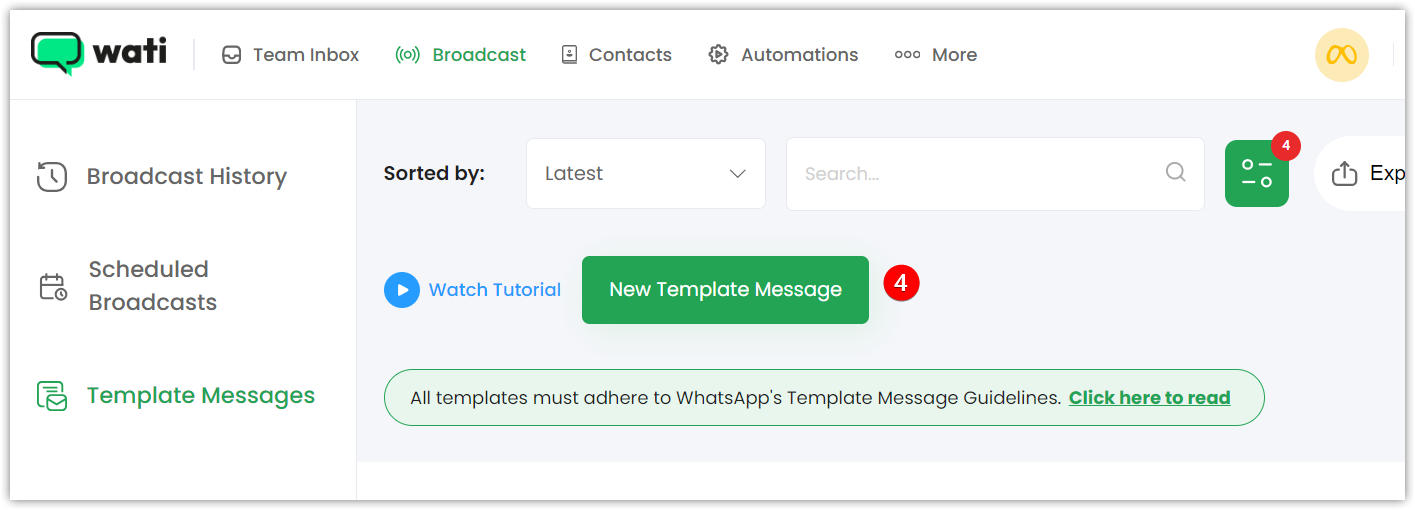
- Click New Template Message. A Create template message window opens.
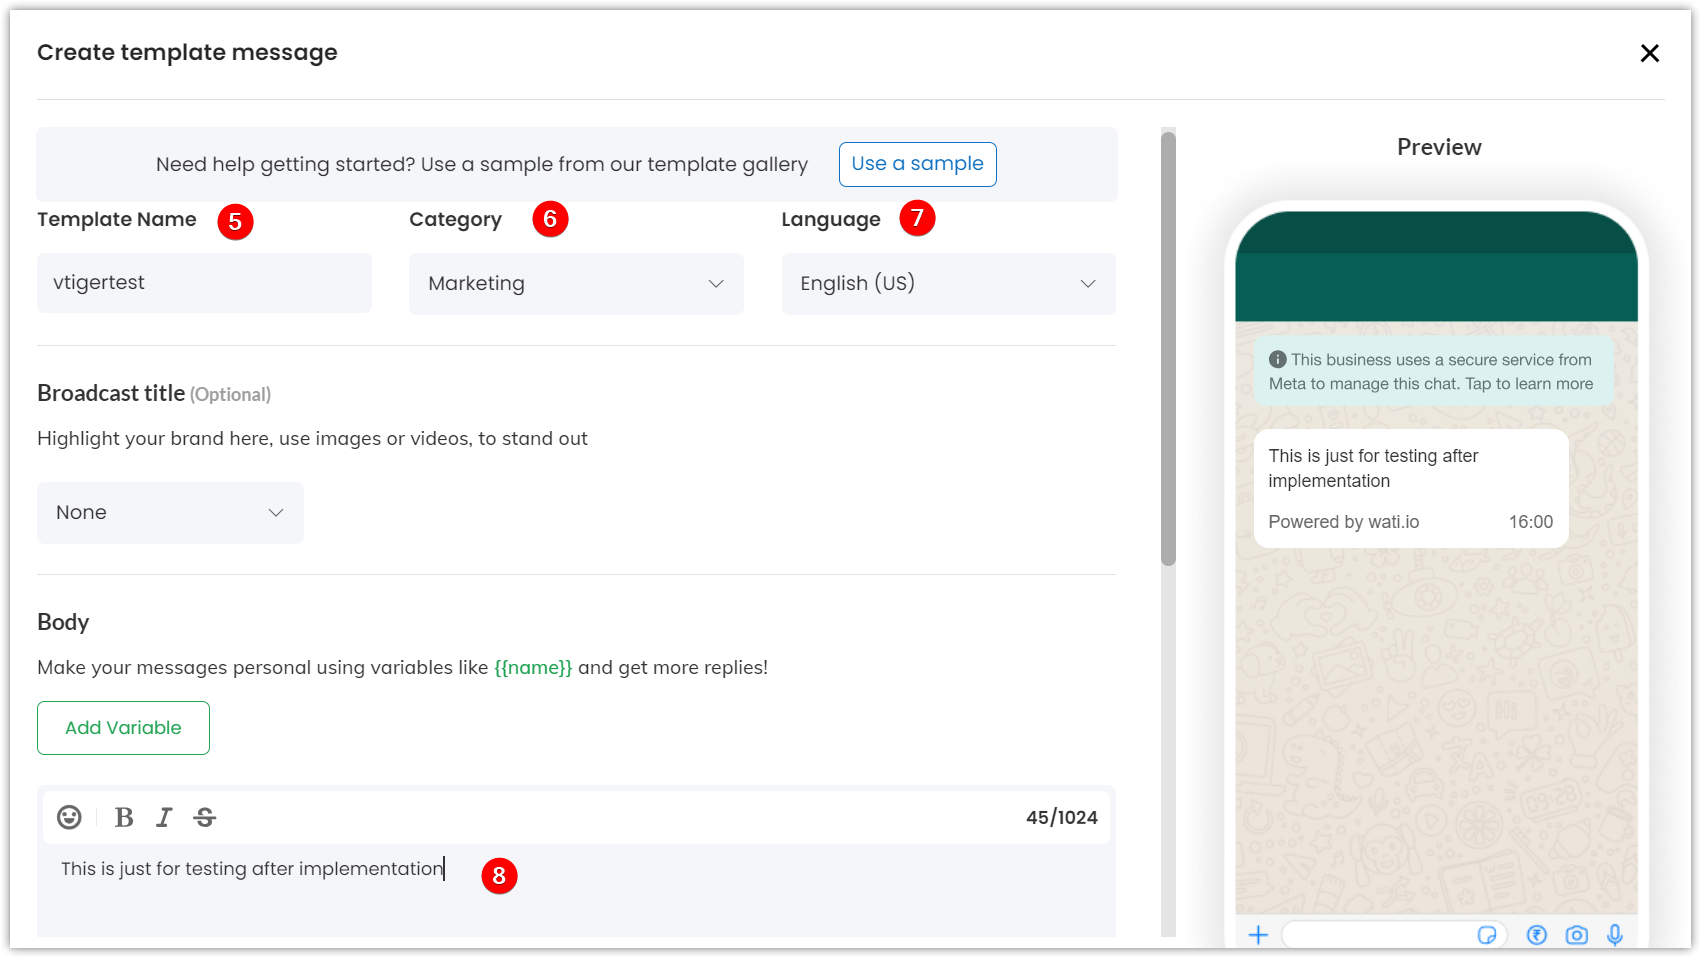
- Type Template Name.
- Select Category from the drop-down.
- Select Language from the drop-down.
- Type the Template Message. You can see the preview of the template message.
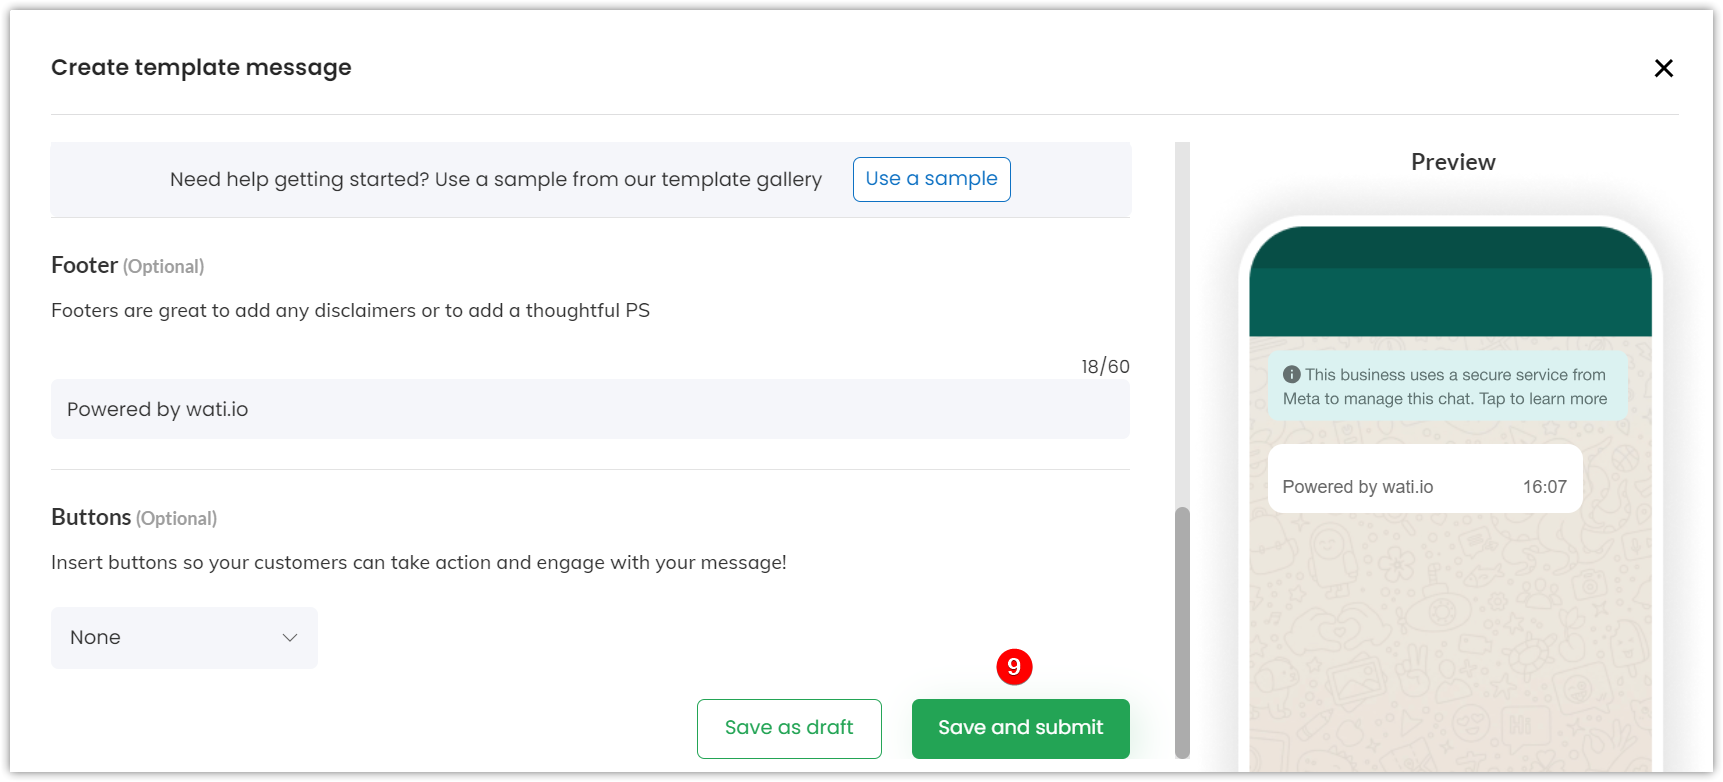
- Click Save and Submit. Do you want to submit this message for validation? Message pops-up.
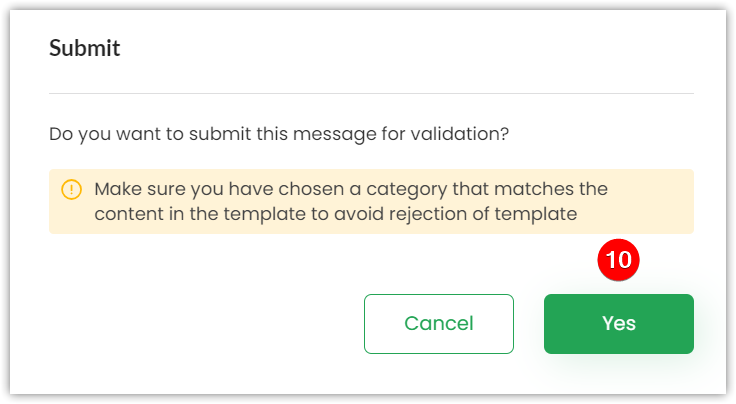
- Click Yes. A notification - Approval time for business takes 30 mins to 2 business days(Subject to Facebook team approval) will appear.
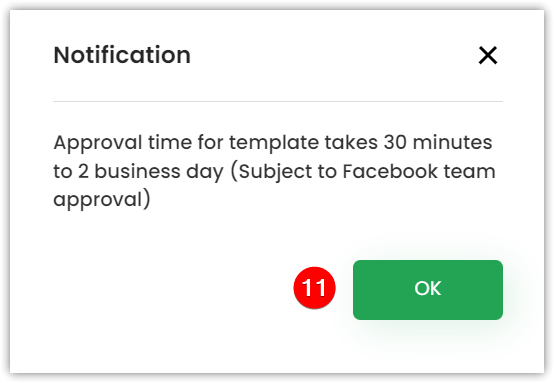
- Click Ok.
Once added, it will appear as Pending in the Status. The templates need to be approved by Facebook before you can use them. It takes 30 mins to 48 hours for a template to be approved.
Once approved, the status will change to Approved.
Sending Messages Using WATI
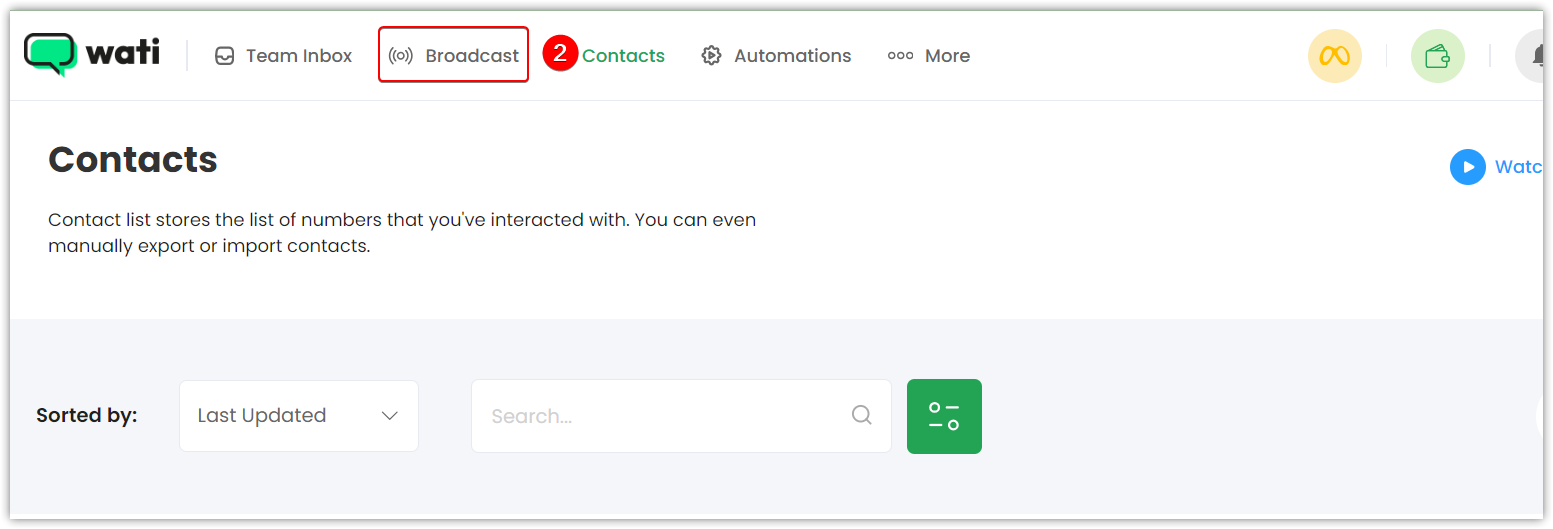
You need to save the WATI number in the Contacts module in Vtiger CRM.
Follow these steps to send WhatsApp messages using WATI.
- Log in to the CRM.
- Go to Contacts.
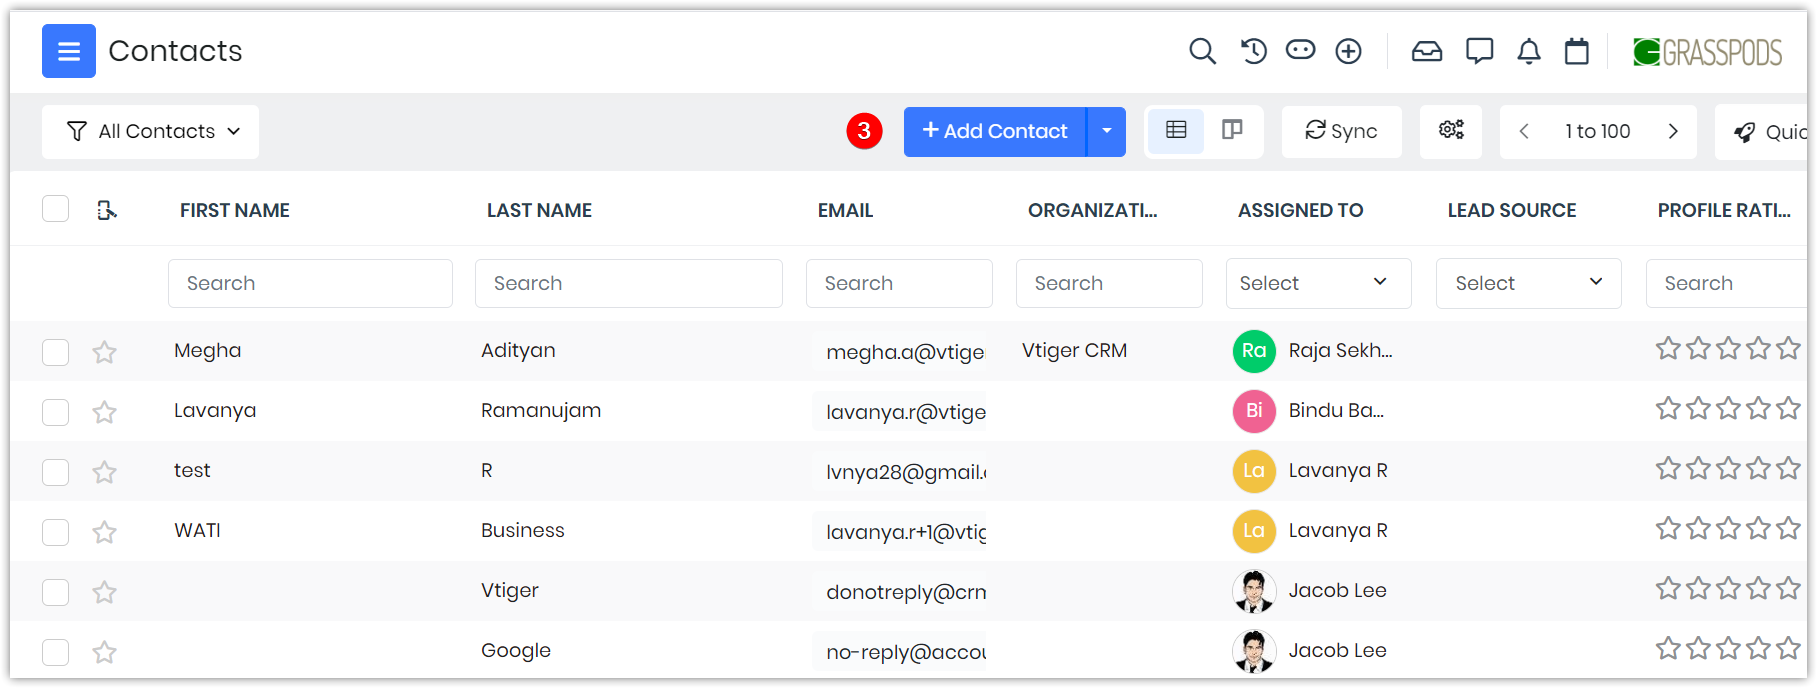
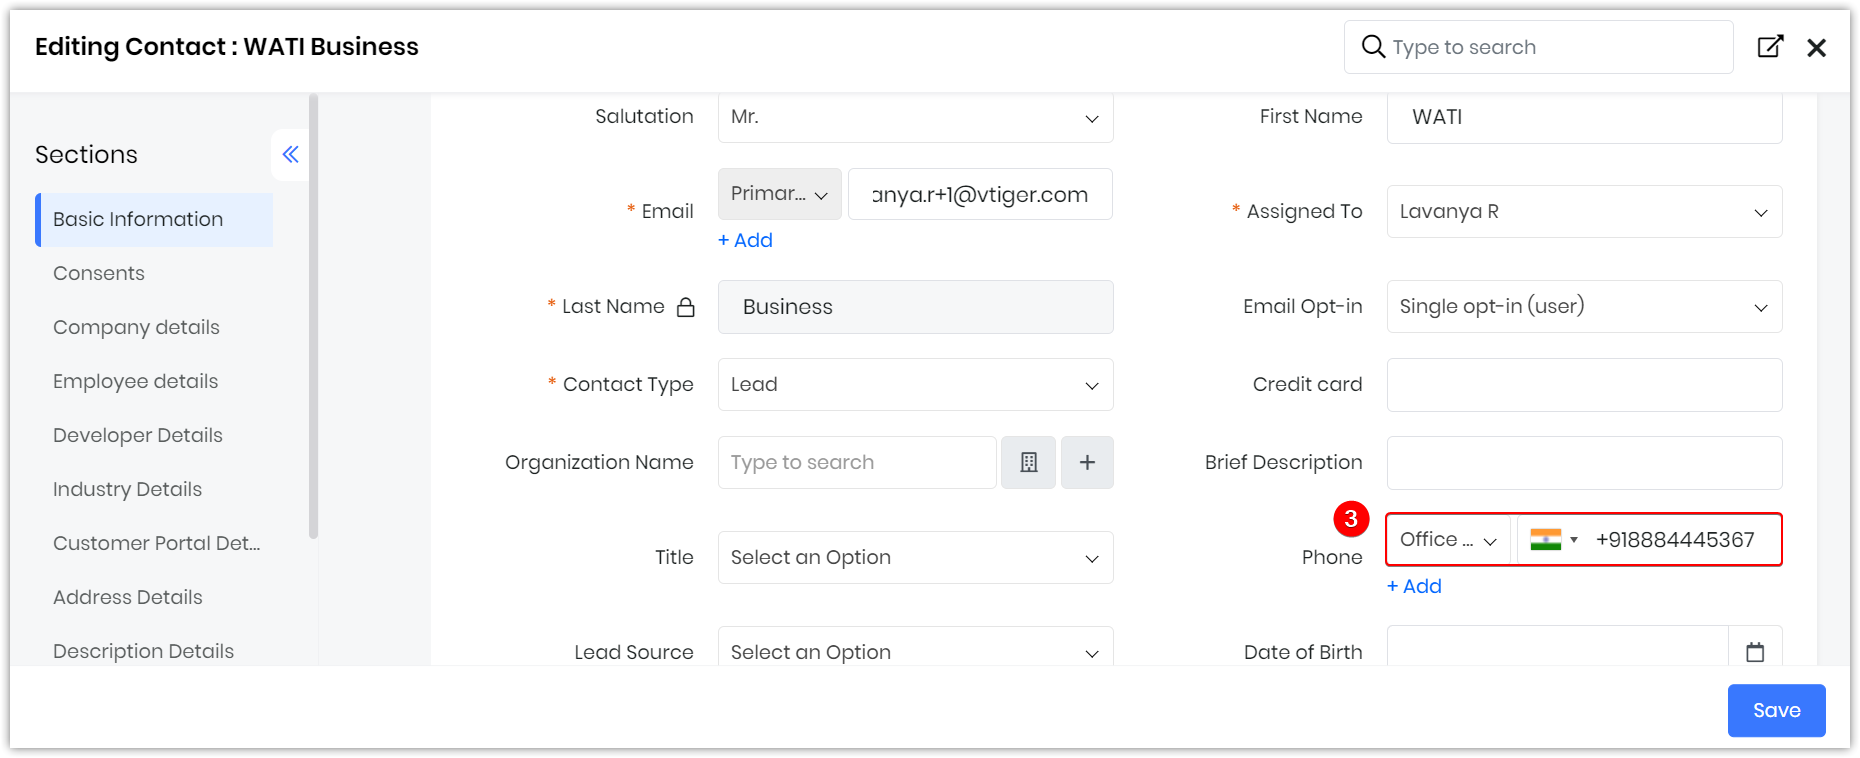
- Click +Add Contact to create a Contact with the WATI registered WhatsApp number.
- Select a Contact from which you wish to send a message. The Summary View of that contact opens.
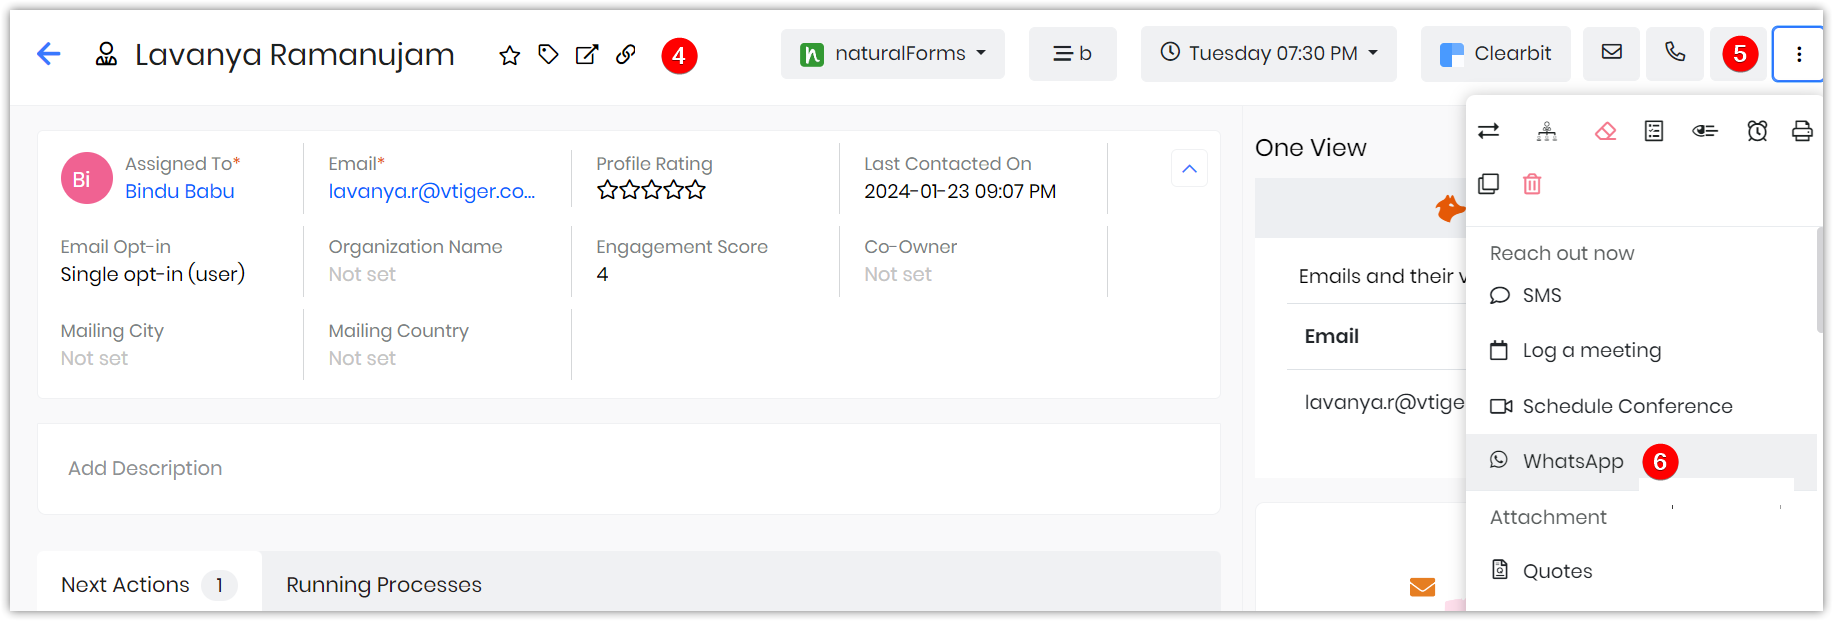
- Click More.
- Select WhatsApp. The Send WhatsApp message window opens.
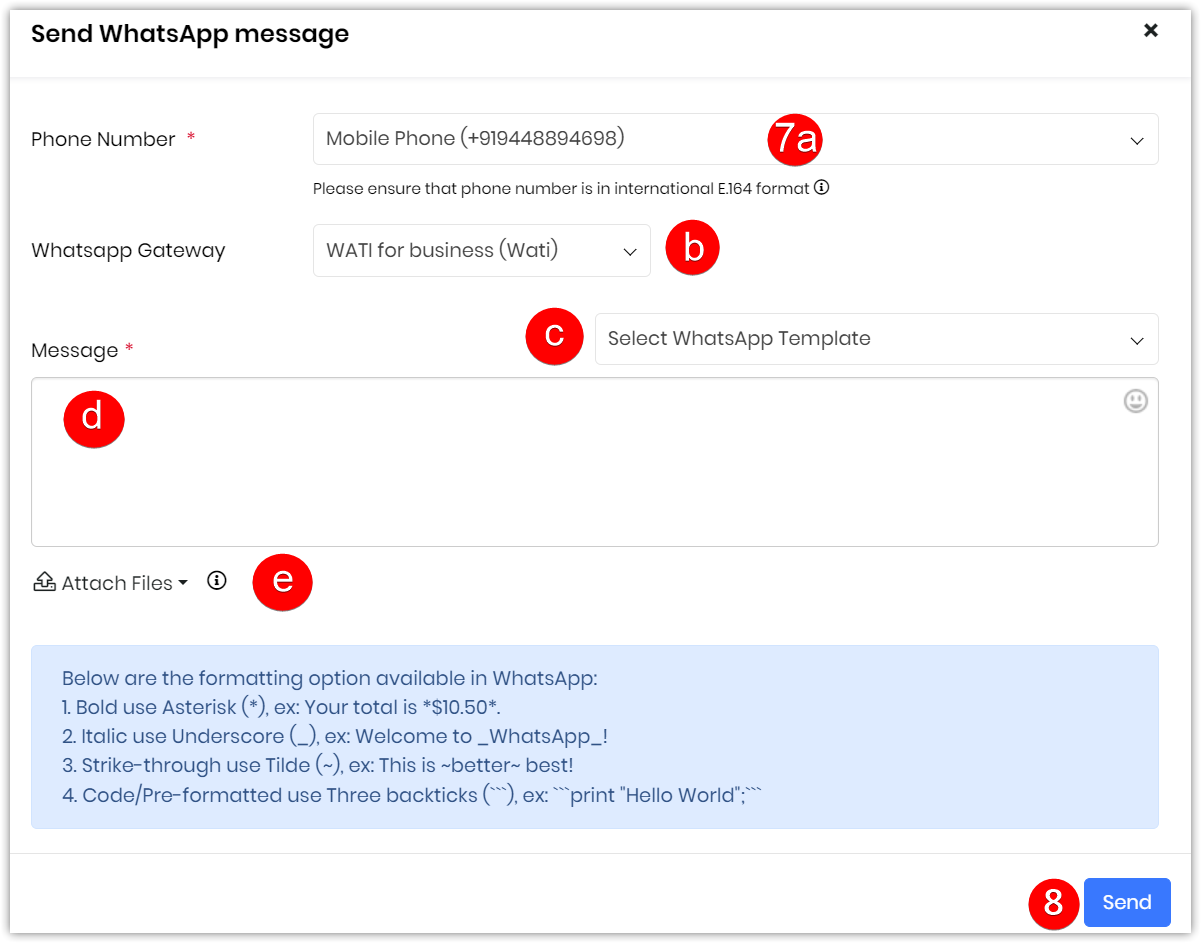
- Enter or select the following information:
- Phone Number: Select the Phone number from which you want to send a message from the drop-down.
- WhatsApp Gateway: Select the WhatsApp Gateway from the drop-down.
- WhatsApp Template: Select the WhatsApp Template from the drop-down. The template will be auto-filled in the message field. Or
- Message: Type the WhatsApp message to be delivered to the customer.
- Attach Files: Attach files if needed.
- Click Send.
The users will receive messages in their WhatsApp on mobile. The messages from the mobile are received on the WATI platform.
WhatsApp Messages from Wati in the Live Chat module
Configure the webhooks in the Wati platform to receive Wati-integrated WhatsApp messages in the Live Chat module.
- For Tap incoming webhook > Message received, Session Message Sent, Template message sent.
- For status callback webhook > Sent message is Delivered, Sent message is Read.
Following are the Webhook Events in the WATI:
- Message Received
- This webhook is triggered whenever a user sends a message to your WATI number.
- Session Message Sent
- This webhook is triggered when a Session message is sent.
- Template Message Sent
- This webhook is triggered when a Template message is sent.
- Sent Message is DELIVERED
- This webhook is triggered when the message you sent is delivered to the user.
- Sent Message is READ
- This webhook is triggered when the user reads the message you sent.
Note: If your Live Chats is enabled in the CRM, you will receive the message in the CRM.