Articles in this section
Vtiger Integration with Exotel
Feature Availability
Vtiger Editions: One Pilot | One Growth | One Professional | One Enterprise | One AI
Introduction
The Phone Calls module in Vtiger lets you:
- Integrate with different service providers.
- Make and receive calls from the CRM.
- Track, manage, and log every phone call with your leads, customers, and team members—ensuring no critical conversation slips through the cracks.
- Create records for every phone call made or received.
- Integrate services such as Live Chat, email, call logging, purchase history, feedback surveying, support tickets, and more.
Exotel Integration with Vtiger CRM
Exotel is a cloud telephony platform that simplifies call management, enabling features like call tracking, automated call logging, and real-time notifications.
Integrating Exotel with Vtiger's Phone Calls module allows you to make and receive calls seamlessly within the CRM platform. With Vtiger's comprehensive CRM capabilities, you can streamline call management, automate follow-ups, and maintain detailed call logs. This integration:
- Supports simultaneous call routing to multiple agents.
- Lets you use Vtiger CRM’s Phone Call module features such as -
- Incoming calls
- Outgoing calls
- Call notes
- Customer sentiments
- Call recordings
Requirements
To integrate Exotel with Vtiger you need to:
- Have an active Exotel account. If you do not have an account, you must sign up with Exotel and create one.
- Provide your Exotel credentials during the configuration process in Vtiger.
- Install Vtiger’s Phone Calls module.
- Integrate your Exotel phone number with the Phone Calls module in Vtiger.
Before configuring Vtiger you have to explain the IVR flow of your phone system to the Telephony service provider (Exotel) to ensure proper setup.
How Does Exotel Work?
Following is a simplified workflow of Exotel calls in Vtiger CRM:- Integration - CRM admins subscribe to the Exotel service and get their Exotel Number.
- Adding members - CRM admins must then add their sales and support representatives as co-workers in Exotel, along with their phone numbers.
- Setting up phone numbers - Individual sales and support representatives must set up their phone number (the same number in Step 2) as their Exotel Extension Number in the CRM preferences.
- Incoming calls - When a customer calls on the Exotel Number, the call is routed to the sales and support representatives, who are added as co-workers. Any one of the representatives can attend the call.
- Outgoing calls - When a sales and support representative calls a customer, the call is first routed to the representative’s own extension number. They must first receive the call on their extension number, after which the call connects to the customer.
- Call Recording Options - Calls are recorded by Exotel with the ability to select single-channel or dual-channel recordings, and the recordings can be saved in mp3 or mp3-hq formats for future reference, analysis, or compliance purposes
Other Telephony Gateways in Vtiger CRM
Vtiger’s Phone Calls module integrates with the following telephony gateways:
- Asterisk
- Knowlarity
- Telzio
- Twilio
- ViciDial
- Plivo
Benefits of Exotel Integration
The benefits of integrating Exotel with Vtiger are:
- Make calls directly from Vtiger by simply clicking on the contact’s phone number.
- Logs all call details within Vtiger automatically, ensuring quick access to call records.
- Use call outcomes to trigger workflows, such as sending automated follow-up emails, updating lead statuses, etc.
- Make and receive Exotel calls through Vtiger’s mobile app, ensuring remote teams can stay connected with customers from anywhere.
- Access real-time insights into team call activities and customer engagement levels to help managers make informed decisions on resource allocation.
- High-quality call recordings in single or dual-channel options (mp3 or mp3-hq) for enhanced clarity, analysis, and improved translation and AI processing.
In this article, you will learn about:
- Setting up the Phone Calls module
- Configuring Exotel Integration
- Managing Phone Call logs and Status
- Resolving common issues with Exotel
Installing Phone Calls
To use the Phone Calls module, you must first install it from the Extension Store. You can access the Extension Store if you are an Admin user.
Follow these steps to install Phone Calls:
- Log in to CRM.
- Click the User Menu on the top right corner of the screen.
- Click Settings.
- Look for the Extensions section.
- Select Extension Store.
- Search for Phone Calls using the search bar.
- Click Install. The Phone Calls module will be installed.
After you install the module, you can see it under Main Menu > Essentials > Conversations.
Configuring Exotel
After installing the Phone Calls extension, you must configure the Exotel gateway. Follow these steps to configure Exotel:
Note: Perform the below steps in Vtiger CRM.
- Log in to CRM.
- Click on the User Menu in the top right corner of the screen.
- Click Settings.
- Look for the Extensions section.
- Select Phone Configuration.
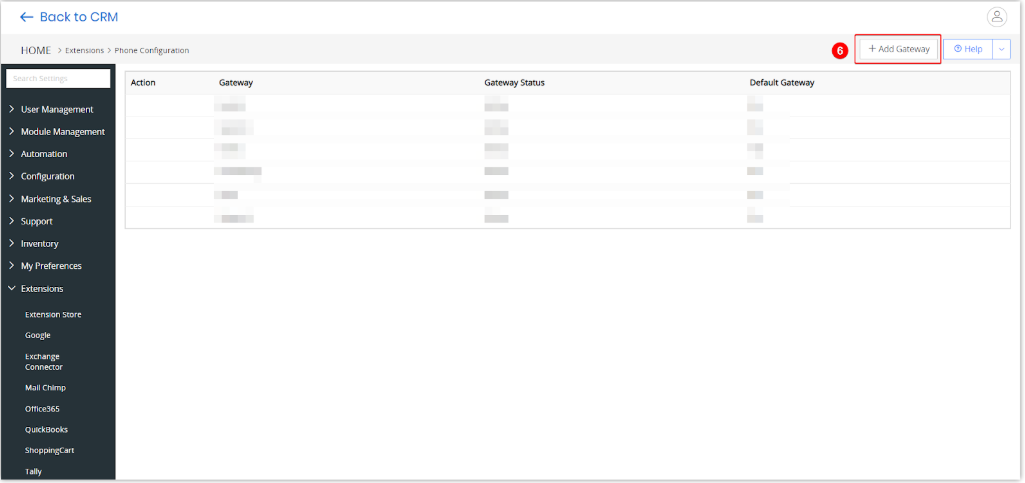
- Click +Add Gateway.
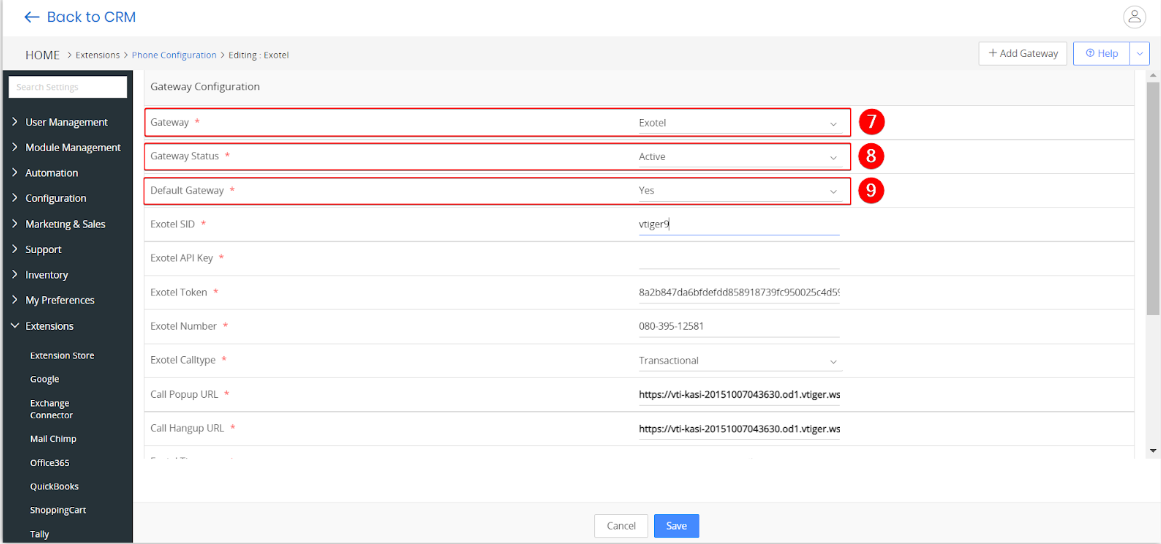
- Select Exotel from the Gateway drop-down.
- Select Active from the Gateway Status drop-down. This activates the gateway for incoming and outgoing calls.
- Set the gateway as default by selecting Yes from the Default Gateway drop-down. This step is optional.
- Enter or select the following details:
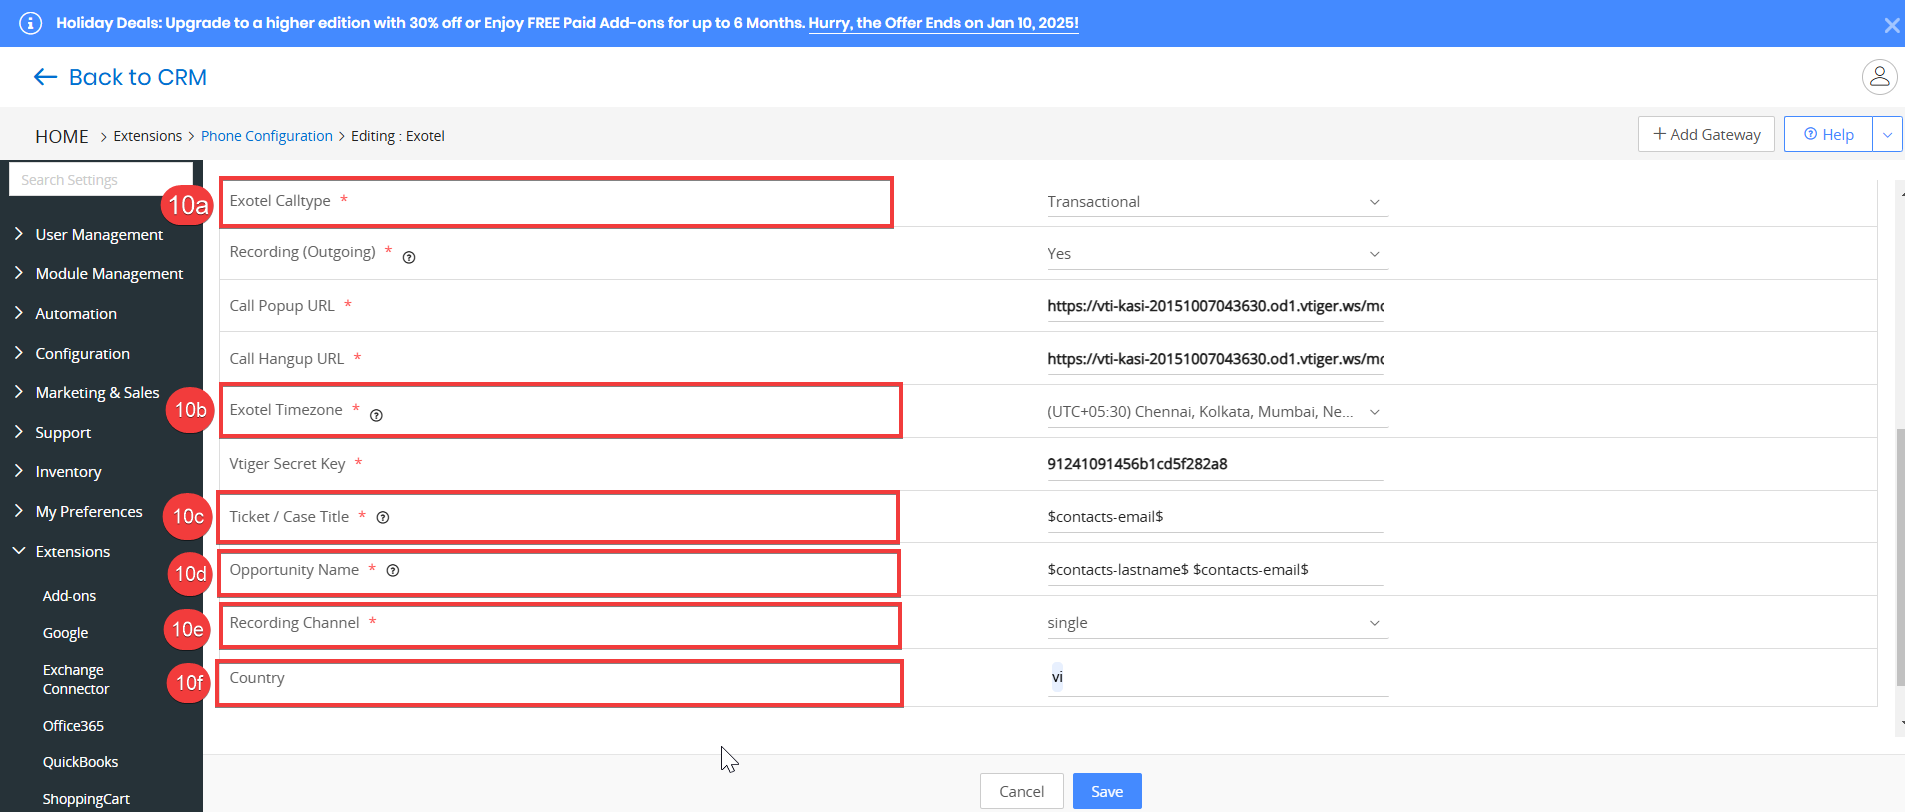
- Select Transactional from the Exotel Calltype drop-down.
- Choose a timezone from the Exotel Timezone drop-down.
- Enter the Case/Ticket Title that you want to create.
- Enter the Opportunity Name that you want to create.
- Choose the recording channel from the following options:
- Single
- Dual
- Choose the country from which you or your business operates from the Country drop-down.
- When you choose a country, the calls populate that country's phone code. For example, if you select India, +91 is taken to generate the calls.
- If you keep the field blank, calls can be triggered with all other providers, and the codes will auto-populate.
- If you select “ALL”, the CRM allows all types of country codes to do a call.
- If you configure the same country in multiple gateway fields, the CRM displays all the providers configured with the same country code. You can choose any of the gateways to generate a call.
Now, launch Exotel in a new tab keeping both Exotel and Vtiger CRM open.
- Log in to your Exotel account.
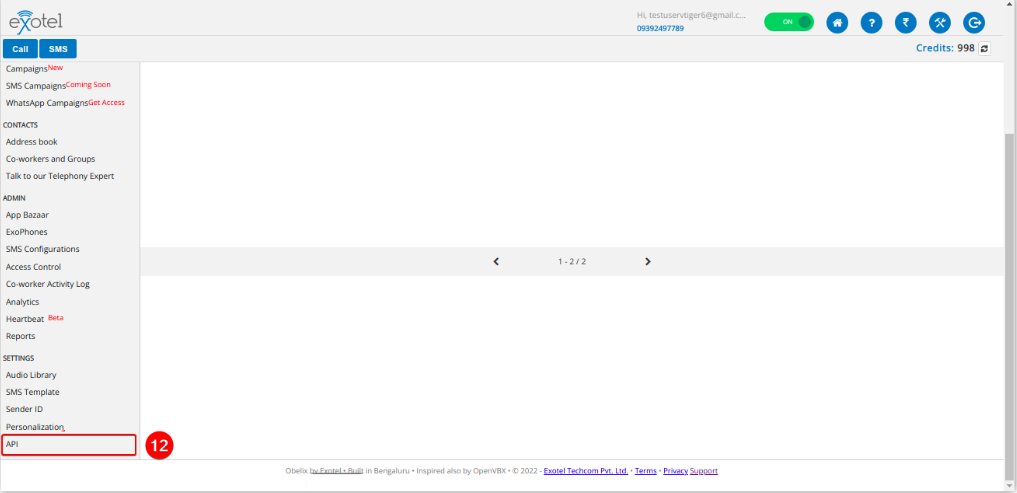
- Click API from SETTINGS in the left sidebar.
- Click API Settings from the left sidebar.
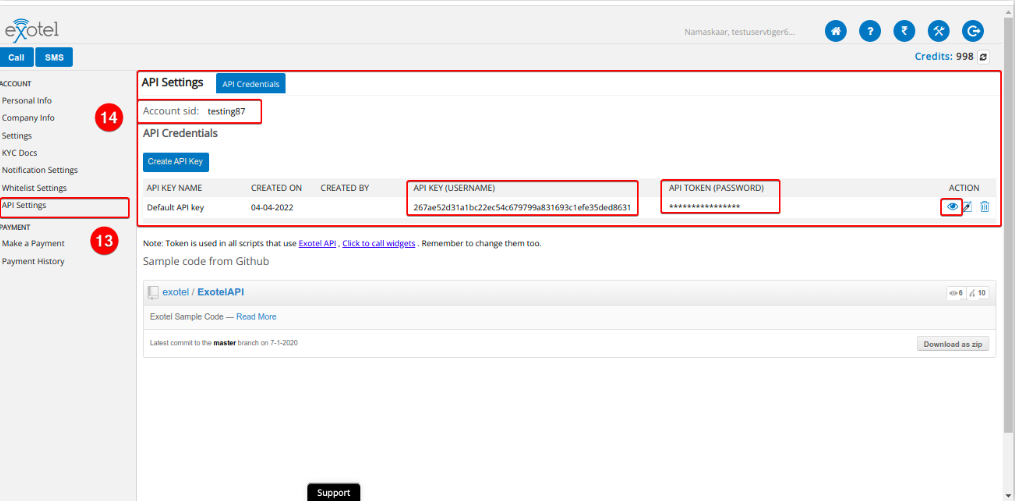
- Copy Account sid, API KEY, API TOKEN simultaneously. Use the eye icon to disclose API TOKEN.
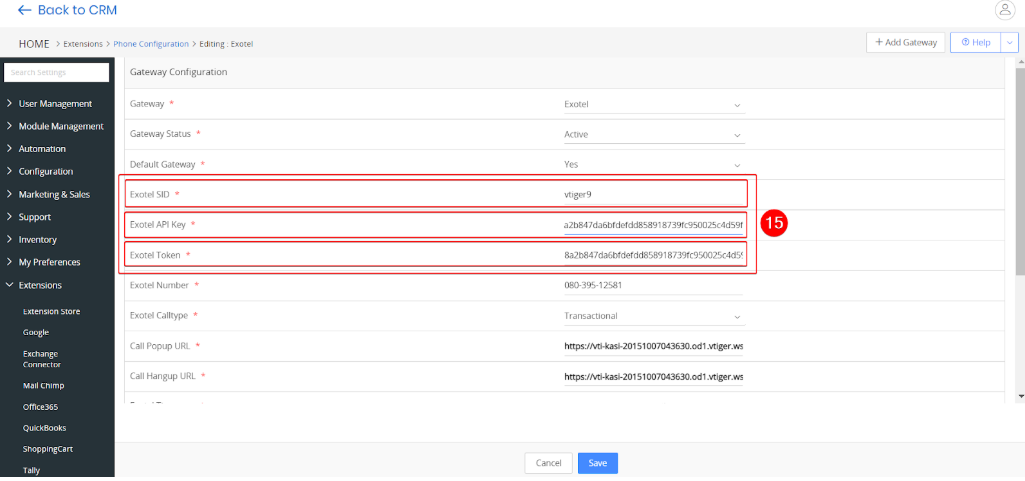
- Paste Account sid to Exotel SID, API KEY to Exotel API Key, API TOKEN to Exotel Token in the CRM. Make sure you disclose the token before copying it.
- Enter Region Code: Specify the region code to indicate the Exotel account’s geographic region.
- India accounts: IN
- Singapore accounts: SG
- UK accounts: UK
- For older accounts that do not have a region code set, you can leave the field empty, the API will still function correctly.
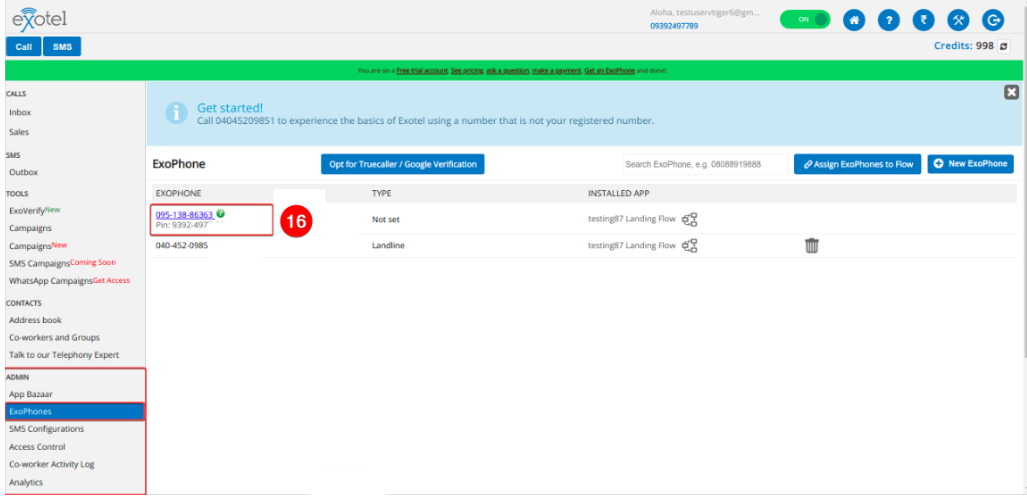
- Copy your Exotel number from the exophone section under the admin column.
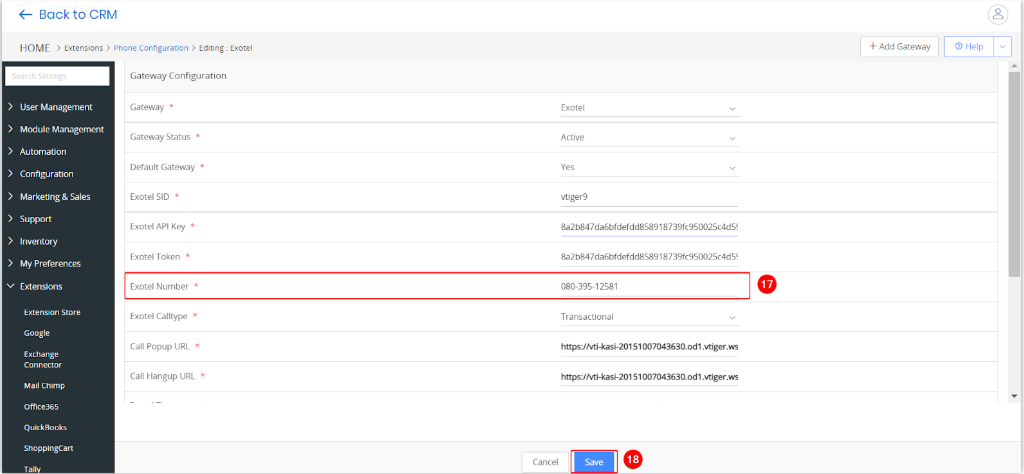
- Paste the copied Exotel number into the Exotel Number field in the CRM. Prefix the number with 0 and remove all special characters.
- Click Save in the CRM.

- Click App Bazaar under ADMIN in Exotel’s sidebar.
- Click Create to create an application.
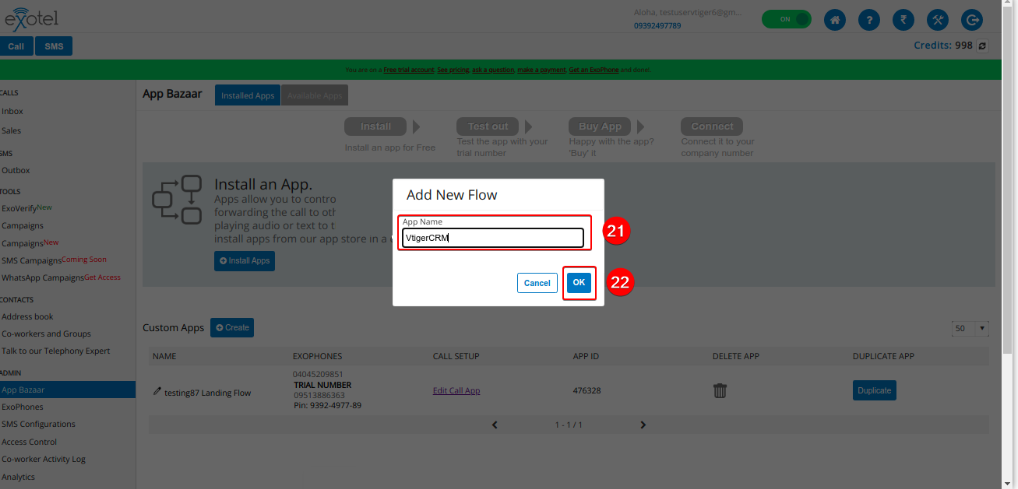
- Enter the App Name. For example, VtigerCRM.
- Click OK.
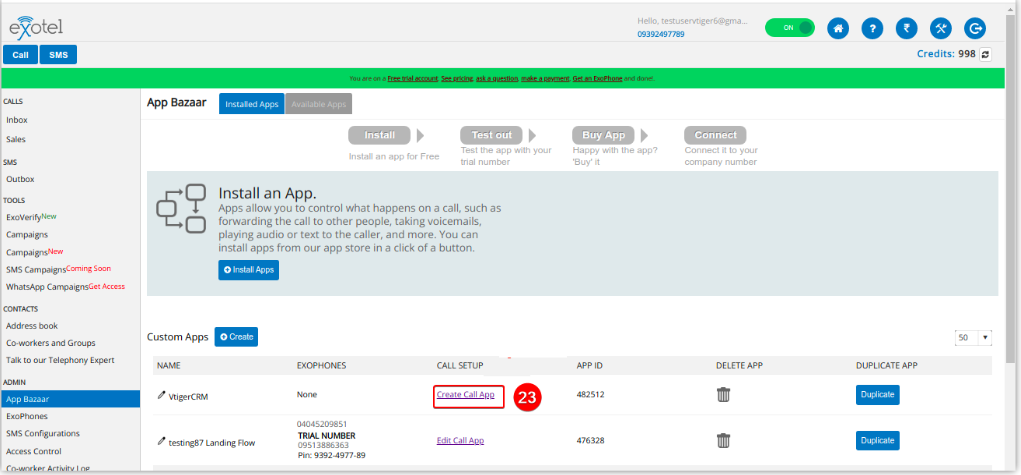
- Click Create Call App in the CALL SETUP column.
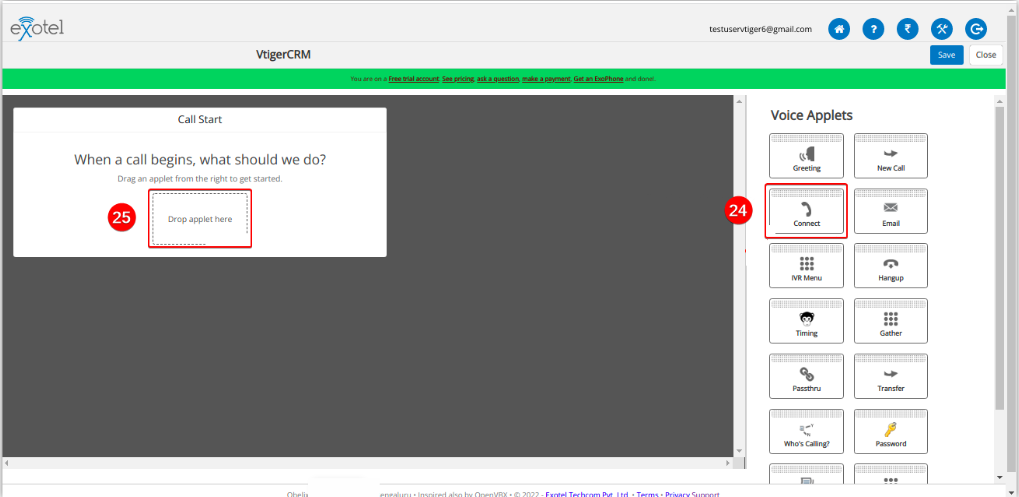
- Drag and drop the Connect applet from the right under When a call happens, what should we do?
- Click on the applet.
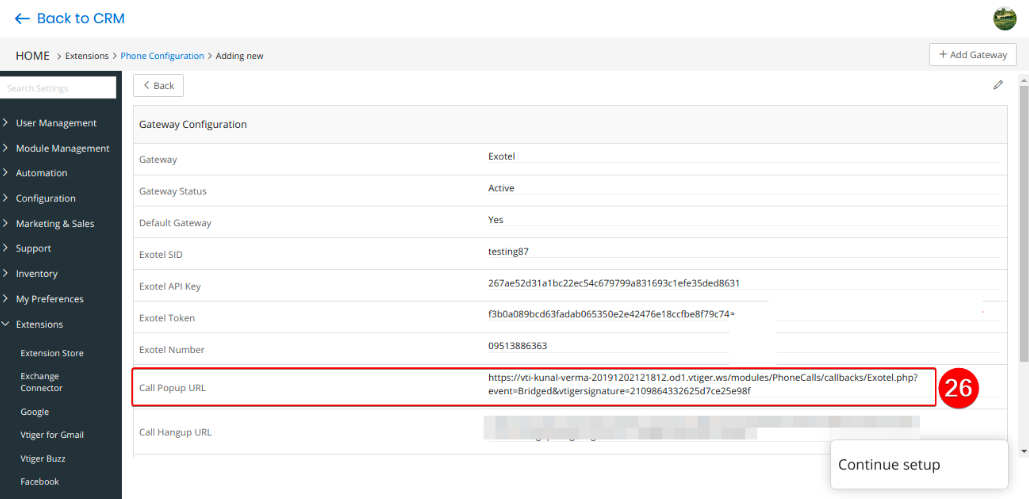
- Copy the Call Popup URL from the CRM into the textbox in Create popup.
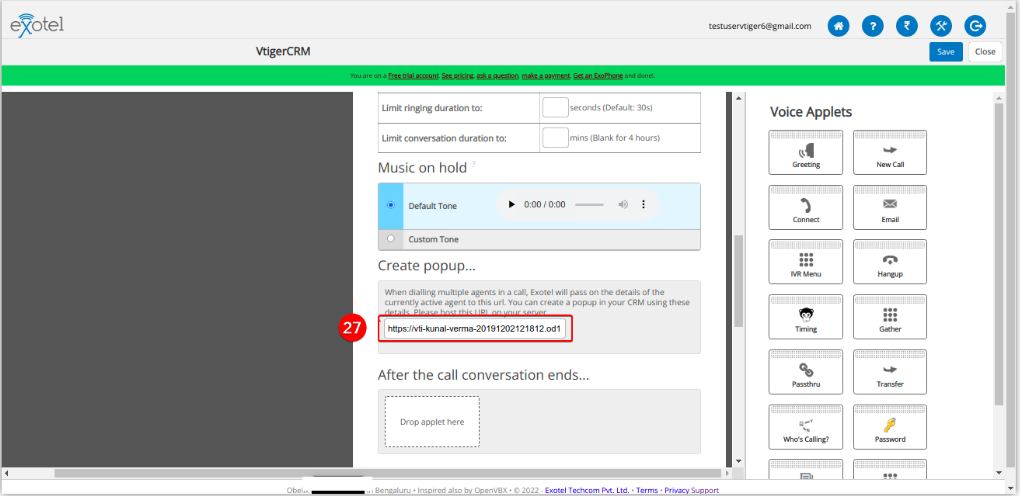
- Scroll down and paste the copied URL into Create popup field.
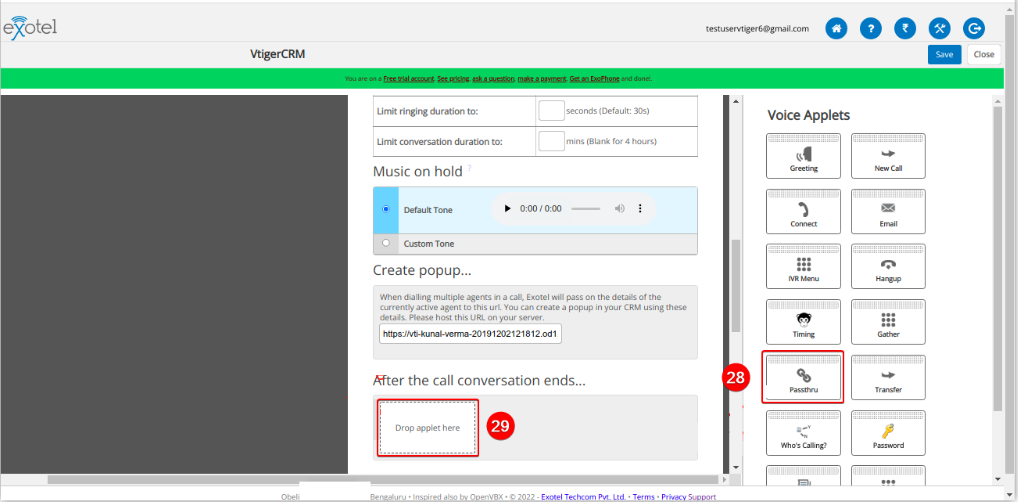
- Drag and drop the Passthru applet from the right under After the call conversation ends.
- Click on the applet.
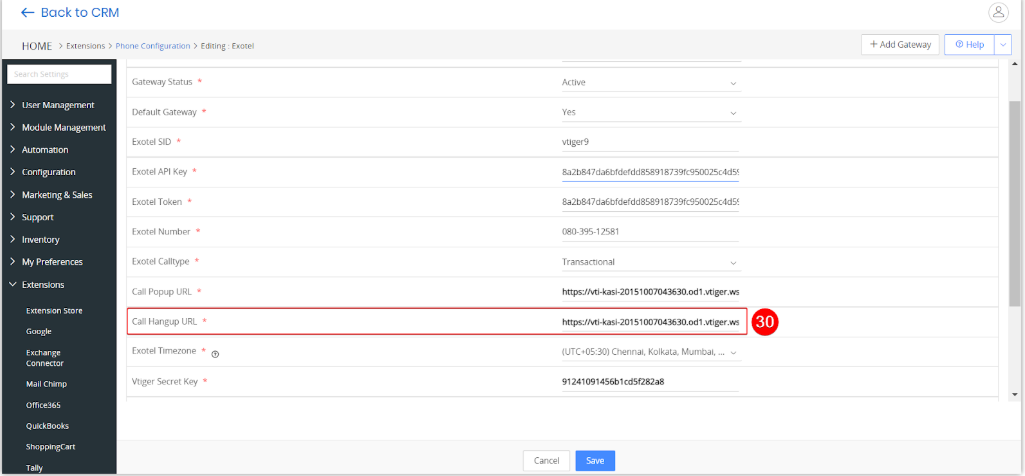
- Copy the Call Hangup URL from the CRM.
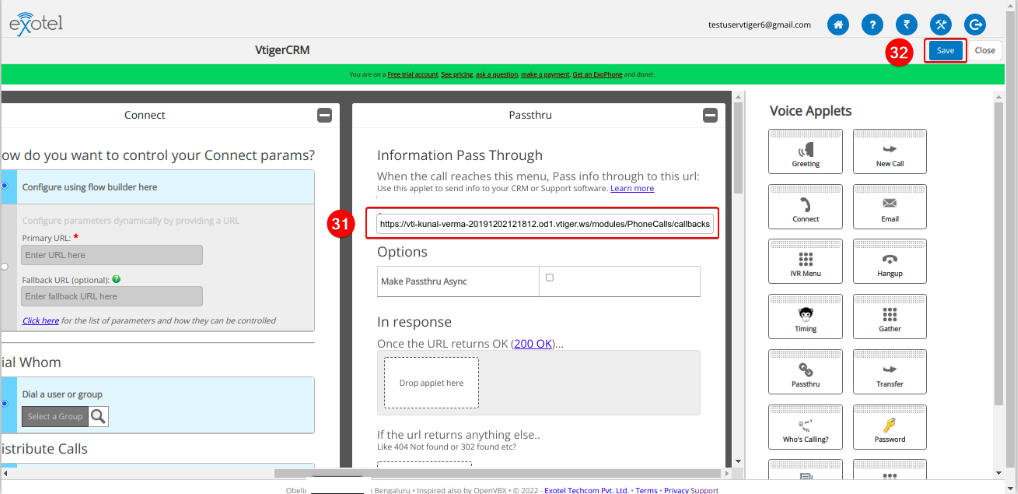
- Paste the copied URL into the textbox in Passthru.
- Click Save.
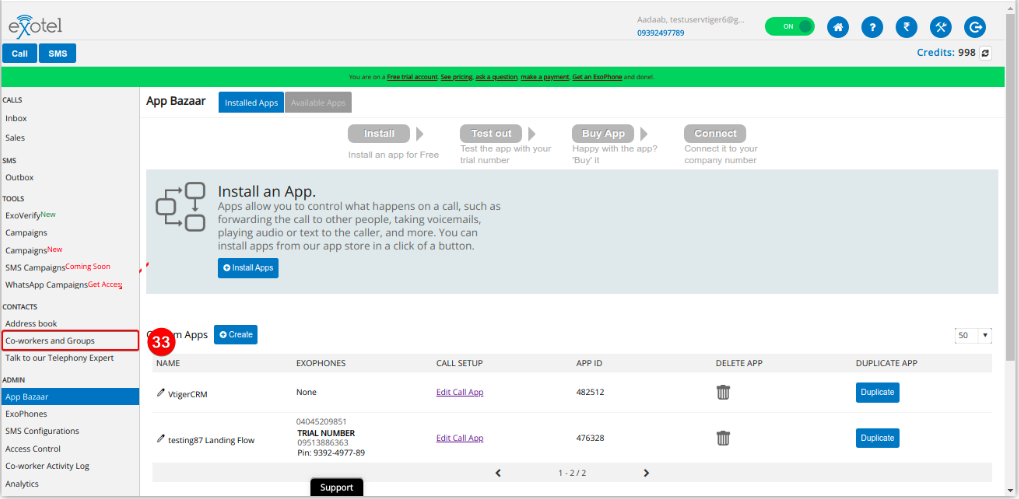
Add co-workers and their numbers in Exotel.
- Click Co-workers and Groups under CONTACTS on the Exotel sidebar.
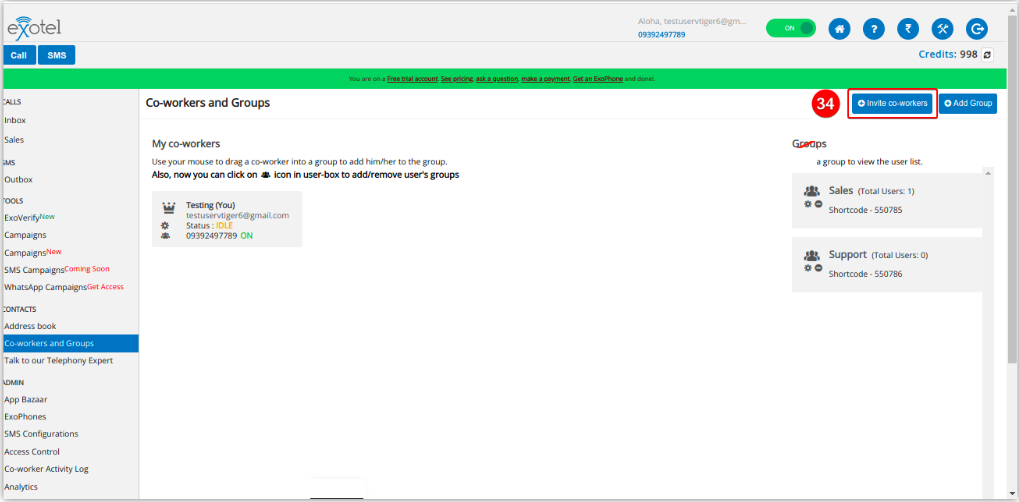
- Click +Invite Co-workers.
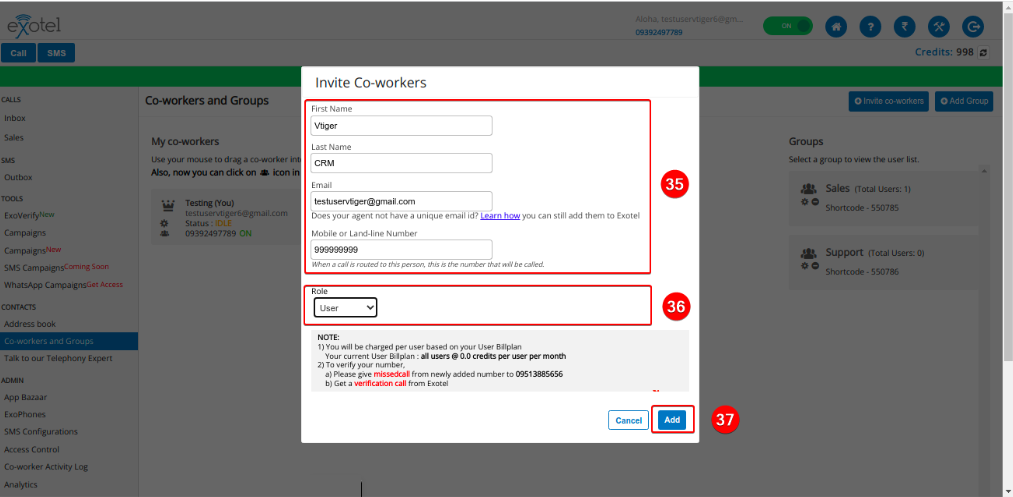
- Enter their name, email address, phone number, etc.
- Specify their role in Exotel - User, Supervisor, or Admin.
- Click Add.
Configure the Extension Number in CRM.
- Click the User Menu on the top right corner of the screen.
- Click My Preferences.
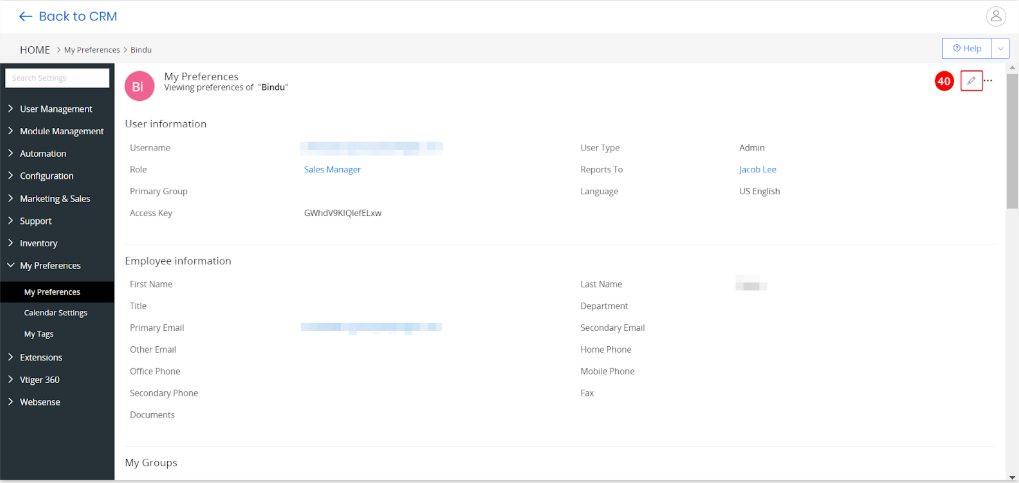
- Click the Edit icon.

- Scroll down to Phone Preferences and enter the extension number (co-worker number added in Exotel) under Exotel Extension. Prefix 0 to the extension number.
- Click Save.
Note:
- To make outgoing calls from the CRM using the Exotel gateway, you must set up your KYC details in your Exotel account. You will be able to make calls only after the Exotel team approves your KYC.
- You can now assign more than one number to a user or group based on your business requirements.
Phone Calls Logs
The log of the calls (incoming and outgoing) is listed under Main Menu > Essentials > Phone Calls. You can view the following details on this screen:
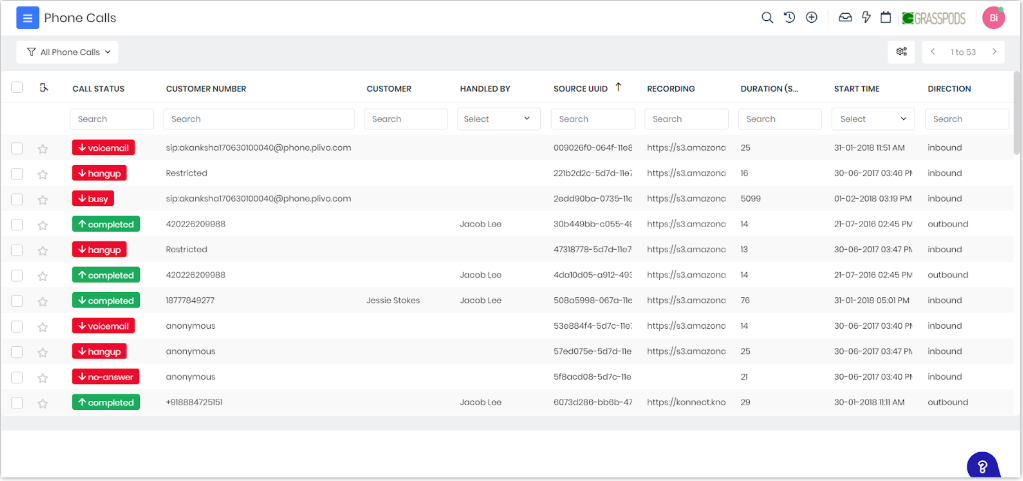
- Call status, customer number, which agent or rep handled the call (mentioned in Handled By and Assigned To fields), call duration, etc.
- Details for each call can be seen when you open the call record, such as -
- Links to the voice recording.
- Call notes.
- Call transfer details.
- Call directions, etc.
You can create a list of all your phone calls, such as missed calls, completed calls, etc., from the ListView.
To learn more about creating a list, click here.
Signed URL Approach for Accessing Call Recordings
Background
As of 8 October 2024, Exotel has changed call recording URL access from public to private to improve security. Call recordings can now be accessed only through the following mechanisms:
- Authentication using API Key and API Token
- Client IP whitelisting
Authentication using API Key and API Token
Follow the steps below to access Exotel call recordings using API Key and API Token authentication.
Note: Keep both the CRM and the Exotel tabs open.
Step 1: Copy the API Key and API Token from Vtiger CRM
- Log in to Vtiger CRM.
- Click the main Menu.
- Go to Essentials > Conversations.
- Click Phone Calls.
- Open the phone call record for which you want to access the call recording.
- In the Summary View, click the link under Recording.
- You will be redirected to the Exotel sign-in page displaying a username and password.
- Copy the username (API Key) and password (API Token) and save them securely.
Step 2: Add the API Key and API Token in the Exotel Account
- Sign in to your Exotel account.
- Paste the copied username into the API Key field.
- Paste the copied password into the API Token field.
- Save the changes to authenticate and access the call recording.
What’s New
Exotel has introduced a Signed URL approach to access call recordings securely. This is an account-level feature that, once enabled, returns an additional parameter called PreSignedRecordingUrl in the API responses of:
- GET Call Details API
- GET Bulk Call Details API
The PreSignedRecordingUrl contains a signed call recording URL that is accessible only for a limited time period (TTL – Time to Live).
- By default, the TTL is set to 5 minutes at the account level.
- The TTL can be configured between 5 and 60 minutes when enabling the feature.
Modifying TTL at the API Request Level
To provide more control, Exotel allows you to override the account-level TTL using a query parameter called RecordingUrlValidity.
- This parameter can be passed in:
- GET Call Details API
- GET Bulk Call Details API
- The value must be an integer between 5 and 60 (in minutes)
- The TTL of the returned PreSignedRecordingUrl will be set to the value specified.
Default behavior:
If RecordingUrlValidity is not specified, the TTL defaults to 5 minutes.
Error handling:
If the value is less than 5 or greater than 60, the API returns a 4XX error.
How to Enable the Signed URL Feature
To enable this feature:
- Contact your Exotel Account Director or CXM, or
- Raise a request to [email protected]
Note:
- The RecordingUrl parameter continues to provide the call recording URL, which can be accessed only through authentication or IP whitelisting.
- The PreSignedRecordingUrl parameter provides access to the same call recording using a signed URL, valid only for the configured TTL.
- Once the TTL expires, the signed URL can no longer be accessed.
Phone Call Status Values
Call status values to define the status of the calls being handled. You can see the following call statuses in the CRM:
- Ringing: For inbound calls, before the call is routed.
- In-progress: For inbound calls, after an agent or a rep picks up the call. For outbound calls, when a rep initiates a call.
- Completed: For inbound and outbound calls, after a call is completed.
- Voicemail: For inbound calls, if a call goes to voicemail.
- Hang-up: For inbound calls, if a customer hangs up the call before it is routed to a rep.
- No-answer: For an outbound call, when it is not answered, and there is no voicemail.
Troubleshooting Tips
Here are some common issues users encounter while using Exotel:
- Delayed or Missed Call Logs: Call logs may not appear in the CRM in real-time or might be missing entirely, which disrupts call tracking.
- Verify Exotel’s webhook configuration to ensure it points to the correct CRM endpoint.
- Check CRM and Exotel server performance; delays can occur during high traffic. Consider upgrading server resources if delays persist.
- Ensure that Exotel’s API rate limits aren’t exceeded and that your CRM API settings allow sufficient requests.
- Failed API Authentication: CRM fails to authenticate Exotel’s API requests, leading to communication issues.
- Check that the Exotel API Key, API Token, and SID are correctly configured in the CRM.
- Verify that API credentials haven’t expired or been changed. Update tokens if needed and re-authenticate in the CRM.
- Ensure the CRM firewall or security settings aren’t blocking Exotel’s IP addresses or requests.
- Integration Connectivity Issues: Network connectivity issues can disrupt the communication between Exotel and CRM.
- Confirm that there is stable internet connectivity and no firewall restrictions on CRM or Exotel servers.
- Regularly monitor server health, as high latency or downtime can impact connectivity.
- Implement error logging to capture connection failures for easier troubleshooting.
- Incorrect Caller Information Displayed: Caller details such as name or phone number may display incorrectly or fail to match the CRM contact data.
- Confirm that fields in Exotel are mapped accurately to corresponding CRM fields.
- Double-check any contact-matching logic within the CRM and update contact records as needed.
- Ensure that the caller ID information in Exotel is correctly set and configured.
- Unauthorized Error
- This error occurs if your Exotel account is still in the trial stage. To resolve this, upgrade to an active Exotel subscription before making calls from the CRM.