Articles in this section
Configuration - Customer Portal
Feature Availability: One Growth | One Professional | One Enterprise | One AI
Introduction
Click here to watch the video on Configuring the Customer Portal
Vtiger's customer portal is a platform to view Vtiger-specific information for your business.
It is a self-service portal and your one-stop destination for all your questions. Whether you want to know the status of an issue that you reported or an answer to a query, log in and look up relevant information.
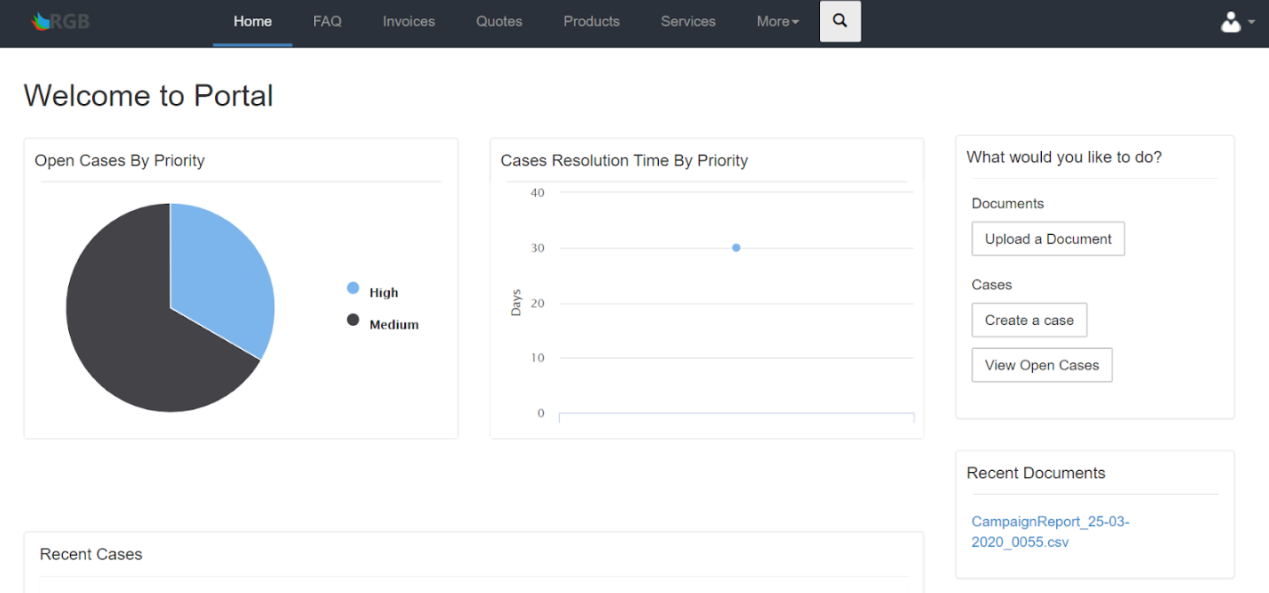
You will see something similar to the image above when you log in to the Customer Portal. You will see the status of your cases, options to create cases, view FAQs, and other information that can help you.
Benefits of the Customer Portal
The benefits of using the Customer Portal are:- Transparency: All customer-related information is readily available.
- Single platform for status updates: The customer portal is a self-service portal with information on customer login. No back-and-forth emails or follow-ups are required for the customers to get updates.
Configuring the Customer Portal
Follow these steps to configure (set up) the Customer Portal:
- Log in to your CRM account.
- Click the User Menu on the top right corner of the CRM screen.
- Click Settings.
- Select Configuration > Customer Portal.
- Go to Customer Portal settings.
- Enter or select the following information:
- Select the template for portal login and other details:
- Portal URL - This is the URL of the customer portal. It cannot be changed unless you host the portal on your server. Skip to this section to learn more.
- Default Assignee - Any case your customers create through the portal will be assigned to the selected user by default.
- Contact Support Notification (Days before) - Contacts/customers will be notified about their support end date (mentioned in the contact record) prior to the number of days you mention in this field.
- Login Details Template - The selected email template will send your customers the portal login credentials.
- Forgot Password Template - The selected email template will send the reset password email when a contact clicks the Forgot Password link while logging in.
- CSS URL for custom theme - You can add the URL of your CSS file to change the theme of the customer portal to match the standards of your organization.
- Default Scope - Choose whether to show only the records related to the logged-in customer or their entire organization in the customer portal. The records are shown under the modules in the menu. To learn more about this, click here.
- If Mine is selected, only records related to the logged-in customer are shown.
- If All is selected, all the records related to the logged-in customer’s organization are shown.
- Set up the Portal Layout:
- Portal Menu - The modules that are enabled here are shown in the menu of the customer portal. Disabled modules are hidden from the menu.
- Drag and drop the module names to rearrange them in the customer portal.
- Records Visibility - You can choose the records that you want your contacts to see in the portal. This setting is shown when you select a module under Portal Menu.
- Created by contact - If enabled, only the records related to the logged-in contact are shown.
- Created by all contacts in the organization - If enabled, the records related to all the contacts in the organization are shown.
- Created by all contacts in the organization and its subsidiaries - If enabled, the records related to all contacts in the organization and its subsidiary organizations are shown.
- Related Information - You can choose the information related to the records to be shown in the portal.
- Updates -Any update on the record is shown in the portal.
- Comments -You can add a comment on the record from the portal.
- Documents - Any document related to the records is shown in the portal.
- Set up the Portal Home Layout:
- Announcement - When you have an announcement to make or a notification to send to the customers, you can write it in the Announcement block.
- Account Representatives Widget - Must be enabled along with Assigned To so that the logged-in customer can see the name of the sales rep handling their organization.
- Greeting Widget -
- Standard greeting - The standard greeting is “Welcome to Portal”.
- Time based greeting - “Good morning Emma”, “Good evening Samantha”, etc. are examples of time-based greetings.
- Charts - Only the charts that are enabled are shown in the portal. The Pie charts in the Customer Portal will display data in the colors chosen (set up) in the Picklist settings.
- Recent Cases Record Widget - If enabled, the Recent Cases widget is shown on the portal's homepage. The widget shows the cases that your customers reported recently.
- Shortcuts - These shortcuts are available by default on the homepage of the portal -
- Add Document
- Create Case
- Open Cases
- Recent Documents Record Widget - If enabled, the Recent Documents widget is shown on the portal's homepage. The widget shows the documents that your customers uploaded recently.
- Recent FAQ Record Widget - If enabled, the Recent FAQ widget is shown on the homepage of the portal. The widget shows the documents that your customers uploaded recently.
- Set up the profile layout:
- Contacts (Contact Fields and Privileges) - Choose the fields from the Contacts module to be shown under Profile in the portal.
- Move the toggle button to the left to make a field read-only. Your customers cannot edit read-only fields in the customer portal.
- Move the toggle button to the right to give read and write permissions on a field. Your customers can edit such fields in the customer portal.
- Type a field name in the text area and click +Add Field to show it in the portal.
- Organizations (Organization Fields and Privileges) - Choose the fields from the Organizations module to be shown under Profile in the portal.
- Move the toggle button to the left to make a field read-only. Your customers can’t edit read-only fields in the customer portal.
- Move the toggle button to the right to give read and write permissions on a field. Your customers can edit such fields in the customer portal.
- Type a field name in the text area and click +Add Field to show it in the portal.
- Contacts (Contact Fields and Privileges) - Choose the fields from the Contacts module to be shown under Profile in the portal.
- Select the template for portal login and other details:
Providing Portal Access to Customers
Enable the Portal User field in the Contacts module to give your customers access to the Customer Portal.
When you do this, your customers will receive credentials on their contact email address, using which they can log in to the customer portal.
Note:
- For customers to receive their login credentials, the Primary Email field in the contact record must contain the customer’s current and active email address.
- Two-step authentication for customer portal login -When customers try to log in to the customer portal, an OTP will be sent to their registered email ID. Here, the password is step 1, and the OTP will be step 2.
Follow these steps to give a contact access to the Customer Portal:
- Log in to your CRM account.
- Click the Main Menu.
- Go to Essentials.
- Click Contacts.
- Select and open a contact record for which the customer portal must be enabled.
- Click the Details tab on the right sidebar.
- Look for the Portal User field and enable it.
- Enter a valid Support Start Date and Support End Date.
- Note: Customers will not be able to log in to the customer portal beyond the support end date.
- Click Save.
Ensuring Email Delivery
To ensure that the email with portal credentials is delivered to the customers, you must enable a setting in the CRM.
Follow these steps to ensure email delivery:- Log in to your CRM account.
- Click the User Menu on the top right corner of the CRM screen.
- Click Settings.
- Select Email Settings under Configuration.
- Click the Edit icon.
- Scroll down to the Required Opt-in for Email Delivery section.
- Enable the checkbox for Allow sending workflow emails to Contacts that have opted out.
- Click Save.
Viewing the Login and Logout Activities of your Customers
When your customers log in to or log out from the customer portal, it is recorded in the CRM in their contact record.
Follow these steps to view your customers’ login and logout activities:
- Log in to your CRM account.
- Click the Main Menu.
- Go to Essentials.
- Select Contacts.
- Open a contact record that has portal access.
- Click Filters in the Activity section in the Summary View.
- Enable Customer Portal under Customer Touchpoints.
When you do this, you will get the login and logout updates in the Activity section of the contact record.
Viewing Records Created by Customers
When customers add records, such as cases, feedback, or requests, through the Customer Portal, these records will automatically appear in the respective modules in your CRM. Additionally, if a customer adds comments to a record (e.g., a case), those comments will be visible within the record's summary view. Any reply or comment added from your end will also be visible to the customer in the Customer Portal.
Example:
When a customer creates a record, like a Case titled Login Issue, their name shows in the CreatedByExt field. If they update the description to Occurred during password reset, their name appears in the ModifiedByExt field. For comments, like an Issue reported by multiple users, the comment and their names are shown in the Comments Section. Replies from you will also be visible to the customer in the Customer Portal.
Follow these steps to view records:
- Log in to your CRM account.
- Click the Main Menu.
- Go to the respective module (e.g., Cases, Feedback, Requests). The List View of the module opens.
- Open the record created by the customer. The Summary View of the record opens.
- View the following details in the record added by the customer:
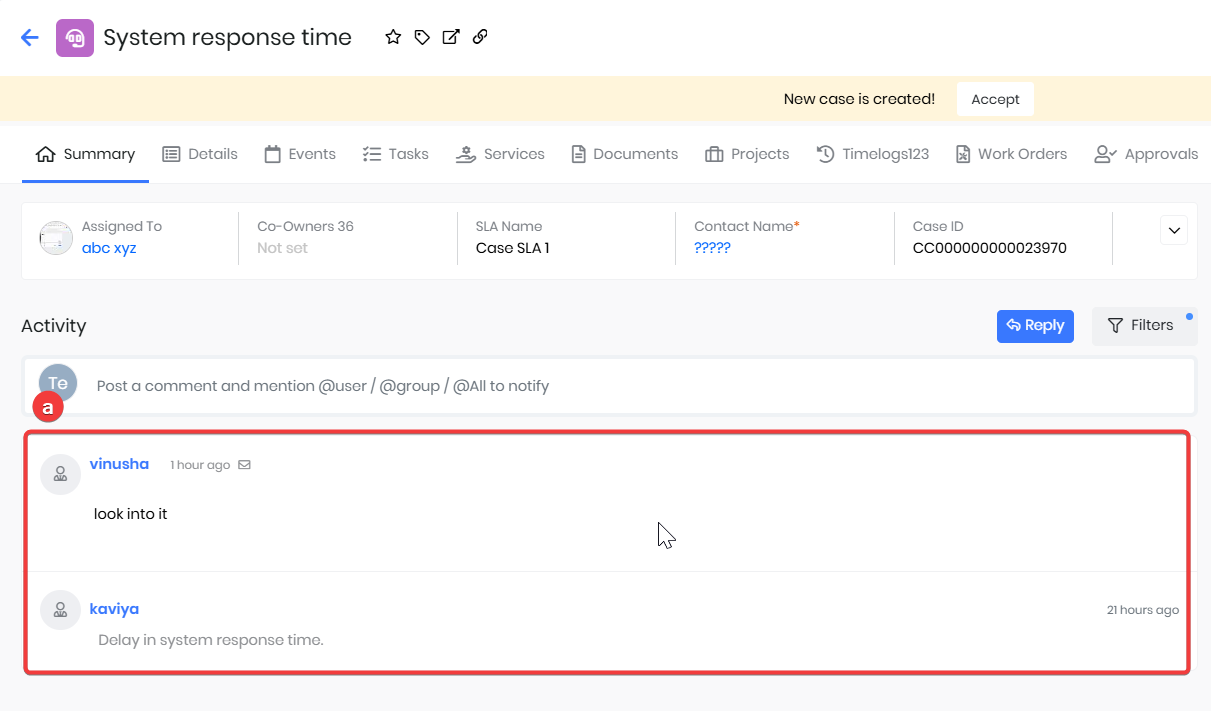
- View customer comments
- Go to the Activity section in the record's Summary View.
- Review comments added by the customer. Each comment will display the customer’s name and timestamp.
- View replies to customer comments
- Go to the Activity section in the record's Summary View.
- In the Activity section, view the reply made to the customer’s comment.
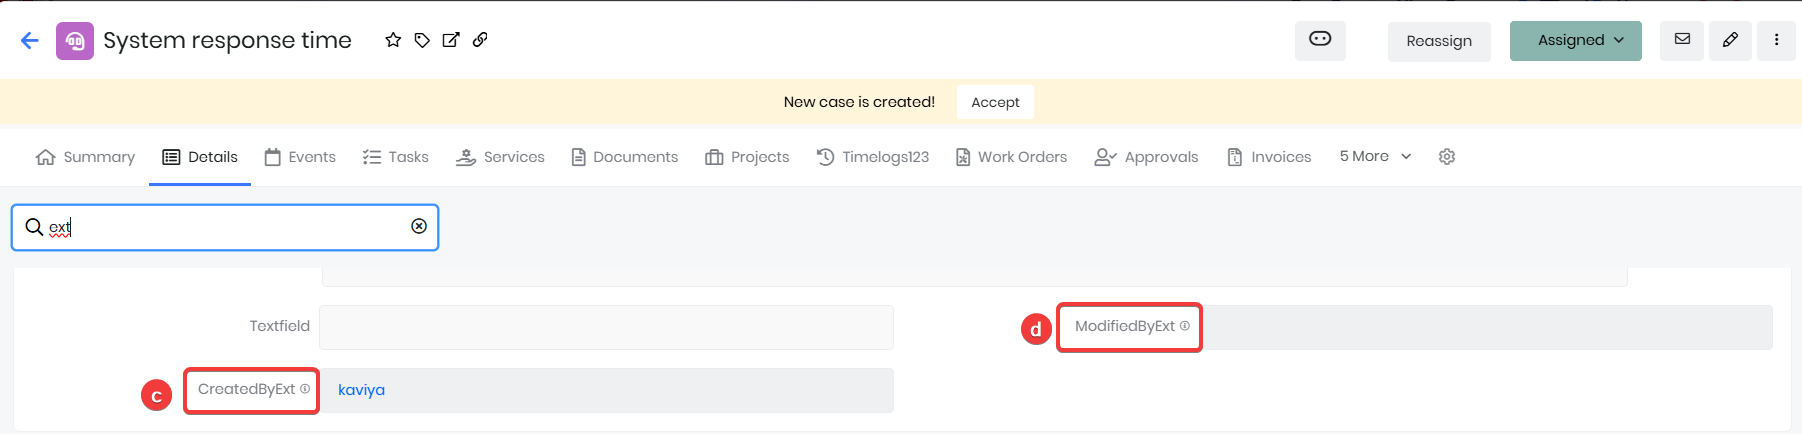
- CreatedByExt
- Click Details. The Details View of the record opens.
- Go to the CreatedByExt field.
- This field will display the name of the customer who created the record.
- ModifiedByExt
- Click Details. The Details View of the record opens.
- Go to the ModifiedByExt field.
- This field will reflect the name of the customer who last updated the record.
- View customer comments
Hosting the Customer Portal on your Server
You can host the customer portal on your website or server. Click here to download the ZIP file.
After the download is complete, you must make the following changes in the config file (/portal/config.inc.php):
- $site_URL: This is the CRM instance path.
- $CompanyName: This is the page title that appears on the browser tab.
- $logoPath: The organization’s logo with the name and extension ‘logo.ico’ must be placed in the path mentioned here.