Articles in this section
Managing User Profiles
Introduction
|
|
A CRM profile defines what actions a user can perform on CRM records. You can have different profiles, such as Sales, Support, Marketing, etc.
When a profile is associated with a role, the access rights defined in the profile are applied to all users having the role.
Only Admin users are allowed by default to set up Profiles for other users.
|
|
Feature Availability and Limits
|
|
|
|
|
| |
|
|
|
|
|
|
|
|
| |||||
|
|
|
|
|
|
|
Note: The maximum number of profiles in Help Desk Starter and Help Desk Professional are 5 and 25, respectively.
Creating a Profile
Creating a profile is simple, but simply creating it is not enough.
To apply the permissions of a profile to a user, you must associate a role with the profile. Then, users having the associated role will have the permissions set for the profile. The Search option in the Settings List View helps you quickly find specific Profile records.
So, here are the four steps that you must perform to complete the setup.
Step 1: Creating a profile
- Log in to your CRM account.
- Click the User Menu on the top right corner of the CRM screen.
- Click Settings.
- Look for the User Management section.
- Select Profiles.
- Click the +Add Profile button.
- Enter the profile name and description.
Step 2: Defining permissions
- Go to the Edit privileges of this profile section.
- Choose an app (Inventory, Sales, etc.) from the Edit privileges of the profile section and click the downward arrow.
- Choose a module. Enable or disable the checkbox for View, Create, Edit, or Delete to provide or revoke respective permissions for the module.
- Click the downward arrow on a module. All the fields in the module are shown in the Fields section.
- Move the toggle button beside a field to the left to make it invisible, center to make it read-only, or right to make it writable. Black color represents invisible, Orange represents read-only, and Green represents writable.
- Note: You cannot change permissions for mandatory fields. Skip to this section to learn more about field-level permissions.
- Scroll down to the Tools section. Enable the checkbox to provide access to a tool. Disable it otherwise.
- Click Save.
Skip to this section to learn about permissions in detail.
Step 3: Linking a role with a profile
- Click the User Menu on the top right corner of the screen.
- Click Settings.
- Look for the User Management section.
- Select Roles.
- Click on a role to edit it.
- Select Assign privileges from existing profiles under Privileges.
- Select the profiles under Assign Profiles.
- Click Save.
Step 4: Assigning the role to users
- Click the User Menu on the top right corner of the CRM screen.
- Click Settings.
- Look for the User Management section.
- Select Users.
- Open a user record to set the role.
- Click the Edit icon on the top right side.
- Look for the Roles field.
- Select a role.
- Click Save.
To learn more about Users, click here.
To learn more about Roles, click here.
Defining Profile Permissions
Profile permissions are divided into two parts:
- Module permissions
- Permissions on fields and tools
Permissions on modules
- When you open a profile, you see the following. Inventory, Marketing, Projects, etc. are all apps.
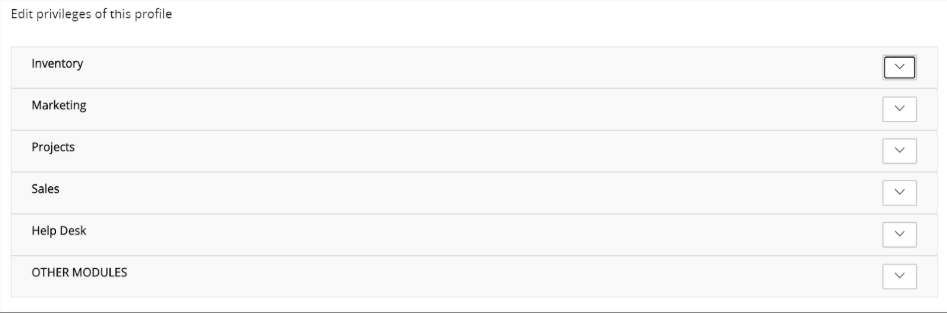
- Each app has multiple modules. When you click the downward arrow on the right side, you will see the modules.
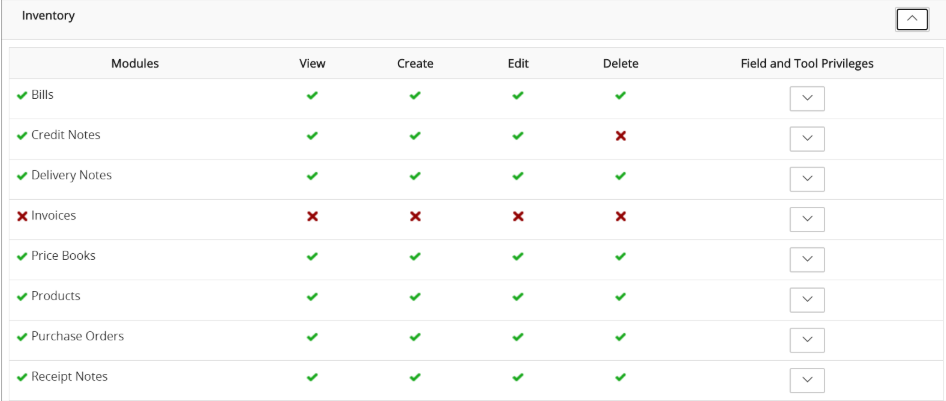
- When you click the Edit icon on the top right side of the page, you can edit the module permissions.

- Enable a checkbox to provide the permission mentioned in the column name.
- Enable the Modules checkbox to provide all permissions on all modules.
- Enable the checkbox beside a module name to provide all permissions on the module.
- Enable the checkbox beside the View, Create, Edit, or Delete to provide the respective permission on all modules.
|
|
Permissions on fields and tools
As a CRM admin, you can decide who can view and edit field values. Also, you can allow or deny access to tools such as import, export, duplicate handling, etc. in the modules.
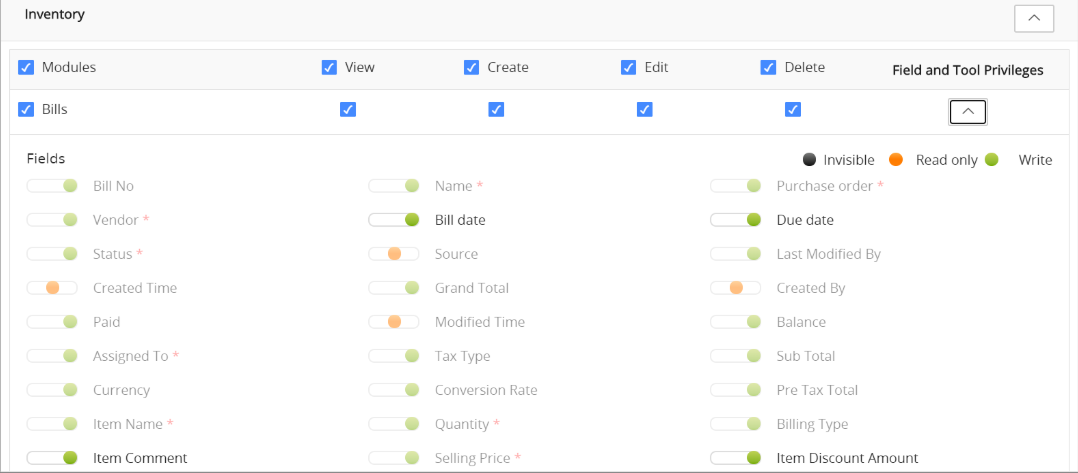
- When you click the downward arrow under the Field and Tool Privileges column for a module, you will see the fields in the module. Move the toggle button beside a field to control its permissions.
- Left, Black = Field is invisible
- Centre, Orange = Field is read-only
- Right, Green = Field is writable (editable)
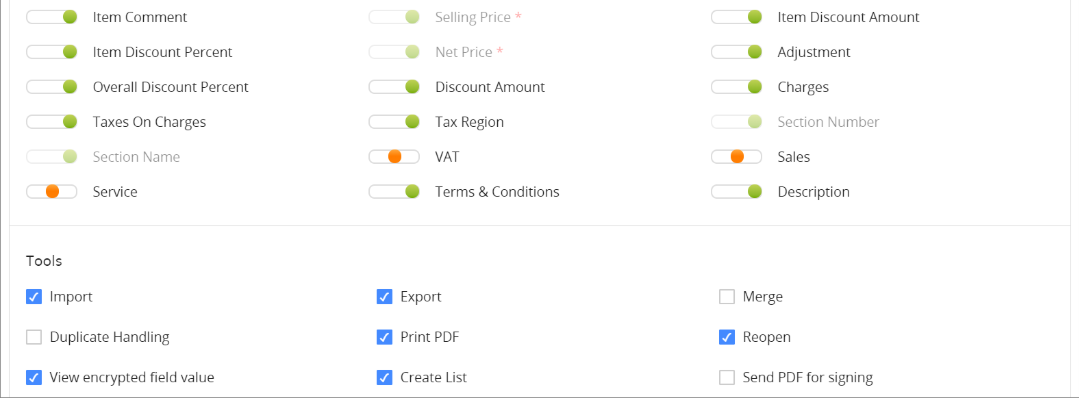
- In addition, you will also see tools relevant to the module by scrolling down. Enable or disable the checkbox beside a tool to control its permissions.
|
|
Deleting a Profile
When you delete a profile, you must transfer the roles belonging to the profile (being deleted) to another profile.
Follow these steps to delete a profile:
- Log in to your CRM account.
- Click the User Menu on the top right corner of the CRM screen.
- Click Settings.
- Look for the User Management section.
- Select Profiles.
- Hover over a profile.
- Click the Delete icon.
- Select a profile to transfer ownership from the Transfer roles to profile drop-down.
- Click Save.
Profiles vs. Sharing Rules
|
|
|
|
|
|
|
|
|
|
|
|
|
|
|
|
|
|
|
|
|
|
|
|
|
|
|
To learn more about sharing rules, click here.
Points to Remember
- You can associate multiple users and profiles with the same role.
- When you associate multiple users with the same role, the users with the role cannot see one another’s records in a module if sharing rules for the module are set to Private.
- A role always works for Profiles and Sharing Rules.
- Sales Insights and Help Desk Insights do not follow ‘Field-level restrictions’ in a profile. Even if fields such as Amount, Sales Stages, etc., are restricted in Profiles, users who are given access permission to Sales Insights and Help Desk Insights can view these fields.