Articles in this section
Vtiger Webforms
Feature Availability
Vtiger Editions: One Pilot | One Growth | One Professional | One Enterprise | One AI
Introduction
Vtiger Webforms are HTML forms that you add or embed on your website. Whenever a website visitor fills out the form, you can:
- Capture data such as visitor details, customer feedback, or vendor information.
- Automatically import data into the CRM and store it in the relevant CRM module, such as Leads, Contacts, Deals, or Cases.
Example: A customer ordered a pair of headphones from Grasspods Audio Equipment, but they arrived damaged. The customer visits the My Orders page and fills out a web form to report the issue. Once submitted, a case record containing all their details is automatically created in the CRM. You can then review this record and take appropriate action to resolve his problem.
Benefits of Webforms in Vtiger CRM
The benefits of using Vtiger Webforms are:
- Capture and store user information automatically in your CRM.
- Save time by eliminating manual data entry.
- Use structured fields and validation checks to collect accurate and relevant data and minimize mistakes.
- Capture leads directly from your website, converting visitors into potential customers.
- Boost lead generation, manage customer service requests, and track vendors, turning website interactions into actionable insights.
In this article, you will learn about:
- Creating a Webform
- Adding a Webform to the Website
- Obtaining Consent through Webforms
- Integrating Existing Webforms
- OTP in Vtiger Webforms
- Blacklisting Spam IDs for Webform
- Troubleshooting tips
Key Terminology
|
|
|
|
|
|
|
|
|
|
|
|
|
|
|
|
|
|
|
|
|
|
|
|
|
|
|
|
|
|
|
|
|
|
|
|
Creating a Webform
Follow these steps to create a Webform:
- Log in to the CRM.
- Click the User Menu in the top right corner of the CRM screen.
- Click Settings.
- Go to Automation > Webforms. The webforms page opens.
- Click +Add Webform. The Adding new page opens.
- Enter or select information for the sections below while creating a webform.
- Webform Information
- User Assignment
- Webform Field
- Additional Hidden Field
- Upload Documents
Webform Information Block
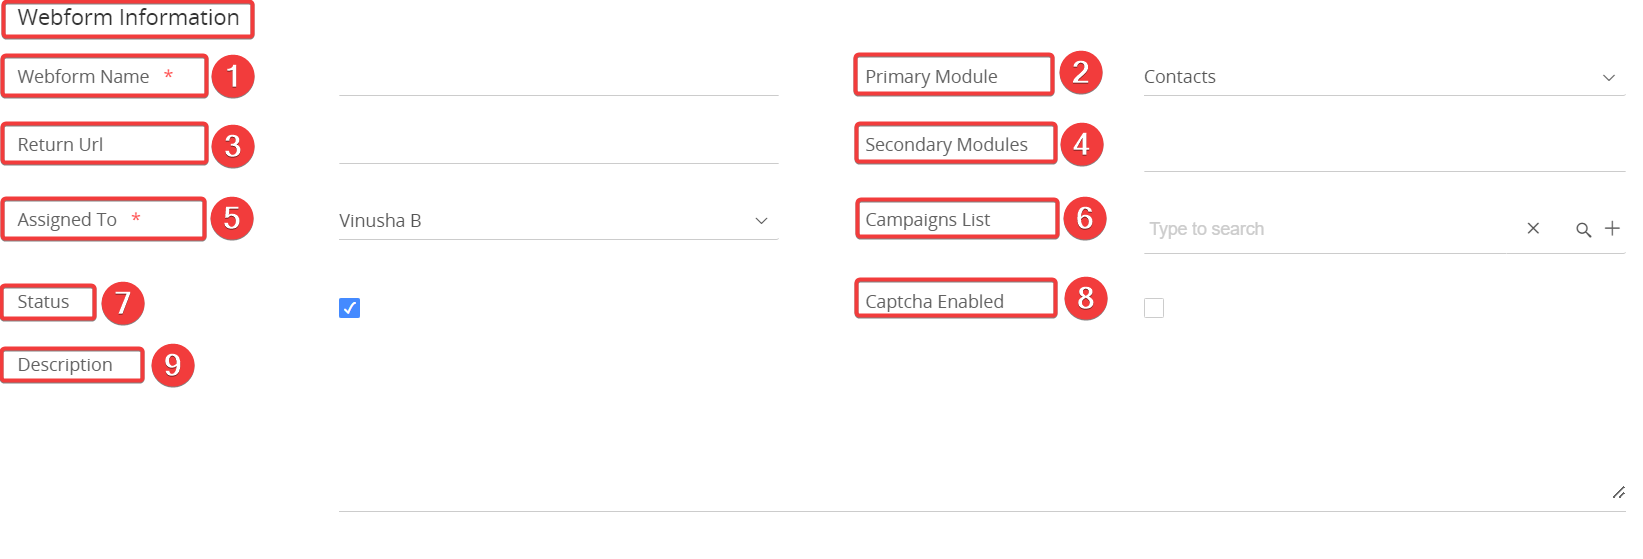
Enter or select information in the Webform block:
- Webform Name - Webform name for your reference.
- Primary Module - Select the Module(e.g., Leads, Contacts, Organizations) where you want a record to be created when the webform is submitted.
- Return URL - The web page URL where users will be redirected after successfully submitting the webform.
- Secondary Modules - Modules related to the primary module, in which a record must be created.
- Assigned To - The user or group in the CRM to whom you want the records created from the webform to be assigned.
- Note: Records are assigned to this user only when Round Robin Assignment is disabled.
- Campaigns List - If Leads or Contacts is the Primary Module, the webform submissions can be linked to one or more selected campaigns.
- Status - Webform is active if the status checkbox is enabled. Otherwise, it is inactive.
- Captcha Enabled - Enabling a captcha prevents bots from generating unnecessary leads through your web form due to automated scripts.
- Description - Provide a brief note or explanation about the webform for internal reference.
User Assignment Block
The User Assignment section enables you to assign webform records to CRM users using the Round-Robin method, distributing records evenly in a set order. For example, if the users are Samuel Johnson, John Doe, and Rahul Kapoor, the first record goes to Samuel, the second to John, the third to Rahul, and then the cycle repeats.
Follow these steps to enable round-robin assignment:

- Assign Users in Round Robin - Enable the checkbox to assign the records using the Round Robin method.
- Round Robin user list - Select users or groups from the drop-down to assign records.
Note: If a user is specified in the Assigned To field with Round Robin enabled, the record will be assigned through Round Robin instead of to the Assigned To user.
Webform Fields Block
This block allows you to select the fields that will be displayed in your Webform.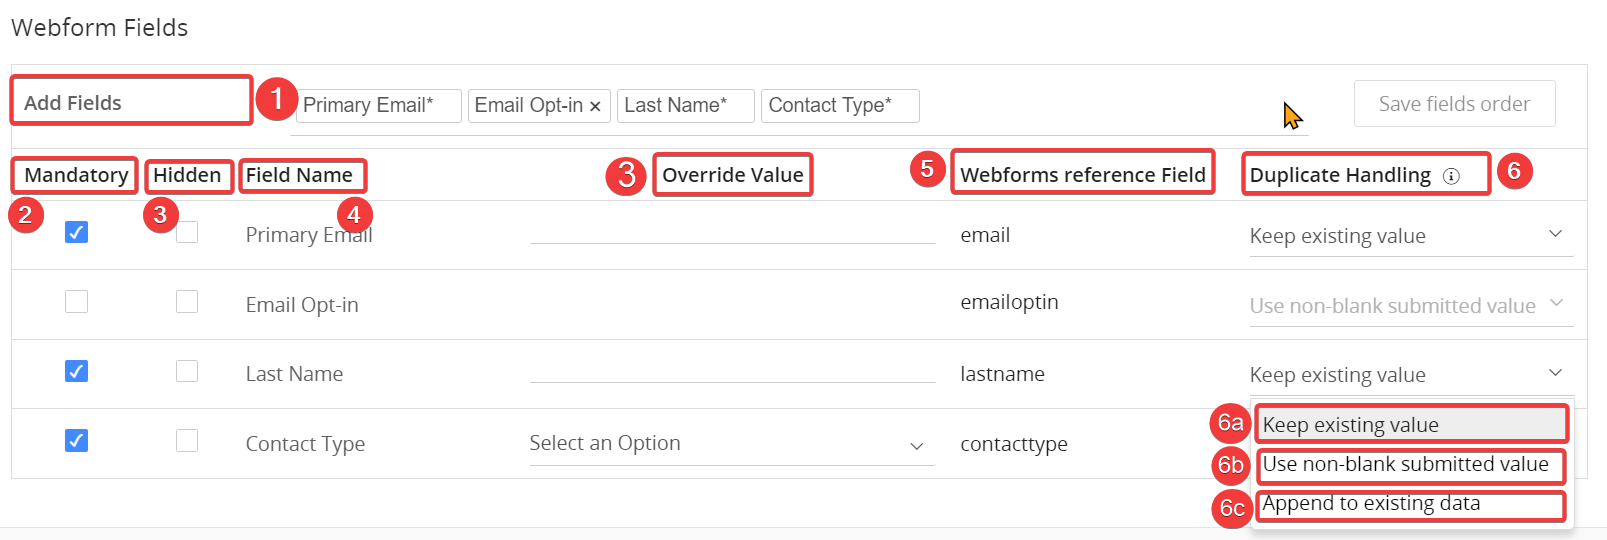
Enter or select information in the Webform Fields block:
- Add Fields - Select the fields from the drop-down menu that you want to appear on the webform. You can reorder the fields using drag-and-drop.
- You can use the Multi-select Combo Box field type to allow users to select multiple values using a drop-down with checkboxes. This is useful for scenarios where users must choose multiple options, like selecting preferences or interests.
- Mandatory Field - Enable the checkbox to make a field mandatory, ensuring users can only submit the form after completing it.
- Hidden Field - Enable this option to hide the field from the web form. The value set in the override value will be automatically pre-filled and saved when the form is submitted. For example, if the Organization field is hidden and the override value is set to Apex Pvt, then every time the form is submitted, the Organization for all records will be stored as Apex Pvt, even though users didn't see or fill in that field.
- Field Name - The fields added will be listed here.
- Webforms Reference field -The name assigned to the field in your CRM for reference purposes.
- Duplicate Handling - Choose how to handle duplicate record submissions from the webform. You can select from the following options:
- Keep existing value - This option retains the existing values in the CRM. If a field has no value, the submitted value is considered.
- Use non-blank submitted value - Replace the CRM value with the submitted value, but only if the submitted value is not blank.
- Append to existing data - Adds the submitted value to the existing CRM value. In this case, you must set up a Concatenation Separator (under Settings > Configuration > Configuration Editor) to separate the new data from the existing value.
Note: When adding a contact field during web form creation, a dropdown to select the country code will appear in your webform.
Additional Hidden Fields
Hidden fields are added to a webform to capture data without user input. They can hold a set override value or dynamically pull data from URL parameters like user IDs or campaign info.

- Add Fields - Select the field from the drop-down that should be hidden. These fields will not be visible to users in the webform.
- Field Name - The list of hidden fields selected will be listed here.
- URL Parameter - A URL parameter is a value added to the webform's URL that automatically populates hidden fields with specific data.
- Override Value - The value assigned to hidden fields in the webform that will be included upon form submission.
Review the following examples.
- If you set the campaign as a hidden field and use campaignid as the URL parameter. When an override value (e.g., 123) is assigned, the hidden field (campaign) will always use this value, regardless of any campaignid value in the URL.
- Example :
- URL: example.com/form?campaignid=456
- Hidden field campaign value on submission: 123 (override value)
- Example :
- If no override value is set, the hidden field (campaign) will capture the exact value provided in the URL parameter (campaignid).
- Example:
- URL: example.com/form?campaignid=456
- Hidden field campaign value on submission: 456 (from URL parameter)
- Example:
Note:
- If any fields are added in Webform fields and marked as mandatory, they cannot be added to the hidden fields.
- Add only the English alphabet, numbers, and underscores to the URL parameter.
Upload Document
You can provide a field to allow web form users to upload documents and files from the webform.
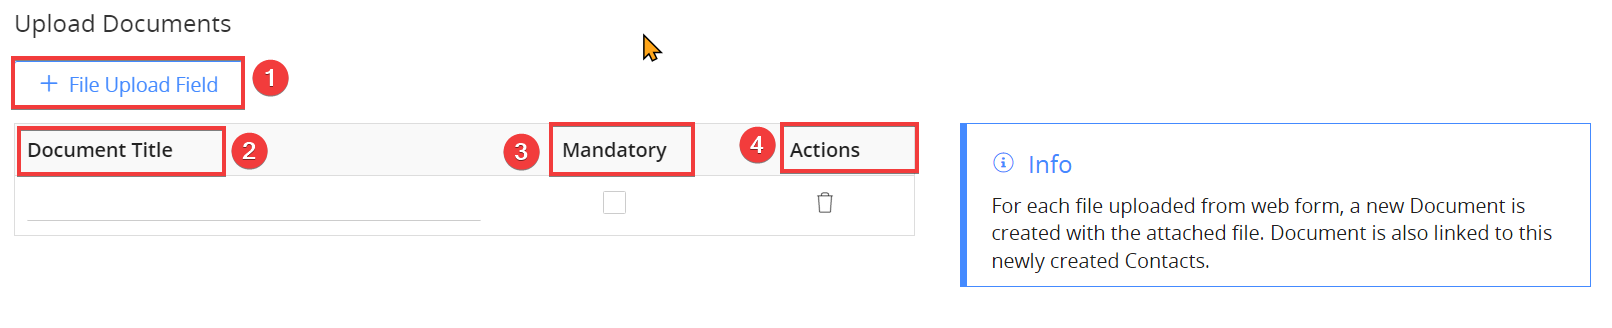
Follow these steps to provide an option to upload documents:
- + File Upload Field - Click the button to add a new file.
- Document Title - Provide a name to the field shown in the webform.
- Mandatory - Mark the field as Mandatory by enabling the checkbox.
- Actions - Click the Delete icon to remove the field.
- Click Save.
After saving the webform, it will be available in the webforms module of the CRM.
Adding a Webform to a Website
Adding CRM webforms to your website is easy and helps collect customer data directly into your CRM system. With just a few quick steps, you can embed these forms to keep customer records automatically updated.
Follow these steps to add a webform to your website
- Log in to the CRM.
- Click the User Menu on the top right corner of the CRM screen.
- Go To Settings > Automation > Webforms. The Webforms page opens. You can copy the HTML code in either of the following ways:
- Click on the Get form code icon by hovering over the Webform. A page with HTML code opens.
- Open the respective Webform and click on the Get form code icon. A page with HTML code opens.
- Click Copy to clipboard.
- The webform code gets copied. You can paste it into your website’s source code.
Note:
- To test a webform, copy its code from the CRM and paste it into a text editor such as Notepad++, etc. Save the file in .html format. Open the HTML file to check how the webform appears. The HTML file opens in your web browser.
- Records created through webforms are connected to existing records in the CRM. For instance, when an existing contact submits a webform to create a case, it will be linked to their contact record in the CRM.
- You can also integrate the webforms into WordPress easily. Click here to learn more.
Obtaining Consent Through Webforms
Consent for marketing emails is crucial when collecting contact details through web forms. Vtiger CRM ensures users' consent to receive emails by automatically adding an Email Opt-in field whenever a Primary Email field is included in web forms.
Primary Email and Email Opt-in Field
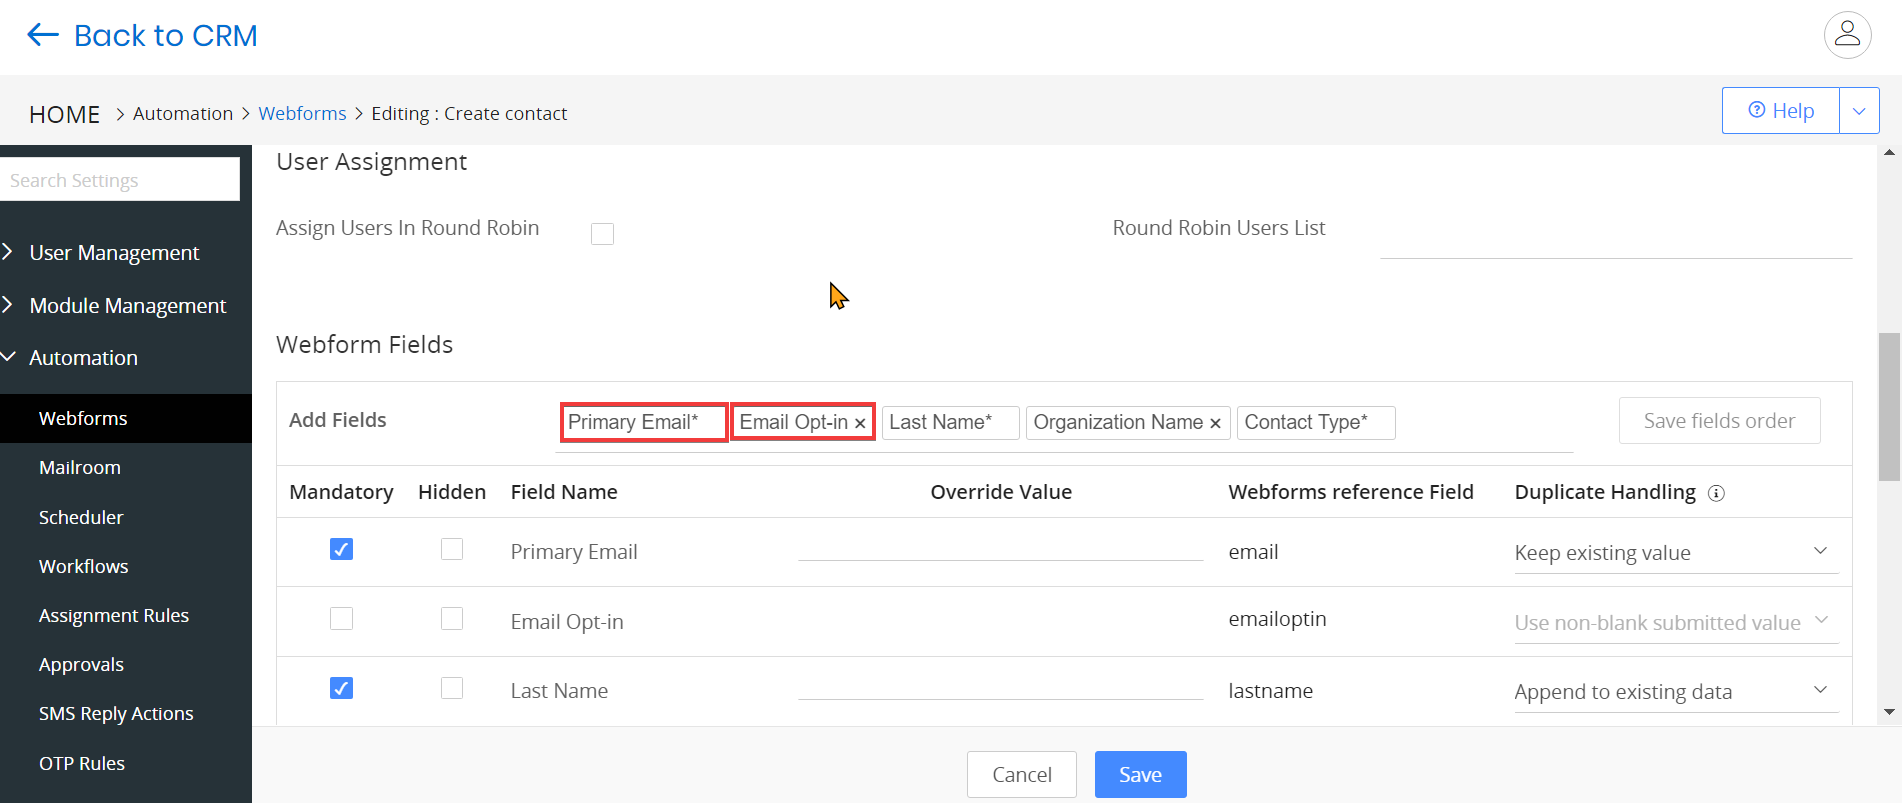
When you add a Primary Email field to your webform, an Email Opt-in checkbox is automatically included. This checkbox ensures that users can grant permission to receive marketing emails. For example, if you’re gathering leads through a webform, the email field will always include the option for the user to opt in or out of receiving marketing messages.
To learn more about email opt-in and marketing emails, click here.
Webforms for Non-Personal Modules
When creating webforms for non-personal modules like support cases (e.g., customer support forms), the Email Opt-in field is automatically added if you collect a contact's email address. This ensures that, even if the webform isn't intended for marketing, you still capture consent if you decide to send marketing emails later.
Note:
- A hidden checkbox cannot be enabled for the Email opt-in field. When a customer submits a webform and does not enable the Email Opt-in checkbox, the CRM's opt-in value is set to None.
- Vtiger retains the existing value of the Email Opt-in field when an existing contact submits a webform without checking the email Opt-in checkbox.
Integrating Existing Webforms
If you already have webforms on your website for various purposes, you can integrate them with Vtiger CRM to automatically store the submitted data in Vtiger.
Follow these steps to integrate existing webforms:
- Create a new webform in Vtiger that aligns fields with the Existing Webform that you want to integrate.
- Once you finish creating the webform in Vtiger, you can open the HTML code in either of the following ways:
- Click on the Get form code icon by hovering over the Webform. A page with HTML code opens.
- Open the respective Webform and click on the Get form code icon. A page with HTML code opens
- Copy the following HTML code and paste it into your existing webform HTML code:
- The Form Action URL specifies the endpoint where the form data is sent upon submission. It is crucial to ensure that the data is processed correctly by the Vtiger CRM.
- The Public ID uniquely identifies the specific webform in Vtiger CRM. It ensures that the submitted data is associated with the correct module.
- Modify the field names in your existing webform to match the reference field names in Vtiger webforms. You can find the exact field names (like firstname for First Name and email for Email) by referring to the Field Information block in the Vtiger webform you create
After making these changes, when users fill out and submit the existing webform on your website, the data will be automatically sent to Vtiger CRM and stored in the module you selected while creating the Webform.
Autoresponding to Leads Generated via Webforms
You can automatically send a thank-you email to Leads created through webforms by configuring a workflow. This lets you send an immediate confirmation message to users after they submit the form.
Follow these steps to configure an Autoresponder Email for Webform Leads:
- Log in to the CRM.
- Click the User Menu in the top-right corner of the screen.
- Go to Settings > Automation > Workflows. The Workflows page opens.
- Click +New Workflow.
- Select Standard.
- Enter or select the following information in Basic Information:
- Workflow Name: Enter the workflow name as Webform Lead – Thank You Email.
- Target Module: Select Leads as the Target Module.
- Status: Set the status to Active.
- Enter the description as: Automatically sends a thank-you email when a Lead is created through a webform.
- Enter or select the following information in Workflow Trigger:
- Under Trigger workflow on, select the Lead Creation radio button.
- Enter or select the following information in Entry Criteria:
- Click +Add Condition under All Conditions.
- Add a condition where Source is Website to ensure the workflow runs only for leads generated through webforms.
- Enter or select the following information in Actions:
- Click Add Action and choose Send Mail.
- Enter or select the following information:
- Action Title: Enter a title for the action.
- From: Enter the sender’s from address.
- To: Enter the recipient’s email address.
- Subject: Enter the email subject.
- Create or select an Email Template, and enter the required email details (recipient, subject, and content).
- Click Save.
- Click Save to activate the workflow.
Once configured, a thank-you email will be automatically sent whenever a Lead is created via a webform on your website.
Adding OTP to Vtiger Webforms
This Add-on improves your web forms by reducing spam and verifying submitted information. When a visitor fills out a form, they must provide a valid contact method. This triggers an OTP (One-Time Password) that they must enter to complete their submission, filtering out spam bots and ensuring accurate contact details.
Follow these steps to add OTP verification in Vtiger Webforms:
- Log in to your CRM account.
- Click the main menu.
- Click Add-ons at the bottom of the menu. The Add-on page opens.
- Search for OTP in Vtiger Webforms in the search bar.
- Click Install.
- After installing, click the User Menu in the top right corner of the CRM screen.
- Go to Settings > Automation > Webforms. The webforms page opens.
- Click and open an existing webform or create a new one by clicking +Add Webform. A new section called OTP Verification will be added.
- Enter or select the following information for OTP verification
- Email-based Verification
- SMS-based Verification
- Choose the Email/SMS field to which the OTP should be sent.
- Click Save.
OTP verification will now be integrated into your webforms. Your customer, contacts, etc., will be expected to enter the OTP when filling out the webforms to submit them.
Blacklisting Spam IDs for Webforms
The Blocked IPs List feature in Vtiger CRM helps prevent spam by automatically blocking IP addresses known for unwanted submissions. If an IP is detected as spam, it is immediately added to the blocked list, and the admin receives a daily email summarizing all blocked IP addresses. The admin also has the option to manually unblock any IP addresses if needed, ensuring better control over web form submissions.
Follow these steps to manage the blocked IPs list:
- Log in to the CRM.
- Click the User Menu in the top right corner of the CRM screen.
- Click Settings.
- Go to Configuration.
- Click Blocked IP. The Blocked IP’s page opens.
- You can view the following information on this page:
- Blocked IP Address - IP addresses added to the Blocked IPs list will be displayed, and any web form submissions from these addresses will be automatically rejected.
- Records Created - The number of records created after the IP address is unblocked.
- Blocked Webform Requests - The total number of webform submissions denied because they came from blocked IP addresses.
- Action - Options to manage the blocked IP addresses, such as blocking or unblocking existing ones.
- Add Blocked IPs -This button displays a pop-up window for adding and saving an IP address to the Blocked IPs List.
- Logs - Page that shows data from the past seven days of webform submissions, including rejected entries due to blocked IP addresses.
Troubleshooting tips
- Form Not Submitting:
- Ensure all mandatory fields are filled in.
- Verify that CAPTCHA or OTP verification, if enabled, is working correctly.
- Data Not Syncing to CRM:
- Confirm that the webform's Public ID and Post URL are correctly set in the form.
- Ensure that field names in the form match the corresponding CRM field names.
- Verify module configurations, especially Primary and Secondary Modules.
- Duplicate Record Handling Issues:
- Check if duplicate handling settings (e.g., Keep existing value, Append to existing data) are correctly configured.
- Review if records are being overridden based on CRM settings for duplicates.
- Round Robin Assignment Not Working:
- Ensure the Round Robin option is enabled in the User Assignment section.
- Confirm that selected users or groups are correctly listed in the Round Robin User list.
- Hidden Fields Not Populating:
- Verify that the override value is correctly set for hidden fields.
- Ensure that the URL parameters are formatted correctly when passing values to hidden fields.
- Unable to Upload Files:
- Ensure the file upload field is added and marked as mandatory if required.
- Verify file type and size restrictions are set correctly and communicated to users.
- IP Address Blocked:
- Check if the user's IP is on the Blocked IPs list and remove it if needed.
- Review the logs to determine if security features like CAPTCHA triggered the block.
- Webform Not Redirecting After Submission:
- Verify the Return URL is entered correctly and points to a valid, accessible page.
- Ensure no typos or incorrect URLs are causing redirection failures.