Articles in this section
User Management - Users
Feature Availability
Vtiger Editions: One Pilot | One Growth | One Professional | One Enterprise | One AI
Introduction
Users in Vtiger CRM are employees of your company who actively use the CRM, each having a unique set of login credentials and access to features. While every user is an employee, not all employees are CRM users. The User field in the Employees module helps identify employees who are also CRM users. When a user is created in Vtiger CRM, an employee record is automatically generated, and the User field is enabled. However, creating an employee record does not automatically create a user account, and the User field remains disabled. If an employee record with the same Primary Email as the Username in a user account exists, the system links the user to the corresponding employee record.
To learn more about Employees in Vtiger CRM, click here.
Benefits of Users in User Management
- Provides secure access to CRM features tailored to user roles and responsibilities.
- Enhances productivity through centralized data management.
- Automates record linkage between employees and users for seamless data consistency.
- Improves accountability and visibility within teams through role-based permissions
In this article, you will learn about:
- Adding a user
- Changing the username
- Changing the password
- Changing the access key
- Logging in as another user
- Importing users
- Exporting users
- Changing CRM account ownership
- Suspending a user
- Reactivating a user
- Deleting a user
Key Terminology
|
|
|
|
|
|
|
|
|
|
|
|
|
|
|
|
|
|
|
|
|
|
|
|
To learn about the other fields in Users, click here.
Adding a User
You can add users to the CRM only if you are an Admin user or the CRM account owner.
Follow these steps to add a user:
- Log in to your CRM account.
- Click the User Menu on the top right corner of the CRM screen.
- Click Settings. The Settings page opens.
- Look for the User Management section.
- Select Users. The Users page opens.
- Click the +Add User button. A Creating New User page opens.
- Enter or select the following information to create a new user:
- User Information
- Employee Information
- User Address
- Currently and Number Preferences
- Phone Preferences
- Business Hours
- Vtiger Usage Preferences
- Signature
- Click Save.
Note:
- Mandatory fields, such as Username, Role, User Type, Password, Confirm Password, Last Name, and Primary Email, must be completed (marked with an asterisk *).
- A verification email is sent to the user's Primary Email and Username email addresses. The user must click the verification link to activate email functionality.
Now, we will learn about each section in detail
User Information
User’s primary information such as username, password, group, user type, etc.
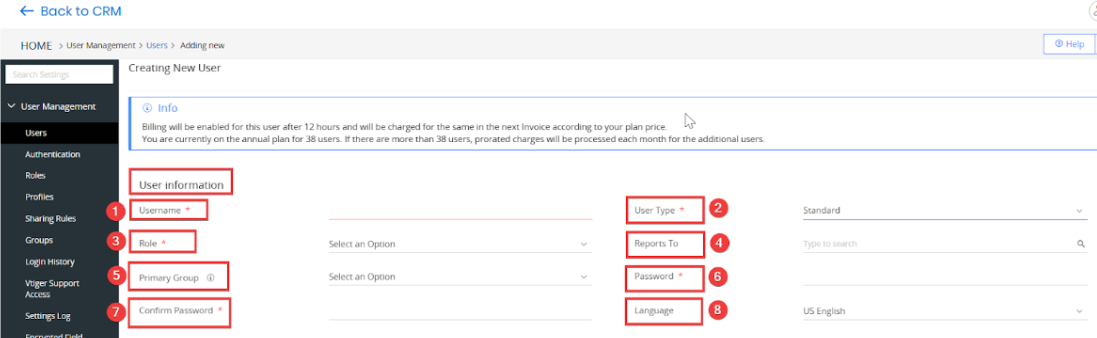
- Username - The unique identifier for the user to log in to the CRM.
- User Type - Defines the user's access level
- Light Agent - A user with limited access and permissions, typically for read-only or basic interaction with the CRM.
- Can view records but has minimal editing or creation rights.
- Designed for users who only need to collaborate or access data without full functionality.
- Common for team members like support staff or collaborators who don't manage leads or sales.
- Single App User - A user with access restricted to a specific application or module within the CRM.
- Only permitted to use one app or feature (e.g., a survey app, time tracker, or lead generation tool).
- Ideal for specialized roles where the user only interacts with one functional area of the CRM.
- Cost-efficient option for users with specific and limited requirements.
- Admin User - A user with full access to all CRM modules, settings, and configurations.
- Responsible for managing the CRM setup, user accounts, permissions, and integrations.
- Can add, edit, or delete users and configure workflows, modules, and reports.
- Typically used by IT teams, CRM managers, or business owners.
- Platform User - A user with restricted access, primarily designed for interacting with VTAP apps via mobile interfaces.

- No access to the CRM’s web or mobile interface; limited to MyApps, VTAP, and VCAP runtime.
- Platform Users can’t be set as the Report To user for other users.
- Platform Users can’t be selected as Approvers in the Approvals process.
- Platform Users can’t use any Role/Profile except the one specifically assigned to them. (e.g., similar to how Light Agents can only use Light Agent Roles/Profiles).
- Designed for roles like field agents, app-only users, or external collaborators.
- Light Agent - A user with limited access and permissions, typically for read-only or basic interaction with the CRM.
Note: If a Platform User attempts to access CRM URLs or logs in through unsupported channels, they are redirected to MyApps (both on CRM and mobile).
- Role - Specifies the position or job function of the user within the CRM hierarchy.
- Reports To - Identifies the user’s direct supervisor.
- Primary Group - The main group or team to which the user belongs.
- Password - A secure credential for the user to access the CRM account.
- Confirm Password - A re-entry of the password to ensure accuracy during setup.
- Language - Specifies the default language interface for the user in the CRM.
Employee Information
User’s work-related name, primary email, department, phone number, etc.
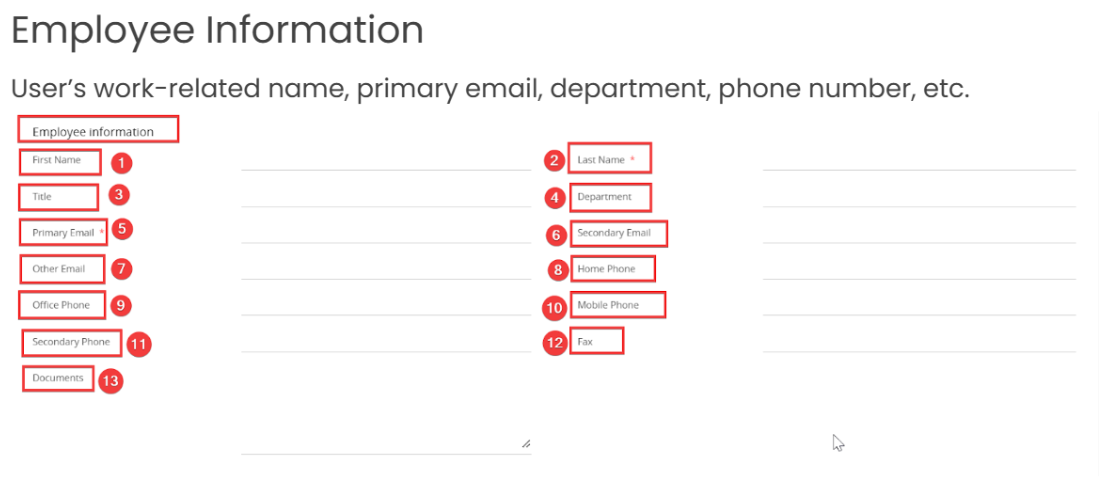
- First name - The user’s given name for identification.
- Last name - The user’s family or surname for identification.
- Title - The user’s professional designation or job role (e.g., Manager, Consultant).
- Department - The organizational unit or division the user belongs to (e.g., Sales, Marketing).
- Primary Email - The main email address used for communication with the user.
- Secondary Email - An alternate email address for communication if needed.
- Other Email - Any additional email addresses for the user.
- Home Phone - The user’s personal landline phone number.
- Office Phone - The landline phone number for the user’s office or workstation.
- Mobile Phone - The user’s primary mobile or cell phone number.
- Secondary Phone - An additional phone number for the user, if available.
- Fax - The user’s fax number for receiving or sending document.
- Documents - Uploaded files or records associated with the user (e.g., ID, certifications).
User Address
User’s address information that includes details such as street, city, state, etc.
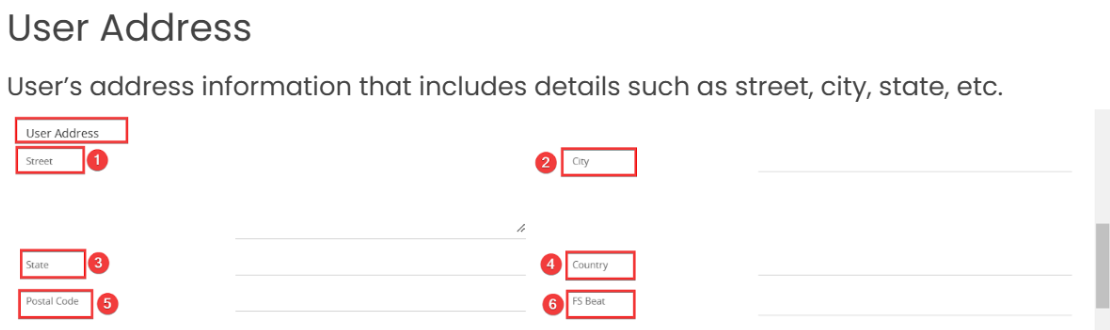
- Street - The user’s street address or location for correspondence.
- City - The city where the user resides or works.
- State - The state or region where the user resides or works.
- Country -The country of the user’s residence or work location.
- Postal Code - The zip or postal code for the user’s address.
- FS Beat - A specific area, zone, or territory assigned to the user.
Currency and Number preferences
User’s currency-related details such as preferred currency, digit grouping pattern, symbol placement, etc.
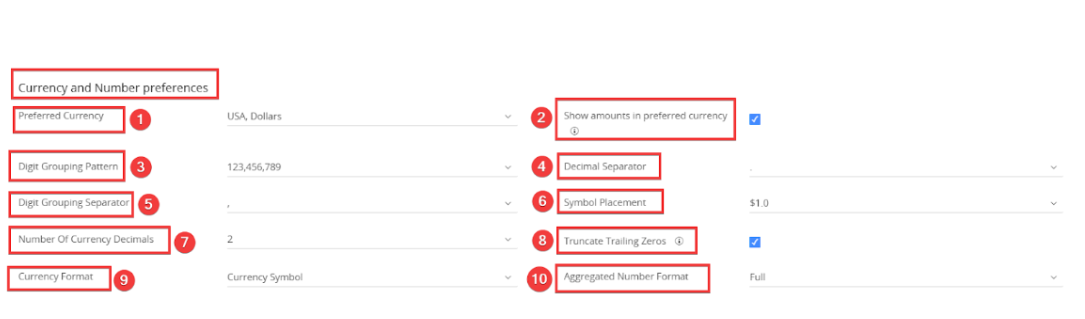
- Preferred Currency - The default currency the user selects for transactions and reports.
- Show amounts in preferred currency - Enables conversion of displayed amounts into the user's preferred currency.
- Digit Grouping Patten - Defines how numbers are grouped.
- Decimal Separator - The symbol used to separate the integer and fractional parts of a number (e.g., "." or ",").
- Digit Grouping Separator - The symbol used to separate groups of digits in large numbers.
- Symbol Placement - Defines whether the currency symbol appears before or after the number (e.g., $100 or 100€).
- Number of Currency Decimals - The number of decimal places displayed for currency values (e.g., 2 for 100.00).
- Truncate Training Zeros - Option to remove unnecessary zeros after the decimal point.
- Currency Format - Determines whether the currency is displayed using the code (e.g., USD, EUR) or the symbol (e.g., $, €).
- Aggregated Number Format - Display numbers as Full (e.g., 1,000,000), K/M/B (e.g., 1K, 1M), or L/CR (e.g., 10L, 1CR).
Phone Preferences
Set up phone numbers for incoming and outgoing calls via supported gateways, such as Asterisk, Plivo, or Telzio. When you set up a phone number for a gateway, you ensure that the gateway is active to receive and make calls.
Phone gateways can be managed and configured by navigating to Settings > Extensions > Phone Configuration.
To learn more about Phone Calls in Vtiger CRM, click here.
User Business hours

- Business Hours - Specifies the working hours from the drop-down for a user within the CRM, used to schedule tasks, assign activities, and calculate response times.
To set up business hours, navigate to Settings > Configuration > Business Hours.
To learn more about User Business Hours, click here.
Vtiger Usage Preferences
Other usage-related preferences include the default login page, default record view, etc.

- Default page after login - The page or module is displayed immediately after the user logs in.
- Hide left modules menu - Option to hide the left-hand navigation menu.
- Default record view - Specifies the default display format for records (e.g., Summary or Details view).
- Hide list menu - Option to hide the list menu.
- User Vtiger's mail compose - Enables the built-in mail composer to send emails directly from the CRM.
- Layout - Defines the appearance and structure of the user’s interface.
- Person Name Format - Determines how names are displayed (e.g., First Last or Last, First).
- Phone Country Code - Automatically prefixes phone numbers with the user’s default country code.
- Use full screen for record preview - Displays record previews in full-screen mode.
Signature
Create a personalized email signature, including text and your user’s company logo.

- Use the Image toolbar option to add a logo.
- Enable the Insert this signature before quoted text checkbox to ensure your User’s signature appears before quoted text in emails.
Changing the Username
If a user’s username is no longer in use, it can be changed. As an Admin user, you can change the username in two ways:
- Direct Modification from the User List
- From the User Record
We will learn more about each method below
Direct Modification from the User List
Follow these steps to change the username from the user list:
- Log in to your CRM account.
- Click the User Menu on the top right corner of the CRM screen.
- Click Settings. The settings page opens.
- Look for the User Management section.
- Select Users. The Users page opens.
- Hover over the username of the user you want to change.
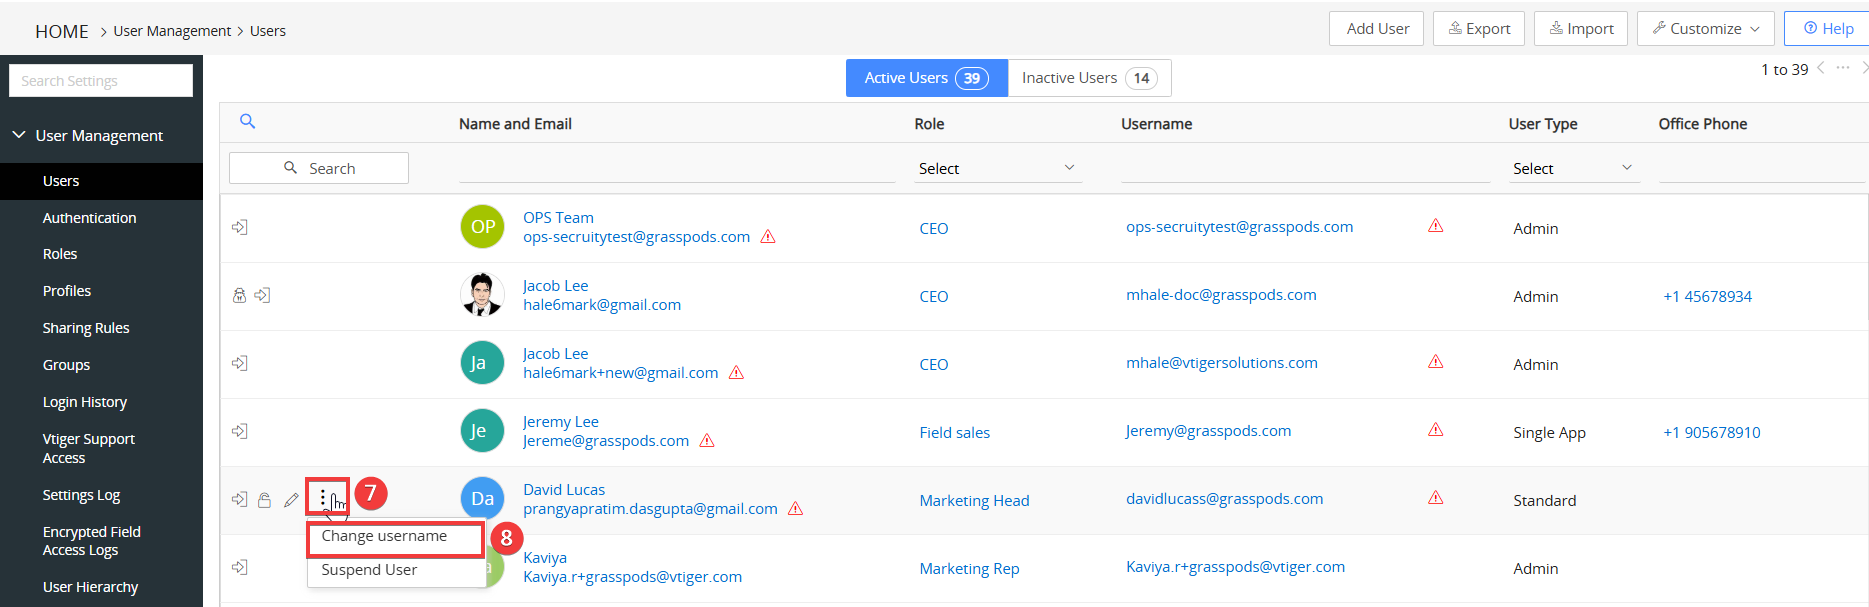
- Click the More icon.
- Select the Change Username option. The Change Username window opens.
- Enter or select the following information to change the username:
- User Name - Enter the new username.
- Password - Enter the current password to authorize the change.
- Confirm Password - Re-enter the current password to confirm.
- Click Save.
- After saving, you must verify the new username.
- Open the user record with the new username.
- Click the exclamation mark beside the Username field.
- Click the Click here link in the tooltip.
- This action will send a verification email to the email address linked to the user account.
- Open the email and verify the email address.
From the User Record
Follow these steps to change the username from the user record:
- Log in to your CRM account.
- Click the User Menu on the top right corner of the CRM screen.
- Click Settings. The settings page opens.
- Look for the User Management section.
- Select Users. The Users page opens.
- Open the user's record from the Users list.
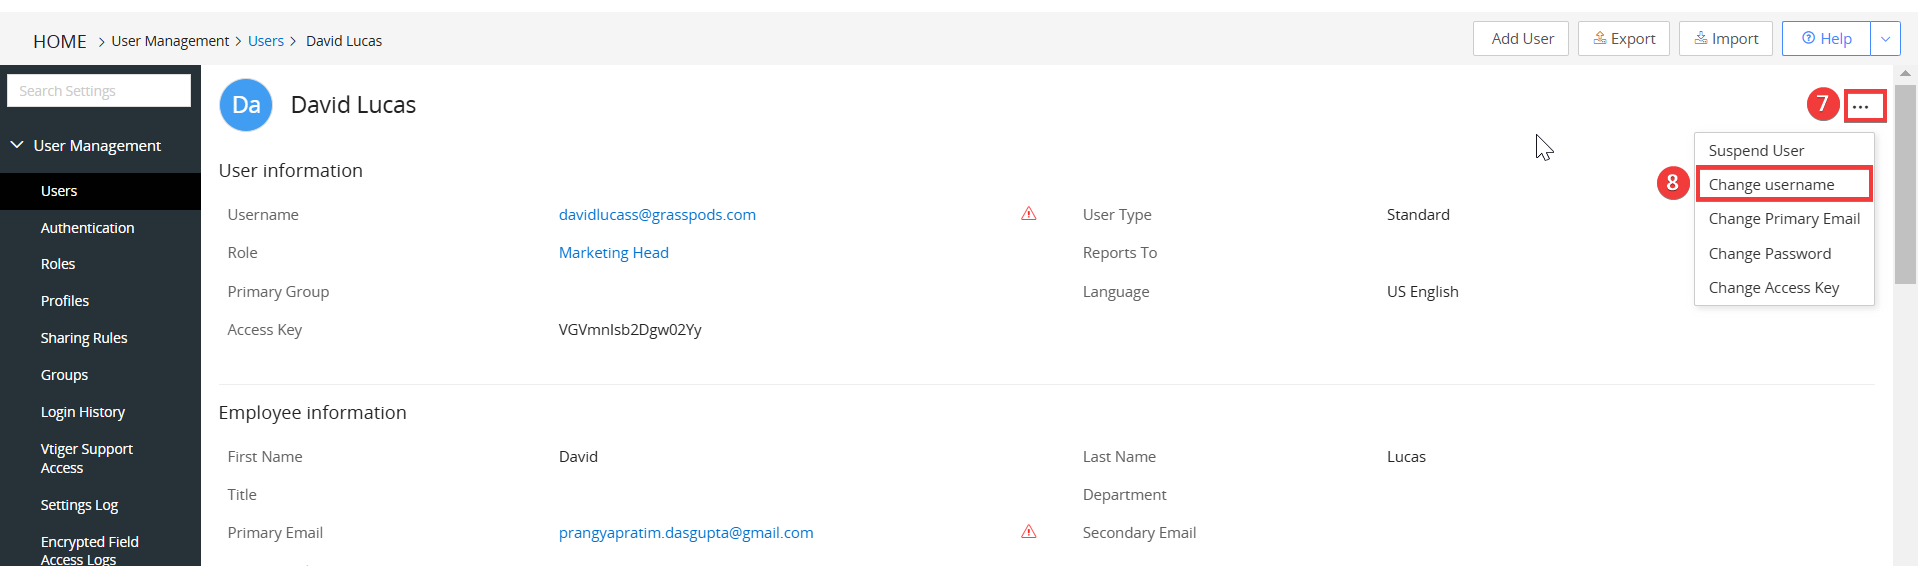
- Click the More icon on the top right corner of the user record.
- Select the Change Username option. The Change Username window opens.
- Enter or select the following information to change the username:
- User Name - Enter the new username.
- Password - Enter your current password to authorize the change.
- Confirm Password - Re-enter your current password to confirm.
- Click Save.
Note:
- If you are a Standard user, you can request a CRM admin change your username.
- As an admin, you can’t change other admins' usernames.
Changing the Password
As an Admin user, you can change your password and other users through two ways:
- Quick Reset from the User List
- From the User Record
We will learn more about each method below
Quick Reset from the User List
Follow these steps to change the Password from the user list:
- Log in to your CRM account.
- Click the User Menu on the top right corner of the CRM screen.
- Click Settings. The settings page opens.
- Look for the User Management section.
- Select Users. The Users page opens.
- Hover over the user you want to change.
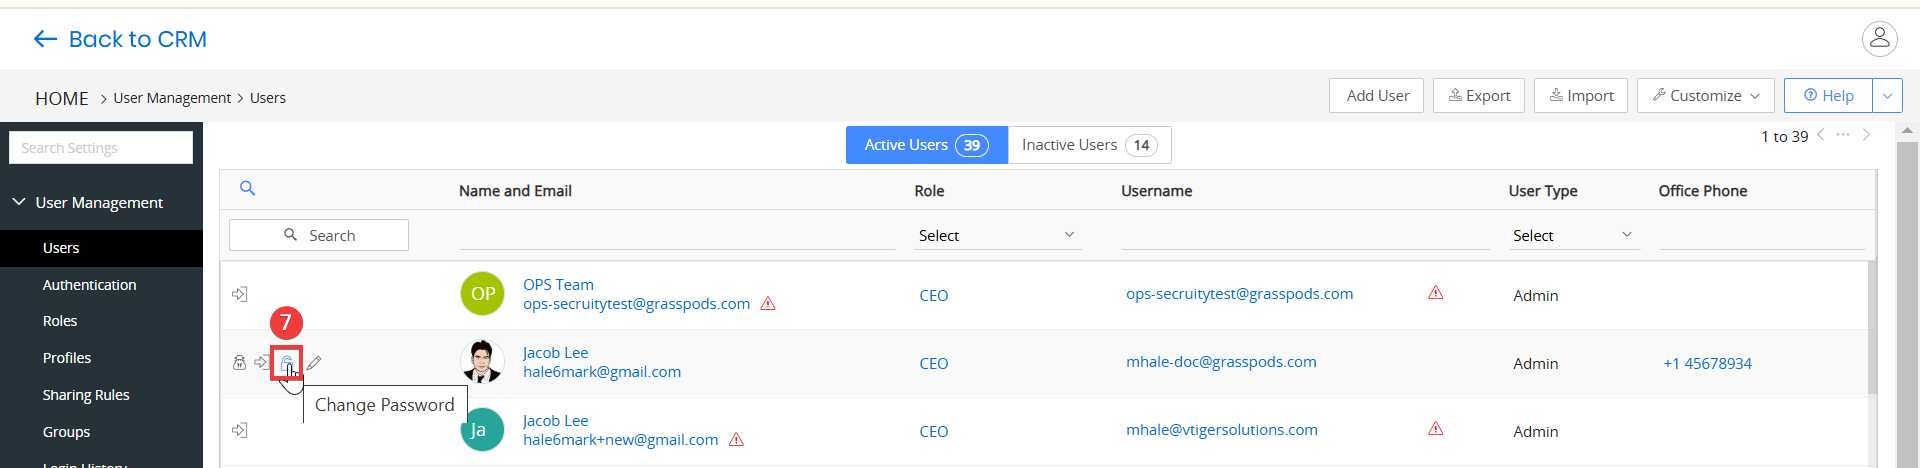
- Click the Change Password. A change password window opens.
- Enter or select the following information to change the Password:
- New Password - Enter the new password.
- Confirm Password - Re-enter the new password to confirm it.
- Click Save.
From the User Record
Follow these steps to change the password from the user record:
- Log in to your CRM account.
- Click the User Menu on the top right corner of the CRM screen.
- Click Settings. The settings page opens.
- Look for the User Management section.
- Select Users. The Users page opens.
- Open the user's record from the Users list.
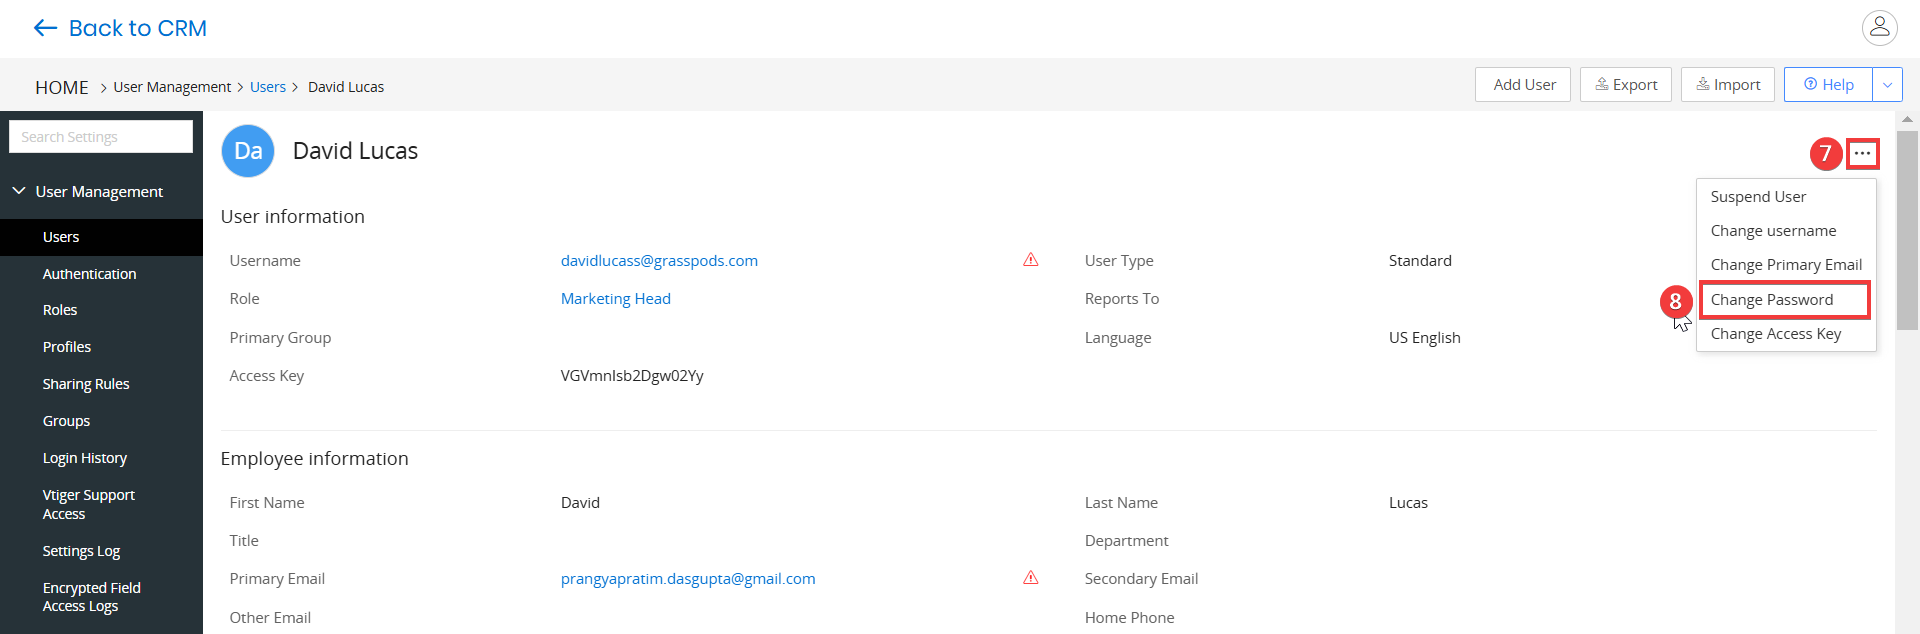
- Click the More icon on the top right corner of the screen.
- Click the Change Password. A change password window opens.
- Enter or select the following information to change the Password:
- New Password - Enter the new password.
- Confirm Password - Re-enter the new password to confirm it.
- Click Save
Changing the Primary Email address
Follow these steps to change a user’s Primary Email:
- Log in to your CRM account.
- Click the User Menu on the top right corner of the CRM screen.
- Click Settings. The settings page opens.
- Look for the User Management section.
- Select Users. The Users page opens.
- Open the user's record from the Users list.
- Click the More icon on the top right corner of the screen.
- Click the Change Primary Email. A change Primary Email window opens.
- Enter or select the following information to change the Email:
- New Primary Email- Enter the new primary email.
- Confirm Password - Enter the password to confirm it.
- Click Save.
Changing the Access Key
Access Key is a unique security token generated automatically when a user is created. It is used for authentication in REST APIs/Web Services.
Follow these steps to change a user’s access key:
- Log in to your CRM account.
- Click the User Menu on the top right corner of the CRM screen.
- Click Settings. The settings page opens.
- Look for the User Management section.
- Select Users. The Users page opens.
- Open the user's record from the Users list.
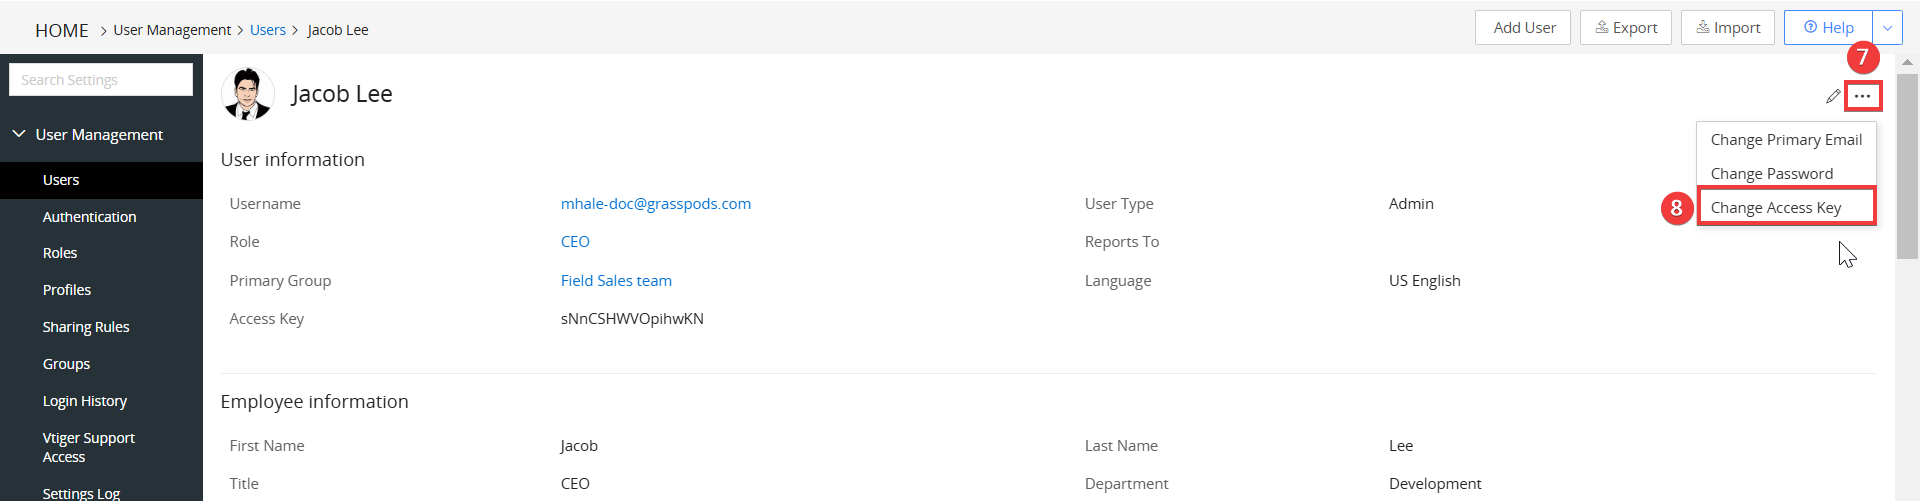
- Click the More icon on the top right corner of the screen.
- Click Change Access Key. A New access key requested window opens.
- Click yes.
The access key will be successfully updated.
Logging in as Another User
Admins can log in as another user to troubleshoot or assist them.
Follow these steps to log in as another user:
- Log in to your CRM account.
- Click the User Menu on the top right corner of the CRM screen.
- Click Settings. The settings page opens.
- Look for the User Management section.
- Select Users. The Users page opens.
- Hover over the user you want to change.

- Click the Log in as (User) icon.
- Click Yes to confirm.
Importing Users
If you have a users list on your local computer and you want to add them as users in the CRM, you can simply import the list. Imported users can log in to the CRM using their username and password after the successful import.
You can import users using two methods:
- Importing users from Settings > Users
- Importing users from the Main Menu > Import module
We will learn more about each method below
Importing users from Settings > Users
Follow these steps to import users into Vtiger CRM:
- Log in to your CRM account.
- Click the User Menu on the top right corner of the CRM screen.
- Click Settings. The settings page opens.
- Look for the User Management section.
- Select Users. The Users page opens.
- Click the Import button at the top of the Users page. The New import window opens.
- Enter or select the following information in the new import window to import users:
- Select file
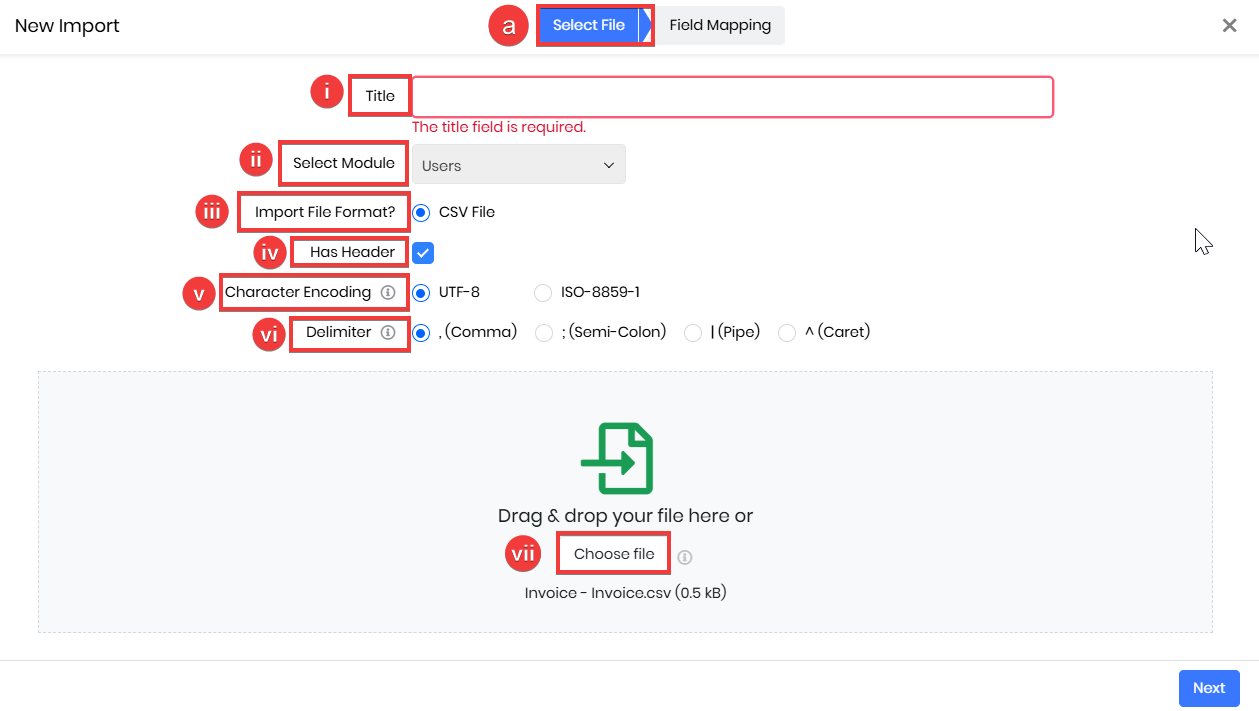
- Title - Enter a title for the new import
- Select Module - The module to which the data will be imported (defaulted to Users and cannot be changed).
- Import File Format - Specify the file format
- Has Header - Enable this checkbox if the first row of your CSV file contains column headers.
- Character Encoding - Choose the encoding format, such as UTF-8 or ISO-8859-1.
- Delimiter - Select the character that separates data fields in your file (e.g., comma, semicolon, pipe, caret).
- Choose file - Upload the CSV file to be imported, with a maximum size of 50 MB.
- Select file
- Field mapping
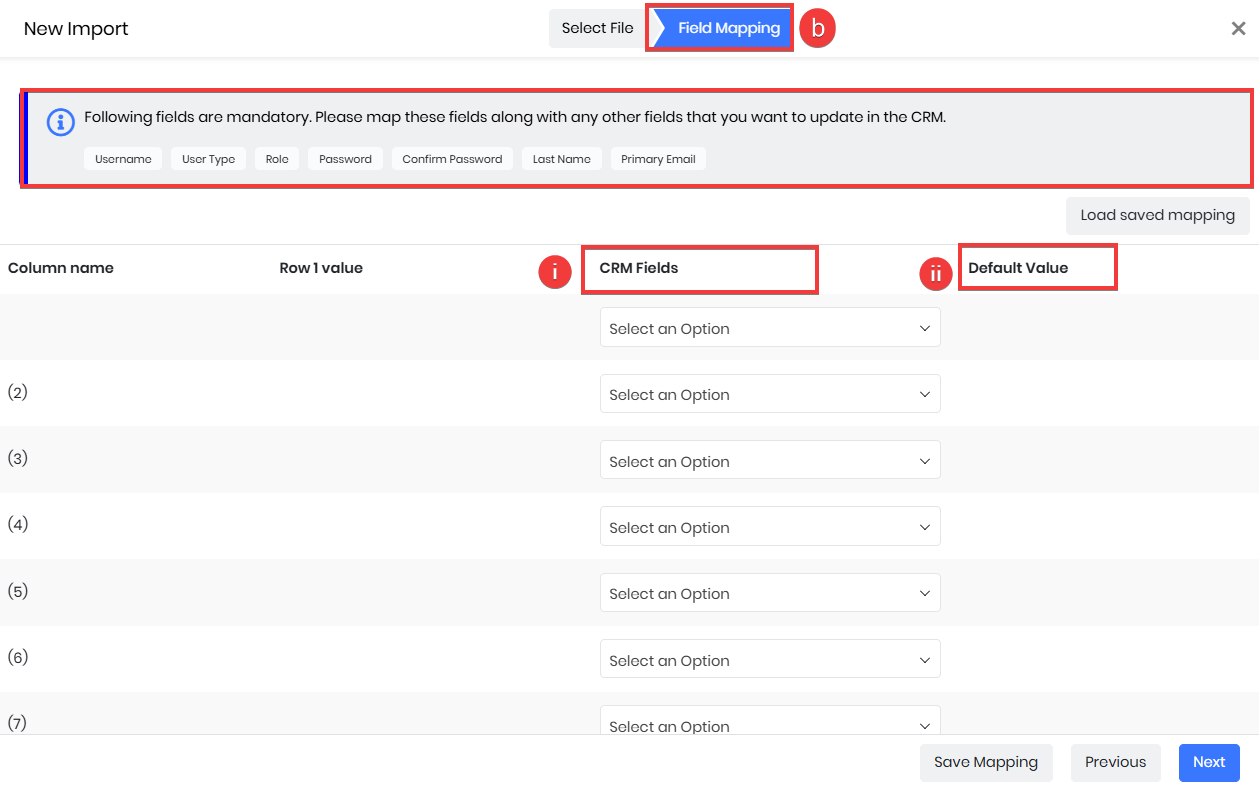
- CRM Fields - Map Column Name in your data file to a CRM field from the drop-down.
- Default Value - Provide a Default Value for the fields from the drop-down.
- Click Next. The Preview Import page opens.
- Click Start Import.
Note:
- Make sure the mandatory fields are mapped with CRM fields.
- When importing user records, the import process may fail in the following cases:
- Users already exist.
- Password and Confirm Password fields do not match.
- Empty values for mandatory fields and no default values are specified.
Importing users from the Import module
Follow these steps to import users into Vtiger CRM:
- Log in to your CRM account.
- Click the Main Menu.
- Go to Tools >Data Management> Import. The import page opens.
- Click + New Import. The New Import window opens.
- Enter or select the following information in the new import window to import users:
- Select file
- Title - Enter a title for the new import
- Select Module - Select the Users module from the drop-down.
- Import File Format - Specify the file format
- Has Header - Enable this checkbox if the first row of your CSV file contains column headers.
- Character Encoding - Choose the encoding format, such as UTF-8 or ISO-8859-1.
- Delimiter - Select the character that separates data fields in your file (e.g., comma, semicolon, pipe, caret).
- Choose file - Upload the CSV file to be imported, with a maximum size of 50 MB.
- Field mapping
- CRM Fields - Map Column Name in your data file to a CRM field from the drop-down.
- Default Value - Provide a Default Value for the fields from the drop-down.
- Select file
- Click Next. The Preview Import page opens.
- Click Start Import.
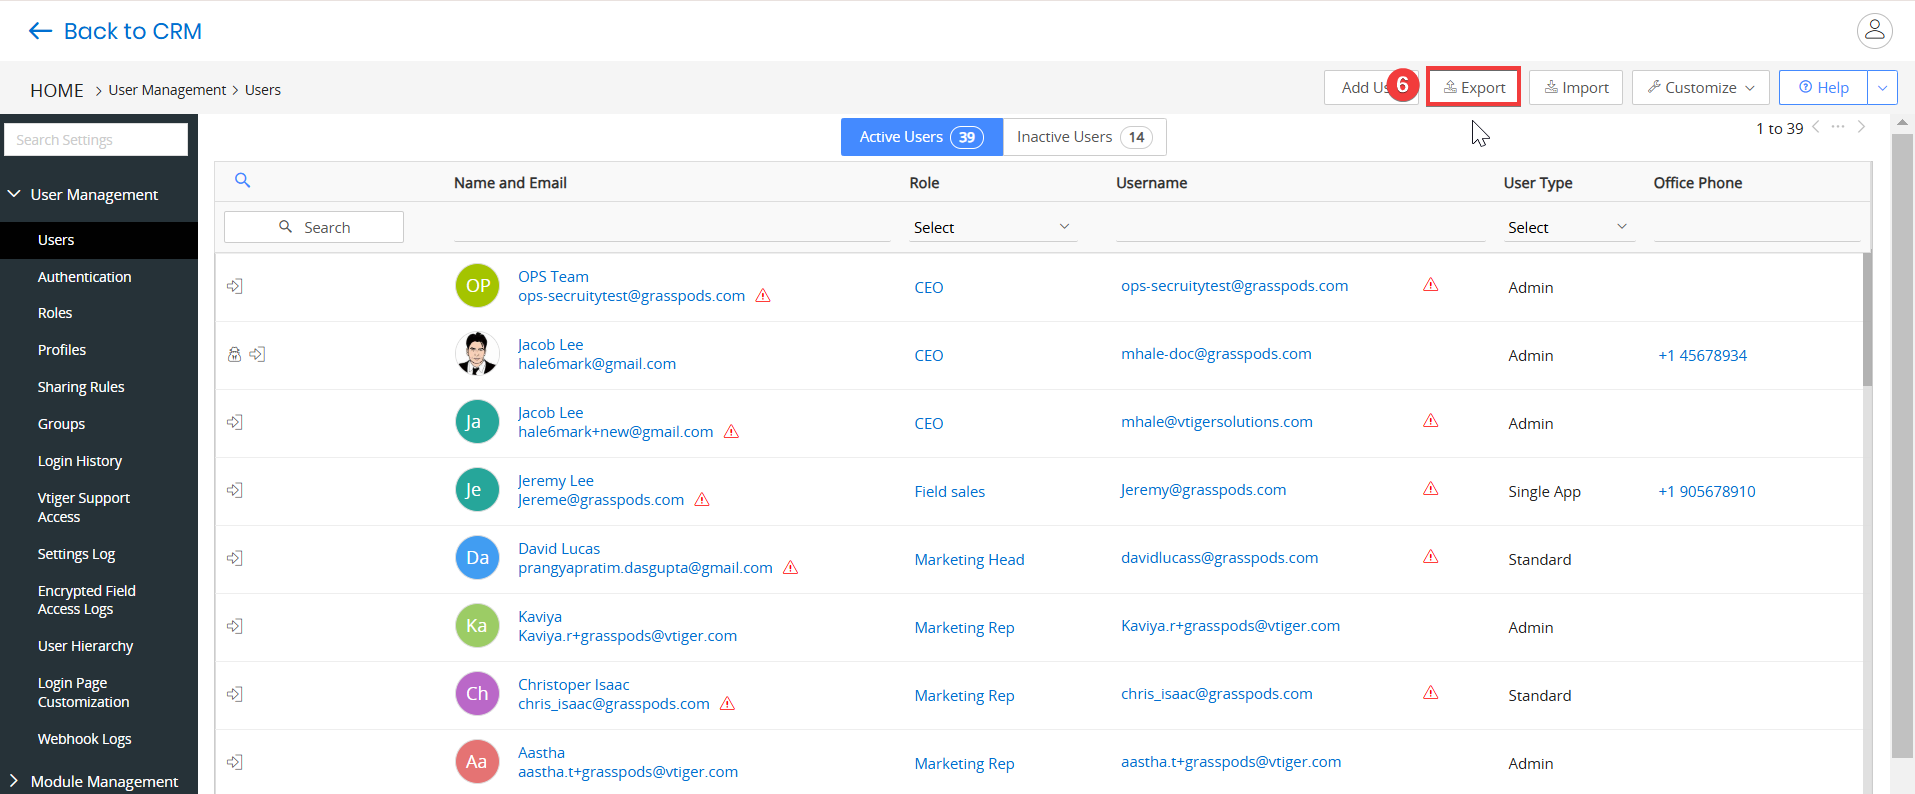
Exporting Users
Exporting is the process of transferring a copy of data from the CRM to your local computer.
Follow these steps to export users:
- Log in to your CRM account.
- Click the User Menu on the top right corner of the CRM screen.
- Click Settings. The settings page opens.
- Look for the User Management section.
- Select Users. The Users page opens.
- Click the Export button located on top of the Users page.
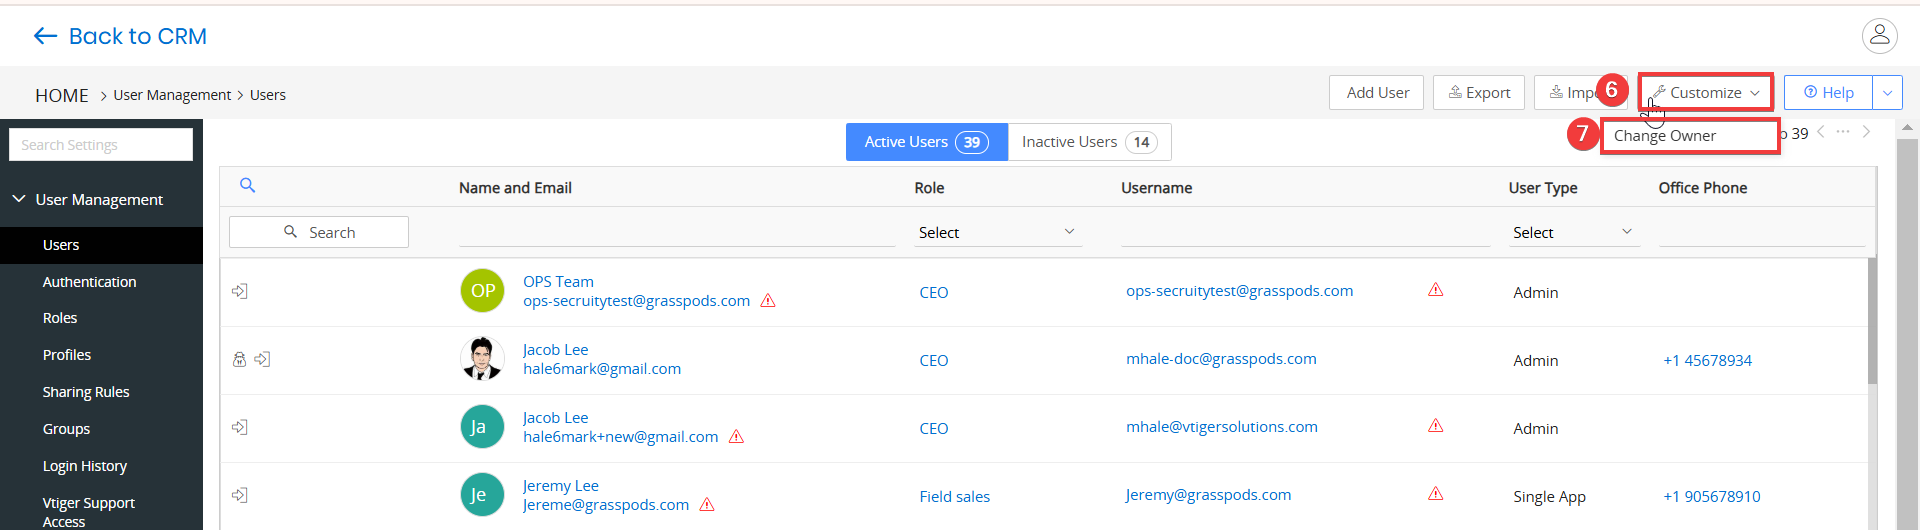
Changing CRM Account Ownership
Transferring CRM account ownership involves assigning the account owner's role to another user. This is useful when the current owner transitions to a different department or leaves the organization.
Follow these steps to transfer account ownership:
- Log in to your CRM account.
- Click the User Menu on the top right corner of the CRM screen.
- Click Settings. The settings page opens.
- Look for the User Management section.
- Select Users. The Users page opens.
- Click the Customize dropdown on the top right corner.
- Select the Change Owner option. The Transfer Owner window opens.
- Select the user to whom you want to transfer the account ownership.
- Click Save.
Note:
- You can transfer the account ownership only if you are an Admin user.
- You can transfer the account ownership only to a user of type Admin
Suspending a User
Suspending a user involves temporarily disabling their access to the CRM. This action ensures they are marked inactive and cannot perform any activities within the system until reactivated.
Here is what happens when you suspend a user:
- The user is marked as inactive and cannot log in to the CRM.
- New records cannot be assigned to the suspended user.
- Billing for the user is stopped.
Follow these steps to suspend a user:
- Log in to your CRM account.
- Click the User Menu on the top right corner of the CRM screen.
- Click Settings. The settings page opens.
- Look for the User Management section.
- Select Users. The Users page opens.
- Hover on the user that you want to suspend.
- Click the More icon.
- Select the Suspend User option.
- Click Yes to confirm.
- Enter or select the following information to handle reportees and assigned records for suspended users:
- Transfer Reportees - If the suspended user has reportees, transfer their supervision to another user.
- Select a user from the Transfer Reports To dropdown.
- The Reports To field in the reportees' records will update to reflect the new supervisor.
- Transfer Assigned Records - When Suspending a user, you must transfer the records that are assigned to them.
- Enable the Transfer all records checkbox to transfer the user’s records.
- Use the Select Modules field to specify which modules’ records you want to transfer.
- Select the new owner from the Transfer records to this user dropdown.
- Enable the Transfer closed records checkbox to include closed records in the transfer.
- Transfer Reportees - If the suspended user has reportees, transfer their supervision to another user.
- Click Save to finalize the transfer.
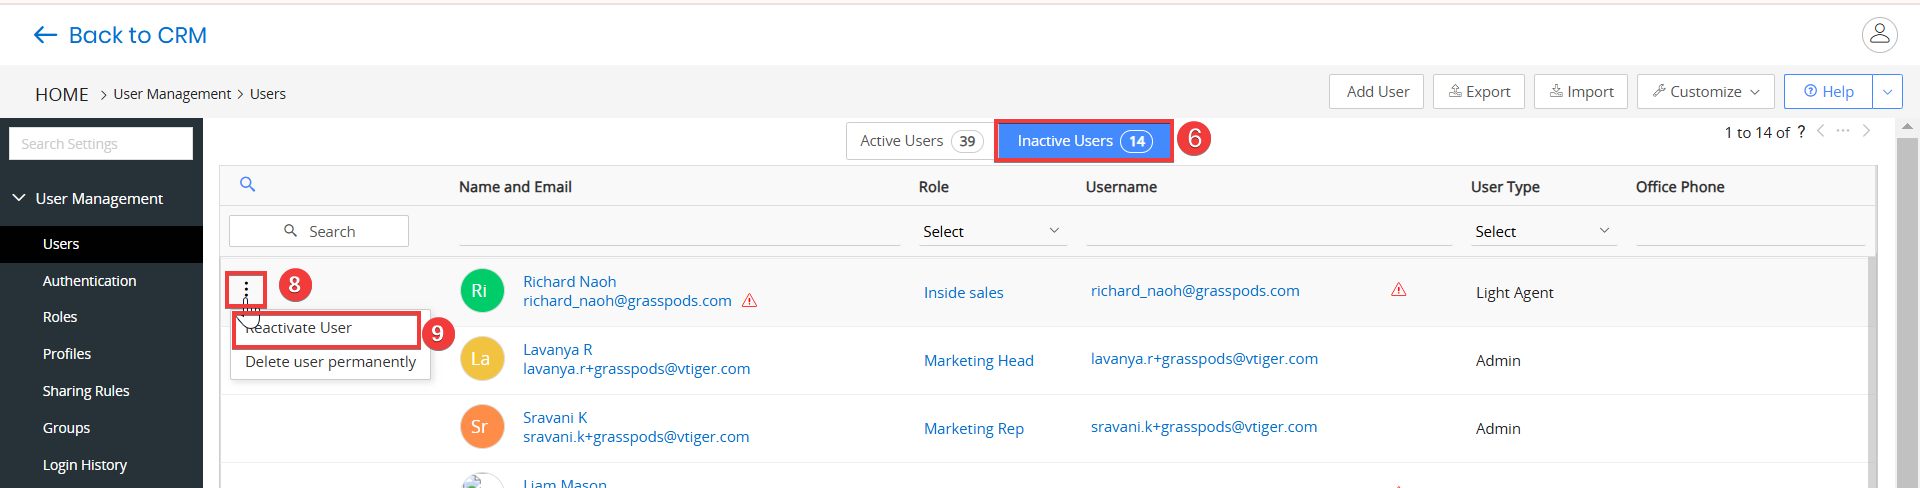
Reactivating a User
Follow these steps to reactivate a suspended user:
- Log in to your CRM account.
- Click the User Menu on the top right corner of the CRM screen.
- Click Settings. The settings page opens.
- Look for the User Management section.
- Select Users. The Users page opens.
- Click the Inactive Users tab.
- Hover over the user that you want to reactivate.
- Click the More icon.
- Select the Reactivate User option.
- Click Yes to confirm
Deleting a User
You might want to permanently delete a user when they no longer use the CRM. However, to delete a user, you must first suspend them.
Follow these steps to delete a user after suspending them:
- Log in to your CRM account.
- Click the User Menu on the top right corner of the CRM screen.
- Click Settings. The settings page opens.
- Look for the User Management section.
- Select Users. The Users page opens.
- Click the Inactive Users tab.
- Hover over the user that you want to delete.
- Click the More icon.
- Select the Delete user permanently option.
- Click Yes to confirm.
- Enter or select the following information to handle the reportees and assigned records for the deleted user:
- Transfer Reportees: If the deleted user has reportees, transfer their supervision to another user.
- Select a user from the Transfer Reports To dropdown.
- The Reports To field in the reportees' records will update to reflect the new supervisor.
- Transfer Assigned Records: When deleting a user, you must transfer the records that are assigned to them.
- Enable the Transfer all records checkbox to transfer all the user’s records.
- Use the Select Modules field to specify which modules’ records you want to transfer.
- Select a user from the Transfer records to this user dropdown to transfer records to them.
- Enable the Transfer closed records checkbox to include closed records in the transfer.
- Transfer Reportees: If the deleted user has reportees, transfer their supervision to another user.
- Click Save.
Troubleshooting Tips
Import Restrictions for Single App and Light Agent Users:
- Users of type Single App and Light Agent cannot be imported unless there is at least one Standard User in the CRM.
Role Type and User Type Matching:
- The import will fail if there is a mismatch between the User Type and Role Type information. To learn more about roles in Vtiger CRM, click here.
Limitations on Record Assignment:
- You cannot import a record (such as a lead, contact, or organization) where the Owner (specified in the Assigned To field) or Co-owner (specified in the Co-owner field) is a user of type Light Agent.
Reporting Restrictions:
- A user can only report to Standard or Admin users. Users of type Light Agent and platform users cannot have subordinate users.
Changing User Profile to Light Agent:
- To change a user with a higher profile (such as Standard or Admin) to a Light Agent, you must first transfer the user’s records to another user.
Reference
User Management - Authentication
User Management - sharing rules