Articles in this section
Configuring App Passwords for Gmail Outgoing Server and Yahoo Mail
Introduction
When configuring Gmail or Yahoo as an outgoing email server in Vtiger CRM, you may need to generate an app-specific password for secure authentication. This is required because Google and Yahoo enforce strict security measures to prevent unauthorized access.
An app-specific password is a unique, system-generated password that allows third-party applications to access your email account without using your main password.
In this article, you’ll learn about:
- Creating app-specific passwords in Gmail
- Generating a third-party app password in Yahoo
Creating App-Specific Passwords
When you configure Gmail as the email outgoing server for Vtiger CRM, you may encounter an SMTP connection failure error in the CRM’s Email Settings page. To avoid this error, you need to create an app-specific password for your Gmail account.
This process consists of the following two steps:
- Step 1: Set up Gmail as an outgoing server
- Step 2: Create an app-specific password for Gmail
Follow these steps to set up Gmail as an outgoing server and create an app-specific password:
Step 1: Setting up Gmail as an outgoing server
- Log in to the CRM.
- Go to the Email Settings page in Vtiger CRM.
- Select the Server Type as Gmail under Mail Server Settings (SMTP).
- Click the Create App-Specific password option to create an app-specific password to configure Gmail as the email outgoing server for Vtiger CRM.
Step 2: Create an app-specific password
Using app-specific passwords is a more secure method of enabling Gmail as the out-going server. To create an app-specific password, you will have to enable the Gmail 2-step verification process first.
Step 2a: Enabling 2-Step Verification
Follow these steps to enable the 2-step verification for your Gmail account:
- Login to your Gmail account.
- Click the Profile icon.
- Click Manage your Google Account.
- Select Security on the left-hand side of the screen. You will be directed to the Gmail Security page.
- Look for Signing into Google.
- Click 2-Step Verification. You will be directed to the 2-step Verification process.
- Click Get Started. The Gmail verification screen appears.
- Enter your Gmail password.
- Click Next.
- Under Let’s set up your phone, enter your phone number.
- Choose the method you want to get the code: Text message or Phone call.
- Click Next.
- Enter the verification code that you have received on your given phone number (or email).
- Click Next.
- Click Turn On.
The 2-Step Verification field will now show as enabled on the Security page on your Gmail.
Step 2b: Create an app-specific password
Note: Once the 2-Step Verification field for your Gmail Account is enabled, the App passwords field will appear under Security settings on your Gmail.
Follow these steps to create an app-specific password for your Gmail account.
- Login to your Gmail account.
- Click the Profile icon.
- Click Manage your Google Account.
- Select Security on the left-hand side of the screen. You will be directed to the Gmail Security page.
- Look for Signing into Google.
- Click App passwords. The Gmail verification screen appears.
- Enter your Gmail password.
Or Follow these steps to create an app-specific password from Mail Server Settings:
- Go to Mail Server Settings (SMTP).
- Click Create App-Specific password. The Gmail login screen appears.
- Login to your Gmail account.
- You will be directed to the App passwords screen.
- Select the app and device you want to generate the app password for.
- The Generate app password window opens, where the app password is generated.
- Copy the app password that is generated.
- Click Done.
- Go back to Mail Server Settings (SMTP) on the Email Settings page in the CRM.
- Paste the generated app password in the Password field.
You have now successfully created an app-specific password for your Gmail account. You will now be able to successfully select Server Type as Gmail and configure it as the email outgoing server for Vtiger CRM.
Note: The Create App-Specific password method is recommended to be chosen when you have specific domains or websites to be configured.
Generating a Third-Party App Password in Yahoo
Third-party email apps require you to enter a single password for login credentials. To access your Yahoo Mail account on these apps, you'll need to generate and use an app password. To authenticate your Yahoo account in Vtiger, you must generate a third-party app password in Yahoo.
Follow these steps to generate a third-party app password in Yahoo:
- Sign in to your Yahoo Account Security page.

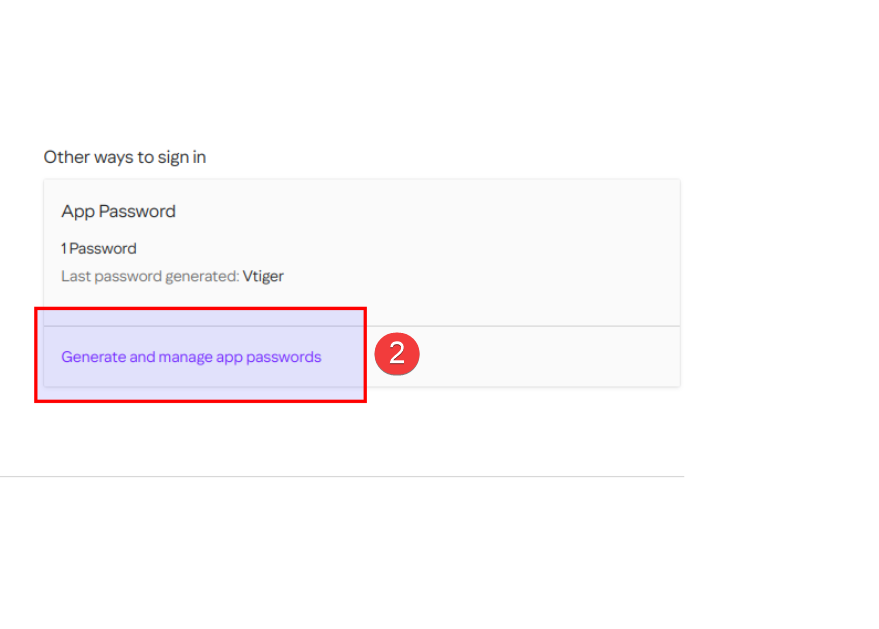
- Click Generate app password or Generate and manage app passwords.
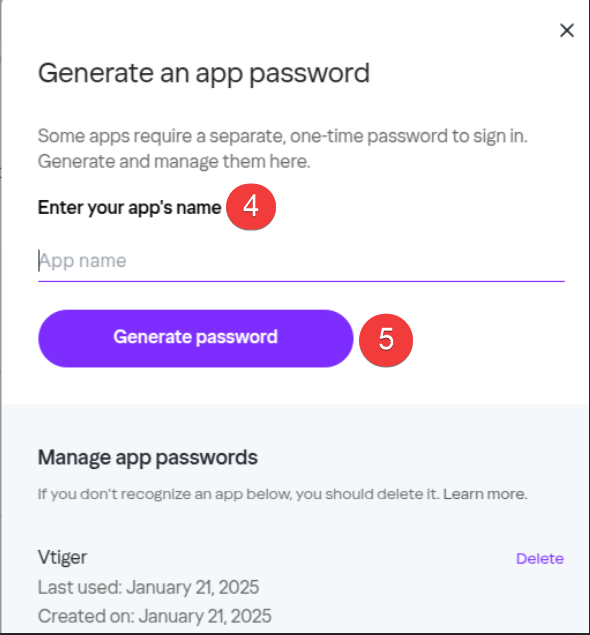
- Click Get Started.

- Enter your app’s name in the text field.
- Click Generate password. A password is generated.

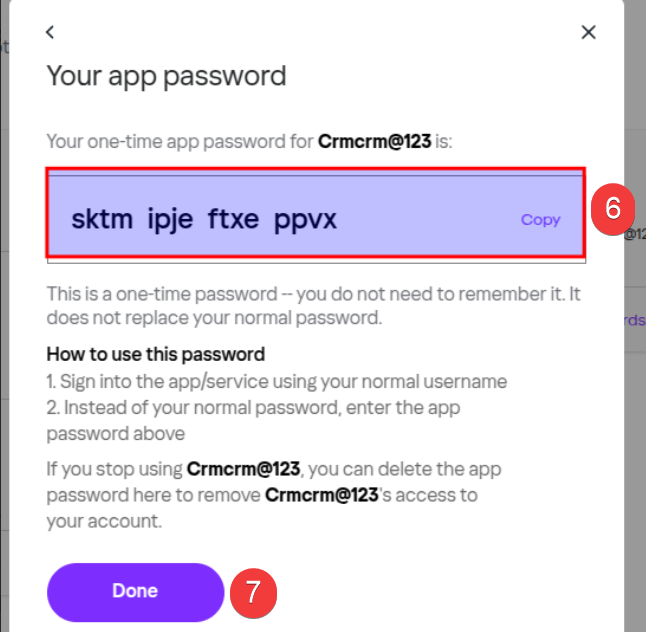
- Copy the one-time password to log in to your third-party app.
- Click Done.
Note: You must copy the password immediately after it is generated. If you forget or lose the password, you must generate another one using the process above.
Deleting an App Password
If you no longer use an app password, you can delete it to keep your account secure.
Follow these steps to delete an app password:
- Sign in to your Yahoo Account Security page.
- Click Generate and manage app passwords.
- Click Delete next to the app password you want to delete.
- Click Delete to confirm.
Note: Yahoo’s settings and security policies are subject to change. Please visit Yahoo’s official website for the latest updates.
References
Check out the following links for related information:


