Articles in this section
Configuring Global Picklists in Vtiger
Feature Availability
Vtiger Editions: One Pilot | One Growth | One Professional | One Enterprise
Introduction
A Global Picklist contains picklist values that can be shared across multiple modules in Vtiger CRM. Instead of maintaining the same set of values separately across modules, administrators can define them once as a global picklist and reference them wherever required.
For example, if a sales rep wants the same Lead Status values to appear in both the Leads and Contacts modules, maintaining separate picklists can be repetitive and error-prone. With Global Picklists, you can define these values centrally and reuse them across modules, saving time and ensuring consistency.
Key Features
The key features of the Global Picklist Settings are:- Define and manage picklist values from a single location.
- Share the same picklist across multiple modules (e.g., Leads, Contacts, Opportunities).
- Ensures uniformity in dropdown selections across different modules.
Benefits
The benefits of the Global Picklists are:
- Eliminates Duplicate Configuration Effort: Define picklist values once and reuse them across multiple modules to save time and administrative effort.
- Ensures Data Consistency Across Modules: Maintain consistent picklist values across linked modules, reducing inconsistencies in CRM data.
- Simplifies Picklist Maintenance: View updates to a Global Picklist, and they are automatically reflected in all linked picklists.
- Improves Reporting Accuracy: Get cleaner data and more reliable cross-module reports.
- Supports Scalable CRM Customization: Easily extend standardized picklist values to new modules as your CRM grows.
- Enhances User Experience: See familiar, consistent dropdown values, reducing confusion and selection errors.
In this article, you will learn about:
- Global Picklists
- Creating and setting up Global Picklists
- Converting Local Picklists to Global Picklists
Key Terminology
|
|
|
|
|
|
|
|
|
|
|
|
|
|
|
|
|
|
|
|
|
|
|
|
|
|
|
Getting Started
There are two picklist types in Module Layout and Field, namely Local and Global. The local picklist is a normal picklist whose values are used for a specific module.
Creating a Global Picklist
Follow these steps to create a global picklist.
- Log in to the CRM.
- Go to the main menu.
- Go to Settings.
- Click on Global Picklist under the Configuration section. The Global Picklist Settings page opens.
- By default, the Country field is added as a Global Picklist.

- To add a new picklist, click Add Global Picklist.
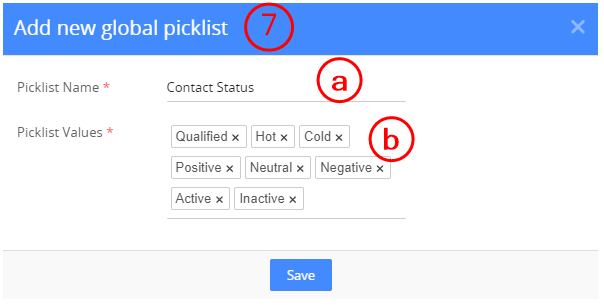
- Enter the following details.
- Picklist Name: Give a name to the picklist.
- Picklist Values: Enter the values.
- Click Save.
Adding values and linking modules to the Global Picklist
Follow the steps below to add values and link modules.
- Click the edit of the desired Global Picklist.
- Click Add Value to add the values.
- To link modules, go to the Linked Picklists tab and click Link Module.

- In the pop-up window, select the module and the picklist field.

-
Click Save.
All the values of the linked picklists are included in the Global Picklist.
You can also add values from the List View of Global Picklist settings.
Country Field as a Global Picklist
A new field type in the Layout Editor called Country & State Picklists will allow you to add Country and State information. This is especially helpful for any custom modules you create. This field type will add two new global picklist values - Country and State, linked to the Country Global Picklist in the CRM.
This feature is available only for new sign-ups. With Global Picklist, you can change the country field to a global picklist that includes all 195 countries.
View Countries and States
To view a country's global picklist, click on the edit icon. You can see all the countries as values.- Click on the view states drop-down menu to view the states.
- Click on Add States to add a state value.
- Enter the state code and the state name.

- Click the Tick Mark icon.
Global Picklist in Layout Editor
You can add a Global picklist or convert an existing local picklist into a Global picklist.
Click here to learn how to add a local picklist.
Follow the steps to add a Global Picklist:
- Log in to the CRM.
- Go to the main Menu.
- Go to Settings.
- Click on Module Layouts and Fields under the Module Management tab.
- Click + Add Custom Field.
- Select Picklist as the field type.
- Enter the label name.
- Select the Picklist type as Global.
- Select an existing global picklist to link its values.
- Enter other details.
- Click Save.

Follow the steps below to convert the existing local picklist:
- Log in to the CRM.
- Go to the main Menu.
- Go to Settings.
- Click on Module Layouts and Fields under the Module Management tab.
- Click the edit of a local picklist.
- Change picklist type to Global.
- Select an existing global picklist to link its values.
- Click Save.

You will receive an alert message to link the values of the local picklist to the Global Picklist. Click Yes to continue.
Role-based picklists
- Create two role-based local picklists in different modules.
- Convert role-based picklists to a Global Picklist.
- Open any of the above two picklists in Picklist Values Settings.
- Click on the values assigned to the Roles tab.
- When you remove a value, you receive a message prompting you to apply the same change to other linked modules.

Note
- You can not disable a Global Picklist if there is a module linked to it.
- Deleting a Global Picklist changes the linked picklists to independent picklists.
Limitations
- You can create up to 100 global picklists.
- You can link 1000 picklist values to a global picklist.
- Adding values to the country picklist is restricted.
- You can not add values to a global picklist from the Layout Editor.