Articles in this section
Creating Workflows in Vtiger CRM
Feature Availability and Limits
|
|
|
|
|
| |
|
| |||||
|
|
|
|
|
|
|
|
|
|
|
|
|
|
|
| |||||
|
|
|
|
|
|
|
|
|
|
|
|
|
|
Note:
- The maximum number of Standard workflows you can create in Help Desk Starter and Help Desk Professional is 25 and 50, respectively.
- The maximum number of workflow actions you can set up per workflow in Help Desk Starter and Help Desk Professional is 6 and 8, respectively.
Introduction
Click here to view the video on Workflow
Workflows are sequences of automated actions or steps that follow a predefined path to complete a business process. They help standardize and automate tasks, reduce human error, and improve productivity.
In Vtiger CRM, workflows let you automate repetitive tasks, streamline business processes, and ensure timely actions without manual effort.
By defining specific triggers, conditions, and actions, you can set up workflows that run automatically based on events such as record creation, updates, or time-based schedules.
For example, you can use workflows to:
- Send automated emails when a lead is created.
- Assign tasks to team members when a deal reaches a certain stage.
- Update fields or records when specific conditions are met.
- Trigger alerts or reminders based on due dates.
Benefits of using Workflows
The following are the benefits of using Workflows in Vtiger CRM:
- Automation of Repetitive Tasks: Save time by automating routine actions like sending emails, assigning records, or updating fields.
- Improved Efficiency: Workflows speed up business processes by reducing manual intervention and delays.
- Consistency and Accuracy: Ensure every process is executed the same way, every time, reducing human errors.
- Faster Response Time: Trigger immediate follow-ups or alerts based on defined conditions to improve customer responsiveness.
In this article, you will learn about:
- Standard Workflow
- Components of a Standard Workflow
- Accessing and Setting up Standard Workflow
- Multi-path Workflows
- Components of a Multi-path Workflow
- Accessing and Setting up Multi-path Workflow
Key Terminology
|
|
|
|
|
|
|
|
|
|
|
|
|
|
|
Types of Workflows
Vtiger offers two types of workflows to help automate and streamline your business processes.
Standard Workflows
These workflows follow a single linear path and execute actions based on predefined conditions. They are ideal for straightforward automation needs.
Four Components of Standard Workflows
To create a standard workflow, you must specify the following:
- The module on which the workflow is executed.
- The trigger that will cause the workflow to execute.
- Conditions based on which the workflow will execute its actions.
- Actions that the workflow will perform when the conditions are met.
To specify the details mentioned above, you must first access the workflow screen.
Accessing Standard Workflows
Follow these steps to access Standard workflows:
- Log in to the CRM.
- Click the User Menu in the top right corner of the screen.
- Click the Settings button. The Settings page opens.
- Look for the Automation section.
- Select Workflows.
- Click the +New Workflow button.
- Select Standard.
- Enter or select the following information:
- Basic information: Define the name and module for your workflow.
- Workflow trigger: Choose when the workflow should run.
- Entry criteria: Set the conditions that determine which records the workflow applies to.
- Actions: Specify what automated tasks should be performed when the criteria are met.
- Click Save.
The configured workflow will now execute automatically when its criteria are met.
Let us have a detailed look at each component.
Basic information
This section provides basic information about a workflow, such as its name, module, etc.
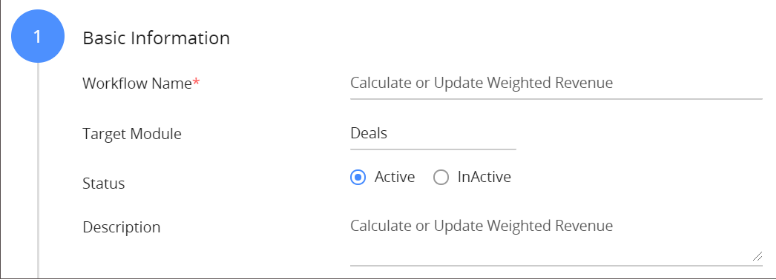
You can fill out the following details:
- Workflow Name: Specify the name of the workflow.
- Target Module: Specify the module on which the workflow must execute, such as Deals, Contacts, Products, etc.
- Status: Specify the workflow status as Active or Inactive. The workflow does not execute when the status is set to Inactive
- Description: Provide a brief description of what the workflow is used for, the actions it performs, etc.
Workflow trigger
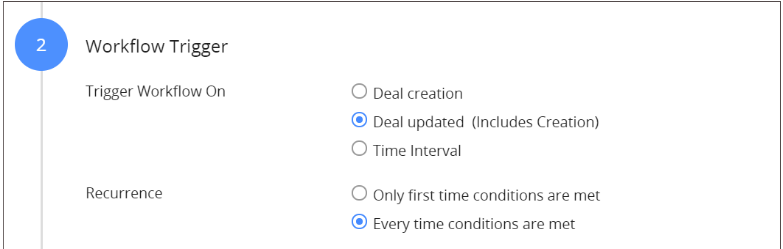
Specify when the workflow must trigger by choosing an option from the following two fields:
- Trigger Workflow On:
- Record creation: Choose this option if you want the workflow to trigger when a record is created in the Target Module (mentioned in the previous section).
- Record updation (includes creation): Choose this option if you want the workflow to trigger when a record is updated or created in the Target Module (mentioned in the previous section).
- Time Interval: Choose this option if you want the workflow to trigger at a frequent time interval.
- Frequency: Specify the frequency at which the workflow must trigger. To learn more about this option, click here.
- Recurrence: This option is shown when you select Record updation in the previous section.
- Only first time conditions are met: Triggers the workflow if the specified conditions are true. Once executed, the workflow will not trigger on the same record again. However, it will trigger on other records in the selected module.
- Every time conditions met: Triggers the workflow on a record every time the specified conditions are true.
Entry criteria
Workflows are executed on records in the Target Module under Basic Information. More often than not, you might only need to perform actions on select records in the module, and that is when you will need to apply conditions and filter out records.
A workflow executes only on records that satisfy the condition that you specify.
For instance, you want to create a workflow on the Contacts module that will send a greeting via email on a contact’s birthday. For this, you must specify the conditions as follows:
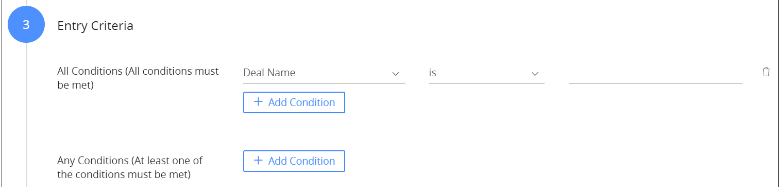
You can specify multiple conditions using the +Add condition button. There are two types of conditions.
- All conditions: It is based on the logical AND operation. Workflow executes when all the conditions are met.
|
|
-
Any condition: It is based on the logical OR operation. Workflow executes when at least one condition is met.
|
|
Types of Conditions
You can apply conditions to different fields in a module, and the type of condition may vary depending on the field.
Example:
You create a workflow on the Deals module. You want the workflow to execute its actions when the deal amount is more than 1000. So, the condition that you specify is Amount greater than 1000.

You can specify the condition using three fields. In the first field, you must select the field name (Amount). In the second step, select the condition (greater than), and in the third step, enter the amount (1000).
- You create a workflow on the Contacts module. The intent is to send an email to contacts two days before their support end date.

-
Select Support End Date in the first field, less than days later in the second, and enter 3 in the last field.
Below is a list of all the conditions available.
|
|
|
|
|
|
|
|
|
|
|
|
|
|
|
|
|
|
|
|
|
|
|
|
|
|
|
|
|
|
|
|
|
|
|
|
|
|
|
|
|
|
|
|
|
|
|
|
|
|
|
|
|
|
|
|
|
|
|
|
|
|
|
|
|
|
|
|
|
|
|
|
|
|
|
|
|
|
|
|
|
|
|
|
|
|
|
|
|
|
|
|
|
|
|
|
|
|
|
|
|
|
|
|
|
|
|
|
|
|
|
|
|
|
|
|
|
|
|
|
|
|
|
|
|
|
Counting only Weekdays using Workflow Conditions
If you want to consider only weekdays, you can use the following workflow conditions:
- Less than weekdays ago
- Less than weekdays later
- More than weekdays ago
- More than weekdays later
- Weekdays ago
- Weekdays later
For example, to send an email to a contact three weekdays before the deal’s close date, you must set up the condition as follows:
In this case, workflows exclude non-working days based on the specified business hours.Using DateTime and Time Fields in Workflow Conditions
You can use DateTime and Time fields to trigger workflows based on business hours. When adding conditions with these fields, the following options are available:
- Less Than
- Greater Than
- Less Than or Equal To
- Greater Than or Equal To
For Time fields:
- Example: Time field > 6:00 AM — Triggers for records created between 6:01 AM and 11:59 PM.
For DateTime fields:
- The time part only is considered.
- Example: CreatedTime > 6:00 AM — Ignores the date and triggers if the time is after 6:00 AM.
This ensures time-based workflow logic is applied consistently across both Time and DateTime fields.
Actions
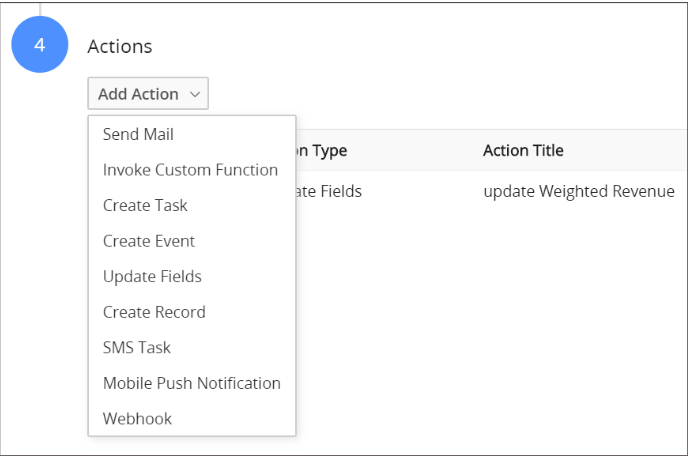
The Actions part defines what the workflow must execute after getting triggered and meeting the entry criteria. You can set up different types of actions. Refer to the table below for information.
|
|
|
| Send Mail |
|
| Invoke Custom Function |
|
| Create Task |
|
| Create Event |
|
| Update Fields |
|
| Create Record |
|
| SMS Task |
|
| Mobile Push Notification |
|
| Webhook |
|
Let us look at an example here.
Setting up workflows to update the Email Opt-in field when a contact subscribes or unsubscribes
The Email Opt-in field determines whether a contact has opted to receive marketing emails from you. To learn more about it, click here.
Follow these steps to save or update the date when a contact subscribes:
- Select the Contacts module under Basic Information.
- Set the Entry Criteria to Email Opt-in has changed to Double Opt-in.
- Create a custom field under Settings > Module Layouts & Fields, say Subscription Date, to update the subscription date.
- Create an Update Fields action to update the Subscription Date to the current date.
Follow these steps to save or update the date when a contact unsubscribes:
- Select the Contacts module under Basic Information.
- Set the Entry Criteria to Email Opt-in has changed to Contact opted out.
- Create a custom field under Settings > Module Layouts & Fields, say Unsubscription Date, to update the unsubscription date.
- Create an Update Fields action to update the Unsubscription Date to the current date.
To learn more about the Update Fields action, click here.
- Workflows can create or update records in the CRM account owner's name, even if the record owners do not have write permission. This is called the account owner context.
- Example: Consider a workflow that is configured to create a deal record when Lead Status = Hot. Let us say, a sales rep who does not have Write permission for Deals edits a lead record and sets Lead Status = Hot.
- As a result, a deal record gets created with the Created By and Last Modified By fields having the CRM account owner's name.
- Scheduled workflows always run in the account owner context.
- Create and Update actions are done in the account owner context to ensure that profile-level restrictions do not block workflows.
Deactivating a Standard Workflow
Follow these steps to deactivate a standard workflow:
- Log in to the CRM.
- Click the User Menu in the top right corner of the screen.
- Click the Settings button. The Settings page opens.
- Look for the Automation section.
- Click Workflows.
- Click the Standard tab on the top left side of the workflow list.
- Select a module from the drop-down at the top to view its related workflows.
- Select a workflow.
- Disable the toggle button on the left side of the workflow to deactivate it.
Deleting a Standard Workflow
Follow these steps to delete a standard workflow:
- Log in to the CRM.
- Click the User Menu in the top right corner of the screen.
- Click the Settings button. The Settings page opens.
- Look for the Automation section.
- Click Workflows.
- Click the Standard tab on the top left side of the workflow list.
- Select a module from the drop-down at the top to view its related workflows.
- Select a workflow.
- Hover over a workflow and click the Delete icon to delete it.
Multi-path Workflows
Multi-path workflows enable you to create multiple actions on a single field, known as the Anchor Field. Unlike in Standard workflows, you need not create a separate workflow to execute an action for each field's value.
For example,
- If you want to send an email to a sales rep when Invoice status = Accepted, and create a task when Invoice status = Rejected, you must create separate Standard workflows.
- However, by creating a multi-path workflow, you can include different actions for different statuses of an invoice in the same workflow. Hence, the name multi-path.
Four Components of Multi-Path Workflows
Similar to Standard workflows, Multi-path workflows also have four components.
- The module on which the workflow is executed.
- The trigger that will cause the workflow to execute.
- Conditions based on which the workflow will execute its actions.
- Actions that the workflow will perform when the conditions are met.
Accessing Multi-path Workflow
Follow these steps to create Multi-path workflows:
- Log in to the CRM.
- Click the User Menu in the top right corner of the screen.
- Click the Settings button. The Settings page opens.
- Look for the Automation section.
- Select Workflows.
- Click the +New Workflow button.
- Select Multi-path.
- Enter the basic information, trigger, entry criteria, and actions.
Let us take an example of the Sales Stage field to get clarity on the usage of Multi-path workflows.
In the example, we will create a workflow that executes different actions when a deal’s sales stage takes different values, such as Value Proposition, Negotiation, Closed Won, etc.
Basic information
You must fill out the following details, which provide basic information about the workflow:
- Workflow Name - Specify the name of the workflow.
- Target Module - Specify the module on which the workflow must execute, such as Deals, Contacts, Products, etc.
- Status - Specify the workflow status: Active or Inactive. The workflow does not execute when the status is set to Inactive.
- Description - Provide a brief description of what the workflow is used for, the actions it performs, etc.
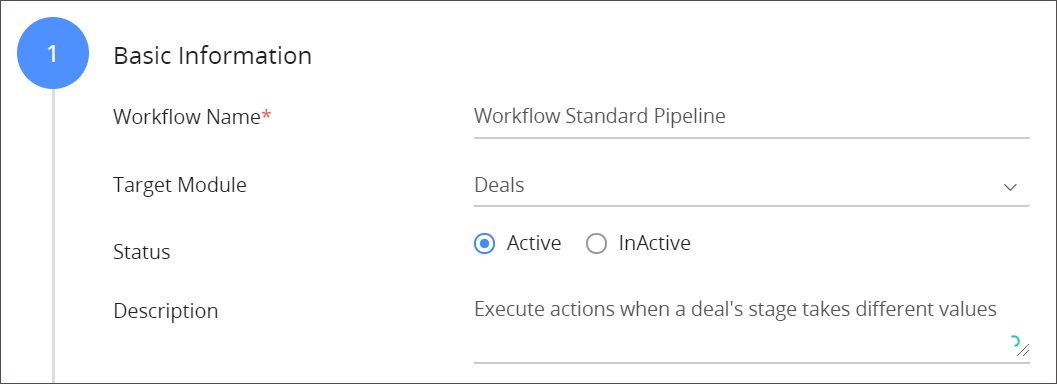
Under Basic Information, we will name the workflow as Workflow Standard Pipeline, and choose Deals as the target module. Next, we will mark the workflow’s status as Active and provide a short description of it.
Workflow trigger
Specify when the workflow must trigger by choosing an option from the following two fields:
- Trigger Workflow On:
- Record creation - Choose this option if you want the workflow to trigger when a record is created in the Target Module (mentioned in the previous section).
- Record updation (includes creation) - Choose this option if you want the workflow to trigger when a record is updated or created in the Target Module (mentioned in the previous section).
- Time Interval - Choose this option if you want the workflow to trigger at a frequent time interval.
- Frequency - Specify the frequency at which the workflow must trigger. To learn more about this option, click here.
- Recurrence:
- Only first time conditions are met - Triggers the workflow if the specified conditions are true. Once executed, the workflow will not trigger on the same record again. However, it will trigger on other records in the selected module.
- Every time conditions met - Triggers the workflow on a record every time the specified conditions are true.
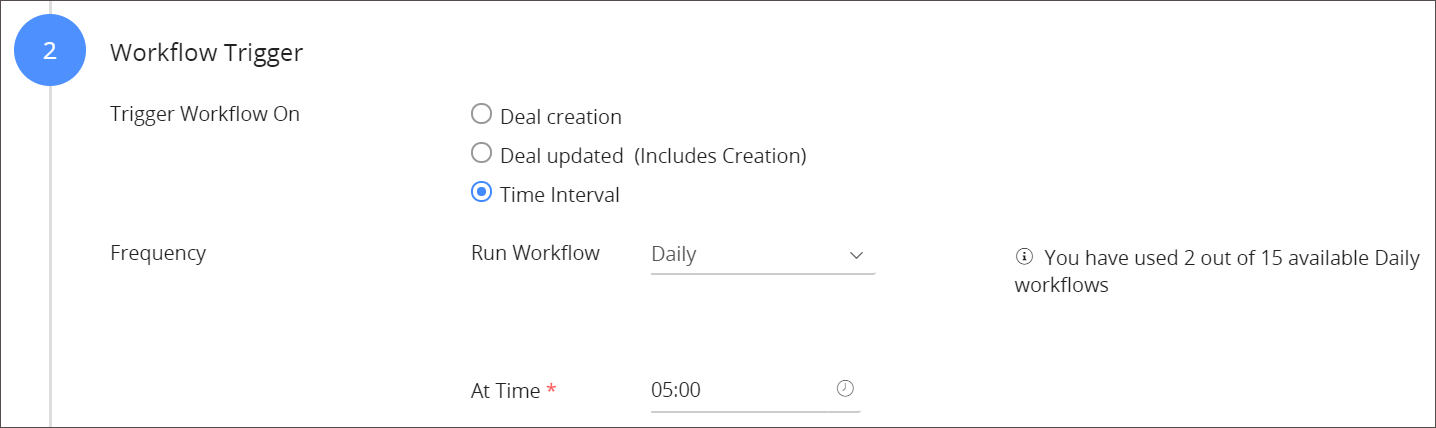
For the trigger, we will choose a customized time interval by selecting the Time Interval radio button. Then we will choose a frequency at which the workflow must get triggered - daily at 5.00 AM.
Entry criteria
Workflows are executed on records in the Target Module under Basic Information. More often than not, you might only need to perform actions on select records in the module, and that is when you will need to apply conditions and filter out records.
A workflow executes only on records that satisfy the condition that you specify. You can specify multiple conditions using the +Add condition button. There are two types of conditions.
- All conditions: It is based on the logical AND operation. Workflow executes when all the conditions are met.
|
|
-
Any condition: It is based on the logical OR operation. Workflow executes when at least one condition is met.
|
|
Note: There is an AND operation between All conditions and Any condition. The conditions mentioned under both All conditions and Any condition are applied in the entry criteria.
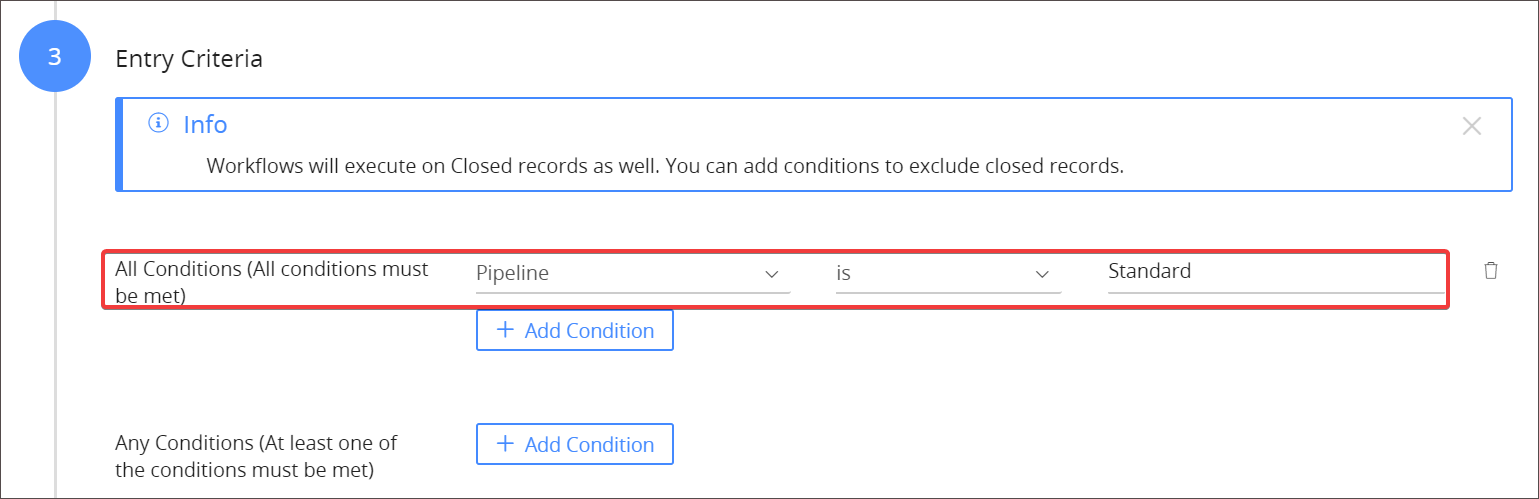
Let us apply a condition on the pipeline such that the workflow executes only when a deal is associated with the Standard pipeline. So, the workflow executes its actions only when Pipeline = Standard.
To learn more about pipelines, click here.
Actions
The Actions part defines what the workflow must execute after getting triggered and meeting the entry criteria. You can set up different types of actions around a Picklist or Assigned To field, which is called the Anchor Field.
You can add the following types of actions for different values of the Anchor Field:
|
|
|
|
|
|
|
|
|
|
|
|
|
|
|
|
|
|
|
|
|
|
|
|
|
|
|
|
|
|
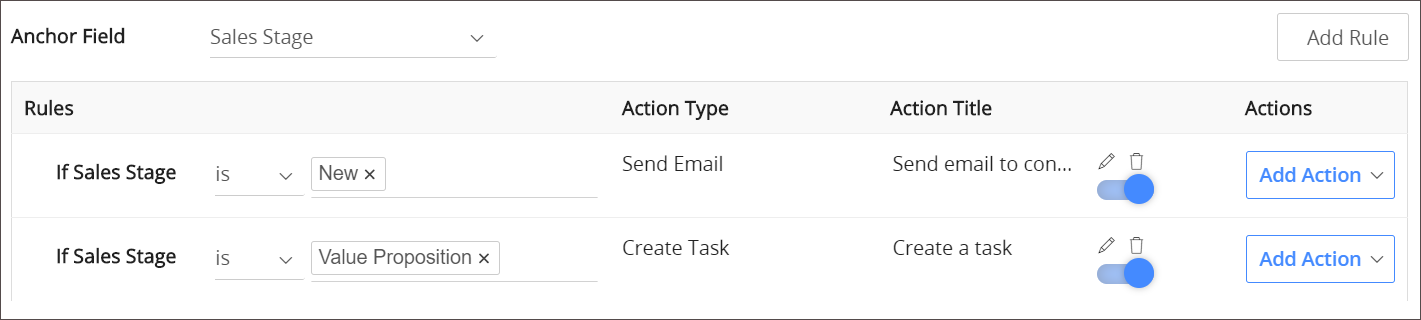
Now, we select the Sales Stage as the Anchor Field.
- Choose an action from the Add Action drop-down.
- Choose a value for the Sales Stage field in the rule. For example, If Sales Stage is New, If Sales Stage is Value Proposition, etc.
- Click the Add Rule button to add an action for another value of the Sales Stage field. If Sales Stage is New - Send Mail, If Sales Stage is Value Proposition - Create Task, etc.
- Click Save.
Deactivating a Multi -path Workflow
Follow these steps to deactivate a multi-path workflow:
- Log in to the CRM.
- Click the User Menu in the top right corner of the screen.
- Click the Settings button.
- Look for the Automation section.
- Click Workflows.
- Click the Multi-path tab on the top left side of the workflow list.
- Select a module from the drop-down at the top to view its related workflows.
- Select a workflow.
- Disable the toggle button on the left side of the workflow to deactivate it.
Deleting a Multi -path Workflow
Follow these steps to delete a multi-path workflow:
- Log in to the CRM.
- Click the User Menu in the top right corner of the screen.
- Click the Settings button.
- Look for the Automation section.
- Click Workflows.
- Click the Multi-path tab on the top left side of the workflow list.
- Select a module from the drop-down at the top to view its related workflows.
- Select a workflow.
- Hover over a workflow and click the Delete icon to delete it.