Articles in this section
Authenticate Emails with SPF, DKIM, and DMARC
Auto forward your emails to Vtiger
Managing User Profiles
Automate Outgoing Emails in Email Settings
Automation - Approvals
Automation - Assignment Rules
Set up Multi-path Workflows
Creating a Scheduled Workflow
Automation - Workflow Scheduler
Workflows in Vtiger CRM
Vtiger Webforms
Set up a Workflow Action to Create Event
Set up a Workflow Action to Create Records
Set up a Workflow Action to Create Task
Set up a Workflow Action to Invoke Custom Function
Set up a Workflow Action to Create an SMS Task
Setting Up a Workflow Action to Send Emails
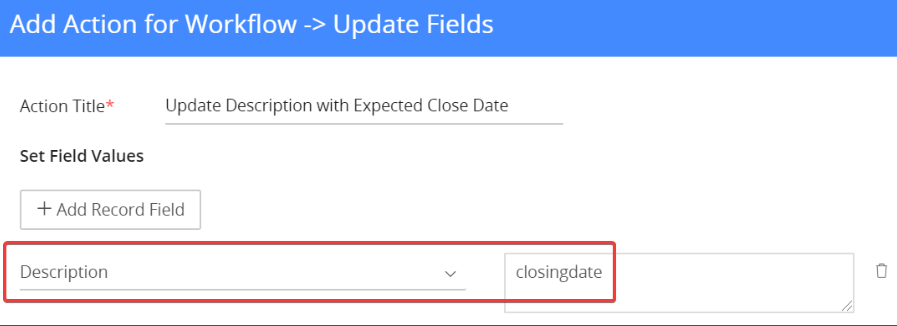
Workflow Action to Update Fields
Automation - Webhook Workflow
Automation - Expressions Workflow
Configuring Business Hours
Configuration - Company Details
Configuration - Consents
Configuring the Customer Portal
Maps in Vtiger CRM
Configuration - Usage Details
Configuring Encrypted Data Fields in Vtiger CRM
Configure Picklist Dependencies
Considerations for Deactivating Vtiger Users
Configuring Field and Record Displays
Create Reminders for Records and Inbox
Creating a Grid Field Type
Dealing with Currencies and Taxes
Enable Desktop Notifications on Chrome Web Browsers
Vtiger CRM Add-ons
IMAP Configuration - 2-way sync between Vtiger and IMAP providers
Setting up Autopay & Payment Gateways
Inventory - Tax Management
Inventory - Terms and Conditions
Login to Vtiger on SSO SAML using ADFS
Mailroom Functionality for Different Scenarios
Manage Multiple Currencies
Marketing and Sales - Deal to Project Mapping
Lead Conversion Data Mapping
Marketing and Sales - Profile Scoring
Using the Module Label Editor
Configuring Module Numbering
Configure My Preferences Feature
Tags in Vtiger
My Preferences - Notification Preferences
SAML Support in Vtiger CRM
Vtiger Mailroom
Configuring Module Settings
Configuring a Relationship Between Modules
Settings - Left Menu
Configuring Global Picklists in Vtiger
Settings - Set up your Support Team
Settings - Start Up Page
Configuring Picklist Values
Configuring Modules Using Module Builder
SLA Policies in Vtiger
Troubleshooting Login Issues
Add-Edit Unsubscribe Links in your Email Template
User Management - Authentication
User Management - Encrypted Field Access Logs
User Management - Groups
User Management - Login History
User Management - Profiles
User Management - Roles
User Management - Settings Log
User Management - Sharing Rules
User Management - Users
User Management - Vtiger Support Access
Vtiger Buzz - Chrome Extension for Notifications
Vtiger Implementation wizard
Vtiger Language Support
Setting Up Websense Trackers
Vtiger Websense Widgets
Creating Custom Modules in Vtiger CRM
Configuring Dependent Fields and Blocks for Modules
Formula Fields
Configuring App Passwords for Gmail Outgoing Server and Yahoo Mail
Customizing Module Layouts
Configuring Module Layouts & Fields
Auto forward Emails from Microsoft Office 365
Automation - SMS Reply Actions
Duplicate Record Prevention in Vtiger CRM
Generate and Manage Third-party App Passwords in Yahoo
Configuration - Storage Guard
Customizing your Self-Service Portal Theme Using CSS Styles
Adding Hidden Fields to a Webform
Login Page Customization
Creating Custom Filters
Adding a local DNS Entry
My Preferences - Calendar Settings
Learn to customize your calendar to suit your preferences with Vtiger's Calendar Settings.
R
Ruba
11 Feb, 2025 - Updated
1 year ago
Introduction
|
|
Vtiger’s calendar settings help you customize your calendar to suit your preferences. Read along to learn about the possibilities.
Accessing Calendar Settings
Follow these steps to go to Calendar Settings:
- Click the User Menu on the top right corner of the screen.
- Click the Settings button.
- Look for the My Preferences section.
- Select Calendar Settings.
- Click the Edit icon on the top right to set up your preferences.
Different Settings Available
The table below summarizes the different settings available for you to customize your calendar.
|
|
|
|
|
|
|
|
|
|
|
|
|
|
|
|
|
|
|
|
|
|
|
|
|
|
|
|
|
|
|
|
|
|
|
|
|
|
|
|
|
|
|
|